> ## Documentation Index
> Fetch the complete documentation index at: https://dragonwingdocs.qualcomm.com/llms.txt
> Use this file to discover all available pages before exploring further.
# Deploy a LiteRT model
> Deploy LiteRT models using the label_image sample application, C++ APIs, or the Qualcomm IM SDK.
You can run LiteRT models on Qualcomm development kits using the precompiled `label_image` sample application, the LiteRT C++ APIs, or the Qualcomm IM SDK `gst-ai-classification` pipeline.
Before deploying, ensure you have completed the [prerequisites and model setup](../topic/benchmark-a-litert-model#prerequisites).
## Deploy as a native application
The `label_image` sample application is part of the TensorFlow repository and is cross-compiled with the LiteRT library and installed on the target device. It loads a classification LiteRT model and performs inference on an image using a delegate.
**Run on CPU using the XNNPACK delegate:**
```shell theme={null}
label_image -l /home/ubuntu/artifacts/labels.txt \
-i /home/ubuntu/artifacts/grace_hopper.bmp \
-m /home/ubuntu/artifacts/mobilenet_v1_1.0_224_quant.tflite \
-c 10 \
-p 1 \
--xnnpack_delegate 1
```
**Run on GPU using the GPU delegate:**
```shell theme={null}
label_image -l /home/ubuntu/artifacts/labels.txt \
-i /home/ubuntu/artifacts/grace_hopper.bmp \
-m /home/ubuntu/artifacts/mobilenet_v1_1.0_224.tflite \
-c 10 \
-p 1 \
--gl_backend 1
```
For the source code, see the [label\_image example on the TensorFlow GitHub repository](https://github.com/tensorflow/tensorflow/tree/master/tensorflow/lite/examples/label_image).
## Deploy as a C++ application
The following figure shows the steps involved in creating a C++ application to run a LiteRT model:
 ### Load a LiteRT model
A LiteRT model is a FlatBuffers file containing model operators, weights, and biases. Use the following API to load a model for inference:
```cpp theme={null}
#include
#include
#include "tensorflow/lite/interpreter.h"
#include "tensorflow/lite/kernels/register.h"
#include "tensorflow/lite/model.h"
#include "tensorflow/lite/optional_debug_tools.h"
std::unique_ptr model;
model = tflite::FlatBufferModel::BuildFromFile(model_name.c_str());
if (!model) {
std::cerr << "Failed to mmap model " << model_name << std::endl;
exit(-1);
}
```
### Create a LiteRT interpreter
The interpreter configures model execution on a chosen delegate and allocates memory for forward propagation:
```cpp theme={null}
tflite::ops::builtin::BuiltinOpResolver resolver;
tflite::InterpreterBuilder builder(*model, resolver);
std::unique_ptr interpreter;
builder(&interpreter);
if (!interpreter) {
std::cerr << "Failed to construct interpreter on provided tflite model" << std::endl;
}
if (interpreter->AllocateTensors() != kTfLiteOk) {
std::cerr << "Failed to allocate tensors!" << std::endl;
exit(-1);
}
```
### Prepare the model with a delegate
The following example creates the XNNPACK delegate for running a LiteRT model on the Arm® CPU:
```cpp theme={null}
TfLiteXNNPackDelegateOptions xnnpack_options = TfLiteXNNPackDelegateOptionsDefault();
xnnpack_options.num_threads = num_threads;
TfLiteDelegate* xnnpack_delegate = TfLiteXNNPackDelegateCreate(&xnnpack_options);
if (interpreter->ModifyGraphWithDelegate(xnnpack_delegate) != kTfLiteOk) {
// Report error and fall back to another delegate, or the default backend
}
```
### Prepare input/output buffers
Before running inference, preprocess the input data (such as camera frames) to match the model's expected format. Common preprocessing steps include:
* Resizing the input image to the resolution expected by the model
* Normalization
* Mean subtraction
### Run inference
Use the `Invoke()` API to run inference. After completion, parse the output tensors from the interpreter:
```cpp theme={null}
interpreter->Invoke();
```
For a comprehensive example, see the [label\_image example on the TensorFlow GitHub repository](https://github.com/tensorflow/tensorflow/tree/master/tensorflow/lite/examples/label_image).
For more information, see the [LiteRT documentation](https://ai.google.dev/edge/litert).
## Deploy with the Qualcomm IM SDK
The `gst-ai-classification` sample application uses the Qualcomm IM SDK plugins to run a LiteRT classification model on Qualcomm development kits with hardware acceleration.
The pipeline receives a video stream from a camera, performs preprocessing, runs inference on the AI hardware, and displays the results:
### Load a LiteRT model
A LiteRT model is a FlatBuffers file containing model operators, weights, and biases. Use the following API to load a model for inference:
```cpp theme={null}
#include
#include
#include "tensorflow/lite/interpreter.h"
#include "tensorflow/lite/kernels/register.h"
#include "tensorflow/lite/model.h"
#include "tensorflow/lite/optional_debug_tools.h"
std::unique_ptr model;
model = tflite::FlatBufferModel::BuildFromFile(model_name.c_str());
if (!model) {
std::cerr << "Failed to mmap model " << model_name << std::endl;
exit(-1);
}
```
### Create a LiteRT interpreter
The interpreter configures model execution on a chosen delegate and allocates memory for forward propagation:
```cpp theme={null}
tflite::ops::builtin::BuiltinOpResolver resolver;
tflite::InterpreterBuilder builder(*model, resolver);
std::unique_ptr interpreter;
builder(&interpreter);
if (!interpreter) {
std::cerr << "Failed to construct interpreter on provided tflite model" << std::endl;
}
if (interpreter->AllocateTensors() != kTfLiteOk) {
std::cerr << "Failed to allocate tensors!" << std::endl;
exit(-1);
}
```
### Prepare the model with a delegate
The following example creates the XNNPACK delegate for running a LiteRT model on the Arm® CPU:
```cpp theme={null}
TfLiteXNNPackDelegateOptions xnnpack_options = TfLiteXNNPackDelegateOptionsDefault();
xnnpack_options.num_threads = num_threads;
TfLiteDelegate* xnnpack_delegate = TfLiteXNNPackDelegateCreate(&xnnpack_options);
if (interpreter->ModifyGraphWithDelegate(xnnpack_delegate) != kTfLiteOk) {
// Report error and fall back to another delegate, or the default backend
}
```
### Prepare input/output buffers
Before running inference, preprocess the input data (such as camera frames) to match the model's expected format. Common preprocessing steps include:
* Resizing the input image to the resolution expected by the model
* Normalization
* Mean subtraction
### Run inference
Use the `Invoke()` API to run inference. After completion, parse the output tensors from the interpreter:
```cpp theme={null}
interpreter->Invoke();
```
For a comprehensive example, see the [label\_image example on the TensorFlow GitHub repository](https://github.com/tensorflow/tensorflow/tree/master/tensorflow/lite/examples/label_image).
For more information, see the [LiteRT documentation](https://ai.google.dev/edge/litert).
## Deploy with the Qualcomm IM SDK
The `gst-ai-classification` sample application uses the Qualcomm IM SDK plugins to run a LiteRT classification model on Qualcomm development kits with hardware acceleration.
The pipeline receives a video stream from a camera, performs preprocessing, runs inference on the AI hardware, and displays the results:
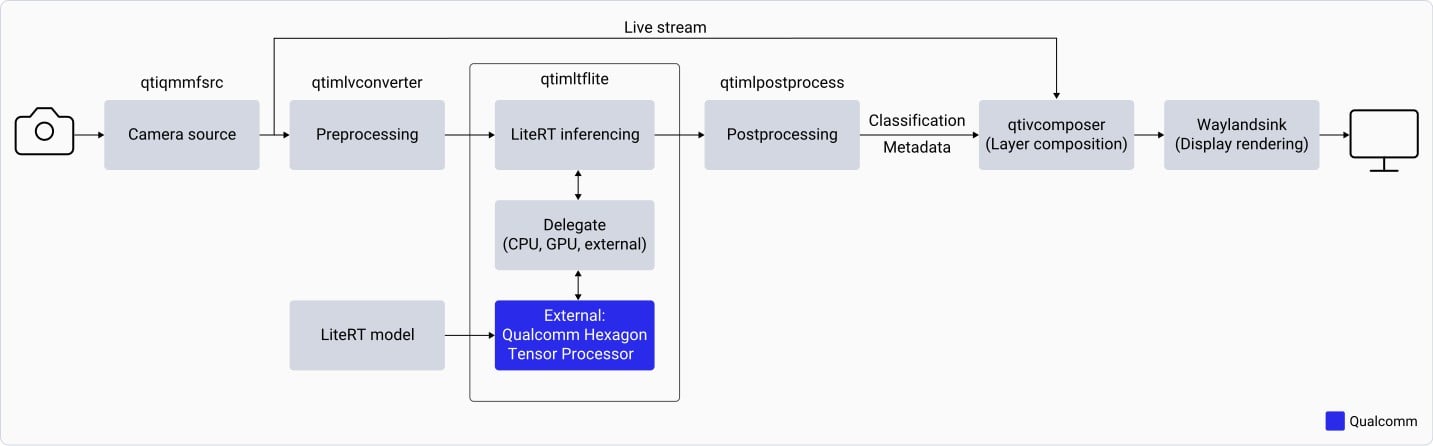 The `gst-ai-classification` application:
Opens the IMX577 camera at a specified resolution and frame rate (for example, 1080p at 30 fps).
Preprocesses each camera frame — downscales to 224×224 and normalizes based on model requirements.
Loads the LiteRT classification model and runs inference using the `qtimltflite` plugin.
Extracts the label with the highest predicted probability from the output tensor.
Overlays the inference result on the original camera frame and displays it on the connected monitor.
### Download the model and label files
Go to [Qualcomm AI Hub](https://aihub.qualcomm.com/models/inception_v3?searchTerm=ince\&chipsets=qualcomm-qcs6490-proxy) and download the Inception-v3 quantized model.
```shell theme={null}
curl -L -O https://raw.githubusercontent.com/qualcomm/sample-apps-for-qualcomm-linux/refs/heads/main/artifacts/json_labels/classification.json
```
```shell theme={null}
ssh ubuntu@
```
```shell theme={null}
sudo mkdir -p /etc/models /etc/labels /etc/media
```
```shell theme={null}
exit
```
```shell theme={null}
scp classification.json ubuntu@:/home/ubuntu/
ssh ubuntu@
cp /home/ubuntu/classification.json /etc/labels/
exit
```
```shell theme={null}
scp inception_v3-inception-v3-w8a8.tflite ubuntu@:/home/ubuntu/
ssh ubuntu@
cp inception_v3-inception-v3-w8a8.tflite /etc/models/
exit
```
### Run the sample application
```shell theme={null}
ssh ubuntu@
```
```json theme={null}
{
"file-path": "/etc/media/video.mp4",
"ml-framework": "tflite",
"model": "/etc/models/inception_v3-inception-v3-w8a8.tflite",
"labels": "/etc/labels/classification.json",
"threshold": 40,
"runtime": "dsp",
"output-type": "waylandsink"
}
```
Download [video file](https://github.com/qualcomm/sample-apps-for-qualcomm-linux/raw/refs/heads/main/qualcomm-linux/artifacts/videos/video.mp4) and copy it to `/etc/media/video.mp4` on the device.
```shell theme={null}
gst-ai-classification --config-file=/etc/configs/config_classification.json
```
To stop the application, press `Ctrl+C`.
When running, the application displays the video stream on the connected monitor with inference results overlaid on each frame.
The `gst-ai-classification` application:
Opens the IMX577 camera at a specified resolution and frame rate (for example, 1080p at 30 fps).
Preprocesses each camera frame — downscales to 224×224 and normalizes based on model requirements.
Loads the LiteRT classification model and runs inference using the `qtimltflite` plugin.
Extracts the label with the highest predicted probability from the output tensor.
Overlays the inference result on the original camera frame and displays it on the connected monitor.
### Download the model and label files
Go to [Qualcomm AI Hub](https://aihub.qualcomm.com/models/inception_v3?searchTerm=ince\&chipsets=qualcomm-qcs6490-proxy) and download the Inception-v3 quantized model.
```shell theme={null}
curl -L -O https://raw.githubusercontent.com/qualcomm/sample-apps-for-qualcomm-linux/refs/heads/main/artifacts/json_labels/classification.json
```
```shell theme={null}
ssh ubuntu@
```
```shell theme={null}
sudo mkdir -p /etc/models /etc/labels /etc/media
```
```shell theme={null}
exit
```
```shell theme={null}
scp classification.json ubuntu@:/home/ubuntu/
ssh ubuntu@
cp /home/ubuntu/classification.json /etc/labels/
exit
```
```shell theme={null}
scp inception_v3-inception-v3-w8a8.tflite ubuntu@:/home/ubuntu/
ssh ubuntu@
cp inception_v3-inception-v3-w8a8.tflite /etc/models/
exit
```
### Run the sample application
```shell theme={null}
ssh ubuntu@
```
```json theme={null}
{
"file-path": "/etc/media/video.mp4",
"ml-framework": "tflite",
"model": "/etc/models/inception_v3-inception-v3-w8a8.tflite",
"labels": "/etc/labels/classification.json",
"threshold": 40,
"runtime": "dsp",
"output-type": "waylandsink"
}
```
Download [video file](https://github.com/qualcomm/sample-apps-for-qualcomm-linux/raw/refs/heads/main/qualcomm-linux/artifacts/videos/video.mp4) and copy it to `/etc/media/video.mp4` on the device.
```shell theme={null}
gst-ai-classification --config-file=/etc/configs/config_classification.json
```
To stop the application, press `Ctrl+C`.
When running, the application displays the video stream on the connected monitor with inference results overlaid on each frame.