> ## Documentation Index
> Fetch the complete documentation index at: https://dragonwingdocs.qualcomm.com/llms.txt
> Use this file to discover all available pages before exploring further.
# Use AI Hub to optimize a model
> Use Qualcomm AI Hub to download preoptimized models or compile and optimize your own models for deployment on Qualcomm Dragonwing IoT platforms.
For quick prototyping of models on Qualcomm AI hardware, AI Hub
provides a way to optimize, validate, and deploy machine learning
models on-device for vision, audio, and speech use cases.
## Set up your environment
1. Set up your Python environment. Install
[miniconda](https://docs.conda.io/projects/miniconda/en/latest/miniconda-install.html)
on your host machine.
When the installation finishes, open an Anaconda prompt from the Start menu.
When the installation finishes, open a new shell window.
Set up a Python virtual environment for AI Hub:
```shell theme={null}
conda activate
```
```shell theme={null}
conda create python=3.10 -n qai_hub
```
```shell theme={null}
conda activate qai_hub
```
2. Install git.
```shell theme={null}
sudo apt-get install git
```
3. Install the AI Hub Python client.
```shell theme={null}
pip3 install qai-hub
```
```shell theme={null}
pip3 install "qai-hub[torch]"
```
4. Sign in to AI Hub.
Go to [AI Hub](https://aihub.qualcomm.com/) and sign in with your
Qualcomm ID to view information about jobs you create.
Once signed in, go to **Account > Settings > API Token** to obtain the API token used to configure your client.
5. Configure the client with your API token using the following command
in your terminal.
```shell theme={null}
qai-hub configure --api_token
```
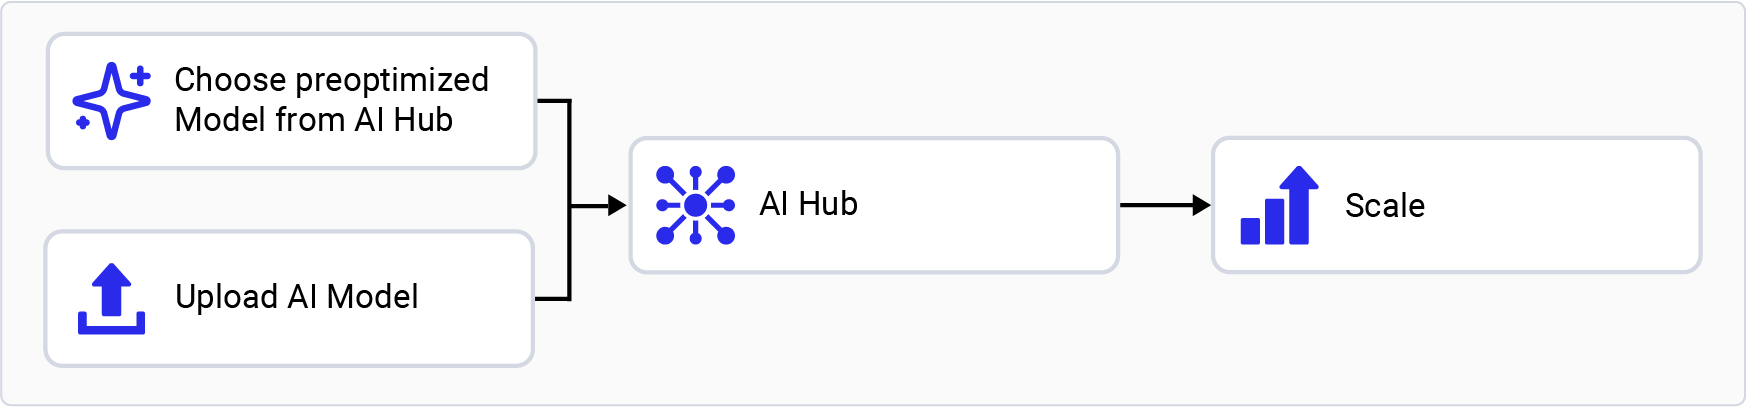
## Choose an AI Hub workflow
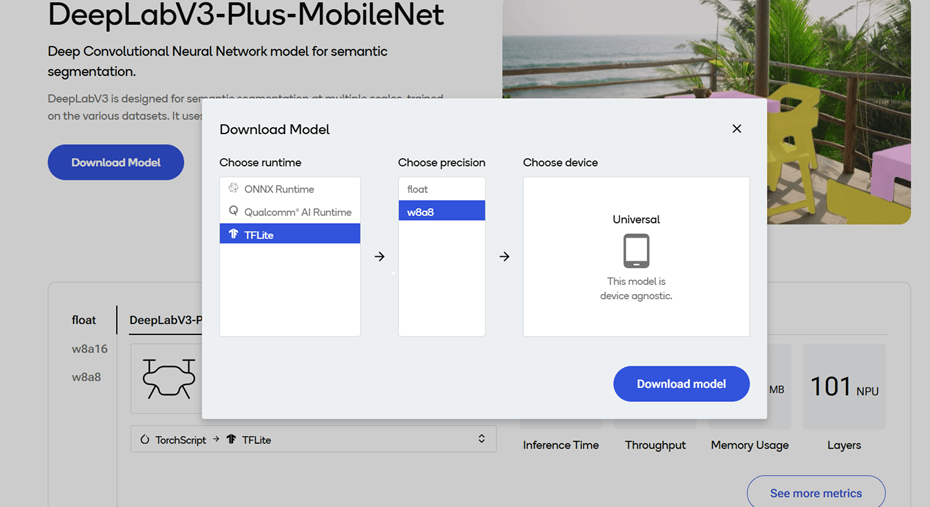
### Try a preoptimized model
1. Go to [AI Hub Model Zoo](https://aihub.qualcomm.com/iot/models) to access preoptimized models available for Qualcomm evaluation kits.
2. Filter models for your EVK by selecting the matching chipset in the left pane. For example,
select **Qualcomm QCS6490** for the Qualcomm Dragonwing™ RB3 Gen 2, or **Qualcomm QCS8300**
for the Qualcomm Dragonwing™ IQ-8275 EVK.
3. Select a model from the filtered view to go to the model page.
4. On the model page, select the runtime and precision.
5. Select **Download** to download the model. The downloaded model is preoptimized and ready for deployment. See [Run inference](../map/use-available-frameworks-and-runtimes) for more information.
### Bring your own model
1. Select a pretrained model in PyTorch or ONNX format.
2. Submit a model for compilation or optimization to AI Hub using Python APIs.
When submitting a compilation job, select a device or chipset for your EVK and the target runtime. For Qualcomm Dragonwing™ RB3 Gen 2, the LiteRT runtime is supported.
| **Chipset** | **Runtime** | **CPU** | **GPU** | **HTP** |
| ------------------------------ | ----------- | --------------- | --------- | ---------- |
| Qualcomm Dragonwing™ RB3 Gen 2 | LiteRT | INT8,FP16, FP32 | FP16,FP32 | INT8,INT16 |
On submission, AI Hub generates a unique ID for the job. You can use
this job ID to view job details.
3. AI Hub optimizes the model based on your device and runtime selections.
* Optionally, you can submit a job to profile or run inference on the
optimized model (using Python APIs) on a real device provisioned
from a device farm.
* **Profiling**: Benchmarks the model on a provisioned device and
provides statistics, including average inference times at the
layer level, runtime configuration, etc.
* **Inference**: Performs inference using an optimized model on data
submitted as part of the inference job by running the model on
a provisioned device.
4. Each submitted job is available for review in the AI Hub portal. A completed compilation job provides a downloadable link to the optimized model, which can then be deployed on a local development device such as Qualcomm Dragonwing™ RB3 Gen 2.
The following example, taken from the [AI Hub documentation](https://workbench.aihub.qualcomm.com/docs/), uploads a pretrained MobileNet V2 model from PyTorch to AI Hub and compiles it to an optimized LiteRT model for Qualcomm Dragonwing™ RB3 Gen 2.
```python theme={null}
import qai_hub as hub
import torch
from torchvision.models import mobilenet_v2
import numpy as np
# Using pre-trained MobileNet
torch_model = mobilenet_v2(pretrained=True)
torch_model.eval()
# Trace model (for on-device deployment)
input_shape = (1, 3, 224, 224)
example_input = torch.rand(input_shape)
traced_torch_model = torch.jit.trace(torch_model, example_input)
# Compile and optimize the model for a specific device
compile_job = hub.submit_compile_job(
model=traced_torch_model,
device=hub.Device("Dragonwing RB3 Gen 2 Vision Kit"),
input_specs=dict(image=input_shape),
#compile_options="--target_runtime tflite",
)
# Profiling Job
profile_job = hub.submit_profile_job(
model=compile_job.get_target_model(),
device=hub.Device("Dragonwing RB3 Gen 2 Vision Kit"),
)
sample = np.random.random((1, 3, 224, 224)).astype(np.float32)
# Inference Job
inference_job = hub.submit_inference_job(
model=compile_job.get_target_model(),
device=hub.Device("Dragonwing RB3 Gen 2 Vision Kit"),
inputs=dict(image=[sample]),
)
# Download model
compile_job.download_target_model(filename="/tmp/mobilenetv2.tflite")
```
To deactivate a previously activated `qai_hub` environment, use the following command.
```shell theme={null}
conda deactivate
```
Once the model is downloaded, it is ready for deployment. See [Run inference](../map/use-available-frameworks-and-runtimes) for next steps.
For more details about the AI Hub workflow and APIs, see the [AI Hub documentation](https://workbench.aihub.qualcomm.com/docs/hub/index.html#examples),
explore the [AI Hub tutorial videos](https://www.youtube.com/watch?v=V1CDWYZ7Shw\&list=PLxeazpXYyqtOowtUdvigvAgMV5_K1KIrh),
or watch the following video about how to profile models in AI Hub.
 ## Set up your environment
1. Set up your Python environment. Install
[miniconda](https://docs.conda.io/projects/miniconda/en/latest/miniconda-install.html)
on your host machine.
## Set up your environment
1. Set up your Python environment. Install
[miniconda](https://docs.conda.io/projects/miniconda/en/latest/miniconda-install.html)
on your host machine.
 ### Bring your own model
1. Select a pretrained model in PyTorch or ONNX format.
2. Submit a model for compilation or optimization to AI Hub using Python APIs.
When submitting a compilation job, select a device or chipset for your EVK and the target runtime. For Qualcomm Dragonwing™ RB3 Gen 2, the LiteRT runtime is supported.
| **Chipset** | **Runtime** | **CPU** | **GPU** | **HTP** |
| ------------------------------ | ----------- | --------------- | --------- | ---------- |
| Qualcomm Dragonwing™ RB3 Gen 2 | LiteRT | INT8,FP16, FP32 | FP16,FP32 | INT8,INT16 |
On submission, AI Hub generates a unique ID for the job. You can use
this job ID to view job details.
3. AI Hub optimizes the model based on your device and runtime selections.
* Optionally, you can submit a job to profile or run inference on the
optimized model (using Python APIs) on a real device provisioned
from a device farm.
* **Profiling**: Benchmarks the model on a provisioned device and
provides statistics, including average inference times at the
layer level, runtime configuration, etc.
* **Inference**: Performs inference using an optimized model on data
submitted as part of the inference job by running the model on
a provisioned device.
4. Each submitted job is available for review in the AI Hub portal. A completed compilation job provides a downloadable link to the optimized model, which can then be deployed on a local development device such as Qualcomm Dragonwing™ RB3 Gen 2.
The following example, taken from the [AI Hub documentation](https://workbench.aihub.qualcomm.com/docs/), uploads a pretrained MobileNet V2 model from PyTorch to AI Hub and compiles it to an optimized LiteRT model for Qualcomm Dragonwing™ RB3 Gen 2.
```python theme={null}
import qai_hub as hub
import torch
from torchvision.models import mobilenet_v2
import numpy as np
# Using pre-trained MobileNet
torch_model = mobilenet_v2(pretrained=True)
torch_model.eval()
# Trace model (for on-device deployment)
input_shape = (1, 3, 224, 224)
example_input = torch.rand(input_shape)
traced_torch_model = torch.jit.trace(torch_model, example_input)
# Compile and optimize the model for a specific device
compile_job = hub.submit_compile_job(
model=traced_torch_model,
device=hub.Device("Dragonwing RB3 Gen 2 Vision Kit"),
input_specs=dict(image=input_shape),
#compile_options="--target_runtime tflite",
)
# Profiling Job
profile_job = hub.submit_profile_job(
model=compile_job.get_target_model(),
device=hub.Device("Dragonwing RB3 Gen 2 Vision Kit"),
)
sample = np.random.random((1, 3, 224, 224)).astype(np.float32)
# Inference Job
inference_job = hub.submit_inference_job(
model=compile_job.get_target_model(),
device=hub.Device("Dragonwing RB3 Gen 2 Vision Kit"),
inputs=dict(image=[sample]),
)
# Download model
compile_job.download_target_model(filename="/tmp/mobilenetv2.tflite")
```
### Bring your own model
1. Select a pretrained model in PyTorch or ONNX format.
2. Submit a model for compilation or optimization to AI Hub using Python APIs.
When submitting a compilation job, select a device or chipset for your EVK and the target runtime. For Qualcomm Dragonwing™ RB3 Gen 2, the LiteRT runtime is supported.
| **Chipset** | **Runtime** | **CPU** | **GPU** | **HTP** |
| ------------------------------ | ----------- | --------------- | --------- | ---------- |
| Qualcomm Dragonwing™ RB3 Gen 2 | LiteRT | INT8,FP16, FP32 | FP16,FP32 | INT8,INT16 |
On submission, AI Hub generates a unique ID for the job. You can use
this job ID to view job details.
3. AI Hub optimizes the model based on your device and runtime selections.
* Optionally, you can submit a job to profile or run inference on the
optimized model (using Python APIs) on a real device provisioned
from a device farm.
* **Profiling**: Benchmarks the model on a provisioned device and
provides statistics, including average inference times at the
layer level, runtime configuration, etc.
* **Inference**: Performs inference using an optimized model on data
submitted as part of the inference job by running the model on
a provisioned device.
4. Each submitted job is available for review in the AI Hub portal. A completed compilation job provides a downloadable link to the optimized model, which can then be deployed on a local development device such as Qualcomm Dragonwing™ RB3 Gen 2.
The following example, taken from the [AI Hub documentation](https://workbench.aihub.qualcomm.com/docs/), uploads a pretrained MobileNet V2 model from PyTorch to AI Hub and compiles it to an optimized LiteRT model for Qualcomm Dragonwing™ RB3 Gen 2.
```python theme={null}
import qai_hub as hub
import torch
from torchvision.models import mobilenet_v2
import numpy as np
# Using pre-trained MobileNet
torch_model = mobilenet_v2(pretrained=True)
torch_model.eval()
# Trace model (for on-device deployment)
input_shape = (1, 3, 224, 224)
example_input = torch.rand(input_shape)
traced_torch_model = torch.jit.trace(torch_model, example_input)
# Compile and optimize the model for a specific device
compile_job = hub.submit_compile_job(
model=traced_torch_model,
device=hub.Device("Dragonwing RB3 Gen 2 Vision Kit"),
input_specs=dict(image=input_shape),
#compile_options="--target_runtime tflite",
)
# Profiling Job
profile_job = hub.submit_profile_job(
model=compile_job.get_target_model(),
device=hub.Device("Dragonwing RB3 Gen 2 Vision Kit"),
)
sample = np.random.random((1, 3, 224, 224)).astype(np.float32)
# Inference Job
inference_job = hub.submit_inference_job(
model=compile_job.get_target_model(),
device=hub.Device("Dragonwing RB3 Gen 2 Vision Kit"),
inputs=dict(image=[sample]),
)
# Download model
compile_job.download_target_model(filename="/tmp/mobilenetv2.tflite")
```