> ## Documentation Index
> Fetch the complete documentation index at: https://dragonwingdocs.qualcomm.com/llms.txt
> Use this file to discover all available pages before exploring further.
# Set up an Ubuntu Server VM on an Arm64 Mac
UTM is an open-source VM host for macOS®, which allows you to run other operating systems on Macs, including Ubuntu. The following figure shows the tasks involved in setting up an Ubuntu Server VM using UTM on an Arm64 Mac:
 ## **Prerequisites to set up an Ubuntu Server VM on an Arm64 Mac**
* Ensure that your host computer meets the system requirements listed in [Host computer requirements for Arm64 Mac](#host-computer-requirements-for-arm64-mac).
* Download the necessary software listed in [Ubuntu Server VM software requirements for Arm64 Mac](#ubuntu-server-vm-software-requirements-for-arm64-mac).
### **Host computer requirements for Arm64 Mac**
The following table lists the host computer requirements to set up an Ubuntu Server VM on an Arm64 Mac:
**Table: Arm64 host computer system requirements**
| **Requirement** | **Specification** |
| ---------------------- | ----------------------------------------------------------------------------------------------------------------------- |
| Processor architecture | Arm64
## **Prerequisites to set up an Ubuntu Server VM on an Arm64 Mac**
* Ensure that your host computer meets the system requirements listed in [Host computer requirements for Arm64 Mac](#host-computer-requirements-for-arm64-mac).
* Download the necessary software listed in [Ubuntu Server VM software requirements for Arm64 Mac](#ubuntu-server-vm-software-requirements-for-arm64-mac).
### **Host computer requirements for Arm64 Mac**
The following table lists the host computer requirements to set up an Ubuntu Server VM on an Arm64 Mac:
**Table: Arm64 host computer system requirements**
| **Requirement** | **Specification** |
| ---------------------- | ----------------------------------------------------------------------------------------------------------------------- |
| Processor architecture | Arm64
To verify that the architecture of your Mac is Arm64, run the `uname -a` command in a terminal window. |
| CPU cores | 8 or more |
| RAM | 8 GB or more |
| Storage | 400 GB of free space for the UTM VM |
| Operating system | macOS 14 |
### **Ubuntu Server VM software requirements for Arm64 Mac**
The following table lists the software requirements to set up an Ubuntu Server VM on an Arm64 Mac:
**Table: Software requirements for Arm64 Mac**
| **Software** | **Description** |
| ------------------------------------------------------------------ | ---------------------------------------------------------------------------------------------------------------------------------------------------------------------------------------------------------------------------------------------------------------------------------------------------------------- |
| UTM virtualization software | Download the UTM virtualization software from the [UTM website](https://mac.getutm.app/). |
| Ubuntu Server International Organization for Standardization (ISO) | Use one of the Ubuntu 22.04 64-bit Arm® (ARMv8/AArch64) Server LTS versions. Qualcomm recommends that you download the latest version of Ubuntu Server 22.04 ISO (for example, `ubuntu-22.04.5-live-server-arm64.iso`) from the [Ubuntu website](https://cdimage.ubuntu.com/releases/22.04/release/). |
## **Install UTM on an Arm64 Mac**
To install the UTM virtualization software, do the following:
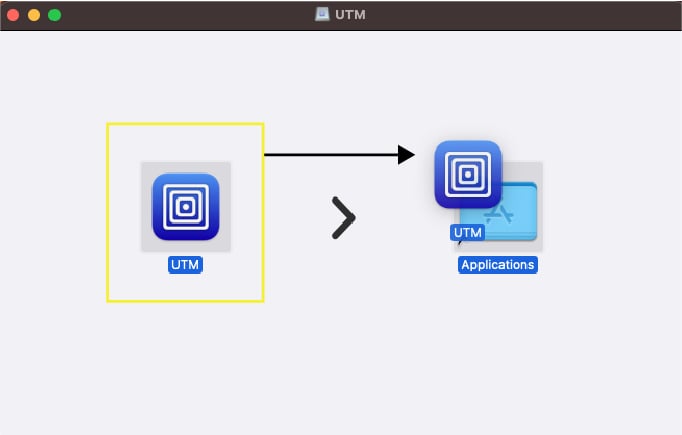
1. Double-click the `UTM.dmg` file downloaded earlier and drag the **UTM** icon onto the **Applications** icon.
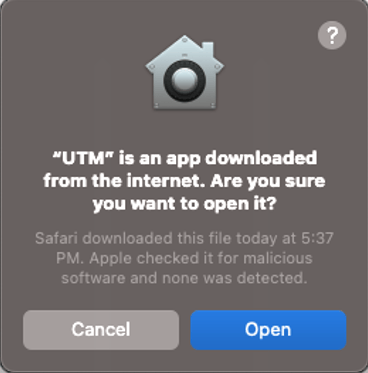
 2. While installing UTM, if you see the following dialog, select **Open**:
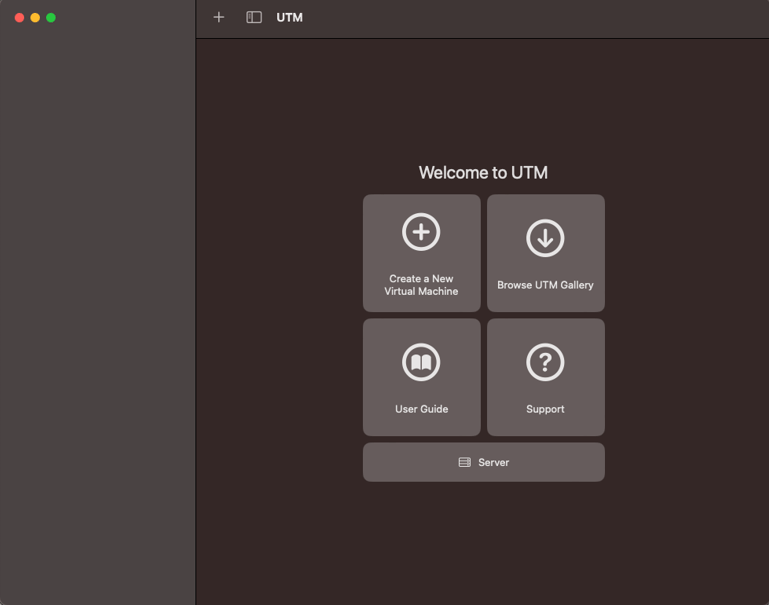
 3. Open Launchpad, search for **UTM**, and select **UTM**.
The UTM main window appears.
3. Open Launchpad, search for **UTM**, and select **UTM**.
The UTM main window appears.
 ## **Create a VM in UTM on an Arm64 Mac**
To create a VM for Ubuntu Server in UTM and configure the VM settings, do the following:
1. In the UTM main window, select **Create a New Virtual Machine**.
2. On the **Start** screen, select **Virtualize**.
3. On the **Operating System** screen, select the **Linux** OS.
4. On the **Hardware** screen, specify the memory and CPU cores you want to assign to the Ubuntu VM, and select **Continue**. The recommended values are as follows:
* Memory: About 70% of the available memory
* CPU cores: At least 50% of the available cores
If you leave the **CPU Cores** field blank or set it to `0`, UTM allocates all the host computer cores to the VM. Allocating all CPU cores to the VM can make the host computer slow or unresponsive.
To check the memory size and the CPU core count of a Mac host computer, see the instructions in the [macOS User Guide](https://support.apple.com/en-in/guide/mac-help/syspr35536/mac).
5. On the **Linux** screen, browse and select the Ubuntu ISO image you downloaded, and select **Continue**.
6. On the **Storage** screen, specify the drive size for the VM, and select **Continue**. Qualcomm recommends that you assign at least 400 GB of storage space for the VM.
7. If you want to share a directory between the host computer and the VM, do the following on the **Shared Directory** screen:
1. Browse and select the directory.
2. Select **Continue**.
8. On the **Summary** screen, do the following:
1. Review the configuration summary for the VM that you're creating.
2. Provide a name for the VM.
3. Select **Save**. The UTM main window lists the newly created VM.
## **Create a VM in UTM on an Arm64 Mac**
To create a VM for Ubuntu Server in UTM and configure the VM settings, do the following:
1. In the UTM main window, select **Create a New Virtual Machine**.
2. On the **Start** screen, select **Virtualize**.
3. On the **Operating System** screen, select the **Linux** OS.
4. On the **Hardware** screen, specify the memory and CPU cores you want to assign to the Ubuntu VM, and select **Continue**. The recommended values are as follows:
* Memory: About 70% of the available memory
* CPU cores: At least 50% of the available cores
If you leave the **CPU Cores** field blank or set it to `0`, UTM allocates all the host computer cores to the VM. Allocating all CPU cores to the VM can make the host computer slow or unresponsive.
To check the memory size and the CPU core count of a Mac host computer, see the instructions in the [macOS User Guide](https://support.apple.com/en-in/guide/mac-help/syspr35536/mac).
5. On the **Linux** screen, browse and select the Ubuntu ISO image you downloaded, and select **Continue**.
6. On the **Storage** screen, specify the drive size for the VM, and select **Continue**. Qualcomm recommends that you assign at least 400 GB of storage space for the VM.
7. If you want to share a directory between the host computer and the VM, do the following on the **Shared Directory** screen:
1. Browse and select the directory.
2. Select **Continue**.
8. On the **Summary** screen, do the following:
1. Review the configuration summary for the VM that you're creating.
2. Provide a name for the VM.
3. Select **Save**. The UTM main window lists the newly created VM.
 ## **Install Ubuntu Server in UTM on an Arm64 Mac**
To install Ubuntu Server in the VM you created, do the following:
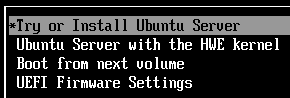
1. In the UTM main window, select the **Play** icon to run the Ubuntu ISO image through virtualization.
## **Install Ubuntu Server in UTM on an Arm64 Mac**
To install Ubuntu Server in the VM you created, do the following:
1. In the UTM main window, select the **Play** icon to run the Ubuntu ISO image through virtualization.
 2. Select **Try or Install Ubuntu Server** using the arrow keys and select **Enter**.
 3. Choose a language and select **Enter**.
4. Optional: You may see a screen to update the installer. Choose one of the following options and select **Enter**:
* **Update to the new installer**
* **Continue without updating**
5. Do the following:
1. Choose a keyboard layout.
2. Select the **Ubuntu Server** installation base.
3. Select the appropriate network interface.
4. Select the appropriate proxy configuration.
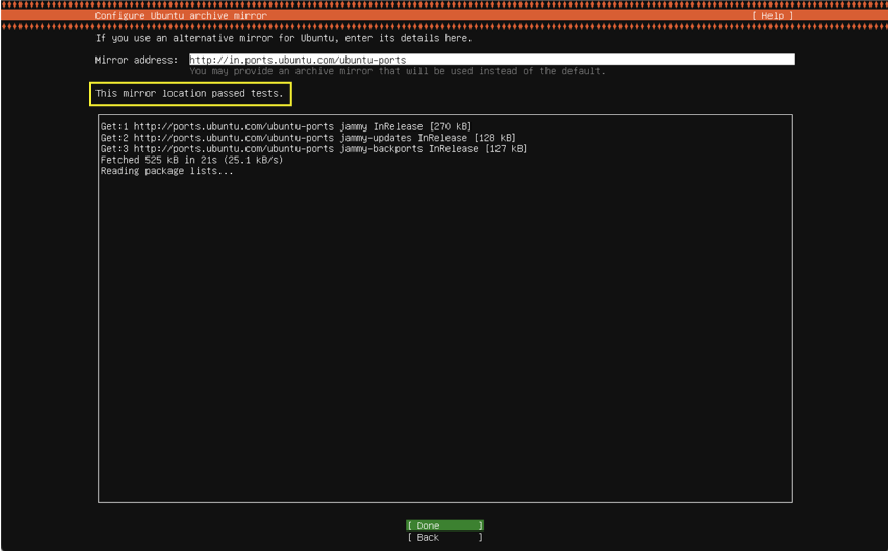
6. If necessary, configure the mirror address and wait until the mirror location passes all the tests, select **Done**, and select **Enter**.
3. Choose a language and select **Enter**.
4. Optional: You may see a screen to update the installer. Choose one of the following options and select **Enter**:
* **Update to the new installer**
* **Continue without updating**
5. Do the following:
1. Choose a keyboard layout.
2. Select the **Ubuntu Server** installation base.
3. Select the appropriate network interface.
4. Select the appropriate proxy configuration.
6. If necessary, configure the mirror address and wait until the mirror location passes all the tests, select **Done**, and select **Enter**.
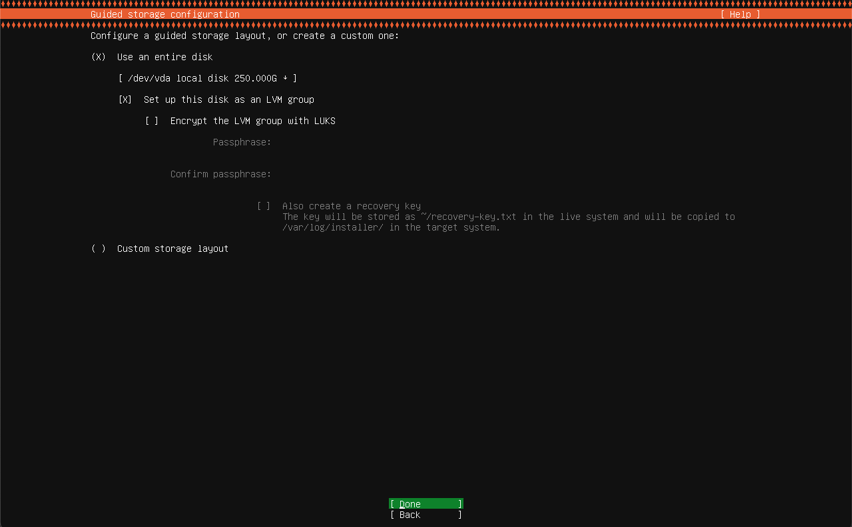
 7. Select **Use an entire disk** > **Set up this disk as an LVM group**, select **Done**, and select **Enter**.
 8. Configure the storage space as follows:
1. Under the **USED DEVICES** section, select **ubuntu-lv**, and select **Enter** to view more options.
8. Configure the storage space as follows:
1. Under the **USED DEVICES** section, select **ubuntu-lv**, and select **Enter** to view more options.
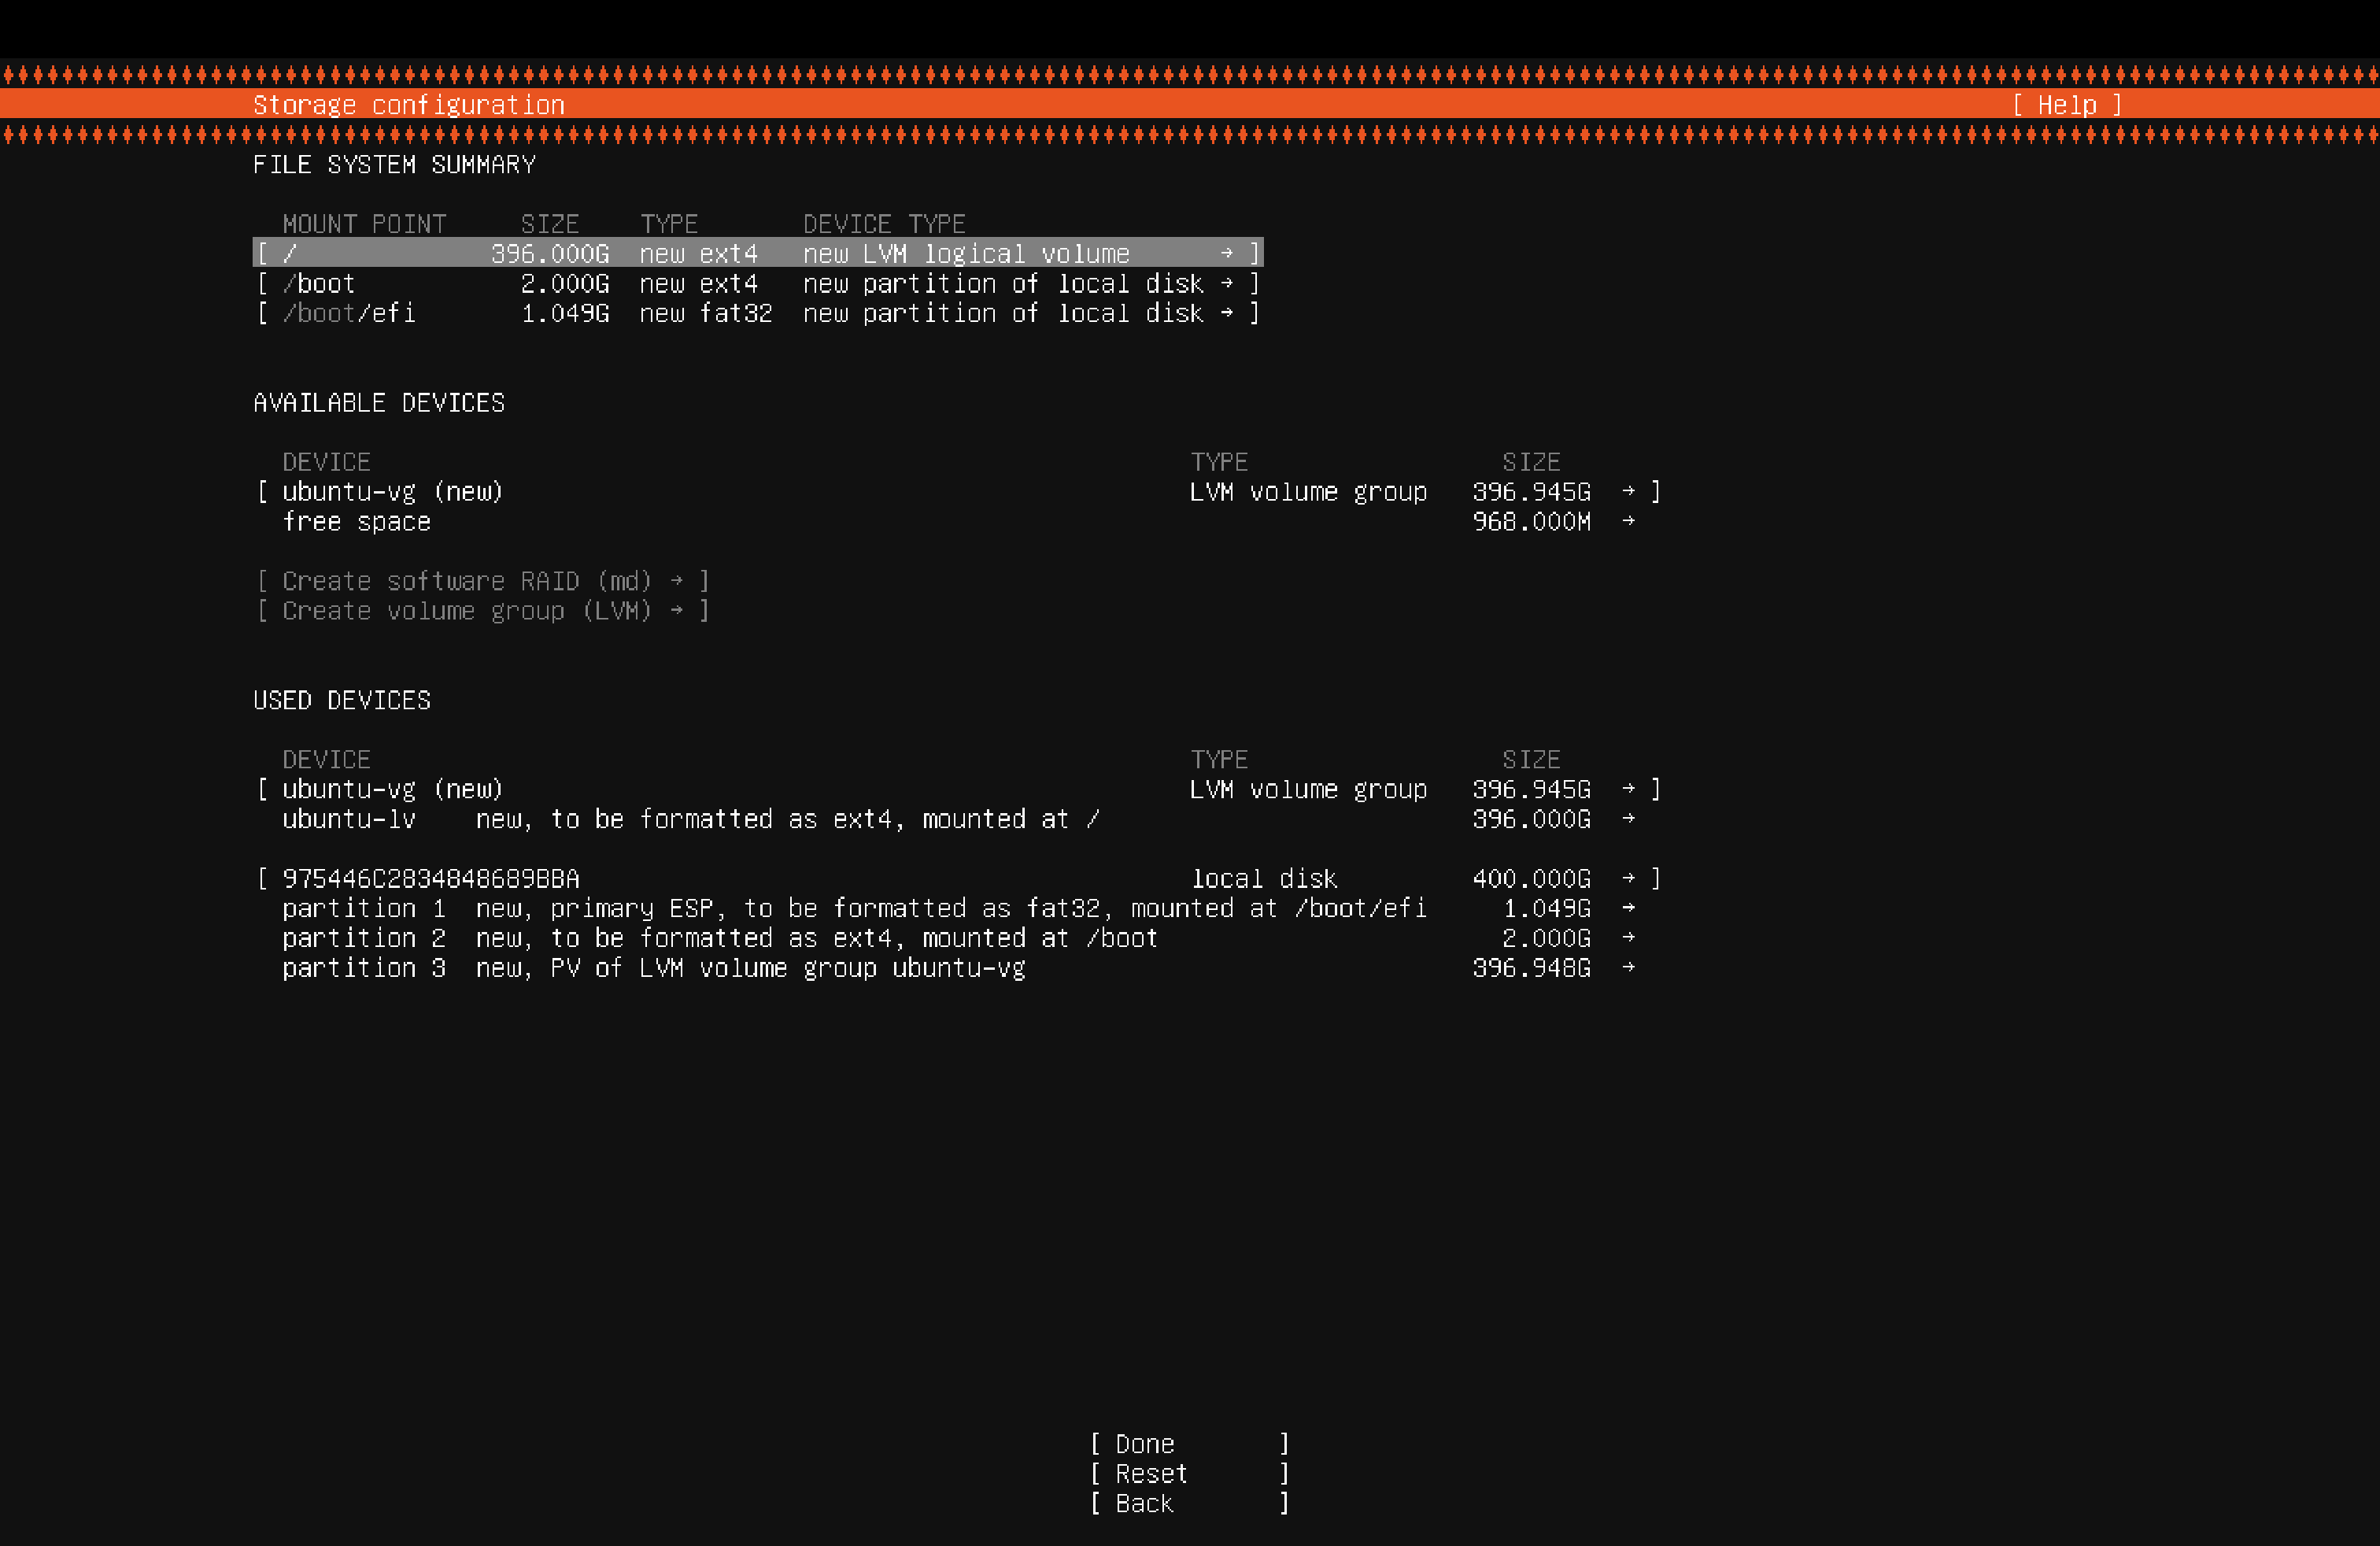 2. Select **Edit**, and select **Enter**.
 3. In the **Size** field, type `396.000G`, select **Save**, and select **Enter**. The updated size should now reflect for the ubuntu-lv entry.
4. Select **Done** and select **Enter**.
9. To set up your profile, specify the required details, select **Save**, and select **Enter**.
10. Skip the **Ubuntu Pro** upgrade option, select **Continue**, and select **Enter**.
11. Optional: Select **Install OpenSSH Server** to set up SSH, select **Done**, and select **Enter**.
**Note**
OpenSSH isn't required for syncing, compiling, and flashing Qualcomm Linux. Install the OpenSSH server only if you want to allow secure remote access for the Ubuntu VM.
12. After the installation is successful, select the **Power** icon to shut down and stop the VM, and select **OK**.
3. In the **Size** field, type `396.000G`, select **Save**, and select **Enter**. The updated size should now reflect for the ubuntu-lv entry.
4. Select **Done** and select **Enter**.
9. To set up your profile, specify the required details, select **Save**, and select **Enter**.
10. Skip the **Ubuntu Pro** upgrade option, select **Continue**, and select **Enter**.
11. Optional: Select **Install OpenSSH Server** to set up SSH, select **Done**, and select **Enter**.
**Note**
OpenSSH isn't required for syncing, compiling, and flashing Qualcomm Linux. Install the OpenSSH server only if you want to allow secure remote access for the Ubuntu VM.
12. After the installation is successful, select the **Power** icon to shut down and stop the VM, and select **OK**.
 13. After the VM stops, close the window.
## **Run the Ubuntu Server VM on an Arm64 Mac**
To run the Ubuntu Server VM, do the following:
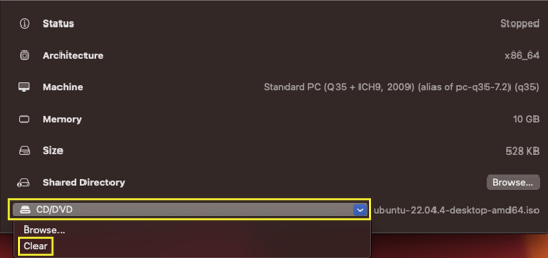
1. In the UTM main window, in the **CD/DVD** drop-down list, select **Clear**.
13. After the VM stops, close the window.
## **Run the Ubuntu Server VM on an Arm64 Mac**
To run the Ubuntu Server VM, do the following:
1. In the UTM main window, in the **CD/DVD** drop-down list, select **Clear**.
 2. Ensure that the ISO image association is empty against the CD/DVD option.
 3. To run the Ubuntu VM, select the **Play** icon.
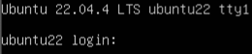
 4. After the Ubuntu operating system boots successfully, enter the credentials to sign in and access the shell.
 5. Run the following commands to update the Ubuntu operating system and install the graphical desktop environment, followed by a restart:
```text theme={null}
sudo apt update && sudo apt upgrade -y
```
```text theme={null}
sudo apt install ubuntu-desktop -y
```
```text theme={null}
reboot
```
6. Sign in to the Ubuntu Server VM you created.
## **Access the Qualcomm Linux development kit**
To access the Qualcomm Linux development kit from the Ubuntu Server VM, do the following:
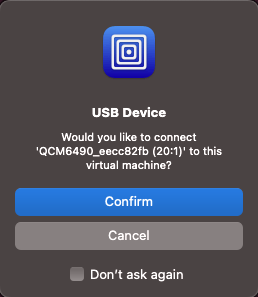
1. Connect the Qualcomm Linux development kit to the host computer.
The UTM software may ask you to confirm whether the Ubuntu operating system should have access to the Qualcomm Linux development kit.
a. If you see a dialog as follows, select **Confirm**:
5. Run the following commands to update the Ubuntu operating system and install the graphical desktop environment, followed by a restart:
```text theme={null}
sudo apt update && sudo apt upgrade -y
```
```text theme={null}
sudo apt install ubuntu-desktop -y
```
```text theme={null}
reboot
```
6. Sign in to the Ubuntu Server VM you created.
## **Access the Qualcomm Linux development kit**
To access the Qualcomm Linux development kit from the Ubuntu Server VM, do the following:
1. Connect the Qualcomm Linux development kit to the host computer.
The UTM software may ask you to confirm whether the Ubuntu operating system should have access to the Qualcomm Linux development kit.
a. If you see a dialog as follows, select **Confirm**:
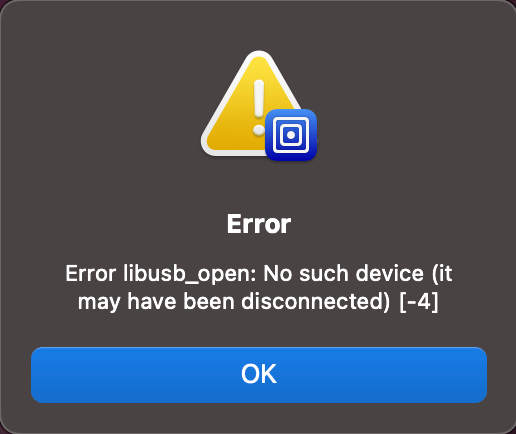
 b. After selecting **Confirm**, if you see the following USB disconnection error, select **OK** to ignore it:
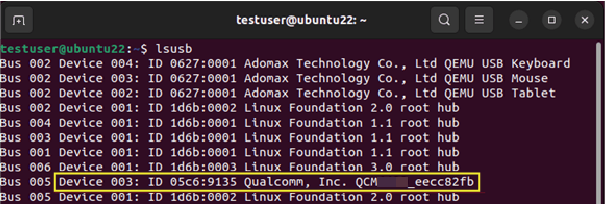
 2. To verify if the Ubuntu VM can access the Qualcomm Linux development kit, run the `lsusb` command in a Ubuntu terminal window.
The output shows the Qualcomm Linux development kit as follows:
2. To verify if the Ubuntu VM can access the Qualcomm Linux development kit, run the `lsusb` command in a Ubuntu terminal window.
The output shows the Qualcomm Linux development kit as follows:
 If the Qualcomm Linux development kit isn't detected in the Ubuntu VM, do the following:
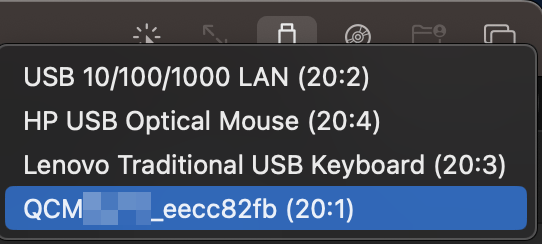
a. Select **USB Devices** in the toolbar of the UTM VM window.
b. Select **QCMXXXX\_xxxxxxxx**.
If the Qualcomm Linux development kit isn't detected in the Ubuntu VM, do the following:
a. Select **USB Devices** in the toolbar of the UTM VM window.
b. Select **QCMXXXX\_xxxxxxxx**.
 If you don't see the Qualcomm Linux development kit listed as one of the USB devices, do the following:
1. In UTM settings, select **Input** in the left panel.
2. In the **Maximum Shared USB Devices** field, set the value to `10`.
## **Configure power settings for Arm64 Mac and Ubuntu Server**
To ensure that the Mac host computer and the Ubuntu Server VM don't go to sleep due to inactivity, do the following:
* To configure the sleep and wake settings for the Mac host computer, see [macOS User Guide](https://support.apple.com/en-in/guide/mac-help/mchle41a6ccd/mac).
* To configure the power settings for Ubuntu Server, do the following:
1. In **System Settings** for Ubuntu, select **Power**.
2. Turn off **Automatic Suspend**.
## **Next steps**
* [Sync, build, and flash Qualcomm Linux](https://dragonwingdocs.qualcomm.com/Key-Documents/Flash-Guide/flash-with-qdl)
* [Fix network failures in the Ubuntu VM](./troubleshoot-host-computers-and-virtual-machines#fix-network-failures-in-the-ubuntu-vm)
* [Optimize slow or unresponsive Mac host computer](./troubleshoot-host-computers-and-virtual-machines#optimize-slow-or-unresponsive-mac-host-computer)
If you don't see the Qualcomm Linux development kit listed as one of the USB devices, do the following:
1. In UTM settings, select **Input** in the left panel.
2. In the **Maximum Shared USB Devices** field, set the value to `10`.
## **Configure power settings for Arm64 Mac and Ubuntu Server**
To ensure that the Mac host computer and the Ubuntu Server VM don't go to sleep due to inactivity, do the following:
* To configure the sleep and wake settings for the Mac host computer, see [macOS User Guide](https://support.apple.com/en-in/guide/mac-help/mchle41a6ccd/mac).
* To configure the power settings for Ubuntu Server, do the following:
1. In **System Settings** for Ubuntu, select **Power**.
2. Turn off **Automatic Suspend**.
## **Next steps**
* [Sync, build, and flash Qualcomm Linux](https://dragonwingdocs.qualcomm.com/Key-Documents/Flash-Guide/flash-with-qdl)
* [Fix network failures in the Ubuntu VM](./troubleshoot-host-computers-and-virtual-machines#fix-network-failures-in-the-ubuntu-vm)
* [Optimize slow or unresponsive Mac host computer](./troubleshoot-host-computers-and-virtual-machines#optimize-slow-or-unresponsive-mac-host-computer)