> ## Documentation Index
> Fetch the complete documentation index at: https://dragonwingdocs.qualcomm.com/llms.txt
> Use this file to discover all available pages before exploring further.
# Update firmware and OS on Qualcomm Linux using capsule and OSTree mechanisms
Over-the-air (OTA) updates are essential for keeping devices functioning, especially embedded systems and IoT devices. These updates allow devices to receive and install updates.
Qualcomm Linux uses the capsule update mechanism for updating firmware images, and the OSTree update mechanism for updating Linux OS.
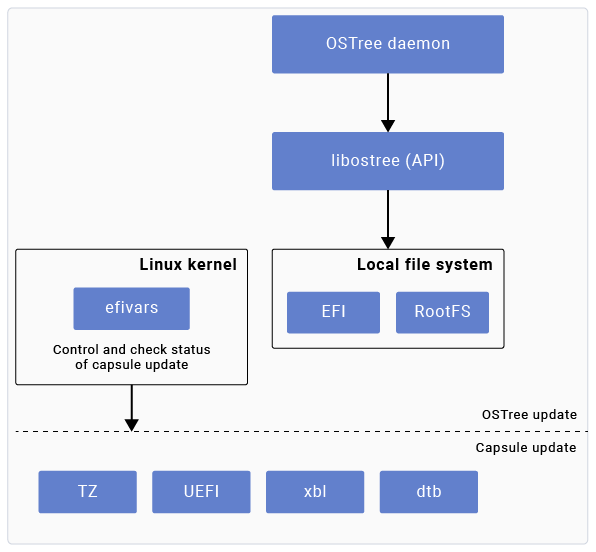
Figure: OTA update for Qualcomm Linux
## **Firmware update using capsule**
Capsule update is a method for updating firmware on Qualcomm Linux-enabled devices. A UEFI capsule packages the firmware into a binary format. When the device boots up and functions in normal mission mode, it downloads and deploys the capsule to the EFI partition. On reboot, during the next bootup cycle, the UEFI processes this capsule and applies the update to the device firmware.
## **OSTree for Linux operating system updates**
OSTree is a tool for managing version-controlled, atomic updates of Linux-based operating systems. It works like a git repository for the entire Linux filesystem. OSTree stores snapshots of filesystem trees in repositories, which devices pull over the network. With OSTree, updates are atomic and support rollback, so an interrupted update won’t break the system. IoT and edge devices benefit from secure, consistent updates that allow rollback if something goes wrong.
## **Use capsule and OSTree for complete OTA software updates**
To manage firmware and OS updates in a single OTA system, use capsule and OSTree update mechanisms together. Capsule update mechanism handles the firmware updates first, updating the low-level firmware. After the capsule update, the system reboots and reaches Linux OS, where it checks and applies the OSTree updates. Qualcomm Linux uses capsule to update low-level firmware through UEFI.
The system follows this procedure to update firmware using capsule:
1. A binary known as a UEFI capsule encapsulates the firmware update.
2. The system delivers the capsule binary to the UEFI by storing it in the mounted `/EFI` path.
3. The UEFI firmware processes the capsule during the bootup cycle, and applies the update to the device firmware.
Qualcomm Linux uses OSTree to manage the Linux OS. The system copies the Qualcomm Linux build-generated update package to the device and stages it for activation using commands listed in [Linux OS update flow using OSTree](https://dragonwingdocs.qualcomm.com/Key-Documents/Yocto-Guide/update-firmware-and-os-on-qualcomm-linux-using-capsule-and-os-tree-mechanisms#linux-os-update-flow-using-ostree). After the device reboots, it applies the update package.
The following figure shows the storage view for the Linux OS with OSTree.
The Runtime view indicates which directories from the Storage at default deployment are mapped to the mount-points at runtime.
The Storage after creation of new deployment view shows how the flash storage updates when the device successfully creates a new OSTree deployment. This deployment is newly created and attempts as the new Linux OS on the next reboot.
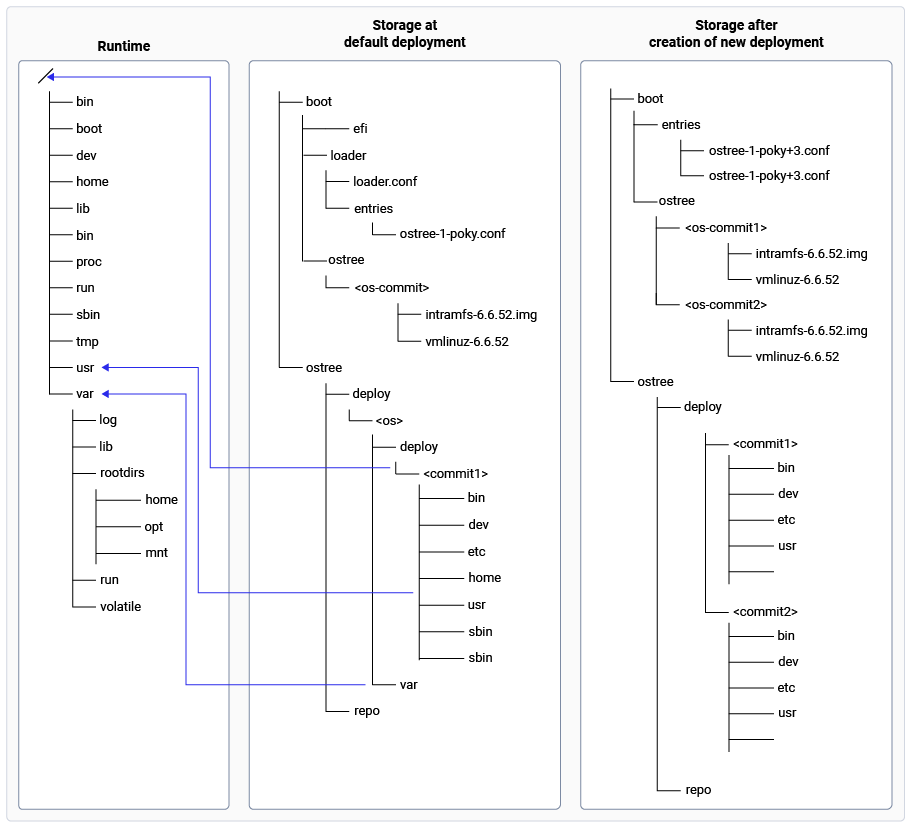
Figure: Overview of the storage during OTA update
The following is the list of Linux OS and firmware images updated as part of OTA:
* Linux OS images
* The `efi.bin` file contains the UKI, initrd, and boot loader configuration files. OSTree creates a new configuration file during deployment. It lists the paths to the new kernel and initramfs images copied to the EFI partition.
* The `system.img` file contains the rootfs, including key components, such as `/ostree`, `/ostree/repo`, and `/ostree/deploy`. When a new deployment is created, OSTree updates the filesystem tree to reflect the new version of the operating system.
* Firmware images For information related to the list of firmware images, see [GitHub](https://github.com/quic/cbsp-boot-utilities/blob/main/uefi_capsule_generation/FirmwarePartitions.md).
## **Update capsule and HLOS**
The following figure shows the capsule and high-level operating system (HLOS) update flow:

Figure: Capsule and HLOS update flow
To update the capsule and HLOS, do the following:
1. Copy the `.cap` capsule file to EFI partition, which is mounted at `/boot/EFI/UpdateCapsule`on the booted-up device.
2. Set the EFI variable (efivar) `OsIndications` flags with `EFI_OS_INDICATIONS_FILE_CAPSULE_DELIVERY_SUPPORTED` and reboot the device. UEFI performs the following steps when it detects a capsule update request through the `OsIndications` flag:
1. UEFI identifies that there is a capsule available for update from `OsIndications` flag.
2. UEFI authenticates the capsule and updates the firmware images from the capsule.
3. The status of capsule update is updated in the EFI system resource table (ESRT).
4. If there is a failure during capsule update, UEFI rolls back the firmware to previous version. UEFI successfully updates the firmware from the capsule, and the device boots up with the new firmware.
3. Copy the OSTree repository to the device. Create a new deployment for HLOS update using OSTree commands, a new configuration file with count tag gets created, reboot the device.
4. Systemd-boot picks the new configuration file and boots up the kernel and user space. The device boots up with the updated firmware and the HLOS software. `systemd-bless-boot.service` marks the new config as good.
5. Reset the `TrialBootEnabled` flag in `OtaStatus` `efivar` to indicate firmware is good. UEFI checks this efivar to commit the new firmware.
### **Update firmware using capsule**
The following figure shows the firmware update flow:

Figure: Firmware update using capsule
To update the firmware using capsule, do the following:
1. To create the `UpdateCapsule` folder on the device, run the following command:
```text theme={null}
adb shell mkdir /boot/EFI/UpdateCapsule
```
2. Copy the capsule to the device:
```text theme={null}
scp -r @:/boot/EFI/UpdateCapsule/
```
For more information about `firmware_capsule.cap` capsule generation, see [Capsule generation in UEFI](https://dragonwingdocs.qualcomm.com/System/Boot/generate-the-capsule).
3. Create the `data.hex` file on the device containing the specified hexadecimal data:
```text theme={null}
echo -e -n "\x4\x0\x0\x0\x0\x0\x0\x0" > data.hex
```
4. Write the contents of `data.hex` on the device to the UEFI variable `OsIndications` using the `efivar`tool:
```text theme={null}
efivar -n 8be4df61-93ca-11d2-aa0d-00e098032b8c-OsIndications -f data.hex -w
```
For more information about UEFI variables, see [Update and recovery](https://dragonwingdocs.qualcomm.com/System/Boot/update-capsule-and-trial-boot-rollback-for-base-and-variants).
5. Print the value of the `OsIndications` UEFI variable using the `efivar` tool:
```text theme={null}
efivar -n 8be4df61-93ca-11d2-aa0d-00e098032b8c-OsIndications -p
```
6. Reboot the device:
```text theme={null}
reboot
```
7. Check the ESRT table entries:
```text theme={null}
cd /sys/firmware/efi/esrt/entries/entry0
```
1. Check the output of `last_attempt_status` command. If it’s 0, then the update is successful:
```text theme={null}
cat last_attempt_status
```
2. Check the output of `last_attempt_version` command:
```text theme={null}
cat last_attempt_version
```
3. Check the output of `fw_version` command. If `last_attempt_version` and `fw_version` are the same, then the update is successful:
```text theme={null}
cat fw_version
```
## **Update Linux OS using OSTree**
The following figure shows the Linux OS update flow:

Figure: Linux OS update using OSTree
To update Linux OS using OSTree, do the following:
1. To check the current deployment in the Qualcomm device, run the following command:
```text theme={null}
ostree admin status
```
Output:
```text theme={null}
* poky 643b332dd72b345b5040a1decbe7e04bd2d208a04ba59417aa667c901c485504.0
Version: 1.0
origin refspec: poky:rb3gen2-core-kit
```
The `*` shows the current deployment that the device has booted with.
2. The `ostree_repo` package is in the `/build/tmp/deploy/images//` path on the host development computer. For example, `/build/tmp/deploy/images/rb3gen2-core-kit/`. Copy the `ostree_repo` package from the host computer to the Qualcomm device using the following `scp`command:
```text theme={null}
scp -r @:/tmp
```
3. Pull a local OSTree repository on the Qualcomm device.
```text theme={null}
ostree pull-local /tmp/
```
To find the `branch_name` for the command, run the following command:
```text theme={null}
ostree refs
```
Output:
```text theme={null}
poky:rb3gen2-core-kit
```
In the preceding output, `rb3gen2-core-kit` is an example branch name.
4. Create the deployment on the Qualcomm device:
```text theme={null}
ostree admin deploy
```
This creates the `ostree-2-poky.conf` configuration file in the `/boot/loader/entries/` directory. For more information, see [Systemd boot counting - Successful boot](https://dragonwingdocs.qualcomm.com/Key-Documents/Yocto-Guide/update-firmware-and-os-on-qualcomm-linux-using-capsule-and-os-tree-mechanisms#systemd-boot-successful-boot).
5. Reboot the device:
```text theme={null}
reboot
```
6. Check if the device is booted with the created deployment:
```text theme={null}
ostree admin status
```
Output:
```text theme={null}
* poky 1e8a01bcc5cd9b3b34043db494ddcd01ec5c1c84312479a55253358a92250fa3.0
Version: 1.0
origin refspec: rb3gen2-core-kit
poky 643b332dd72b345b5040a1decbe7e04bd2d208a04ba59417aa667c901c485504.0 (rollback)
Version: 1.0
origin refspec: poky:rb3gen2-core-kit
```
To verify the newly created deployment on the build host computer, check the deployment in the `/build-/tmp-glibc/work///ota-sysroot/ostree/deploy/poky/deploy` path. For example, `/build/tmp/work/rb3gen2-core-kit/qcom-multimedia-image/ota-sysroot/ostree/deploy/poky/deploy`.
## **Systemd-boot counting - Successful boot**
The following figure shows the systemd-boot counting on successful boot flow:

Figure: Systemd-boot counting on successful boot
To manage boot counting in systemd-boot after a successful boot, OSTree executes the following procedure:
1. When OSTree deploys a new configuration, it creates a configuration file with a `+3` tag in the name, indicating the maximum retry count. This allows boot counting.
2. systemd-boot detects the `+3` tag in the entry file name and renames it to `ostree-conf+2-1.conf`, indicating that one boot attempt has started. After renaming the file, the boot process continues.
3. The `systemd-bless-boot-generator` creates the `systemd-bless-boot.service`, which is set to start when `boot-complete.target` is reached.
4. The `systemd-bless-boot.service` marks the new configuration as successful by removing the counter tags `+2-1` and renaming the file to `ostree-conf.conf`.
## **Systemd boot counting - Unsuccessful boot and rollback**
Following figure shows the systemd-boot counting on unsuccessful boot and rollback flow:

Figure: Systemd-boot counting on unsuccessful boot and rollback
To manage boot counting in systemd-boot after a unsuccessful boot and rollback, OSTree executes the following procedure:
1. When OSTree deploys a new configuration, it creates a systemd configuration file with a `+3` tag in the name, indicating the maximum retry count, such as `ostree-boot+3.conf`. This enables boot counting.
2. systemd-boot detects the `+3` tag in the configuration file name and renames it to `ostree-boot+2-1.conf`, indicating that one boot attempt has started. After renaming the file, the boot process continues.
3. The `systemd-bless-boot-generator` creates the `systemd-bless-boot.service`, which starts when `boot-complete.target` is reached. If there are any failures during the Linux boot-up, the `systemd-bless-boot.service` does not remove the `+2-1` counter tags from the configuration file.
4. On the subsequent boot, systemd-boot detects the `+2-1` tag in the configuration file name, renames the file to `ostree-boot+1-2.conf`, and tries to boot with it.
5. If the Linux bootup fails on the second attempt, the `systemd-bless-boot.service` does not remove the counter tags `+1-2` from the configuration file.
6. On the next boot, systemd-boot detects the `+1-2` tag in the configuration file name, renames the file to `ostree-boot+0-3.conf`, and tries to boot with it. This is the last attempt to boot Linux deployment.
7. If the device fails to bootup Linux during the third attempt, the `systemd-bless-boot.service` does not remove the counter tags `+0-3` from the configuration file.
8. On the subsequent boot, systemd-boot finds the `+0-3` tag in the configuration file name. As the counter has reached zero, the entry (configuration file) is considered bad. The systemd-boot reverts to an earlier version by trying the valid configuration file entry.
## **Usrmerge**
The Usrmerge feature in Linux simplifies the filesystem layout by merging certain directories under the `/usr`path. It combines `/bin`, `/sbin`, and `/lib` with `/usr/bin`, `/usr/sbin`, and `/usr/lib`, respectively.
With Usrmerge, executables and libraries found in `/bin`, `/sbin`, and `/lib` are placed in `/usr/bin`, `/usr/sbin`, and `/usr/lib`, respectively. The original directories become symbolic links to their /usr counterparts. This unified structure makes maintenance easier and reduces redundancy, as there is only one location for binaries and libraries instead of separate location for root-level and `/usr` directories. Symbolic links ensure compatibility, allowing scripts and software that reference paths such as `/bin` to continue functioning.
Linux distributions are adopting Usrmerge to align with the filesystem hierarchy standard (FHS) recommendations and simplify root filesystems, especially in containerized and embedded systems.
Distributions such as Debian, Ubuntu, and Fedora have adopted Usrmerge as part of their system layout, making it a standard in recent versions. The transition involves creating symbolic links and moving any remaining files from the original directories to their `/usr` equivalents.
## **Manage** `/var`**,** `/home`**,** `/media`**,** `/mnt`**,** `/opt`**,** `/srv`**, and** `/usr `**in Qualcomm Linux**
OSTree considers `/var` as a persistent directory. This means user and runtime created contents under `/var`remain untouched by OSTree and persist across OTA updates. For more information, see [OSTree Overview](https://ostreedev.github.io/ostree/introduction/).
Other directories that remain untouched by OSTree during an OTA update are `/home`, `/media`, `/mnt`, `/opt`, and `/srv`. OSTree maps these directories as symbolic links as follows:
* `/home` is a symbolic link to `/var/rootdirs/home`
* `/media` is a symbolic link to `/var/rootdirs/media`
* `/mnt` is a symbolic link to `/var/rootdirs/mnt`
* `/opt` is a symbolic link to `/var/rootdirs/opt`
* `/srv` is a symbolic link to `/var/rootdirs/srv`
Any runtime data stored under `/home`, `/media`, `/mnt`, `/opt`, `/srv`, and `/var` stays persistent across OTA updates.
To maintain a clean and consistent filesystem, don’t install any artifacts under the preceding directories at build time. Any artifacts installed in these directories during build time are not packaged into the `rootfs` image generated by the Qualcomm Linux build command, that is, `bitbake `.
To handle runtime creation of files and directories under persistent paths, do the following:
The process creates the files or directories at runtime when it’s required.
> 1. Paths under `/run/`, `/var/lib/`, `/var/cache/`, and `/var/log/` can be created from the respective systemd unit files. Here is a [reference](https://www.freedesktop.org/software/systemd/man/latest/systemd.exec.html#RuntimeDirectory=).
> 2. Use [systemd-tmpfiles](https://www.freedesktop.org/software/systemd/man/latest/systemd-tmpfiles-setup.service.html) to create files, symbolic links, and directories at bootup.
OSTree creates a read only bind mount at `/usr`, ensuring that the core operating system files remain immutable by users. This approach helps to maintain system integrity and security. OSTree uses the `/usr` mount-point to deploy next update.
> **Note**
>
> * OSTree allows the installation of files and directories under the `/var/local` path at build time.
> * Although OSTree preserves the contents installed under `/usr` during build time, it doesn’t package the contents installed under the `/usr/local` subdirectory into the rootfs image.
In Qualcomm Linux with OSTree enabled, the `/etc` directory is managed in a way that allows for both system updates and local customizations.
> * The `/etc` directory is mutable, allowing modifications at runtime for maintaining system configurations that need to persist across updates.
> * OSTree supports merging configuration files from the `/usr/etc` directory to `/etc`. This allows OSTree to update default configurations while preserving any local changes made.
> * When an update is applied, OSTree performs a three-way merge for configuration files in `/etc` using the original version of the file, version of the file in new update and locally modified version of the file.
> * If conflicts arise during the merge process, OSTree retains the runtime modifications. This helps maintain system stability and ensures that critical configurations aren’t overwritten.
## **SOTA distribution feature**
The software over-the-air (SOTA) distribution feature allows remote updates for embedded systems and IoT devices. It integrates tools such as OSTree for system updates, allowing devices to receive and install updates without physical access.
To enable the SOTA distribution feature in Qualcomm Linux, run the following build command:
> ```text theme={null}
> kas build meta-qcom/ci/rb3gen2-core-kit.yml:meta-qcom/ci/qcom-distro-sota.yml
> ```
This command automatically configures and enables the SOTA distribution feature for your build.
## **Next steps**
Handle out-of-tree kernel modules and device tree using recipes:
* To build an out-of-tree kernel module, see [Add a kernel module](https://dragonwingdocs.qualcomm.com/System/Kernel/out-of-tree-kernel-modules). **Note** Qualcomm Linux supports out-of-kernel device tree overlays only for the `custom` variant.
* For device-tree/device-tree blob management, see DTB build support in kernel in [Platform device tree](https://dragonwingdocs.qualcomm.com/System/Kernel/locate-and-modify-device-trees).