

Overview
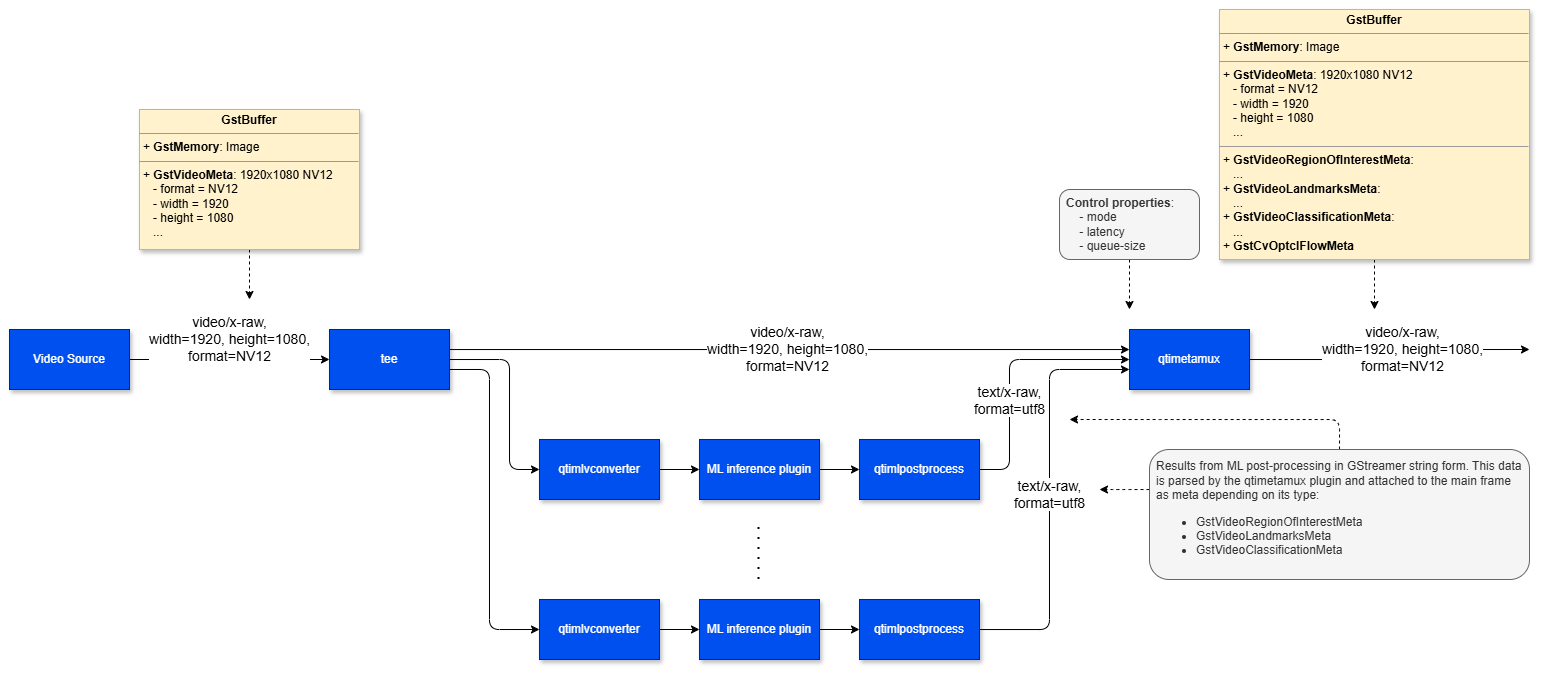
The qtimetamux element is a core component of an AI-enabled GStreamer pipeline. Its purpose is to synchronize post-processed AI/CV results with the original media buffer and attach those results as GstMeta using the standard metadata mechanism provided by GStreamer. In practice, outputs generated by ML post-processing stages — such as:- Bounding box coordinates
- Class labels
- Segmentation masks
- Key points
- Motion vectors
- Other custom AI/CV metadata
- Live visualization — Metadata can be consumed by overlay elements such as
qtivoverlayto render bounding boxes, labels, and other inference results directly on the video output. - Daisy-chained AI pipelines — The metadata-bearing buffer can be passed to a subsequent inference stage, allowing multi-stage AI workflows where the output of one model feeds the next.
- Application-level access — The resulting buffer can be sent to an
appsink, giving a custom application access to both the media frame and the attached metadata for business logic or decision-making. - Metadata serialization and external integration — The metadata can be forwarded to
qtimlmetaparser, which converts it into JSON. That JSON can then be published to external systems such as MQTT, Kafka, or a REDIS server viaqtiredissink.
Example Pipeline
Download Required Files
| File | Download | Save as |
|---|---|---|
| YOLOX W8A8 model | Qualcomm AI Hub — YOLOX | yolo_x_w8a8.tflite |
| Detection labels | yolov8.json | yolov8.json |
| Sample video | Input video | Draw_1080p_180s_30FPS.mp4 |
Hierarchy
GObjectGstObject
GstElement
qtimetamux
Pad Templates
sink
| Capabilities | |
|---|---|
video/x-raw(ANY) | format: NA |
audio/x-raw(ANY) | format: NA |
| Availability: Always | |
| Direction: sink | |
Pad Name: sink |
| Capabilities | |
|---|---|
text/x-raw | format: utf8 |
cv/x-optical-flow | format: NA |
| Availability: On request | |
| Direction: sink | |
Pad Name: data_%u |
src
| Capabilities | |
|---|---|
video/x-raw(ANY) | format: NA |
audio/x-raw(ANY) | format: NA |
| Availability: Always | |
| Direction: source |
Element Properties
| Property | Description |
|---|---|
latency | Additional latency in nanoseconds to allow more time for upstream to produce metadata entries for the current position. Useful in sync mode when metadata generation takes longer than the default hold window.Type: Unsigned Integer64Default: 0Range: 0 - 18446744073709551615Flags: readable/writable (changeable only in NULL or READY state) |
mode | Controls the synchronization strategy used to associate metadata buffers with main media frames.Type: Enum Default: 0, "async"Range:(0): async - No timestamp synchronization. The N-th incoming media frame is held until the N-th data buffer has been received on all data pads. Suitable for fixed, predictable sequences(1): sync - Timestamp-based synchronization. Each incoming frame is held for up to 1 / framerate (video) or 1 / rate (audio). Metadata with matching timestamps is attached before the frame is forwarded downstreamFlags: readable/writable (changeable only in NULL or READY state) Example: mode="sync" (or) mode=1 |
queue-size | Sets the size of the internal input and output queues.Type: Unsigned IntegerDefault: 10Range: 3 - 4294967295Flags: readable/writable (changeable only in NULL or READY state) |
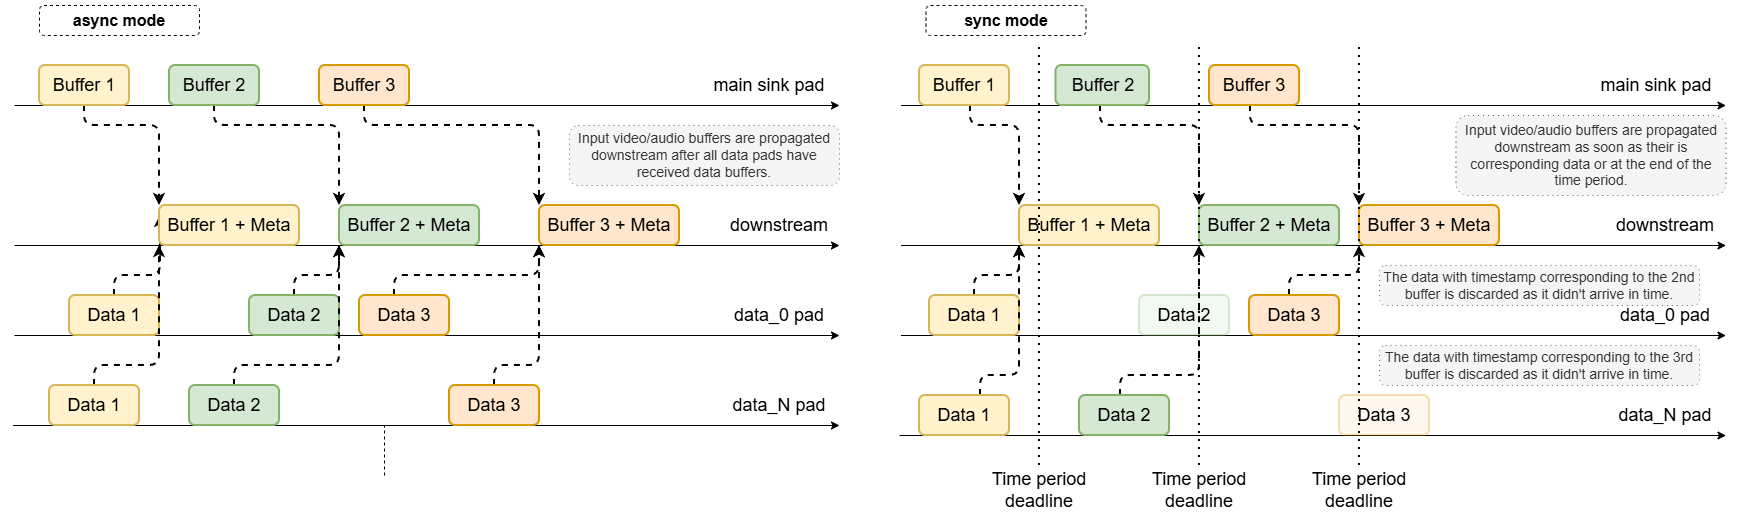
Main Buffer, Metadata Synchronization and Latency control
The plugin is designed with a single main sink pad that receives the primary video or audio buffers, and multiple auxiliary data pads that collect ML post-processing results or CV motion vectors. Data arriving on auxiliary pads may be provided in string or blob form and is parsed into structured representations. Once parsed, the plugin matches each data buffer to its corresponding main media frame and attaches the result as GstMeta.Async Mode
This is the default synchronization mode. No timestamp-based matching is performed. Instead, metadata buffers are associated with main frames in strict 1:1 order:- The N-th incoming video/audio frame is held until the N-th data buffer has been received on all data pads.
- Once all required data for that frame is available, the metadata is attached.
- The enriched buffer is then pushed downstream.
Sync Mode
In sync mode, the plugin performs timestamp-based synchronization. Each incoming main frame is held for a limited time window of up to1 / framerate seconds (video) or 1 / rate seconds
(audio). For example, at 30 fps, the frame may be held for approximately 33.3 ms.
During this hold period, the plugin waits for data buffers on its auxiliary pads whose timestamps
match the timestamp of the main frame:
- If all expected data buffers arrive within the time window, they are attached before forwarding.
- If one or more auxiliary pads do not provide matching buffers in time, only the successfully matched metadata is attached and the main buffer is released downstream.
Latency Control
In some use cases, the default hold period in sync mode may be too short — especially when metadata generation takes longer than expected. Thelatency property extends the waiting period by
accepting an integer value in nanoseconds, allowing the plugin to wait longer for late-arriving
data buffers before forwarding the main frame.
Usage
Person Detection
Download Required Files
| File | Download | Save as |
|---|---|---|
| YOLOX W8A8 model | Qualcomm AI Hub — YOLOX | yolo_x_w8a8.tflite |
| Detection labels | yolov8.json | yolov8.json |
| Sample video | Input video | Draw_1080p_180s_30FPS.mp4 |
If any downloaded file is a
.zip archive, extract it on your host machine before copying:
unzip filename.zipDetection-Classification Daisy Chain Pipeline
This pipeline demonstrates a cascaded inference approach where the output of one model (Detection) is used to crop regions of interest (ROIs) which are then fed into secondary models (Classification).Download Required Files
| File | Download | Save as |
|---|---|---|
| YOLOX model | Qualcomm AI Hub — YOLOX | yolox-yolo-x-w8a8.tflite |
| YOLO labels | yolov8.json | yolov8.json |
| MobileNet model | mobilenet-softmax | mobilenet_v2-mobilenet-v2-w8a8.tflite |
| MobileNet labels | mobilenet.json | mobilenet_v2.json |
| Input video | Input video | video.mp4 |