

- Config #1
- Config #2
| Application | Source code | Description | QCS6490 | IQ-8275 | IQ-9075 | IQ-615 |
|---|---|---|---|---|---|---|
| Camera | ||||||
| Single camera streaming | gst-camera-single-stream-example | Single camera: preview, encode, YUV dump, or RTSP. | ✓ | ✓ | ✓ | ✓ |
| Multi-camera streaming | gst-multi-camera-example | Concurrent streaming from two cameras. | × | × | × | TBD |
| Multistream | gst-multi-stream-example | Single camera duplicated into two streams via tee. | × | × | × | × |
| Live snapshot | gst-snapshot-stream-example | Preview + JPEG snapshot capture simultaneously. | × | × | × | × |
| RTMP camera streaming | gst-rtmp-stream-example | ISP / RTSP camera feed converted to RTMP stream. | × | × | × | × |
| Activate/deactivate streams at runtime | gst-activate-deactivate-streams-runtime-example | Change resolution on-the-fly without sensor restart. | × | × | × | × |
| Add/remove streams at runtime | gst-add-remove-streams-runtime | Dynamically add and remove streams. | × | × | × | × |
| Camera frame processing | gst-appsink-example | Apply transforms to camera frames before encoding. | × | × | × | × |
| Camera metadata | gst-camera-metadata-example | Capture scene mode, white balance, and bit rate metadata. | × | × | × | × |
| Camera stream configuration | gst-add-streams-as-bundle-example | Configure camera streams as a bundle. | × | × | × | × |
| Camera burst capture | gst-camera-burst-capture-example | Burst-mode snapshot capture. | × | × | × | × |
| Camera switch | gst-camera-switch-example | Switch between two cameras without stopping pipeline. | × | × | × | × |
| SHDR / LDC / EIS | gst-camera-shdr-ldc-eis-example | Super HDR, lens distortion correction, and image stabilization. | × | × | × | × |
| Decode JPEG images | gst-jpg-decode-example | Decode JPEG images and preview on screen. | ✓ | ✓ | ✓ | ✓ |
| Video | ||||||
| Video Wall | gst-concurrent-videoplay-composition | Concurrent video playback composed on display. | ✓ | ✓ | ✓ | ✓ |
| Smart codec | gst-smartcodec-example | Reduce bandwidth / storage for camera input. | × | × | × | × |
| Multiformat encode/decode | gst-videocodec-concurrent-playback | Concurrent decode and playback of multiple formats. | ✓ | ✓ | ✓ | ✓ |
| Audio-video playback | gst-audio-video-playback | Simultaneous audio and video decode and playback. | ✓ | ✓ | ✓ | ✓ |
| Video transcoding | gst-video-transcode-example | Transcode AVC↔HEVC. | ✓ | ✓ | ✓ | ✓ |
| Video playback | gst-video-playback-example | Decode and play back a video file. | ✓ | ✓ | ✓ | ✓ |
| Record and preview transformed video | gst-transform-example | Rotate, flip, and scale a video stream. | × | × | × | × |
| Video composition using Weston | gst-weston-composition-example | Compose live camera and offline file sources. | × | × | × | × |
| Encode audio and video | gst-audio-video-encode | Encode audio and video to a file. | × | × | × | × |
| Audio | ||||||
| Audio playback | gst-audio-decode-example | Decode and play back WAV, MP3, or FLAC. | ✓ | ✓ | ✓ | ✓ |
| Audio recording | gst-audio-encode-example | Record and encode audio to FLAC or WAV. | ✓ | ✓ | ✓ | ✓ |
Prerequisites
Try me
Try me
Set up Wi-Fi
Set up Wi-Fi
Download Models and Artifacts
download_artifacts.sh script, set executable
permissions, and run it to download the model, media, and label files:Enable qticamsrc
qticamsrc on Config #2:Enable libcamera
cdt_vision_kit.bin file from Qualcomm multimedia proprietary image at images/rb3gen2-core-kit/qcom-multimedia-proprietary-image-rb3gen2-core-kit:Enable Audio and GPU Delegate
wpctl status and run the following command:Camera Applications
Single Camera Streaming
Description: The gst-camera-single-stream-example application demonstrates single camera use cases with possible outputs: live camera preview on display, store video encoder output, dump the camera YUV, and live RTSP streaming.- Live camera preview on display
- Encode MP4 saved to file
- Encode YUV saved to file
- RTSP use case
- Usage Example: For example, you can use this application in a security system where the goal is to capture a video from one camera and stream it across a network. You can either view it or archive it for future review.
The following figure shows the pipeline flow for various single camera stream use cases.For more information, see pipeline flow.

gst-camera-single-stream-example
Try me
Try me
Run the application
Complete prerequisites
In the terminal of the target device, select a use case and run the command
/etc/media/ folder:/etc/media/ folder:- Run the RTSP server in a separate console on the target device with udpsrc (you can run it in the background as a service):
- Then start single camera streaming:
In the terminal of the host computer, run one of the following commands to view the stream
In the terminal of the target device, run the following command to display the available help options:
Expected output
The following table lists the expected output based on the selected output type.
| Output | Description |
|---|---|
| Display | Preview the stream. |
| Dump the MP4 and YUV data | Save the output to a file at /etc/media/. |
| RTSP | View the output on a remote display. |
Pipeline flow
The following table lists the plugins used in the single camera streaming pipeline:| Pipeline | Description |
|---|---|
| Live camera preview on display |
|
| Video encoding |
|
| Dump the camera YUV to a filesink |
|
| RTSP streaming |
|
Multi-Camera
Description: The gst-multi-camera-example application allows you to stream from two camera sensors simultaneously. The application composes the camera feeds side by side to display on a screen or encodes and stores the video streams to files. A few use cases that need many camera inputs are dash camera or stereo camera. You can use this application as a reference and build your use case. For example, a security system where the goal is to capture a video from several cameras. You can either view it or archive it for a future review. The following figure shows the pipeline for several camera streams. For more information about the elements used in this pipeline, see pipeline flow.
gst-multi-camera-example
Try me
Try me
Run the application
Complete prerequisites
In the terminal of the target device, select any of the following use cases and run the respective command:
In the terminal of the target device, run the following command to display the available help options:
Expected Output
The output is displayed on the screen and saved to a file.- If the output type is display, you can preview the stream on the display.
-
If the output type is video encoding, then the encoded files are saved at
/etc/media/cam1_vid.mp4and/etc/media/cam2_vid.mp4for camera 1 and camera 2 respectively.
Pipeline flow
The following table lists the plugins used in the multi camera streaming pipeline:| Pipeline | Description |
|---|---|
| Preview on display |
|
| Encoder dump on the device |
|
Camera Switch
Description: The gst-camera-switch-example application allows you to switch between two cameras. The following figure shows the pipeline, which demonstrates the camera switch between the two cameras of the device without changing the state of the pipeline. The switching is done in the Playing state after every 5 seconds. For more information about the plugins used in this pipeline, see Pipeline flow.
gst-camera-switch-example
Try me
Try me
Run the application
Complete prerequisites
In the terminal of the target device, run the respective command for any of the following use cases:
In the terminal of the target device, run the following command to display the available help options:
Expected output
The application generates the output as a preview or an encoded MP4 file.
Pipeline flow
The following table lists the plugins used in the camera switch pipeline:| Pipeline | Description |
|---|---|
| Display preview |
|
| Encode as MP4 file |
|
Multi-Stream
Description: The gst-multi-stream-example The gst-multi-stream-example application allows you to access several streams from a single camera and either display them simultaneously on a screen or save them in MP4 format. For example, you can use this application for a camera security system where the video is captured from a camera. This video can be simultaneously streamed over a network, displayed on a monitor, and archived for future review. The figure shows the pipeline, which is run with flags to specify width, height, stream count, and output file. For more information, see Pipeline flow.
gst-multi-stream-example
Try me
Try me
Run the application
Complete prerequisites
In the terminal of the target device, run the following command to display the available help options:
Expected output
The output streams are displayed simultaneously on the screen or saved to a file.
Pipeline flow
The following table lists the plugins used in the multistream pipeline:| Plugin | Description |
|---|---|
| qticamsrc |
|
| Capsfilter |
|
Known Issues
- The default bit rate for the encoded video is configured to a low setting, leading to reduced quality at higher resolutions.
- The application may not work due to v4l2h264enc encoder issue.
Wide dynamic range and electronic image stabilization
Description: The gst-camera-shdr-ldc-eis-example application shows the staggered high dynamic range (sHDR), lens distortion correction (LDC), and electronic image stabilization (EIS) camera imaging features. For more information, see Overview of camera imaging features.
- For sHDR, ensure that the Sensor mode for Digital Overlap mode is enabled and tuned.
-
For LDC and EIS, ensure that the sensor and hardware are tuned.
Application:
gst-camera-shdr-ldc-eis-example
Try me
Try me
Run the application
Complete prerequisites
In the terminal of the target device, run the respective command for any of the following use cases to display the output:
Expected output
- sHDR
- LDC
Pipeline flow
The following table lists the plugins used in the gst-camera-shdr-ldc-eis-example pipeline:| Plugin | Description |
|---|---|
| qticamsrc |
|
| Capsfilter |
|
| waylandsink |
|
Overview of camera imaging features
The following table provides a brief description of the supported imaging features:Table : Camera imaging features| Feature | Description |
|---|---|
| sHDR |
|
| LDC |
|
| EIS |
|
Snapshot Stream
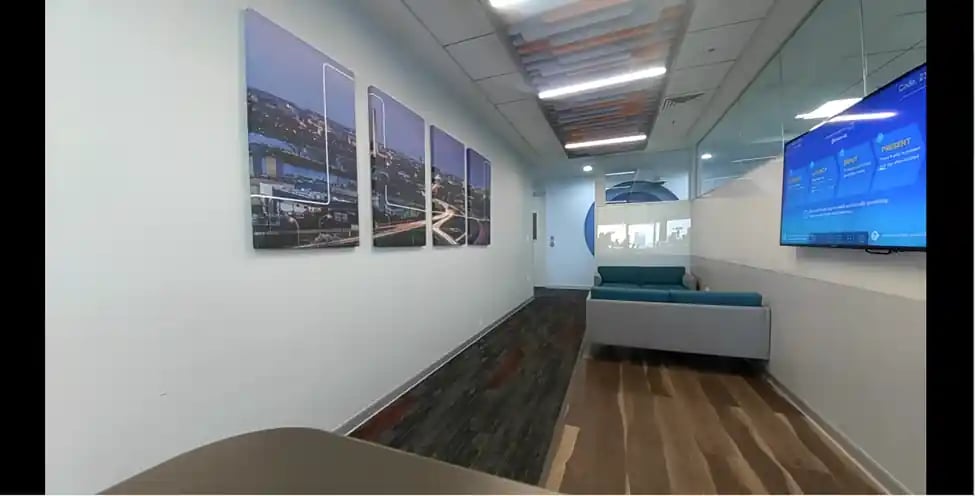
Description: The gst-snapshot-stream-example application allows you to generate two streams: a preview stream for live display and a snapshot stream that captures images and saves them as JPEG files. For the snapshot stream, you can determine the number of snapshots.
gst-snapshot-stream-example
Try me
Try me
Run the application
Complete prerequisites
In the terminal of the target device, use the following command to run the use case. Specify the application with parameters, such as camera width, height, and the maximum snapshot count for dumping JPEG files.
Expected output
The application generates an output for preview on the display and dumps the JPEG files in the respective location on the device. After the use case stops, the snapshot output files are available at the/etc/media/ path.Pipeline flow
The following table lists the plugins used in the live snapshot pipeline:| Plugin | Description |
|---|---|
| qticamsrc |
|
| Capsfilter |
|
Camera frame processing
Description: The gst-appsink-example application allows you to extract the buffer samples from a camera pipeline. These buffers can configure the camera resolution with the options such as width and height. For example, the appsink plugin can be used for a multimedia application that processes the video frame samples in real-time. Filters or transformations can be applied to the data before playing it back. The following figure shows the pipeline, which configures the camera resolution using parameters such as width and height. When appsink emits a signal indicating the availability of a new sample in the pipeline, the application extracts the buffer from this sample. For information about the plugins used in this pipeline, see Pipeline flow.
gst-appsink-example
Try me
Try me
Run the application
Complete prerequisites
Expected output
The user interface displays the following message: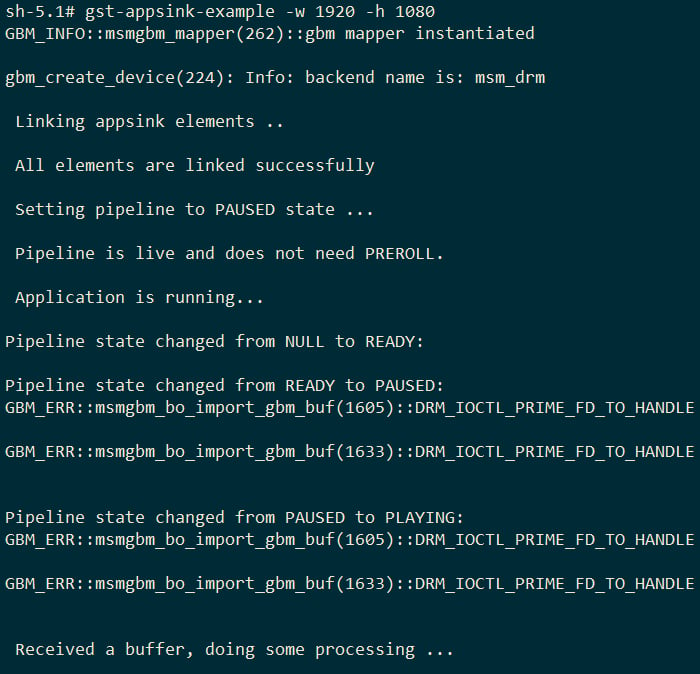
Pipeline flow
The following table lists the plugins used in the camera frame processing pipeline:| Plugin | Description |
|---|---|
qticamsrc | Captures the camera feed and sends it into the capsfilter. |
Capsfilter | Ensures that the video stream is in the correct format. |
Appsink | Provides the video data as an output to an application. |
Camera metadata
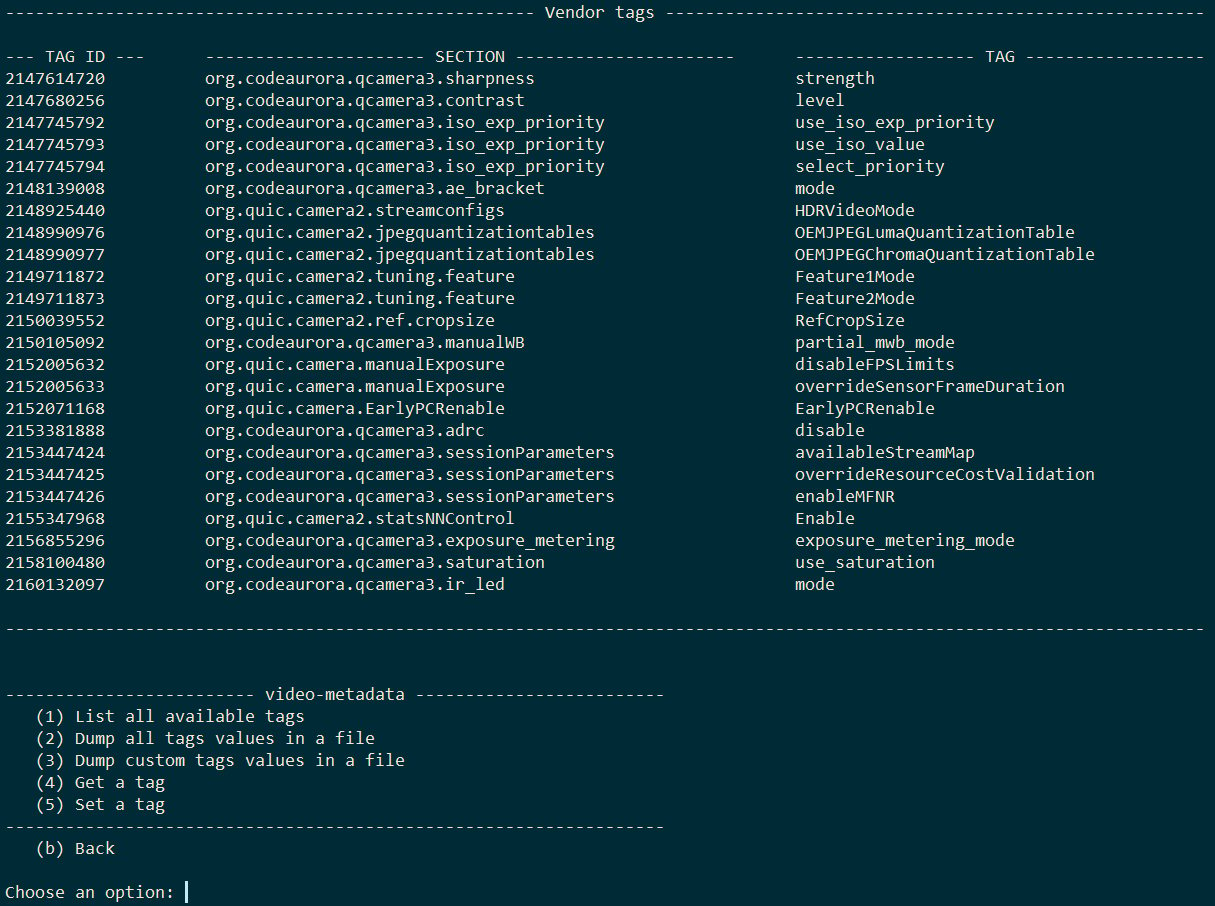
Description: The gst-camera-metadata-example application starts with a menu that allows you to choose between multiple properties of the camera plugin such asvideo-metadata, static-metadata, and image-metadata.
A practical use case for this application is handling camera metadata such as white balance, International Organization for Standardization (ISO) sensitivity, and exposure to tune the camera.
The following figure shows the execution of appsink when a new sample is available in the pipeline. The application is run from the command-line with specific options for custom pipeline, display type, and timestamp location.
For information about the plugins used in this pipeline, see Pipeline flow.

gst-camera-metadata-example
Try me
Try me
Run the application
Complete prerequisites
In the terminal of the target device, run the following use case:
Expected output
- During the execution, the application requires the command-line options to output the camera metadata and options available to set or get the vendor tags.
- On successful execution of the application, you can find and dump the respective metadata information.
Pipeline flow
The following table lists the plugins used in the camera metadata pipeline:| Plugin | Description |
|---|---|
qticamsrc | Captures the camera feed and sends it into the capsfilter. |
Capsfilter | Passes the feed to waylandsink for display. If display option isn’t provided, passes the feed to appsink. |
- Video metadata
- Image metadata
- Static metadata
- Session metadata
Known issue
When the GetTag menu option is selected, the capture options don’t work.Camera stream configuration
Description: The gst-add-streams-as-bundle-example application allows you to activate and configure camera streams as a bundle instead of configuring each stream one at a time thus reducing the delay in configuring new streams. The following figure shows the pipeline, which takes the configuration parameters such as width and height, processes to either display on a screen, or encodes and saves to a file. For more information about the plugins used in the pipeline, see Pipeline flow.
gst-add-streams-as-bundle-example
Try me
Try me
Run the application
Complete prerequisites
Run for various use cases
/etc/media/video_%d.mp4.In the terminal of the target device, run the following command to display the available help options:
Expected output
One stream is sent to display and the other stream is saved to a file.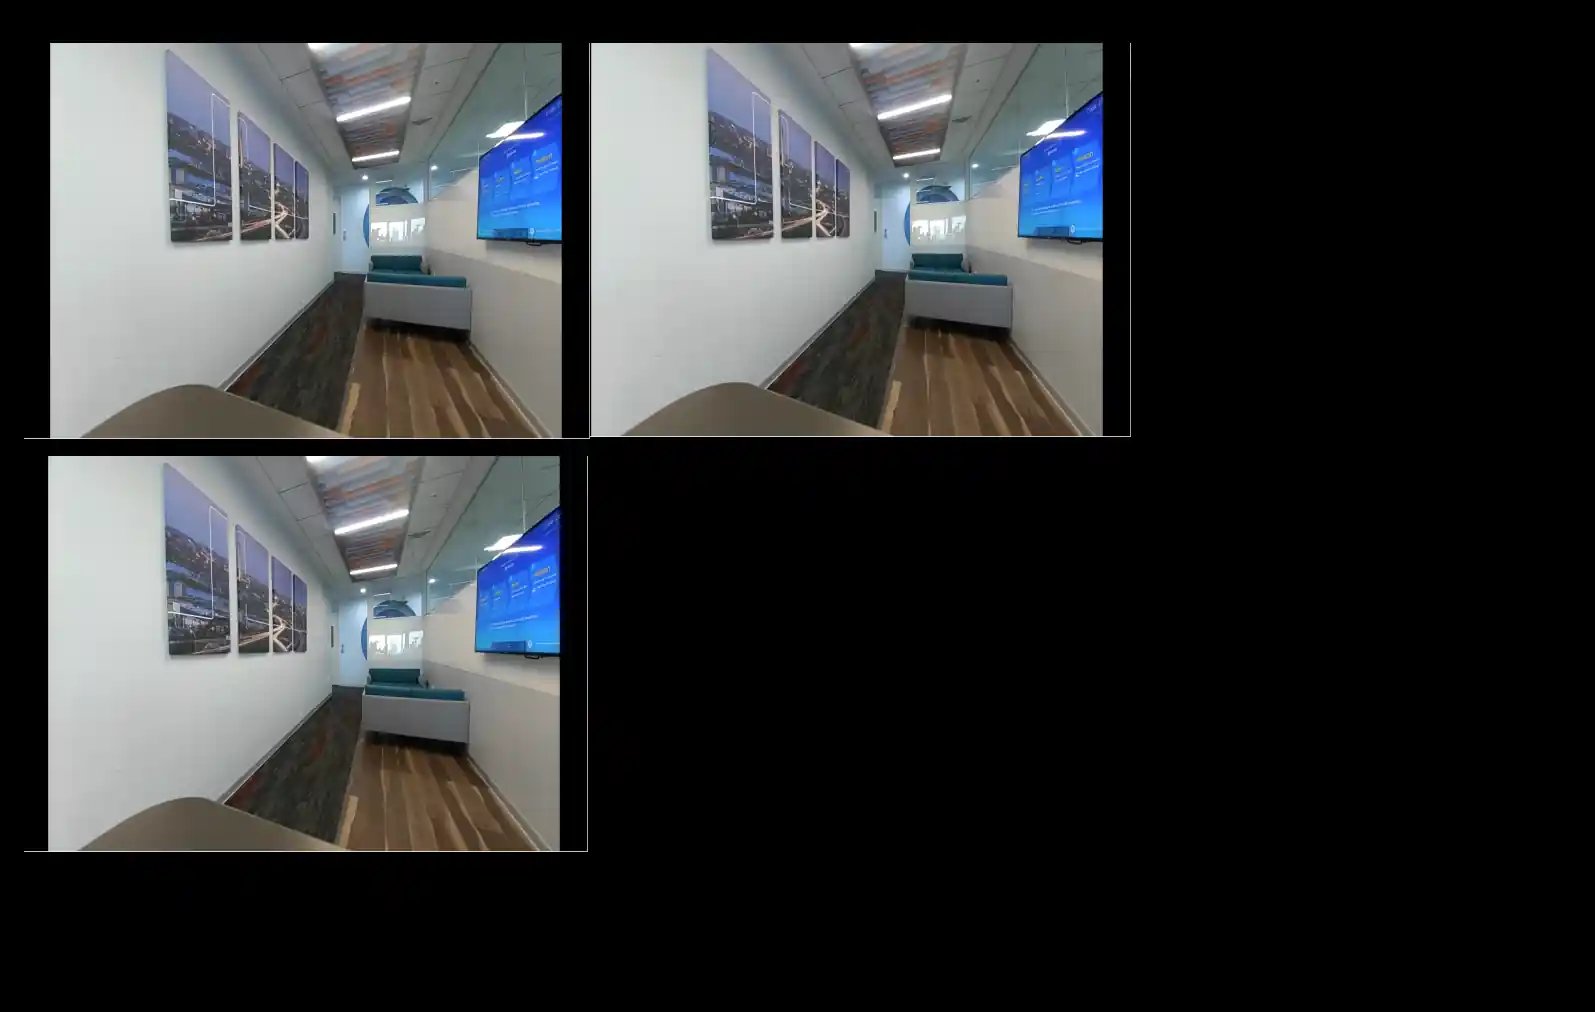
Pipeline flow
The following table lists the plugins used in the camera stream configuration pipeline:| Plugin | Description |
|---|---|
qticamsrc | Captures the video stream and feeds it into the capsfilter. |
Capsfilter | Branches the source into two separate pipelines. In one pipeline, the output is sent to waylandsink for display. In the other pipeline, the video undergoes the following: 1. Encoded using v4l2h264enc. 2. Parsed with h264parse. 3. Multiplexed into an MP4 format with mp4mux. 4. Written to a file using filesink. |
Known issue
The application doesn’t work due to video encoder issue.Camera Burst Capture
Description: The gst-camera-burst-capture-example application allows you to capture snapshots in the Burst mode. It captures five burst snapshots delayed by a 10-second timer and displays the snapshots on a screen.- They’re displayed on the screen.
- They’re encoded and saved to a file.
-
They’re saved to a buffer and based on the capture format (BAYER/RAW/JPEG), saved to the device storage.
For more information about the plugins used in the pipeline, see Pipeline flow.

gst-camera-burst-capture-example
Try me
Try me
Run the application
Complete prerequisites
In the terminal of the target device, run the respective command for any of the following use cases:
In the terminal of the target device, run the following command to display the available help options:
Expected output
- If you choose to display the stream, the snapshots are displayed on the screen.
- If you choose to encode the stream, the encoded stream is saved at
/etc/media/video_%d.mp4.
Pipeline flow
The following table lists the plugins used in the camera burst capture pipeline:| Pipeline | Description |
|---|---|
| Display preview |
|
| Encode and save to a file |
|
| BAYER/RAW/JPEG dump |
|
Known issue
The test cases for 144p and 240p resolutions are failing.RTMP Streaming
Description: The gst-rtmp-stream-example application uses the input from ISP or RTSP camera source to generate RTMP streams on a Waylandsink. You can use this application as a reference to develop and configure new applications. This application is primarily targeted for security systems and media broadcasting, where a video from RTSP source or camera source streams across a network. You can either view the stream or archive it for future review. The following figure shows the pipeline involved in RTMP streaming with different sources. For more information about the elements used in this pipeline, see Pipeline flow.
gst-rtmp-stream-example
Try me
Try me
Run the application
Complete prerequisites
In the terminal of the target device, select any of the following use cases and run the respective command:
In the terminal of the target device, run the following command to connect VLC to the stream:
rtmp://192.168.1.171/live/01 with the IP address of your device.Expected output
The output is displayed on a Waylandsink.Pipeline flow
The following table lists the plugins used in the RTMP stream pipeline:| Plugin | Description |
|---|---|
| qticamsrc |
|
| Capsfilter |
|
| v4l2h264enc |
|
| h264parse |
|
| flvmux |
|
| rtmp2sink |
|
Smart Codec
Description: The gst-smartcodec-example application reduces bandwidth and storage resources based on scene change estimate thresholds. The smart codec plugin,qtismartvencbin, uses smart fps, smart I-frame, smart bit rate, and smart ROI to do the following:
- Decrease the bit rate without compromising the quality.
- Enable efficient use of network and storage resources.

gst-smartcodec-example
Try me
Try me
Run the application
Complete prerequisites
Expected output
The application generates the output as an encoded MP4 file. The following table lists the file sizes of a 1080p video with and without smart codec. Table:Smart codec–file sizes| Smart codec | File size |
|---|---|
| Enabled | 3718 KB. |
| Disabled | 17706 KB. |
Pipeline flow
The following table lists the plugins used in the smart codec pipeline:| Plugin | Description |
|---|---|
| qticamsrc |
|
| Capsfilter |
|
GstD single camera streaming
Description: The GstD-camera-single-stream-example shows how to use a menu‑driven GstD application to create and control a single‑camera pipeline with configurable resolution. The application supports live preview, MP4 recording, and raw YUV dumping, and manages the GStreamer pipeline lifecycle cleanly for capture and archival use cases. The following figure shows the pipeline flow for various single camera stream use case. For more information, see Pipeline flow.GstD-camera-single-stream-example
Try me
Try me
Run the application
Complete prerequisites
In the terminal of the target device, select any of the following use cases and run the respective command:
/opt folder:/opt folder:In the terminal of the target device, run the following command to display the available help options:
Expected output
The following table lists the expected output based on the selected use case.| Output Type | Description |
|---|---|
| Display | Preview the camera stream on display |
| MP4 | Saves encoded video to /opt |
| YUV | Dumps raw YUV data to /opt |
| RTSP | View the stream on a remote display |
Pipeline flow
The following table lists the pipelines and their descriptions:| Pipeline | Description |
|---|---|
| Live camera preview on display | 1. qtiqmmfsrc captures the camera live stream.2. Capsfilter is applied to enforce constraints on the raw video data. 3. The data is sent to the Wayland display sink ( waylandsink) for live preview. |
| Video encoding | 1. qtiqmmfsrc captures the camera live stream.2. Capsfilter is applied to enforce constraints on the raw video data. 3. The stream is sent to ( waylandsink) for preview.4. v4l2h264enc encodes the video using the H.264 format.5. h264parse parses the encoded stream.6. mp4mux multiplexes the stream into an MP4 container.7. filesink writes the video to a file. |
| Dump the camera YUV to a filesink | 1. qtiqmmfsrc captures the camera live stream.2. Capsfilter is applied to enforce constraints on the raw video data. 3. filesink dumps the YUV data into a file. |
Dynamic configuration
A common scenario in Edge AI applications is changing the image resolution at runtime for minimal frame loss or gap in the display or adding and removing several streams for camera reconfiguration. The dynamic configuration sample applications support these runtime changes.Activate-deactivate streams at runtime
The gst-activate-deactivate-streams-runtime-example application allows you to change the resolution dynamically without the need to reconfigure the camera sensor. This application can be used in surveillance systems, videoconferencing, and broadcasting where several live streams are processed in parallel and you can control the active streams dynamically. The following figure shows the pipeline, where the application creates two streams of different resolutions, and activates and deactivates them at runtime. For information about the plugins used in this pipeline, see Pipeline flow.
gst-activate-deactivate-streams-runtime-example
Try me
Try me
Run the application
The following table lists the application use case modes. The NULL state is the initial state of a GStreamer element.| Use case mode | Description |
|---|---|
Basic | Activates or deactivates several streams without entering the NULL state. |
Full | Activates or deactivates several streams by entering the NULL state. |
Complete prerequisites
In the terminal of the target device, run the respective command for any of the following use cases. Before running the application, ensure to configure the use cases and output type parameters.
In the terminal of the target device, run the following command in the SSH shell to display the available help options:
Expected output
During the execution, the first stream is activated followed by the second stream. After a while, the streams deactivate.- If the output option is set to
Display, the output is displayed as a preview. - If the output option is set to
File, the encoded video files are generated.

Pipeline flow
The following table lists the plugins used in the gst-activate-deactivate-streams-runtime-example pipeline:| Plugin | Description |
|---|---|
qticamsrc | Captures the camera feed and sends it into the capsfilter. |
Capsfilter | Passes the feed to waylandsink for display. Passes the feed to filesink to save it to a file. |
Add-remove streams at runtime
The gst-add-remove-streams-runtime application allows you to add or remove several camera streams dynamically during runtime. The following figure shows the pipeline, which demonstrates the ability of the application to add or remove the streams at runtime with camera reconfiguration. It creates three streams and adds or removes them in different order. For information about the plugins used in the pipeline, see Pipeline flow.
gst-add-remove-streams-runtime
Try me
Try me
Run the application
Complete prerequisites
In the terminal of the target device, run the following command to verify if many streams can run simultaneously:
Use the following commands to run the application for various use cases:
In the terminal of the target device, run the following command to display the available help options:
Expected output
- If you choose to preview, the stream is displayed on the screen.
- If you choose to encode the stream, the encoded stream is saved at
/etc/media/video_%d.mp4.
Pipeline flow
The following table lists the plugins used in the gst-add-remove-streams-runtime pipeline:Plugin | Description |
|---|---|
| qticamsrc | Captures the video stream and feeds it into the capsfilter. |
| Capsfilter | Branches the source into two separate pipelines. In one pipeline, the output is sent to waylandsink for display. |
| |
|
Video and Audio Applications
Video playback
Description: The gst-video-playback-example application allows you to decode and playback a video file. The standard playback options such as play, pause, resume, and fast forward are supported. Application:gst-video-playback-example
The following figure shows the pipeline workflow of the video playback GStreamer application. The file is read,
demultiplexed, parsed, decoded, and displayed on a screen.For more information about the plugins, see pipeline flow.

Try me
Try me
Run the application
Complete prerequisites
| Command-line parameter | Description |
|---|---|
<input-file> | Specifies the MP4 input file to playback. |
<video-parser> | h264parse for H.264, h265parse for H.265. |
<video-decoder> | v4l2h264dec for H.264, v4l2h265dec for H.265. |
Expected output
The video is captured, decoded, and played on the local display.
Pipeline flow
The following table lists the plugins used to run the video playback pipeline:| Plugin | Description |
|---|---|
| filesrc |
|
| qtdemux |
|
| h264parse |
|
| h265parse |
|
| v4l2h264dec |
|
| v4l2h265dec |
|
| waylandsink |
|
Video Transcode
Description: The gst-video-transcode-example application supports video transcoding of AVC-to-HEVC or HEVC-to-AVC format. A few use cases can be video editing, security camera, and augmented reality. The following figure shows the pipeline, which reads the incoming stream, decodes and encodes it, and either displays the transcoded output on a screen, or saves it to a file. For information about the plugins used in this pipeline, see Pipeline flow
gst-video-transcode-example
Try me
Try me
Run the application
The following table lists the actions that can be performed for the common use cases of gst-videotranscode- example application:| Use case | Actions |
|---|---|
| Video editing | Rotate, flip, or resize videos. |
| Security camera | Invert or rotate the video image to compensate for situations where the camera is improperly mounted. |
| Augmented reality | Scale or rotate the video feed to synchronize with the virtual components. |
Complete prerequisites
In the terminal of the target device, transcode the video file:
| Command-line parameter | Description |
|---|---|
-1 | Specifies the absolute path to the MP4 input file. |
-c | Specifies the video codec of the input file. |
-o | Specifies the absolute path to where the transcoded MP4 file is saved. |
Run the use cases for different video formats:
- Transcode from AVC to HEVC:
- Transcode from HEVC to AVC:
Expected output
The video stream is transcoded from H.264 to H.265 and back again to the H.264 format.Pipeline flow
The following table lists the plugins used in the video transcoding pipeline:| Plugin | Description |
|---|---|
| filesrc |
|
| qtdemux |
|
| h264parse |
|
| h265parse |
|
| v4l2h264dec |
|
| v4l2h265dec |
|
| waylandsink |
|
| filesink |
|
| Plugin | Description |
|---|---|
| H.264 |
|
| H.265 |
|
Video Transform
Description: The gst-transform-example application supports rotation, flipping, and scaling operations. You can use this application for a security camera. Adjust the orientation of the displayed image using the flip and mirror operations on the CCTV camera. For more information about the transformation properties, see qtivtransform. The following figure shows the pipeline, which takes the captured video stream, transforms it, and either displays it or saves it to a file. For information about the plugins used in the pipeline, see Pipeline flow.
gst-transform-example
Try me
Try me
Complete prerequisites
In the terminal of the target device, run the following use cases to rotate, downscale, or flip the video:
- Use camera source and save output to a file.
- Use file source and save output to a file.
In the terminal of the target device, run the following command to display the available help options:
| Parameter | Description |
|---|---|
-h, --help | Help |
--output_width | Downscale/upscale width. - Default value: 1920 - Supports scaling: 1080 → 720 or 720 → 1080 |
--output_height | Downscale/upscale height. Default value: 1080 |
-o | Absolute path to generate the file |
-r | Image rotation. Supported values: 0, 90, 180, 270 |
--input_width | Camera width. Default value: 1920 |
--input_height | Camera height. Default value: 1080 |
-f | Flip the image: - 0: Don’t flip (Default) - 1: Flip horizontally - 2: Flip vertically - 3: Flip horizontally and vertically |
-I, --input_file | Absolute path of the input file. Example: -I /etc/media/inputfileh264.mp4 |
-o, --output_file | Absolute path of the output file. Example: -o /etc/media/video_transform.mp4 |
Expected output
This pipeline supports simultaneous live preview and recording of the transformed video stream. It provides two outputs:- A video recording that’s stored as an MP4 file in the specified path.
- A preview on a display device.

Pipeline flow
The following table lists the plugins used to run the video transforming pipeline:Plugins Overview
| Plugin | Description |
|---|---|
| qticamsrc and filesrc |
|
| capsfilter |
|
| qtivtransform |
|
| tee |
|
| waylandsink |
|
| h264parse |
|
| mp4mux |
|
| filesink |
|
Concurrent Playback & Composition(video wall)
The gst-concurrent-videoplay-composition application supports concurrent video playback for MP4 AVC (H.264) videos and performs composition on a video wall display. In the concurrent video playback and composition pipeline, four decode and composition pipelines run concurrently. For more information about the plugins used in this pipeline, see Pipeline flow.
gst-concurrent-videoplay-composition
Try me
Try me
Run the application
The following table lists the use cases that are supported through the gst-concurrent-videoplay-composition application:| Use case | Description |
|---|---|
| Video conferencing |
|
| Surveillance systems |
|
| Digital signage |
|
Complete prerequisites
Command-line parameters
| Parameter | Description |
|---|---|
-c | Number of streams to decode for composition. Supported values: 2, 4, 8, 16. |
-i | Absolute path to an input video file. |
Examples
-
Concurrent playback of two sessions
-
Concurrent playback of four sessions
Expected output
The individual composed streams are tiled together to display as a unified stream.
Pipeline flow
The following table lists the plugins used to run the video wall pipeline:| Plugin | Description |
|---|---|
| filesrc |
|
| qtdemux |
|
| h264parse |
|
| v4l2h264dec |
|
| qtivcomposer |
|
| waylandsink |
|
Known issue
Video playback closes or freezes. About an hour later, it continues running with 16 H.264 720p concurrent video playback sessions.Weston Composition
The gst-weston-composition-example application allows you to arrange live camera input or offline files on the screen using the picture-in-picture (PiP) or side by side display formats. A few use cases of this application are video conferencing and online educational courses. This application involves several pipelines and elements. For more information, see Pipeline flow.
gst-weston-composition-example
Try me
Try me
Run the application
The following table lists the use cases that supported through the gst-weston-composition-example application:| Use case | Description |
|---|---|
| Video conferencing | • Simultaneously displays several video streams from many participants. • Videos are displayed in either PiP or side-by-side format. • Useful in a multi-party video conference scenario where the application manages several video streams. |
| Online education | Enhances the learning experience by enabling the PiP or side-by-side display of the instructional video. |
Complete prerequisites
In the terminal of the target device, run any of the following use cases:
- Compose PiP:
- Compose side by side:
Command-line Parameters
| Command-line parameter | Description |
|---|---|
-t | Specifies the type of composition: • 0 = Picture in picture• 1 = Side by side |
-i | Specifies the absolute path to the input video file. |
Expected output
The video is rendered as PiP and side by side display on the screen.
Pipeline flow
The following table lists the plugins used to run the video composition pipeline:| Plugin | Description |
|---|---|
qticamsrc | Captures the video from a source. |
capsfilter | Filters the video file. |
filesrc | Reads the video data. |
qtdemux | Demultiplexes the video data. |
h264parse | Parses the H.264 video. |
v4l2h264dec | Decodes H.264 video from a file. |
qtivcomposer | Composes the decoded video. |
Multi format decode
Description: The gst-videocodec-concurrent-playback application supports concurrent video playback for AVC (H.264) and HEVC (H.265) videos. It demonstrates the concurrent decoding capabilities of the Qualcomm Linux video engine, which can process different video codecs simultaneously. As shown in the following figure, the sample application uses H.264 and H.265 videos, both encapsulated in MP4 containers. The pipeline involves several elements for concurrent video playback. For more information about these elements, see Pipeline flow.
gst-videocodec-concurrent-playback
Try me
Try me
Run the application
The following table lists the use cases that are supported through thegst-videocodec-concurrent-playback application:| Use case | Description |
|---|---|
| Video conferencing | • Simultaneously decodes the video streams of several participants. • Useful in a multi-party video conference scenario where the application manages several video streams. |
| Surveillance systems | Concurrently decodes video feeds from two separate cameras, each employing a different encoding method. |
Complete prerequisites
Command-line parameters
| Command-line parameter | Description |
|---|---|
-i | Specifies the absolute path to the H.264 and H.265 input video files. Ensure that the H.264 input file is specified before H.265. |
-o | Specifies the absolute path to the H.265 output YUV file. |
Expected output
- The H.264 video is displayed on the Wayland display.
- The H.265 video is written to the YUV file.
- Pull the YUV dump file from the device.
- Use a YUV player running on the host to play the video.
For example, select
YUV420planarNV12format, and use1920and1088as the stride and scan lines.
Pipeline flow
The following table lists the plugins used to run the videocodec concurrent playback pipeline:| Plugin | Description |
|---|---|
filesrc | Reads the video data. |
qtdemux | Demultiplexes the video data. |
h264parse | Parses the H.264 video stream. |
h265parse | Parses the H.265 video stream. |
v4l2h264dec | Decodes the H.264 video stream using Video4Linux. |
v4l2h265dec | Decodes the H.265 video stream using Video4Linux. |
waylandsink | Displays the H.264 video stream on Wayland display. |
filesink | Writes the H.265 video to a YUV file for playback. |
Known issues
- Video playback may not work as expected when the stream is generated from a file source.
JPEG Decode
Description: The gst-jpg-decode-example application allows you to decode JPEG images and view the decoded images on a screen. The following figure shows the pipeline for gst-jpg-decode-example. For information about the plugins used in the pipeline flow, see Pipeline flow.
gst-jpg-decode-example
Try me
Try me
Run the application
Complete prerequisites
In the terminal of the target device, run the use case. Specify the application with parameters such as width and height.
Expected output
The decoded image is displayed on the screen for preview.Pipeline flow
The following table lists the plugins used to run the decode JPEG images pipeline:| Plugin | Description |
|---|---|
| multifilesrc |
|
| capsfilter |
|
| jpegdec |
|
| videoconvert |
|
| waylandsink |
|
Audio Playback
Description: The gst-audio-decode-example application demonstrates the playback of audio files in WAV, MP3, and FLAC formats. Separate pipelines for each audio format ensure efficient processing and compatibility. This sample application provides a basic template that can be extended and adapted. The following figure shows the pipeline, which reads and parses the audio file, and then decodes and plays the audio. For information about the plugins used in the pipeline, see Pipeline flow.
gst-audio-decode-example
Try me
Try me
Run the application
Complete prerequisites
<filename>.mp3, <filename>.wav, or <filename>.flac.Command-line parameters
| Command-line parameter | Description |
|---|---|
-i | Specifies the absolute path to the input audio file to decode. |
--audio_format | Specifies the format of the audio file: • 1 = MP3• 2 = WAV• 3 = FLAC |
-
Decode MP3:
-
Decode WAV:
-
Decode FLAC:
Expected output
Based on the selected format (MP3, WAV, or FLAC), the decoded audio file is played back.Pipeline flow
The following table lists the plugins used to run the audio decode pipeline:| Plugin | Description |
|---|---|
| filesrc | Reads the audio files. |
| mpegaudioparse | Parses MPEG audio files. |
| wavparse | Parses WAV audio files. |
| flacparse | Parses FLAC audio files. |
| mpg123audiodec | Decodes MP3 files. |
| flacdec | Decodes FLAC files. |
| pulsesink | Plays the decoded audio. |
Known issues
- Audio playback may not work if the audio sink isn’t selected using wpctl.
Audio Encode
Description: The gst-audio-encode-example application encodes audio in FLAC or WAV format. A common use case for this application can be to encode live audio data for streaming or storage. The following figure shows the pipeline, which captures the audio, converts the stream into FLAC or WAV formats, encodes the stream, and stores it in a file. For more information about the plugins used in the pipeline, see Pipeline flow.
gst-audio-encode-example
Try me
Try me
Run the application
For this use case, if you have a live audio source (such as a microphone or an internet radio stream), you can encode this audio data into a more compact or standardized format for efficient transmission or storage.Complete prerequisites
Command-line parameters
| Command-line parameter | Description |
|---|---|
-o | Specifies the absolute path to the output audio file. |
--audio_format | Specifies the format of the audio file: • 1 = FLAC• 2 = WAV |
- Encode FLAC audio:
- Encode WAV audio:
Expected output
The captured audio is encoded and written to a file based on the selected format (FLAC or WAV).Pipeline flow
In audio encoding, the pipeline differs slightly based on the encoding format. The following table lists the plugins used to run the audio recording pipeline:| Plugin | Description |
|---|---|
| pulsesrc | Captures audio from the system sound device. |
| capsfilter | Ensures that the audio is in a format suitable for the encoder. |
| audioconvert | Converts the audio to the required format. |
| flacenc | Encodes audio into FLAC format. |
| wavenc | Encodes audio into WAV format. |
| filesink | Writes the encoded audio to a file. |
Known issues
- Audio encode may not work if the audio sink is not selected using wpctl.
Audio-Video Encode
Description: The gst-audio-video-encode application encodes audio and video data, which is stored in a user-specified output file. A few use cases for this application are streaming services, video conferencing, and surveillance systems. The following figure shows the pipeline, which receives the video and audio feed, encodes, and parses the video stream. It then captures the audio stream and encodes it in MP3 format. Both streams are multiplexed and written to a file. For information about the plugins used in the pipeline, see Pipeline flow.
gst-audio-video-encode
Try me
Try me
Run the application
The following table lists the actions that can be performed for common use cases of thegst-audio-video-encode
application:| Use case | Actions |
|---|---|
| Streaming services | Encode audio and video streams for live internet streaming. |
| Security camera | Invert or rotate the video image to compensate for situations where the camera is improperly mounted. |
| Augmented reality | Scale or rotate the video feed to synchronize with virtual components. |
Complete prerequisites
Command-line parameters
| Command-line parameter | Description |
|---|---|
-w | Specifies the camera width. |
-h | Specifies the camera height. |
-c | Specifies the video codec: • 1 = AVC (H.264)• 2 = HEVC (H.265) |
-o | Provides the absolute path to the output file. |
- AVC:
- HEVC:
Expected output
The encoded audio and video streams are multiplexed into an MP4 container and written to a file.Pipeline flow
The following table lists the plugins used to run the audio and video stream encoding pipeline:| Plugin | Description |
|---|---|
qticamsrc and capsfilter | Captures the media stream. |
v4l2h264enc | Encodes video for AVC (H.264) format. |
v4l2h265enc | Encodes video for HEVC (H.265) format. |
h264parse | Parses the H.264 video stream. |
h265parse | Parses the H.265 video stream. |
pulsesrc | Captures the audio stream, filtered using capsfilter. |
audioconvert | Converts the audio for encoding. |
lamemp3enc | Encodes the audio in MP3 format. |
mp4mux | Multiplexes encoded video and audio into an MP4 container. |
filesink | Writes the stream into a file. |
Known issues
- Audio and video encode may not work if the sink is not selected using wpctl.
Audio-Video Playback
The gst-audio-video-playback application supports simultaneous audio and video decoding and playback of FLAC/MP3 audio and AVC/HEVC video. The following are the applicable scenarios to use the gst-audio-video-playback application:- Media player applications
- Streaming services
- Video conferencing
- Surveillance systems
- Educational platforms
- Entertainment platforms that can play back audio and video files in various formats

gst-audio-video-playback
Try me
Try me
Run the application
Complete prerequisites
<avc_flac_file>.mp4, <hevc_flac_file>.mp4, <avc_mp3_file>.mp4, and <hevc_mp3_file>.mp4.Command-line parameters
| Command-line parameter | Description |
|---|---|
-v | Specifies the video codec:1 = AVC (H.264)2 = HEVC (H.265) |
-a | Specifies the audio codec:1 = FLAC2 = MP3 |
-i | Specifies the absolute path to the MP4 input file. |
- AVC video with FLAC audio:
- AVC video with MP3 audio:
- HEVC video with FLAC audio:
- HEVC video with MP3 audio:
Expected output
- The AVC/HEVC video is displayed on the screen.
- The audio plays through the device speaker.
Pipeline flow
The following table lists the plugins used to run the audio-video playback pipeline:| Plugin | Description |
|---|---|
filesrc | Reads the video data. |
qtdemux | Demultiplexes the video data into separate audio and video streams. |
h264parse | Parses the H.264 video stream. |
h265parse | Parses the H.265 video stream. |
v4l2h264dec | Decodes the H.264 video stream. |
v4l2h265dec | Decodes the H.265 video stream. |
waylandsink | Displays the video stream on Wayland display. |
flacparse or mpegaudioparse | Parses the audio stream. |
flacdec or mpg123audiodec | Decodes the audio stream. |
pulsesink | Allows playback of the audio stream. |
Known issues
- Audio and video playback may not work if the sink is not selected using wpctl.