> ## Documentation Index
> Fetch the complete documentation index at: https://dragonwingdocs.qualcomm.com/llms.txt
> Use this file to discover all available pages before exploring further.

# Experience remote assistant in the simulator with simulation_remote_assistant

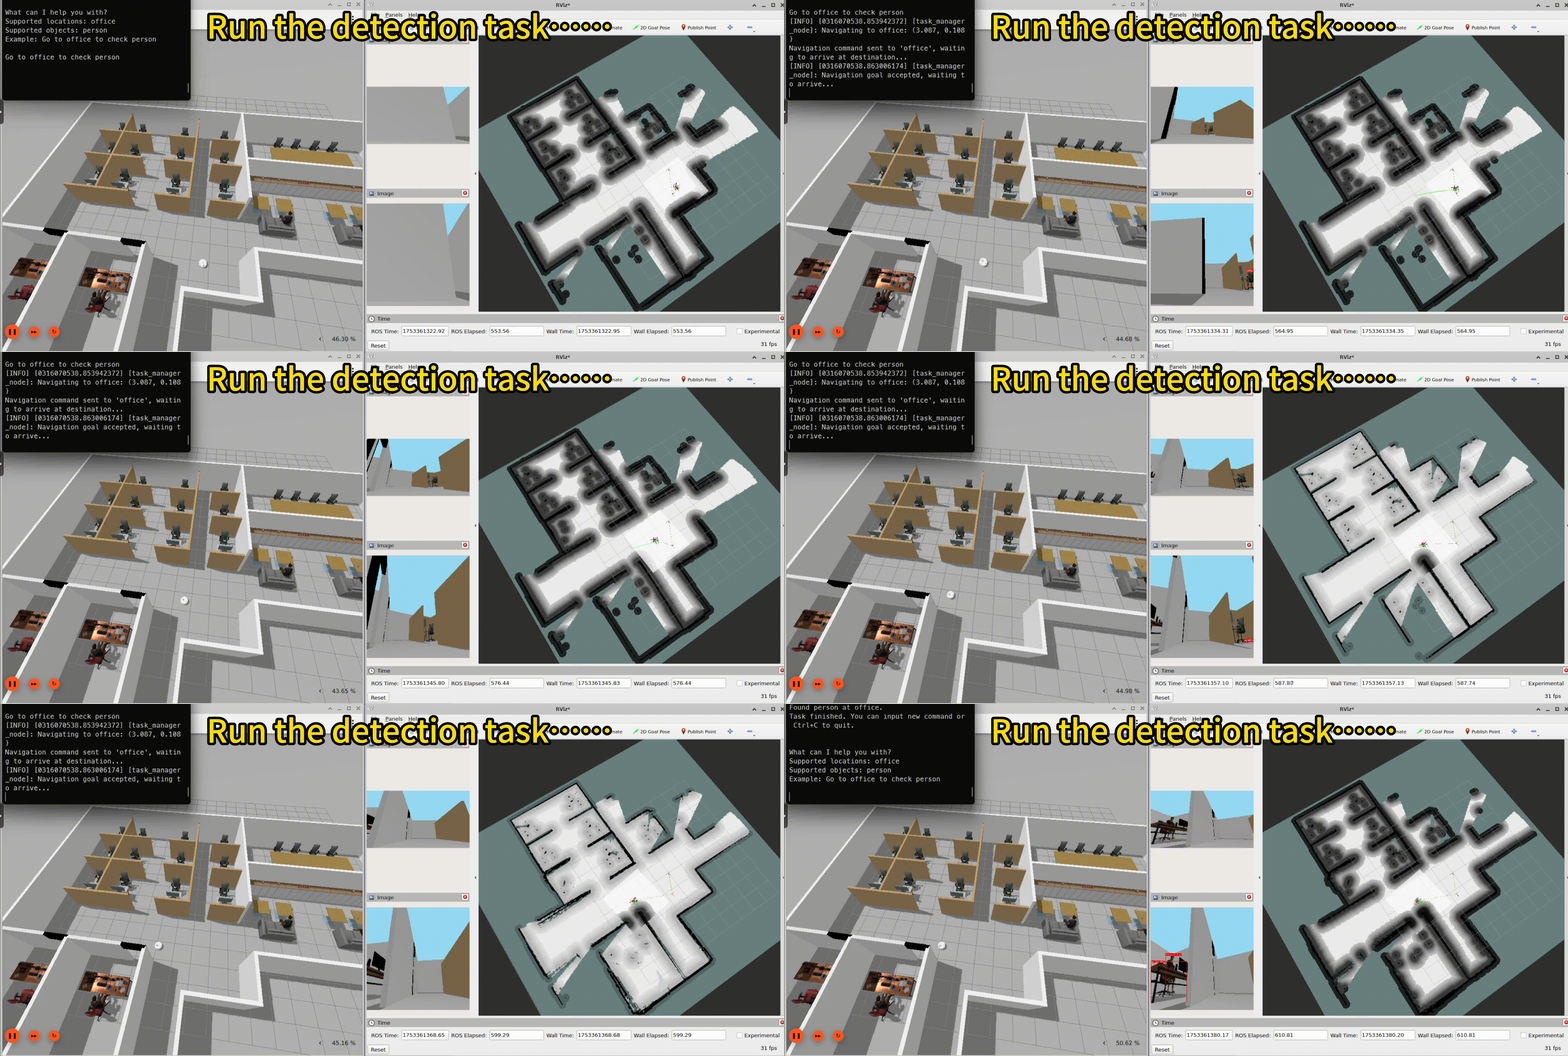
The `simulation_remote_assistant` sample application is the ROS package that uses an AMR as a remote assistant within a virtual office environment. Users can interact with the robot by inputting natural language commands, such as "Go to the office to check the person." The robot can autonomously navigate to the specified location and perform object detection tasks as instructed.

<Note>
  **Note**

  For more information, see [simulation\_remote\_assistant](https://github.com/qualcomm-qrb-ros/qrb_ros_samples/tree/main/robotics/simulation_remote_assistant) on GitHub.
</Note>

<img
  src="https://mintcdn.com/qualcomm-prod/BUW_rqJcTn92gBMR/SDKs/QIR-SDK-2.0/media/80-65220-2-qirp-sdk-qsg/simulation_remote_assistant_detection.gif?s=82c257e3ea16d56534d273e76e2c4357"
  style={{
width: "70%",
display: "block",
margin: "0 auto" }}
  width="2400"
  height="1080"
  data-path="SDKs/QIR-SDK-2.0/media/80-65220-2-qirp-sdk-qsg/simulation_remote_assistant_detection.gif"
/>

<p style={{ textAlign: 'center', fontWeight: 'bold' }}>
  Figure: Sample effects of `simulation_remote_assistant`
</p>

## Pipeline flow for Simulation Remote Assistant

<img
  src="https://mintcdn.com/qualcomm-prod/IP0o0G5fE3MFmCJ8/SDKs/QIR-SDK-2.0/media/80-65220-2-qirp-sdk-qsg/ga1.6-remote-assistant-sim.svg?fit=max&auto=format&n=IP0o0G5fE3MFmCJ8&q=85&s=d94eaf3ed95f96e63ec54981d56effcb"
  style={{
width: "70%",
display: "block",
margin: "0 auto" }}
  width="2002"
  height="2132"
  data-path="SDKs/QIR-SDK-2.0/media/80-65220-2-qirp-sdk-qsg/ga1.6-remote-assistant-sim.svg"
/>

<p style={{ textAlign: 'center', fontWeight: 'bold' }}>
  Figure: Pipeline flow for `simulation_remote_assistant`
</p>

## ROS nodes used in the simulation\_remote\_assistant pipeline

<table>
  <thead>
    <tr>
      <th style={{ width: '30%' }}>ROS node</th>
      <th style={{ width: '70%' }}>Description</th>
    </tr>
  </thead>

  <tbody>
    <tr>
      <td>`qrb_ros_simulation`</td>
      <td>`qrb_ros_simulation` is a ROS package that sets up the Qualcomm robotic simulation environment. For details, see [QRB ROS Simulation](https://github.com/qualcomm-qrb-ros/qrb_ros_simulation).</td>
    </tr>

    <tr>
      <td>`nn_inference_node`</td>
      <td>Loads a trained AI model, receives preprocessed images, performs inference, and publishes results. For details, see [NN Inference Node](https://github.com/qualcomm-qrb-ros/qrb_ros_nn_inference).</td>
    </tr>

    <tr>
      <td>`yolo_preprocess_node`</td>
      <td rowSpan={3}>Executes preprocess and postprocess for Yolo model. For details, see [QRB ROS Tensor Process](https://github.com/qualcomm-qrb-ros/qrb_ros_tensor_process).</td>
    </tr>

    <tr>
      <td>`yolo_detection_postprocess_node`</td>
    </tr>

    <tr>
      <td>`yolo_detection_overlay_node`</td>
    </tr>

    <tr>
      <td>`cartographer_node`</td>
      <td>Processes sensor data to perform SLAM.</td>
    </tr>

    <tr>
      <td>`cartographer_occupancy_grid_node`</td>
      <td>Publishes a ROS occupancy grid map.</td>
    </tr>

    <tr>
      <td>`nav2_bringup`</td>
      <td>The Navigation2 stack for robot navigation.</td>
    </tr>

    <tr>
      <td>`build_map_node`</td>
      <td>Builds the map of office world.</td>
    </tr>

    <tr>
      <td>`nav_preparation_node`</td>
      <td>Relocalization and launches the navigation node.</td>
    </tr>

    <tr>
      <td>`task_manager_node`</td>
      <td>Parses the input commands and executes the action.</td>
    </tr>
  </tbody>
</table>

## ROS topics used in the Simulation Remote Assistant pipeline

<table>
  <thead>
    <tr>
      <th style={{ width: '20%' }}>ROS topic</th>
      <th style={{ width: '30%' }}>Type</th>
      <th style={{ width: '20%' }}>Published by</th>
      <th style={{ width: '30%' }}>Description</th>
    </tr>
  </thead>

  <tbody>
    <tr>
      <td>`/scan`</td>
      <td>`sensor_msgs::msg::LaserScan`</td>
      <td>`qrb_ros_simulation`</td>
      <td>2D lidar scan data for SLAM and mapping.</td>
    </tr>

    <tr>
      <td>`/map`</td>
      <td>`nav_msgs::msg::OccupancyGrid`</td>
      <td>`cartographer_occupancy_grid_node`</td>
      <td>Occupancy grid map for navigation.</td>
    </tr>

    <tr>
      <td>`/tf`</td>
      <td>`tf2_msgs::msg::TFMessage`</td>
      <td>`qrb_ros_simulation` / `cartographer_node`</td>
      <td>Frame transforms between coordinate systems.</td>
    </tr>

    <tr>
      <td>`/odom`</td>
      <td>`nav_msgs::msg::Odometry`</td>
      <td>`qrb_ros_simulation`</td>
      <td>Odometry data for pose estimation.</td>
    </tr>

    <tr>
      <td>`/cmd_vel`</td>
      <td>`geometry_msgs::msg::Twist`</td>
      <td>`qrb_ros_simulation`</td>
      <td>Velocity commands for robot motion.</td>
    </tr>

    <tr>
      <td>`/goal_pose`</td>
      <td>`geometry_msgs::msg::PoseStamped`</td>
      <td>`task_manager_node`</td>
      <td>Target goal pose for navigation.</td>
    </tr>

    <tr>
      <td>`/camera/color/image_raw`</td>
      <td>`sensor_msgs::msg::Image`</td>
      <td>`qrb_ros_simulation`</td>
      <td>RGB image from the simulation camera.</td>
    </tr>

    <tr>
      <td>`/qrb_inference_input_tensor`</td>
      <td>`qrb_ros_tensor_list_msgs::msg::TensorList`</td>
      <td>`yolo_preprocess_node`</td>
      <td>Preprocessed input tensor for inference.</td>
    </tr>

    <tr>
      <td>`/yolo_detect_tensor_output`</td>
      <td>`qrb_ros_tensor_list_msgs::msg::TensorList`</td>
      <td>`nn_inference_node`</td>
      <td>Inference output tensor for detection.</td>
    </tr>

    <tr>
      <td>`/yolo_detect_result`</td>
      <td>`vision_msgs::msg::Detection2DArray`</td>
      <td>`yolo_detection_postprocess_node`</td>
      <td>The detected objects as 2D bounding-box results.</td>
    </tr>

    <tr>
      <td>`/yolo_detect_overlay`</td>
      <td>`sensor_msgs::msg::Image`</td>
      <td>`yolo_detection_overlay_node`</td>
      <td>The detection overlay image with bounding boxes.</td>
    </tr>
  </tbody>
</table>

## Prerequisites

* You have completed the following settings in [Set up the environment for running sample applications](./set-up-env-for-sample-app) (Skip the settings of **Set up host docker**).
  * Set up the device
  * Set up the host computer
* Follow the steps in [Generate YOLOv8 model using QAIHUB](https://github.com/qualcomm-qrb-ros/qrb_ros_tensor_process/tree/main/cv_tensor_process/yolo_v8_process#1-generate-yolov8-model-using-qaihub:~:text=Generate%20YOLOv8%20model%20using%20QAIHUB) to generate the model files and download the [coco-labels](https://github.com/ultralytics/ultralytics/blob/main/ultralytics/cfg/datasets/coco8.yaml) YAML file. Then, push them to the `/opt/model/` directory on the device.
  ```powershell theme={null}
  mkdir /opt/model/
  mv coco8.yaml yolov8_det_qcs9075.bin yolov8_det_qcs8275.bin /opt/model/
  ```

## Set up the simulation environment

1. On your host computer, complete the following to build the Qualcomm robotic simulation environment according to the **README** of [QRB ROS Simulation](https://github.com/qualcomm-qrb-ros/qrb_ros_simulation). Ensure that the device and the host are on the same local network and can communicate with each other through ROS communication.
   1. Set up development environment on Ubuntu24.04 host or Docker.
   2. Build from source.
2. On the host, run the `QRB Robot Base AMR` in the simulated office world.
   ```cpp theme={null}
   # Set the ROS_DOMAIN_ID
   export ROS_DOMAIN_ID=78
   ros2 launch qrb_ros_sim_gazebo gazebo_robot_base_mini.launch.py \
   world_model:=office \
   initial_x:=1.0 \
   initial_y:=6.0 \
   enable_depth_camera:=false
   ```

## Run out-of-the-box `simulation_remote_assistant`

On the development kit, run the following commands:

```python theme={null}
# setup runtime environment
(ssh) mount -o remount rw /usr
(ssh) source /opt/ros/jazzy/setup.bash
(ssh) export ROS_DOMAIN_ID=78

# In /opt/ros/jazzy/share/nav2_bringup/params/nav2_params.yaml,
# change nav2_mppi_controller::MPPIController to nav2_graceful_controller::GracefulController.

# launch the map_nav_setup.launch.py for auto mapping
(ssh) ros2 launch simulation_remote_assistant map_nav_setup.launch.py

# launch the yolo_detectcion.launch.py
# qcs9075 RB8 bin htp
(ssh) ros2 launch simulation_remote_assistant yolo_detectcion.launch.py model:=/opt/model/yolov8_det_qcs9075.bin backend_option:=libQnnHtp.so label_file:=/opt/model/coco8.yaml
# qcs8275 RB4 bin htp
(ssh) ros2 launch simulation_remote_assistant yolo_detectcion.launch.py model:=/opt/model/yolov8_det_qcs8275.bin backend_option:=libQnnHtp.so label_file:=/opt/model/coco8.yaml


# launch the task_manager node
(ssh) ros2 run simulation_remote_assistant task_manager_node

# input the fix commands in the task_manager_node terminal like
(ssh) Go to office to check person
```

## Build and run `simulation_remote_assistant`

1. In a terminal of the host computer, run the following commands:

   <Note>
     **Note**

     * `<qir_version>`: Version of the QIR SDK, see [QIR SDK 2.0 Release Notes](../../Key-Documents/QIR-SDK-Release-Notes/robotics-sdk-qli2.0-062026).
     * `<qir_decompressed_path>`: The path where the QIR SDK is decompressed.
   </Note>

   1. Build the sample application project.
      ````powershell theme={null}
      # set up the QIR SDK environment
      cd <decompressed_workspace>/target/qcs6490-rb3gen2-vision-kit/qirpsdk_artifacts/qcs6490-rb3gen2-vision-kit
      tar -zxf qirp-sdk_<qir_version>.tar.gz
      cd <qir_decompressed_path>/qirp-sdk
      source setup.sh
      # build sample
      cd <qir_decompressed_path>/qirp-sdk/qirp-samples/robotics/simulation_remote_assistant
      > colcon build
      > ```
      ````
   2. Package and push the sample application to the device.
      ```powershell theme={null}
      # package and push build result of sample
      cd <qir_decompressed_path>/qirp-sdk/qirp-amples/robotics/simulation_remote_assistant/install/simulation_remote_assistant
      tar -czf simulation_remote_assistant.tar.gz lib share
      scp simulation_remote_assistant.tar.gz root@[ip-addr]:/opt/
      ```
2. On the development kit, run the following commands:
   1. Install the sample application.
      ```python theme={null}
      # install sample package
      (ssh) tar --no-overwrite-dir --no-same-owner -zxf /opt/simulation_remote_assistant.tar.gz -C /usr/ros/jazzy/
      ```
   2. Run the sample application with the steps in [Run out-of-the-box simulation\_remote\_assistant](#run-out-of-the-box-simulation_remote_assistant).
