> ## Documentation Index
> Fetch the complete documentation index at: https://dragonwingdocs.qualcomm.com/llms.txt
> Use this file to discover all available pages before exploring further.
# Classify images with sample_resnet101
> The sample_resnet101 is a Python-based ROS node that performs image classification using QNN-based inference.
The following figure shows an example image classification result.
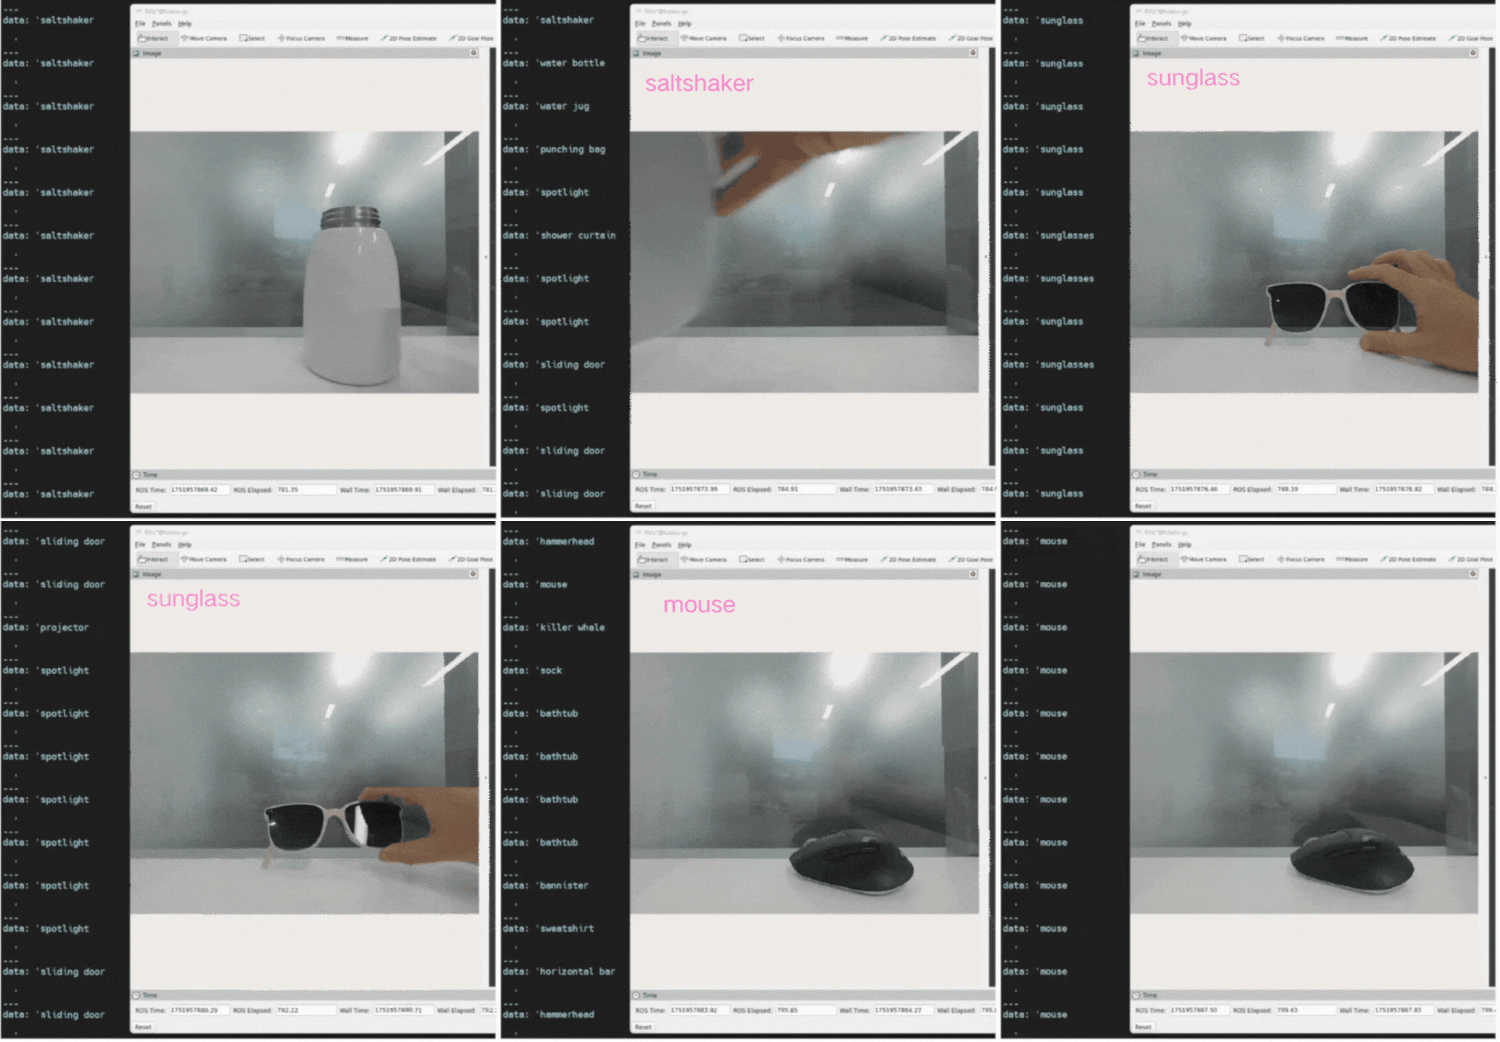 [ResNet101](https://huggingface.co/qualcomm/ResNet101) is a machine learning model that can classify images from the ImageNet data set. It can also be used as a base network in building more complex models for specific use cases.
## Image classification pipeline flow
The following figure shows the pipeline flow for the image classification sample application.
[ResNet101](https://huggingface.co/qualcomm/ResNet101) is a machine learning model that can classify images from the ImageNet data set. It can also be used as a base network in building more complex models for specific use cases.
## Image classification pipeline flow
The following figure shows the pipeline flow for the image classification sample application.
 ## ROS nodes used in the image classification pipeline
The following table lists the ROS nodes used in the image classification pipeline.
| Node name | Description |
| -------------------------------------------------------------------------------- | ------------------------------------------------------------------------------------------------------------------ |
| [qrb ros camera](https://github.com/qualcomm-qrb-ros/qrb_ros_camera) | Qualcomm ROS 2 package that captures images with parameters and publishes them to ROS topics. |
| Image publisher | Publishes image data to a ROS topic—can be camera frames, local files, or processed outputs. |
| Image classification preprocess | Subscribes to image data, reshapes and resizes it, and republishes it to a downstream topic. |
| [qrb ros nn interface](https://github.com/qualcomm-qrb-ros/qrb_ros_nn_inference) | Loads a trained AI model, receives preprocessed images, performs inference, and publishes results. |
| Image classification postprocess | Transforms raw inference outputs into human-readable results by mapping predicted indices to corresponding labels. |
## ROS topics used in the image classification pipeline
The following table lists the ROS topics used in the image classification pipeline.
| ROS topic | Type | Description |
| ------------------------------ | ------------------------------------------- | ------------------------------------------- |
| `/image_raw` | `` | Publishes image information. |
| `/qrb_inference_input_tensor` | `` | Preprocesses messages. |
| `/qrb_inference_output_tensor` | `` | This is the nn interface result with model. |
| `/resnet101_results` | `` | This is the model output label. |
## Prerequisites
You have set up the device, installed ROS2 Jazzy and Qualcomm Intelligent Robotics (QIR) SDK on the device according to [Install the QIR SDK](./install-the-qir-sdk).
## Run out-of-the-box image classification
```bash Install the packages theme={null}
sudo apt install ros-jazzy-sample-resnet101
```
```bash Launch the sample application theme={null}
source /opt/ros/jazzy/setup.bash
ros2 launch sample_resnet101 launch_with_image_publisher.py
or # You can also replace this with a custom image file
ros2 launch sample_resnet101 launch_with_image_publisher.py image_path:=
or # You can launch with qrb ros camera
ros2 launch sample_resnet101 launch_with_qrb_ros_camera.py
```
The `launch_with_image_publisher.py` launch script uses the default parameters:
```python theme={null}
DeclareLaunchArgument(
'image_path',
default_value=os.path.join(package_path, 'glasses.jpg'),
description='Path to the image file'
)
# Node for image_publisher
image_publisher_node = Node(
package='image_publisher',
executable='image_publisher_node',
namespace=namespace,
name='image_publisher_node',
output='screen',
parameters=[
{'filename': image_path},
{'rate': 10.0}, # Set the publishing rate to 10 Hz
]
)
```
a. It sends the `local glasses.jpg` file, and outputs the image at 10 Hz.
b. Then, you can check ROS topics with the `name/resnet101_output` in another shell terminal.
```bash theme={null}
ros2 topic echo /resnet101_output
```
```yaml Output theme={null}
data: 'sunglass
```
## Build from the source of image classification
Build the image classification sample from source when you need to change the sample code. The device steps install the dependencies, clone the source repository, and build the package.
### Device steps
```bash Install the dependencies theme={null}
sudo apt install ros-jazzy-rclpy \
ros-jazzy-sensor-msgs \
ros-jazzy-std-msgs \
ros-jazzy-cv-bridge \
ros-jazzy-ament-index-python \
ros-jazzy-qrb-ros-tensor-list-msgs \
python3-opencv \
python3-numpy \
ros-jazzy-image-publisher \
ros-jazzy-qrb-ros-nn-inference \
ros-jazzy-qrb-ros-camera \
ros-jazzy-image-publisher
```
```bash theme={null}
mkdir -p ~/qrb_ros_ws/src && cd ~/qrb_ros_ws/src
git clone https://github.com/qualcomm-qrb-ros/qrb_ros_samples.git
```
```bash Build the sample application theme={null}
cd ~/qrb_ros_ws/src/qrb_ros_samples/ai_vision/sample_resnet101
colcon build
source install/setup.bash
```
Run and test according to step 2 of [Run out-of-the-box image classification](./classify-images-with-sample_resnet101#run-out-of-the-box-image-classification).
## ROS nodes used in the image classification pipeline
The following table lists the ROS nodes used in the image classification pipeline.
| Node name | Description |
| -------------------------------------------------------------------------------- | ------------------------------------------------------------------------------------------------------------------ |
| [qrb ros camera](https://github.com/qualcomm-qrb-ros/qrb_ros_camera) | Qualcomm ROS 2 package that captures images with parameters and publishes them to ROS topics. |
| Image publisher | Publishes image data to a ROS topic—can be camera frames, local files, or processed outputs. |
| Image classification preprocess | Subscribes to image data, reshapes and resizes it, and republishes it to a downstream topic. |
| [qrb ros nn interface](https://github.com/qualcomm-qrb-ros/qrb_ros_nn_inference) | Loads a trained AI model, receives preprocessed images, performs inference, and publishes results. |
| Image classification postprocess | Transforms raw inference outputs into human-readable results by mapping predicted indices to corresponding labels. |
## ROS topics used in the image classification pipeline
The following table lists the ROS topics used in the image classification pipeline.
| ROS topic | Type | Description |
| ------------------------------ | ------------------------------------------- | ------------------------------------------- |
| `/image_raw` | `` | Publishes image information. |
| `/qrb_inference_input_tensor` | `` | Preprocesses messages. |
| `/qrb_inference_output_tensor` | `` | This is the nn interface result with model. |
| `/resnet101_results` | `` | This is the model output label. |
## Prerequisites
You have set up the device, installed ROS2 Jazzy and Qualcomm Intelligent Robotics (QIR) SDK on the device according to [Install the QIR SDK](./install-the-qir-sdk).
## Run out-of-the-box image classification
```bash Install the packages theme={null}
sudo apt install ros-jazzy-sample-resnet101
```
```bash Launch the sample application theme={null}
source /opt/ros/jazzy/setup.bash
ros2 launch sample_resnet101 launch_with_image_publisher.py
or # You can also replace this with a custom image file
ros2 launch sample_resnet101 launch_with_image_publisher.py image_path:=
or # You can launch with qrb ros camera
ros2 launch sample_resnet101 launch_with_qrb_ros_camera.py
```
The `launch_with_image_publisher.py` launch script uses the default parameters:
```python theme={null}
DeclareLaunchArgument(
'image_path',
default_value=os.path.join(package_path, 'glasses.jpg'),
description='Path to the image file'
)
# Node for image_publisher
image_publisher_node = Node(
package='image_publisher',
executable='image_publisher_node',
namespace=namespace,
name='image_publisher_node',
output='screen',
parameters=[
{'filename': image_path},
{'rate': 10.0}, # Set the publishing rate to 10 Hz
]
)
```
a. It sends the `local glasses.jpg` file, and outputs the image at 10 Hz.
b. Then, you can check ROS topics with the `name/resnet101_output` in another shell terminal.
```bash theme={null}
ros2 topic echo /resnet101_output
```
```yaml Output theme={null}
data: 'sunglass
```
## Build from the source of image classification
Build the image classification sample from source when you need to change the sample code. The device steps install the dependencies, clone the source repository, and build the package.
### Device steps
```bash Install the dependencies theme={null}
sudo apt install ros-jazzy-rclpy \
ros-jazzy-sensor-msgs \
ros-jazzy-std-msgs \
ros-jazzy-cv-bridge \
ros-jazzy-ament-index-python \
ros-jazzy-qrb-ros-tensor-list-msgs \
python3-opencv \
python3-numpy \
ros-jazzy-image-publisher \
ros-jazzy-qrb-ros-nn-inference \
ros-jazzy-qrb-ros-camera \
ros-jazzy-image-publisher
```
```bash theme={null}
mkdir -p ~/qrb_ros_ws/src && cd ~/qrb_ros_ws/src
git clone https://github.com/qualcomm-qrb-ros/qrb_ros_samples.git
```
```bash Build the sample application theme={null}
cd ~/qrb_ros_ws/src/qrb_ros_samples/ai_vision/sample_resnet101
colcon build
source install/setup.bash
```
Run and test according to step 2 of [Run out-of-the-box image classification](./classify-images-with-sample_resnet101#run-out-of-the-box-image-classification).