> ## Documentation Index
> Fetch the complete documentation index at: https://dragonwingdocs.qualcomm.com/llms.txt
> Use this file to discover all available pages before exploring further.
# Estimate image depth values with sample_depth_estimation
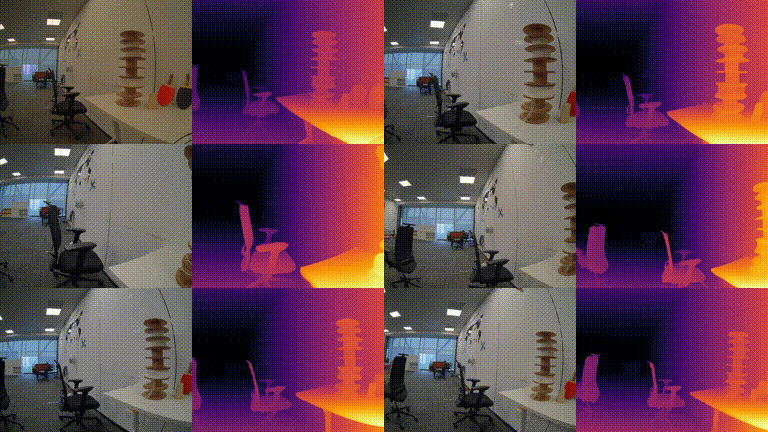
> This sample application allows you to input an RGB image named input_image.jpg or subscribe to the ROS topic /cam0_stream1 from qrb_ro_camera. It then uses QNN to perform model inference and publishes the result as the /depth_map ROS topic containing per-pixel depth values.
The `sample_depth_estimation` sample application takes an RGB image named `input_image.jpg` or the `/cam0_stream1` ROS topic from `qrb_ros_camera`. It runs model inference with the [Qualcomm AI Engine Direct SDK (QNN)](https://www.qualcomm.com/developer/software/qualcomm-ai-engine-direct-sdk) and publishes the result as the `/depth_map` ROS topic containing per-pixel depth values.
The model has its source from [Depth Anything V2](https://aihub.qualcomm.com/iot/models/depth_anything_v2?searchTerm=depth\&domain=Computer+Vision), a deep convolutional neural network model for depth estimation.
The following figure shows an example depth estimation result.
 ## `sample_depth_estimation` pipeline flow
The following figure shows the pipeline flow for `sample_depth_estimation`.
## `sample_depth_estimation` pipeline flow
The following figure shows the pipeline flow for `sample_depth_estimation`.
 ## ROS nodes used in `sample_depth_estimation`
The following table lists the ROS nodes used in `sample_depth_estimation`.
| Node name | Description |
| -------------------------------------------------------------------------------- | ------------------------------------------------------------------------------------------------------------------------------------------- |
| [qrb ros camera](https://github.com/qualcomm-qrb-ros/qrb_ros_camera) | Qualcomm ROS 2 package that captures images with parameters and publishes them to ROS topics. |
| Image publisher | Publishes image data to a ROS topic—can be camera frames, local files, or processed outputs. |
| Sample depth estimation | Subscribes to input images for preprocessing, then performs postprocessing on the output tensor published by the qrb ros nn interface node. |
| [qrb ros nn interface](https://github.com/qualcomm-qrb-ros/qrb_ros_nn_inference) | Loads a trained AI model, receives preprocessed images, performs inference, and publishes results. |
## ROS topics used in `sample_depth_estimation`
The following table lists the ROS topics used in `sample_depth_estimation`.
| ROS topic | Type | Description |
| ------------------------------ | ------------------------------------------- | ------------------------------------------- |
| `/image_raw` | `` | Published image information. |
| `/qrb_inference_input_tensor` | `` | Preprocessed message. |
| `/qrb_inference_output_tensor` | `` | Neural network interface result with model. |
| `/depth_map` | `` | Depth map result. |
## Prerequisites
You have set up the device, installed ROS2 Jazzy and Qualcomm Intelligent Robotics (QIR) SDK on the device according to [Install the QIR SDK](./install-the-qir-sdk).
## Build from the source of `sample_depth_estimation`
Build `sample_depth_estimation` from source when you need to change the sample code. The device steps install the dependencies, clone the source repository, and build the package.
### Device steps
```bash Download the model theme={null}
sudo mkdir -p /opt/model && cd /opt/model
sudo wget https://huggingface.co/qualcomm/Depth-Anything-V2/resolve/19ce3645e11de17eed7e869eebcc07dd352834f3/Depth-Anything-V2.bin?download=true -O Depth-Anything-V2.bin
```
```bash Install the dependencies theme={null}
sudo apt install -y ros-dev-tools
sudo apt install -y ros-jazzy-qrb-ros-camera
```
```bash Download the source code theme={null}
mkdir -p ~/qrb_ros_ws/src && cd ~/qrb_ros_ws/src
git clone -b jazzy-rel https://github.com/qualcomm-qrb-ros/qrb_ros_samples.git
```
```bash Build the sample application theme={null}
cd ~/qrb_ros_ws/src/qrb_ros_samples/ai_vision/sample_depth_estimation
rosdep install -i --from-path ./ --rosdistro jazzy -y
colcon build
```
```bash Launch the sample application theme={null}
source install/setup.bash
ros2 launch sample_depth_estimation launch_with_image_publisher.py
```
```bash Launch with a custom image and model theme={null}
source install/setup.bash
ros2 launch sample_depth_estimation launch_with_image_publisher.py image_path:= model_path:=
```
```bash Launch with qrb_ros_camera theme={null}
source install/setup.bash
ros2 launch sample_depth_estimation launch_with_qrb_ros_camera.py
```
```python theme={null}
image_path_arg = DeclareLaunchArgument(
'image_path',
default_value=os.path.join(package_path, "resource", "input_image.jpg"),
description='Path to the input image file'
)
# Node for image_publisher
image_publisher_node = Node(
package='image_publisher',
executable='image_publisher_node',
namespace=namespace,
name='image_publisher_node',
output='screen',
parameters=[
{'filename': image_path},
{'rate': 10.0}, # Set the publishing rate to 10 Hz
]
)
```
To install `rqt`, see the [ROS 2 Jazzy documentation](https://docs.ros.org/en/jazzy/Tutorials/Beginner-CLI-Tools/Introducing-Turtlesim/Introducing-Turtlesim.html).
a. Run `rqt` and select the following buttons in sequence: `Plugins --> Visualization --> Image View`.
b. Select `/sample_container/depth_map` to see the results.
## ROS nodes used in `sample_depth_estimation`
The following table lists the ROS nodes used in `sample_depth_estimation`.
| Node name | Description |
| -------------------------------------------------------------------------------- | ------------------------------------------------------------------------------------------------------------------------------------------- |
| [qrb ros camera](https://github.com/qualcomm-qrb-ros/qrb_ros_camera) | Qualcomm ROS 2 package that captures images with parameters and publishes them to ROS topics. |
| Image publisher | Publishes image data to a ROS topic—can be camera frames, local files, or processed outputs. |
| Sample depth estimation | Subscribes to input images for preprocessing, then performs postprocessing on the output tensor published by the qrb ros nn interface node. |
| [qrb ros nn interface](https://github.com/qualcomm-qrb-ros/qrb_ros_nn_inference) | Loads a trained AI model, receives preprocessed images, performs inference, and publishes results. |
## ROS topics used in `sample_depth_estimation`
The following table lists the ROS topics used in `sample_depth_estimation`.
| ROS topic | Type | Description |
| ------------------------------ | ------------------------------------------- | ------------------------------------------- |
| `/image_raw` | `` | Published image information. |
| `/qrb_inference_input_tensor` | `` | Preprocessed message. |
| `/qrb_inference_output_tensor` | `` | Neural network interface result with model. |
| `/depth_map` | `` | Depth map result. |
## Prerequisites
You have set up the device, installed ROS2 Jazzy and Qualcomm Intelligent Robotics (QIR) SDK on the device according to [Install the QIR SDK](./install-the-qir-sdk).
## Build from the source of `sample_depth_estimation`
Build `sample_depth_estimation` from source when you need to change the sample code. The device steps install the dependencies, clone the source repository, and build the package.
### Device steps
```bash Download the model theme={null}
sudo mkdir -p /opt/model && cd /opt/model
sudo wget https://huggingface.co/qualcomm/Depth-Anything-V2/resolve/19ce3645e11de17eed7e869eebcc07dd352834f3/Depth-Anything-V2.bin?download=true -O Depth-Anything-V2.bin
```
```bash Install the dependencies theme={null}
sudo apt install -y ros-dev-tools
sudo apt install -y ros-jazzy-qrb-ros-camera
```
```bash Download the source code theme={null}
mkdir -p ~/qrb_ros_ws/src && cd ~/qrb_ros_ws/src
git clone -b jazzy-rel https://github.com/qualcomm-qrb-ros/qrb_ros_samples.git
```
```bash Build the sample application theme={null}
cd ~/qrb_ros_ws/src/qrb_ros_samples/ai_vision/sample_depth_estimation
rosdep install -i --from-path ./ --rosdistro jazzy -y
colcon build
```
```bash Launch the sample application theme={null}
source install/setup.bash
ros2 launch sample_depth_estimation launch_with_image_publisher.py
```
```bash Launch with a custom image and model theme={null}
source install/setup.bash
ros2 launch sample_depth_estimation launch_with_image_publisher.py image_path:= model_path:=
```
```bash Launch with qrb_ros_camera theme={null}
source install/setup.bash
ros2 launch sample_depth_estimation launch_with_qrb_ros_camera.py
```
```python theme={null}
image_path_arg = DeclareLaunchArgument(
'image_path',
default_value=os.path.join(package_path, "resource", "input_image.jpg"),
description='Path to the input image file'
)
# Node for image_publisher
image_publisher_node = Node(
package='image_publisher',
executable='image_publisher_node',
namespace=namespace,
name='image_publisher_node',
output='screen',
parameters=[
{'filename': image_path},
{'rate': 10.0}, # Set the publishing rate to 10 Hz
]
)
```
To install `rqt`, see the [ROS 2 Jazzy documentation](https://docs.ros.org/en/jazzy/Tutorials/Beginner-CLI-Tools/Introducing-Turtlesim/Introducing-Turtlesim.html).
a. Run `rqt` and select the following buttons in sequence: `Plugins --> Visualization --> Image View`.
b. Select `/sample_container/depth_map` to see the results.