> ## Documentation Index
> Fetch the complete documentation index at: https://dragonwingdocs.qualcomm.com/llms.txt
> Use this file to discover all available pages before exploring further.
# Enable UEFI secure boot
UEFI secure boot enhances the security and reliability of the system by ensuring that only the verified and trusted software loads during startup.
[Secure boot](./security-features#secure-boot) and [UEFI secure boot](./security-features#uefi-secure-boot) are distinct security features and cover different images for authentication.
UEFI secure Boot can be enabled either on a secure boot device or, for testing purposes, on a non-secure boot device.
## **Prerequisites**
### **Host requirements**
1. Install [OpenSSL 0.9.80 June 2010 (or later version)](https://openssl-library.org/source/) on the Linux host computer.
2. Install the following [efitools](https://pkgs.org/download/efitools):
> * cert-to-efi-sig-list: converts OpenSSL certificates to EFI signature lists
> * sign-efi-sig-list: signs the EFI signature list
> * hash-efi-sig-list: creates a hash signature list entry from a binary
### **Provision replay protected memory block on device**
Replay protected memory block (RPMB) provisioning is mandatory for UEFI secure boot enablement. For more information, see [RPMB](./security-features#rpmb).
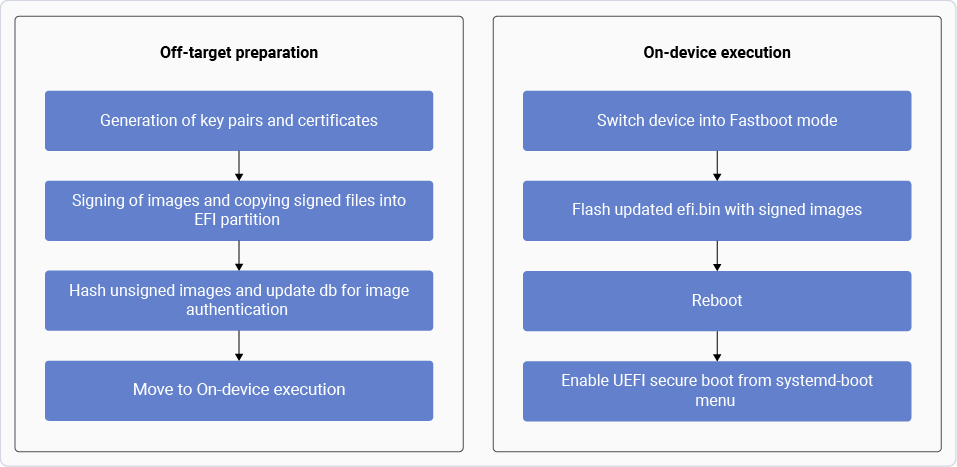
## **Configure an UEFI secure boot to generate keys and certificates**
You can setup an initial UEFI secure boot configuration and convert the keys and certificates into a format that UEFI can understand. See the workflow to understand the off-target preparation and the on-device execution.
**Figure : UEFI secure boot workflow**
**Note**
Secure communications and cryptography are facilitated by the OpenSSL toolkit, while keys and signatures for UEFI secure boot are managed by efitool.
## **Generate key and certificate**
To enable UEFI secure boot, generate a pair of keys and certificates for signing and authentication.
The key generation supports the following algorithms:
* RSA 2048/4096 with SHA-256/SHA384 hash algorithm
* ECDSA secp256r1/secp384r1
The following procedures provide instructions to generate keys and certificates with RSA 2048 and SHA-256 as an example.
**Note**
* Create a directory and run the commands in the same location to perform these steps on a Linux machine.
* For ECC, replace `rsa:2048` with `ec:secp384r1` or `ec:secp256r1`. For SHA384, replace `-sha256` with `-sha384` in the following commands.
### **Generate UID**
You can generate a GUID and create three new keys with self-signed certificates in CRT/PEM format and keys in `.key` format:
GUID uses `uuidgen` to generate the signature owner GUID:
```text theme={null}
uuidgen --random > GUID.txt
```
### **Create PK key**
1. Create a PK key pair (RSA-2048) and certificate:
```text theme={null}
openssl req -new -x509 -newkey rsa:2048 -subj "/CN=Custom PK/" -keyout PK.key -out PK.crt -days 3650 -nodes -sha256
```
2. Convert the `.crt` file into the `.cer` file:
```text theme={null}
openssl x509 -outform der -in PK.crt -out PK.cer
```
3. Convert the `.crt` file into the `.esl` file:
```text theme={null}
cert-to-efi-sig-list -g "$(< GUID.txt)" PK.crt PK.esl
```
4. Sign and generate the `.auth` file with the `.crt`, `.esl`, and `.key` files:
```text theme={null}
sign-efi-sig-list -k PK.key -c PK.crt PK PK.esl PK.auth
```
### **Create KEK key**
1. Create a KEK key pair (RSA-2048) and certificate:
```text theme={null}
openssl req -new -x509 -newkey rsa:2048 -subj "/CN=Custom KEK/" -keyout KEK.key -out KEK.crt -days 3650 -nodes -sha256
```
2. Convert the `.crt` file into the `.cer` file:
```text theme={null}
openssl x509 -outform der -in KEK.crt -out KEK.cer
```
3. Convert the `.crt` file into the `.esl` file:
```text theme={null}
cert-to-efi-sig-list -g "$(< GUID.txt)" KEK.crt KEK.esl
```
4. Sign and generate the `.auth` file with the `.crt`, `.esl`, and `.key` files:
```text theme={null}
sign-efi-sig-list -k PK.key -c PK.crt KEK KEK.esl KEK.auth
```
### **Create dB key**
1. Create a dB key pair (RSA-2048) and certificate:
```text theme={null}
openssl req -new -x509 -newkey rsa:2048 -subj "/CN=Custom DB Signing Key 1/" -keyout db.key -out db.crt -days 3650 -nodes -sha256
```
2. Convert the `.crt` file into the `.cer` file:
```text theme={null}
openssl x509 -outform der -in db.crt -out db.cer
```
3. Convert the `.crt` file into the `.esl` file:
```text theme={null}
cert-to-efi-sig-list -g "$(< GUID.txt)" db.crt db.esl
```
4. Sign and generate the `.auth` file with the `.crt`, `.esl`, and `.key` files:
```text theme={null}
sign-efi-sig-list -k KEK.key -c KEK.crt db db.esl db.auth
```
## **Sign images and copy (.auth) key/signed files to EFI partition**
The EFI system partition consists of EFI, loader, and ostree with information relevant to EFI when using systemd-boot. The DTB partition consists of dtb directories.
The EFI system partition holds essential files for booting the system and managing updates, while the DTB partition contains hardware configuration information. This section provides instructions to:
> * Sign various images.
> * Copy `(.auth)` key and signed files to EFI partition and DTB partition directories.
> * Signed and executable images such as the `bootaa64.efi` file (systemd-boot) are placed in the `efimountedbin/EFI/BOOT/` directory and the `linux-.efi` file (Linux) image is placed in the `efimountedbin/EFI/Linux` directory.
The systemd-boot validates the signed images and is also used to enroll the following:
> * UEFI secure boot keys are placed in a specific directory in `/keys` for key enrollment. The systemd-boot uses these keys and stores them in the RPMB during UEFI boot time services.
> * You can configure the wait time (in seconds) in the systemd-boot loader configuration. Kernel loading is delayed during the wait time, allowing you to review and select available options in the systemd-boot menu.
> * Device tree files are stored in the `dtbmountedbin/dtb` directory. These files are used by UEFI during runtime, and the device tree files are initialized. While signing, `.sig` files are created and placed in the same directory as these files are non-PE images.
> | | **Table : EFI system partition (efi.bin)** |
> | --------------------------------------- | --------------------------------------------------------------------------- |
> | `/EFI` | `/Loader` |
> | `/Boot/bootaa64.efi` | `loader.conf` |
> | `/Linux/linux-.efi` | `/keys/authkeys/db.auth` `/keys/authkeys/KEK.auth` `/keys/authkeys/PK.auth` |
> | | **Table : DTB partition (dtb.bin)** |
> | --- | --- |
> | `qclinux_fit.img (or combined-dtb.dtb)` | `qclinux_fit.sig (or combined-dtb.sig)` |
### **Place signed images and keys in EFI partition**
Follow these steps to place the signed images and keys in an EFI partition on a Linux host machine.
1. Locate the `efi.bin` and `dtb.bin` file paths in the `contents.xml`, file to obtain the `efi.bin` and dtb.bin\` files from the meta.
2. Mount the `efi.bin` file into the `` directory and create an `efimountedbin` directory within the `` directory.
3. Mount the `dtb.bin` file into the \ directory and create a `dtbmountedbin` directory within the \ directory.
4. Mount the `efi.bin` file:
```text theme={null}
sudo mount efi.bin efimountedbin
```
```text theme={null}
cd efimountedbin
```
5. Mount the `dtb.bin` file:
```text theme={null}
sudo mount dtb.bin dtbmountedbin
```
```text theme={null}
cd dtbmountedbin
```
6. Create the `loader/keys/authkeys` directory chain in `/efimountedbin/` to enroll keys.
7. Select and copy the `.auth files` (PK.auth, KEK.auth, and db.auth) to the authkeys directory in `efimountedbin`.
```text theme={null}
sudo cp /efimountedbin/loader/keys/authkeys/
```
8. Sign the `bootaa64.efi`, `linux-.efi`, and `qclinux_fit.img` (or `combined-dtb.dtb`) binary files with the keys and copy to the respective directories in the `efimountedbin` and `dtbmountedbin` directories.
1. Sign `efi` images:
> The sbsign tool is designed for signing EFI boot images, such as `bootaa64.efi` that follow EFI specifications. This tool, which is used for UEFI secure boot signing is available for download and use on Linux systems. It’s important to note that sbsign can only sign PE images with a `.efi` extension.
>
> 1. Copy the `bootaa64.efi` file from the `/efimountedbin/EFI/BOOT` directory and the `linux-.efi` file from the `efimountedbin/Linux/` directory to the `/images` directory on your Linux machine.
>
> 2. Sign the images:
>
> > ```text theme={null}
> > cd /images
> > ```
> >
> > > ```text theme={null}
> > > sudo sbsign --key /keys/db.key --cert /keys/db.crt bootaa64.efi --output /bootaa64.efi
> > > ```
> >
> > ```text theme={null}
> > sudo sbsign -key /keys/db.key --cert /keys/db.crt linux.efi -output /linux.efi
> > ```
> 2) Sign the dtb image:
> All images authenticated by UEFI secure boot are regular APIs and typically in the PE format. The signature header and size are appended to the existing PE header, and the signature is appended at the end of the signed file.
> However, when images in non-PE formats require UEFI secure boot authentication, the absence of the PE header and its magic number to recognize the image format fail. As a result, it’s not possible to use standard tools and paths for image verification.
> Currently, among the list of images that UEFI secure boot verifies, only the dtb files are in non-PE format images. As an alternative to the sbsign tool, you can use the `OpenSSL cms` command to generate signature files for signing images in non-PE format.
> Follow these steps for signing non-EFI images:
> 1. To sign the dtb file and signature file, run the following command:
> > ```text theme={null}
> > openssl cms -sign -inkey <.key file> -signer <.crt file> -binary -in -out
 **Note**
Secure communications and cryptography are facilitated by the OpenSSL toolkit, while keys and signatures for UEFI secure boot are managed by efitool.
## **Generate key and certificate**
To enable UEFI secure boot, generate a pair of keys and certificates for signing and authentication.
The key generation supports the following algorithms:
* RSA 2048/4096 with SHA-256/SHA384 hash algorithm
* ECDSA secp256r1/secp384r1
The following procedures provide instructions to generate keys and certificates with RSA 2048 and SHA-256 as an example.
**Note**
* Create a directory and run the commands in the same location to perform these steps on a Linux machine.
* For ECC, replace `rsa:2048` with `ec:secp384r1` or `ec:secp256r1`. For SHA384, replace `-sha256` with `-sha384` in the following commands.
### **Generate UID**
You can generate a GUID and create three new keys with self-signed certificates in CRT/PEM format and keys in `.key` format:
GUID uses `uuidgen` to generate the signature owner GUID:
```text theme={null}
uuidgen --random > GUID.txt
```
### **Create PK key**
1. Create a PK key pair (RSA-2048) and certificate:
```text theme={null}
openssl req -new -x509 -newkey rsa:2048 -subj "/CN=Custom PK/" -keyout PK.key -out PK.crt -days 3650 -nodes -sha256
```
2. Convert the `.crt` file into the `.cer` file:
```text theme={null}
openssl x509 -outform der -in PK.crt -out PK.cer
```
3. Convert the `.crt` file into the `.esl` file:
```text theme={null}
cert-to-efi-sig-list -g "$(< GUID.txt)" PK.crt PK.esl
```
4. Sign and generate the `.auth` file with the `.crt`, `.esl`, and `.key` files:
```text theme={null}
sign-efi-sig-list -k PK.key -c PK.crt PK PK.esl PK.auth
```
### **Create KEK key**
1. Create a KEK key pair (RSA-2048) and certificate:
```text theme={null}
openssl req -new -x509 -newkey rsa:2048 -subj "/CN=Custom KEK/" -keyout KEK.key -out KEK.crt -days 3650 -nodes -sha256
```
2. Convert the `.crt` file into the `.cer` file:
```text theme={null}
openssl x509 -outform der -in KEK.crt -out KEK.cer
```
3. Convert the `.crt` file into the `.esl` file:
```text theme={null}
cert-to-efi-sig-list -g "$(< GUID.txt)" KEK.crt KEK.esl
```
4. Sign and generate the `.auth` file with the `.crt`, `.esl`, and `.key` files:
```text theme={null}
sign-efi-sig-list -k PK.key -c PK.crt KEK KEK.esl KEK.auth
```
### **Create dB key**
1. Create a dB key pair (RSA-2048) and certificate:
```text theme={null}
openssl req -new -x509 -newkey rsa:2048 -subj "/CN=Custom DB Signing Key 1/" -keyout db.key -out db.crt -days 3650 -nodes -sha256
```
2. Convert the `.crt` file into the `.cer` file:
```text theme={null}
openssl x509 -outform der -in db.crt -out db.cer
```
3. Convert the `.crt` file into the `.esl` file:
```text theme={null}
cert-to-efi-sig-list -g "$(< GUID.txt)" db.crt db.esl
```
4. Sign and generate the `.auth` file with the `.crt`, `.esl`, and `.key` files:
```text theme={null}
sign-efi-sig-list -k KEK.key -c KEK.crt db db.esl db.auth
```
## **Sign images and copy (.auth) key/signed files to EFI partition**
The EFI system partition consists of EFI, loader, and ostree with information relevant to EFI when using systemd-boot. The DTB partition consists of dtb directories.
The EFI system partition holds essential files for booting the system and managing updates, while the DTB partition contains hardware configuration information. This section provides instructions to:
> * Sign various images.
> * Copy `(.auth)` key and signed files to EFI partition and DTB partition directories.
> * Signed and executable images such as the `bootaa64.efi` file (systemd-boot) are placed in the `efimountedbin/EFI/BOOT/` directory and the `linux-
**Note**
Secure communications and cryptography are facilitated by the OpenSSL toolkit, while keys and signatures for UEFI secure boot are managed by efitool.
## **Generate key and certificate**
To enable UEFI secure boot, generate a pair of keys and certificates for signing and authentication.
The key generation supports the following algorithms:
* RSA 2048/4096 with SHA-256/SHA384 hash algorithm
* ECDSA secp256r1/secp384r1
The following procedures provide instructions to generate keys and certificates with RSA 2048 and SHA-256 as an example.
**Note**
* Create a directory and run the commands in the same location to perform these steps on a Linux machine.
* For ECC, replace `rsa:2048` with `ec:secp384r1` or `ec:secp256r1`. For SHA384, replace `-sha256` with `-sha384` in the following commands.
### **Generate UID**
You can generate a GUID and create three new keys with self-signed certificates in CRT/PEM format and keys in `.key` format:
GUID uses `uuidgen` to generate the signature owner GUID:
```text theme={null}
uuidgen --random > GUID.txt
```
### **Create PK key**
1. Create a PK key pair (RSA-2048) and certificate:
```text theme={null}
openssl req -new -x509 -newkey rsa:2048 -subj "/CN=Custom PK/" -keyout PK.key -out PK.crt -days 3650 -nodes -sha256
```
2. Convert the `.crt` file into the `.cer` file:
```text theme={null}
openssl x509 -outform der -in PK.crt -out PK.cer
```
3. Convert the `.crt` file into the `.esl` file:
```text theme={null}
cert-to-efi-sig-list -g "$(< GUID.txt)" PK.crt PK.esl
```
4. Sign and generate the `.auth` file with the `.crt`, `.esl`, and `.key` files:
```text theme={null}
sign-efi-sig-list -k PK.key -c PK.crt PK PK.esl PK.auth
```
### **Create KEK key**
1. Create a KEK key pair (RSA-2048) and certificate:
```text theme={null}
openssl req -new -x509 -newkey rsa:2048 -subj "/CN=Custom KEK/" -keyout KEK.key -out KEK.crt -days 3650 -nodes -sha256
```
2. Convert the `.crt` file into the `.cer` file:
```text theme={null}
openssl x509 -outform der -in KEK.crt -out KEK.cer
```
3. Convert the `.crt` file into the `.esl` file:
```text theme={null}
cert-to-efi-sig-list -g "$(< GUID.txt)" KEK.crt KEK.esl
```
4. Sign and generate the `.auth` file with the `.crt`, `.esl`, and `.key` files:
```text theme={null}
sign-efi-sig-list -k PK.key -c PK.crt KEK KEK.esl KEK.auth
```
### **Create dB key**
1. Create a dB key pair (RSA-2048) and certificate:
```text theme={null}
openssl req -new -x509 -newkey rsa:2048 -subj "/CN=Custom DB Signing Key 1/" -keyout db.key -out db.crt -days 3650 -nodes -sha256
```
2. Convert the `.crt` file into the `.cer` file:
```text theme={null}
openssl x509 -outform der -in db.crt -out db.cer
```
3. Convert the `.crt` file into the `.esl` file:
```text theme={null}
cert-to-efi-sig-list -g "$(< GUID.txt)" db.crt db.esl
```
4. Sign and generate the `.auth` file with the `.crt`, `.esl`, and `.key` files:
```text theme={null}
sign-efi-sig-list -k KEK.key -c KEK.crt db db.esl db.auth
```
## **Sign images and copy (.auth) key/signed files to EFI partition**
The EFI system partition consists of EFI, loader, and ostree with information relevant to EFI when using systemd-boot. The DTB partition consists of dtb directories.
The EFI system partition holds essential files for booting the system and managing updates, while the DTB partition contains hardware configuration information. This section provides instructions to:
> * Sign various images.
> * Copy `(.auth)` key and signed files to EFI partition and DTB partition directories.
> * Signed and executable images such as the `bootaa64.efi` file (systemd-boot) are placed in the `efimountedbin/EFI/BOOT/` directory and the `linux-