> ## Documentation Index
> Fetch the complete documentation index at: https://dragonwingdocs.qualcomm.com/llms.txt
> Use this file to discover all available pages before exploring further.
# Perform VIP flashing
When secure boot is enabled, each stage of the boot process only loads and runs the next stage if it’s digitally signed and the signature is verified. It starts with the primary boot loader (PBL), which loads the secondary boot loader (SBL) or eXtensible Boot Loader (XBL). If the signature check fails at any stage, the device halts immediately. This ensures that only trusted, signed code is executed, keeping the device secure.
Validated image programming (VIP) adds another layer of control. It allows you to decide which files and commands can be sent to the device during the flashing process. Once the chip’s fuse is blown, secure boot is permanently enabled. From that point on, the device only accepts signed images—any unsigned image will cause flashing to fail. This secure flashing process is called VIP flashing.
## **Create digests table**
1. Select the signed image files that must be downloaded with VIP.
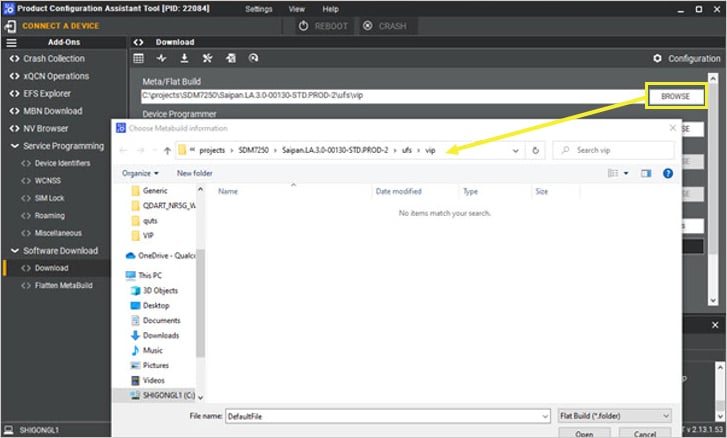 2. Select the right memory type and other parameters on the **Download** window.
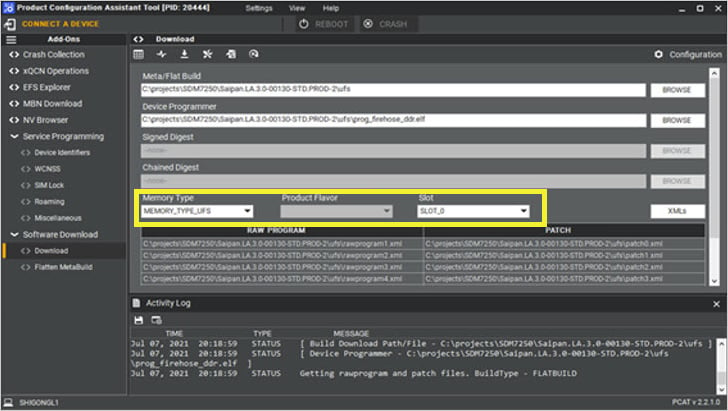 3. Set up all the download options.
 > **Note**
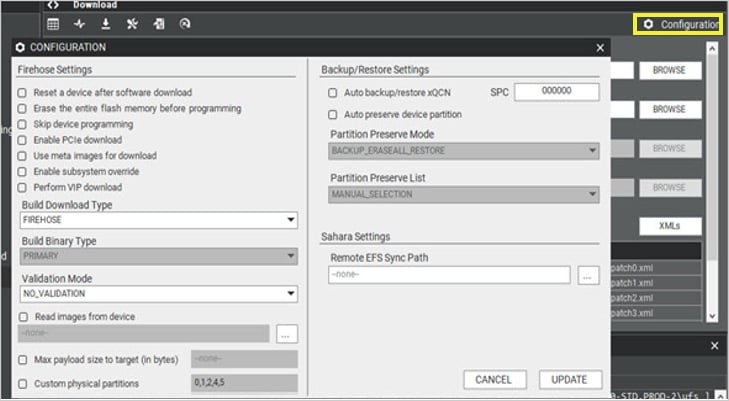
> Ensure that the configurations used when generating the digests table match those used during VIP download. For example, if you select **Erase the entire flash before programming** while generating the digests table, then select the same option during VIP download.
4. Select **Create Digest Files**.
> **Note**
> Ensure that the configurations used when generating the digests table match those used during VIP download. For example, if you select **Erase the entire flash before programming** while generating the digests table, then select the same option during VIP download.
4. Select **Create Digest Files**.
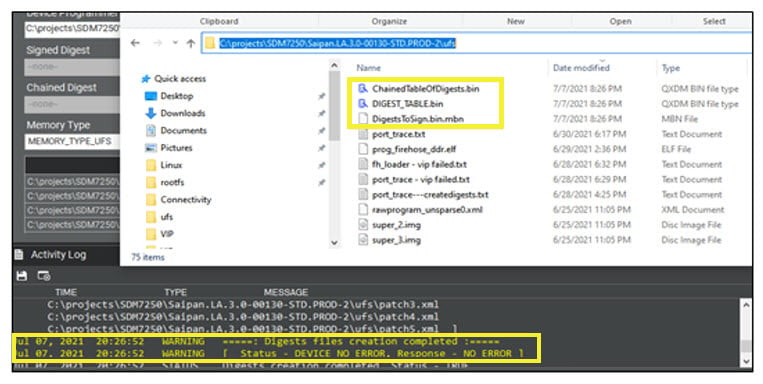
 > If the process runs successfully, it generates the digest files in the same folder as the build.
 ## **Sign components**
1. Sign both the `DigestsToSign.bin.mbn` image and the `Device Programmer` image using the same keys used during secure boot enablement by using the following commands:
* To sign the digest table:
> ```text theme={null}
> /.LE.X.x/common/sectoolsv2/ext/Linux/sectools secure-image --sign /path/to/ DigestsToSign.bin.mbn --image-id=VIP --security-profile /.LE.X.x/common/sectoolsv2/_security_profile.xml --oem-id=0x1 --oem-product-id=0xabcd --anti-rollback-version=0x0 --signing-mode=LOCAL --root-certificate=./OEM-KEYS/qpsa_rootca.cer --ca-certificate=./OEM-KEYS/qpsa_attestca.cer --ca-key=./OEM-KEYS/qpsa_attestca.key --outfile ./signed_images_out/DigestsToSign.bin.mbn
> ```
* To sign the device programmer:
> ```text theme={null}
> /.LE.X.x/common/sectoolsv2/ext/Linux/sectools secure-image --sign /path/to/ prog_firehose_ddr.mbn --image-id= DEVICE-PROGRAMMER --security-profile /.LE.X.x/common/sectoolsv2/_security_profile.xml --oem-id=0x1 --oem-product-id=0xabcd --anti-rollback-version=0x0 --signing-mode=LOCAL --root-certificate=./OEM-KEYS/qpsa_rootca.cer --ca-certificate=./OEM-KEYS/qpsa_attestca.cer --ca-key=./OEM-KEYS/qpsa_attestca.key --outfile ./signed_images_out/prog_firehose_ddr.mbn
> ```
2. Ensure the following:
> * Use values that match your secure boot enablement configuration. For example, replace OEM ID `0x1` and OEM product ID `0xabcd` with your specific values.
> * Replace `_security_profile.xml` with the same security profile used during secure boot enablement.
> * The signing keys must match those used during secure boot enablement.
**Note**
If the target `DigestsToSign.bin.mbn` is expected to be in MBNv6 format (check according to `_security_profile.xml`) and if PCAT isn’t generating MBNv6, then do the following:
1. Remove or delete any existing digest files such as `ChainedTableOfDigests.bin`, `DIGEST_TABLE.bin`, or `DigestsToSign.bin.mbn` from the flat build folder.
2. Open PCAT app and goto **Configuration**, change **Digest Header Type** to **DIGEST\_HEADER\_TYPE\_NONE**.
3. Keep all the other fields as same and re-generate the digest files.
> In the output, you will see: `ChainedTableOfDigests.bin`, `DIGEST_TABLE.bin`, and `DigestsToSign.bin`, not `Not DigestsToSign.bin.mbn`.
4. Run the command to convert .bin to .bin.mbn.
```text theme={null}
./sectools mbn-tool generate --data ./DigestsToSign.bin --outfile DigestsToSign.bin.mbn --mbn-version 6
```
5. Sign the `DigestsToSign.bin.mbn` (generated in step 4) with `--image-id` VIP.
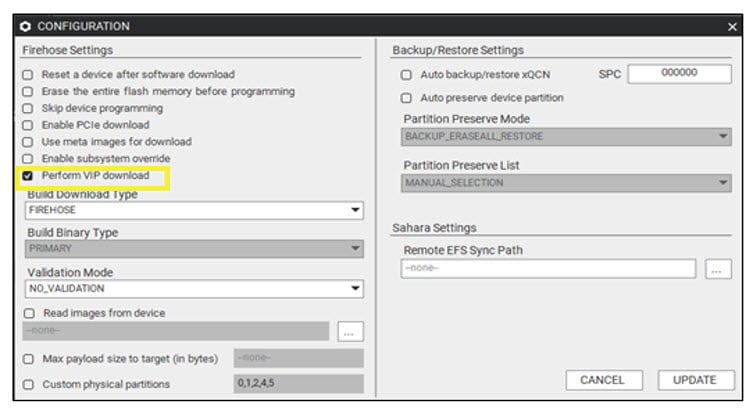
## **Download using PCAT**
1. Select **Perform VIP download** in PCAT.
## **Sign components**
1. Sign both the `DigestsToSign.bin.mbn` image and the `Device Programmer` image using the same keys used during secure boot enablement by using the following commands:
* To sign the digest table:
> ```text theme={null}
> /.LE.X.x/common/sectoolsv2/ext/Linux/sectools secure-image --sign /path/to/ DigestsToSign.bin.mbn --image-id=VIP --security-profile /.LE.X.x/common/sectoolsv2/_security_profile.xml --oem-id=0x1 --oem-product-id=0xabcd --anti-rollback-version=0x0 --signing-mode=LOCAL --root-certificate=./OEM-KEYS/qpsa_rootca.cer --ca-certificate=./OEM-KEYS/qpsa_attestca.cer --ca-key=./OEM-KEYS/qpsa_attestca.key --outfile ./signed_images_out/DigestsToSign.bin.mbn
> ```
* To sign the device programmer:
> ```text theme={null}
> /.LE.X.x/common/sectoolsv2/ext/Linux/sectools secure-image --sign /path/to/ prog_firehose_ddr.mbn --image-id= DEVICE-PROGRAMMER --security-profile /.LE.X.x/common/sectoolsv2/_security_profile.xml --oem-id=0x1 --oem-product-id=0xabcd --anti-rollback-version=0x0 --signing-mode=LOCAL --root-certificate=./OEM-KEYS/qpsa_rootca.cer --ca-certificate=./OEM-KEYS/qpsa_attestca.cer --ca-key=./OEM-KEYS/qpsa_attestca.key --outfile ./signed_images_out/prog_firehose_ddr.mbn
> ```
2. Ensure the following:
> * Use values that match your secure boot enablement configuration. For example, replace OEM ID `0x1` and OEM product ID `0xabcd` with your specific values.
> * Replace `_security_profile.xml` with the same security profile used during secure boot enablement.
> * The signing keys must match those used during secure boot enablement.
**Note**
If the target `DigestsToSign.bin.mbn` is expected to be in MBNv6 format (check according to `_security_profile.xml`) and if PCAT isn’t generating MBNv6, then do the following:
1. Remove or delete any existing digest files such as `ChainedTableOfDigests.bin`, `DIGEST_TABLE.bin`, or `DigestsToSign.bin.mbn` from the flat build folder.
2. Open PCAT app and goto **Configuration**, change **Digest Header Type** to **DIGEST\_HEADER\_TYPE\_NONE**.
3. Keep all the other fields as same and re-generate the digest files.
> In the output, you will see: `ChainedTableOfDigests.bin`, `DIGEST_TABLE.bin`, and `DigestsToSign.bin`, not `Not DigestsToSign.bin.mbn`.
4. Run the command to convert .bin to .bin.mbn.
```text theme={null}
./sectools mbn-tool generate --data ./DigestsToSign.bin --outfile DigestsToSign.bin.mbn --mbn-version 6
```
5. Sign the `DigestsToSign.bin.mbn` (generated in step 4) with `--image-id` VIP.
## **Download using PCAT**
1. Select **Perform VIP download** in PCAT.
 > **Note**
> Ensure that the configurations used when generating the digests table match those used during VIP download. For example, if you select **Erase the entire flash before programming** while generating the digests table, then select the same option during VIP download.
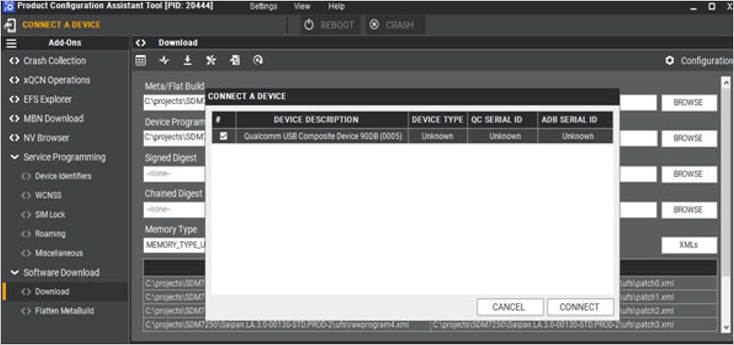
2. Connect a secure device.
> **Note**
> Ensure that the configurations used when generating the digests table match those used during VIP download. For example, if you select **Erase the entire flash before programming** while generating the digests table, then select the same option during VIP download.
2. Connect a secure device.
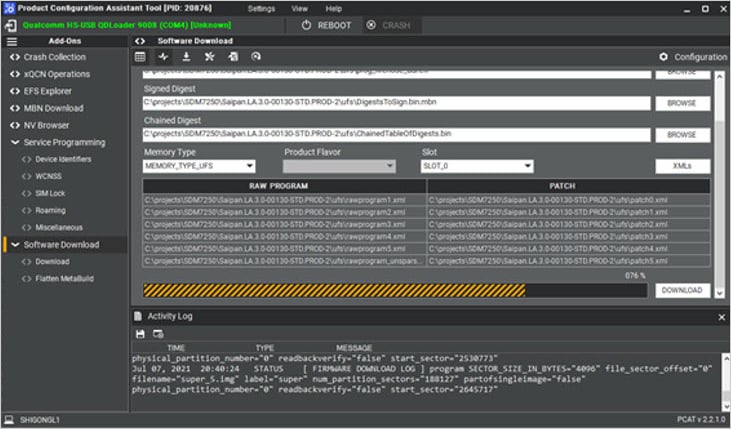
 3. To perform VIP download, click on **DOWNLOAD**.
 ## **Next steps**
* To enforce strict access controls, see [Enable SELinux](./enable-se-linux).
* To ensure that only the verified and trusted applications are loaded during the startup process, see [Enable UEFI secure boot](./enable-uefi-secure-boot).
## **Next steps**
* To enforce strict access controls, see [Enable SELinux](./enable-se-linux).
* To ensure that only the verified and trusted applications are loaded during the startup process, see [Enable UEFI secure boot](./enable-uefi-secure-boot).