> ## Documentation Index
> Fetch the complete documentation index at: https://dragonwingdocs.qualcomm.com/llms.txt
> Use this file to discover all available pages before exploring further.
# Deploy NVIDIA Nemotron Nano on Dragonwing IQ-9075
> Quantize NVIDIA Llama-3.1-Nemotron-Nano-8B-v1 with AIMET W4A16, compile it in Qualcomm AI Hub, and run it with Genie/QnnHtp on the IQ-9075 EVK.
**Repository:** [github.com/eivholt/qai-nemotron](https://github.com/eivholt/qai-nemotron)\
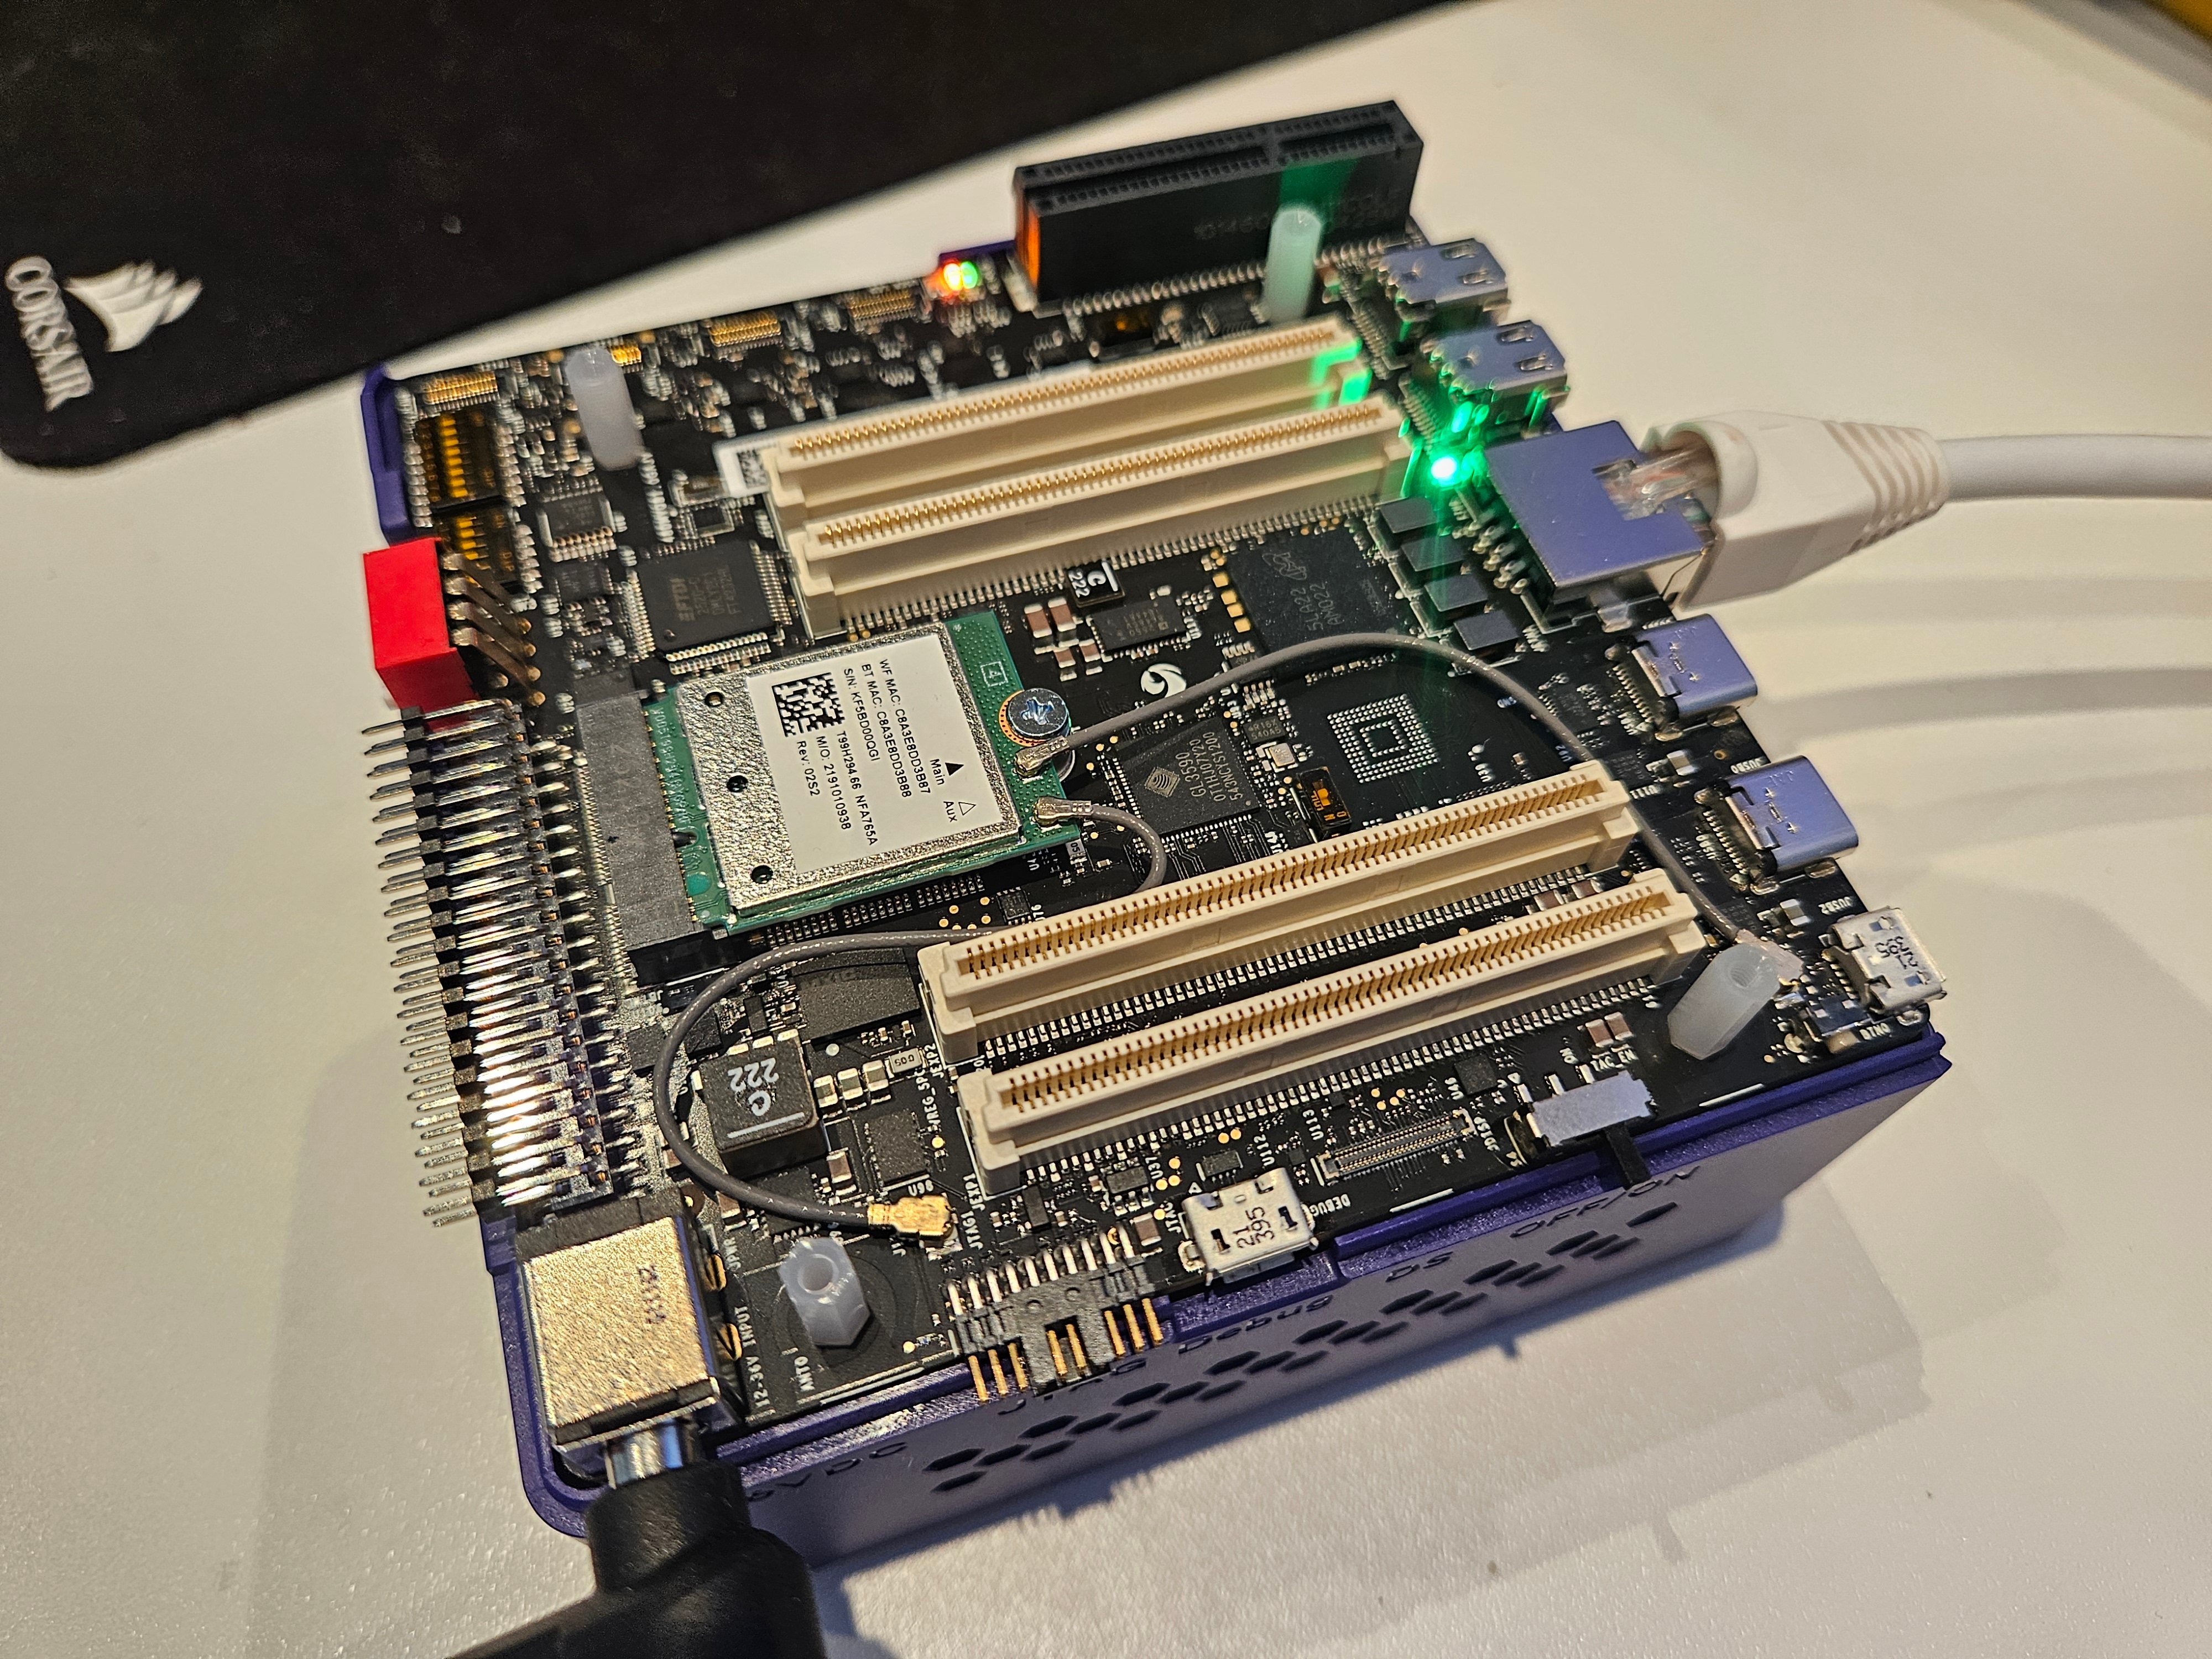
**Target:** [Qualcomm Dragonwing IQ-9075 EVK / QCS9075 / Hexagon v73](https://www.qualcomm.com/developer/hardware/qualcomm-iq-9075-evaluation-kit-evk). Hardware generously sponsored by Qualcomm.\
**Model:** [nvidia/Llama-3.1-Nemotron-Nano-8B-v1](https://huggingface.co/nvidia/Llama-3.1-Nemotron-Nano-8B-v1)\
**Runtime result:** 183 ms time to first token and 10.03 generated tokens/s on the EVK
Edge-deployed language models are at the very cusp of being useful alternatives to traditional control-flow programming. While exciting, local model selection can be tricky, in stark contrast to large frontier models. The larger models are more forgiving all-rounders, edge-deployable smaller models need to be selected with care. Official model benchmarks and leaderboards may give some idea on what a particular model is good at, but they often hide practical quirks or limitations. The only certain way to gauge a model is to get it running on an end-device and running some representative tests.
## What this tutorial accomplishes
In this tutorial I share my journey taking NVIDIA's BF16 `Llama-3.1-Nemotron-Nano-8B-v1` checkpoint, quantizing it to Qualcomm's W4A16 deployment format, compiling it for QCS9075 in Qualcomm AI Hub Workbench, installing the matching QAIRT runtime on a physical IQ-9075 EVK, and running the model through Genie on the Hexagon HTP/NPU.
My friend coined the phrase "Like applause at a jazz concert". In the same way non-jazz listeners may be puzzled by spontaneous bursts of cheer in the middle of 23 minute jazz jams, the accomplishments of this technical exercise may not be obvious and can also easily be misinterpreted.
 The result is not a CPU-only GGUF experiment. The final bundle uses the `QnnHtp` backend and the physical EVK's Hexagon v73 DSP. In the validated run, the model generated coherent output at 10.03 tokens/s, essentially matching Qualcomm's published performance for stock Llama 3.1 8B on the same platform.
### An important architectural clarification
This specific Nemotron model is **not** a new Mamba or mixture-of-experts network. NVIDIA identifies it as a dense decoder-only Transformer with the same network architecture as Llama 3.1 8B Instruct. Its differentiation is in NVIDIA's post-training: reasoning on/off behavior, tool calling, RAG, coding, instruction following, preference optimization, and reinforcement learning.
That architectural compatibility is why Qualcomm's existing Llama 3.1 8B implementation could be used as the deployment scaffold. The accomplishment is therefore:
> Running NVIDIA's Nemotron-specific post-trained weights on Qualcomm's optimized Llama 3.1 execution path, not adding a new Mamba/MoE operator stack to QAIRT.
### Where Nemotron Nano finds its role on a Qualcomm Dragonwing IQ-9075 EVK
As detailed in the follow-up tutorial, quantizing and exporting Nemotron Nano for the IQ9075 is a good fit if the target is simple, BFCL-style agentic tool use: choosing the right tool, filling arguments, abstaining when no tool is needed, and issuing simple parallel calls. After fixing the Nemotron-native parser, it outperformed the already-quantized QC AI Hub Llama 3.1 8B model on my small EVK BFCL-inspired suite. A model like Ministral 3B Q4 is weaker on that type of simple tasks, while it remains much stronger on complex multi-step agent workflows.
> For model selection for any given application, the devil is in the details. Aggregated benchmark results in model cards might indicate a model's strengths, but purpose-built benchmarks for each application are a must!
***
## The end-to-end pipeline
The result is not a CPU-only GGUF experiment. The final bundle uses the `QnnHtp` backend and the physical EVK's Hexagon v73 DSP. In the validated run, the model generated coherent output at 10.03 tokens/s, essentially matching Qualcomm's published performance for stock Llama 3.1 8B on the same platform.
### An important architectural clarification
This specific Nemotron model is **not** a new Mamba or mixture-of-experts network. NVIDIA identifies it as a dense decoder-only Transformer with the same network architecture as Llama 3.1 8B Instruct. Its differentiation is in NVIDIA's post-training: reasoning on/off behavior, tool calling, RAG, coding, instruction following, preference optimization, and reinforcement learning.
That architectural compatibility is why Qualcomm's existing Llama 3.1 8B implementation could be used as the deployment scaffold. The accomplishment is therefore:
> Running NVIDIA's Nemotron-specific post-trained weights on Qualcomm's optimized Llama 3.1 execution path, not adding a new Mamba/MoE operator stack to QAIRT.
### Where Nemotron Nano finds its role on a Qualcomm Dragonwing IQ-9075 EVK
As detailed in the follow-up tutorial, quantizing and exporting Nemotron Nano for the IQ9075 is a good fit if the target is simple, BFCL-style agentic tool use: choosing the right tool, filling arguments, abstaining when no tool is needed, and issuing simple parallel calls. After fixing the Nemotron-native parser, it outperformed the already-quantized QC AI Hub Llama 3.1 8B model on my small EVK BFCL-inspired suite. A model like Ministral 3B Q4 is weaker on that type of simple tasks, while it remains much stronger on complex multi-step agent workflows.
> For model selection for any given application, the devil is in the details. Aggregated benchmark results in model cards might indicate a model's strengths, but purpose-built benchmarks for each application are a must!
***
## The end-to-end pipeline
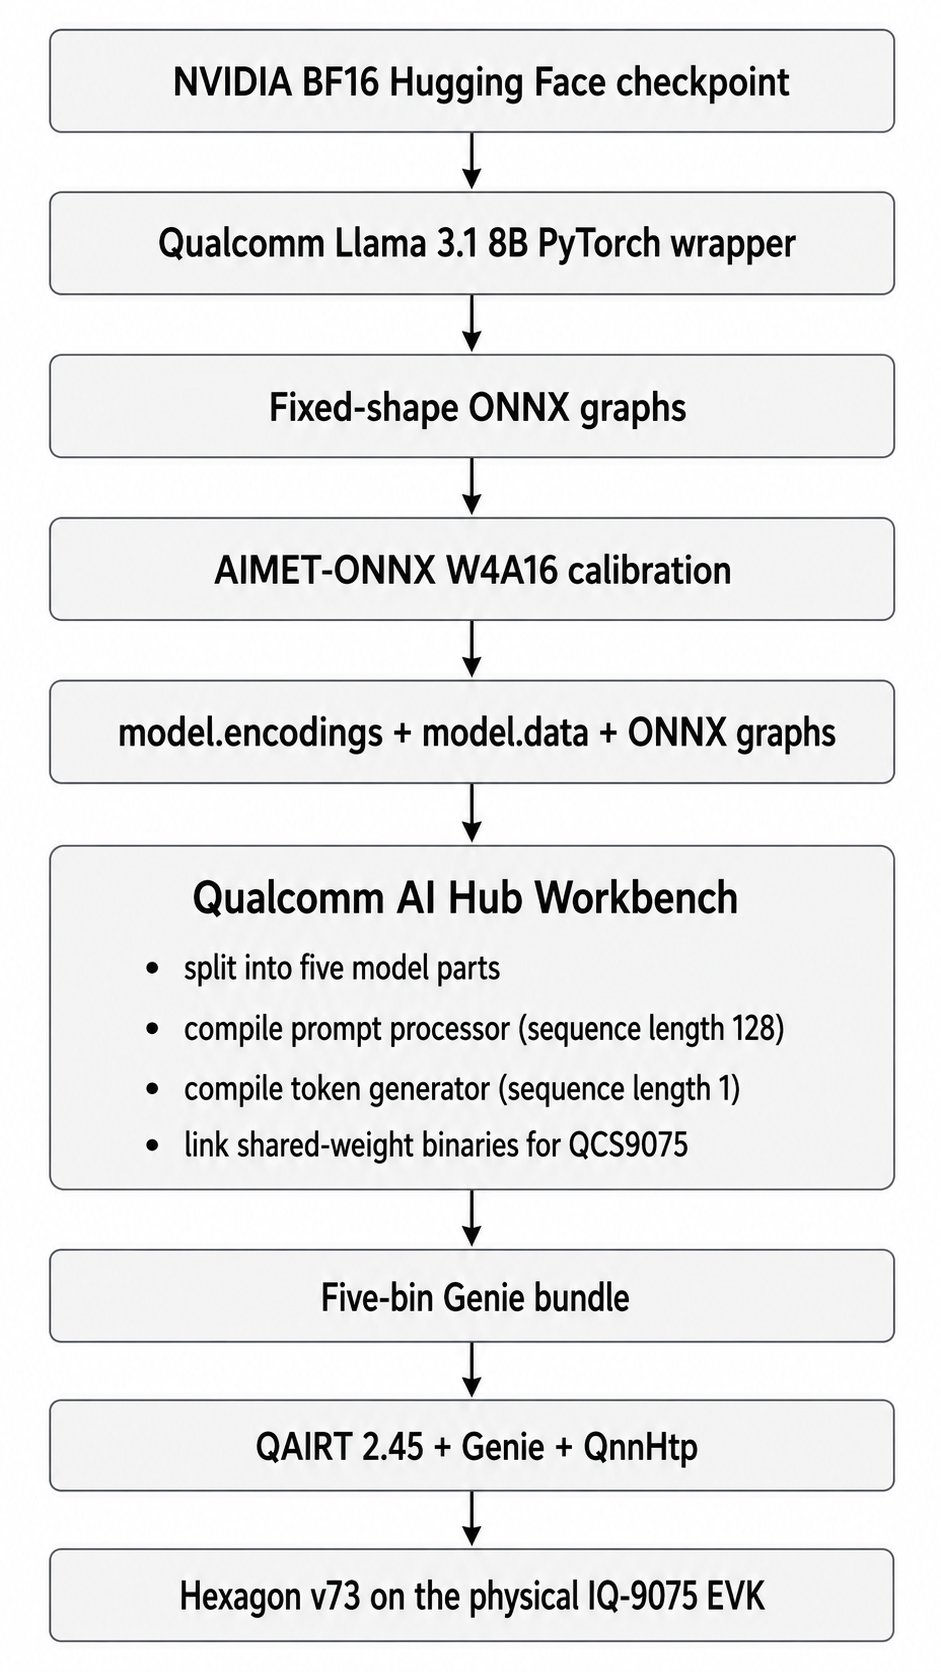 ```text theme={null}
NVIDIA BF16 Hugging Face checkpoint ->
Qualcomm Llama 3.1 8B PyTorch wrapper ->
Fixed-shape ONNX graphs ->
AIMET-ONNX W4A16 calibration ->
model.encodings + model.data + ONNX graphs ->
Qualcomm AI Hub Workbench
- split into five model parts
- compile prompt processor (sequence length 128)
- compile token generator (sequence length 1)
- link shared-weight binaries for QCS9075 ->
Five-bin Genie bundle ->
QAIRT 2.45 + Genie + QnnHtp ->
Hexagon v73 on the physical IQ-9075 EVK
```
### Technical concepts
**W4A16** means most weights are represented with 4-bit integers while activations remain 16-bit. Qualcomm also keeps selected tensors, including the language-model head and KV-cache interfaces, at higher precision where needed.
**ONNX** short for Open Neural Network Exchange, is a portable model format for representing machine-learning models independently of the framework they were trained in. A model trained in PyTorch, TensorFlow, or another framework can be exported to ONNX, then optimized, quantized, compiled, or run by different inference engines and hardware toolchains. In practice, ONNX acts as an interchange layer: it describes the model graph, operators, tensor shapes, weights, and metadata in a standardized way so deployment tools can consume the model without depending directly on the original training framework.
**AIMET** short for AI Model Efficiency Toolkit, is Qualcomm’s open-source toolkit for compressing and optimizing neural networks before deployment. It is commonly used for quantization, calibration, and accuracy recovery, helping convert large floating-point models into lower-precision formats such as INT8 or W4A16 while preserving as much model quality as possible. In a Qualcomm deployment pipeline, AIMET often sits between model export, such as ONNX, and hardware compilation, producing quantization encodings and calibrated artifacts that downstream Qualcomm tools can compile for efficient inference on target accelerators.
**QuantSim** is AIMET's quantization simulation graph. It inserts quantize/dequantize operations into ONNX so calibration can estimate scales and the host can approximate on-device numerical behavior before compilation.
**Prompt processor versus token generator:** the prompt processor consumes chunks of the input, 128 tokens per invocation in this deployment. The token generator consumes one token at a time after the first output token. Both graphs must work; validating only the calibration-shape graph is insufficient.
**KV cache** stores attention keys and values from previous tokens. It avoids recomputing the whole prompt for every generated token, but its dimensions depend on context length and are therefore compiled into the deployment graphs.
**HTP/cDSP:** Qualcomm's Hexagon Tensor Processor is accessed through the compute DSP and FastRPC transport. The application uses host-side QNN libraries, DSP-side skel libraries, a kernel FastRPC device, and a userspace daemon. A failure in any layer can appear as a generic device-creation error.
**BFCL**
***
## Hardware and software used for the successful run
### Host workstation
| Component | Validated setup |
| --------------------------- | ------------------------------------------------------ |
| Host OS | Windows host with WSL2 Linux |
| GPU | NVIDIA GeForce RTX 5090, compute capability `sm_120` |
| System RAM | 192 GB |
| Python environment | Conda, Python 3.10.20 |
| Repository location | WSL-native Linux filesystem, not `/mnt/c` |
| Peak full-quantization RSS | 174 GiB |
| Full quantization wall time | 45 minutes |
| Disk use during development | More than 128 GB under the project, plus shared caches |
### Target device
| Component | Setup |
| ------------------ | ------------------------------------------------------------- |
| Board | Qualcomm Dragonwing IQ-9075 EVK |
| Chipset | QCS9075 |
| Memory | 36 GB LPDDR5 |
| Operating system | Ubuntu on the EVK |
| Accelerator | Hexagon v73 HTP/NPU |
| QAIRT runtime | `2.45.0.260326`, matching compile build `2.45.0.260326154327` |
| Runtime executable | `genie-t2t-run` |
### Why this host is unusually large
The final W4A16 checkpoint itself is only part of the story. During QuantSim creation, ONNX export, calibration, and checkpoint serialization, the host temporarily holds large graph structures and external tensor data. The successful 4K-context run reached roughly 174 GiB resident memory. A smaller workstation may complete a reduced smoke test but still fail on the full `4096 / 2048 / 20` run. A few detours arose due to compatibility issues with the RTX 5090 (sm\_120); this tutorial addresses these, as that card is the only feasibly obtainable “enthusiast-level” option capable of the task at hand.
For a lower-memory host, use a bare-metal Linux server or cloud A100/H100-class machine with at least 192-256 GB system RAM. The compiled bundle can then be copied back to the EVK.
***
# Prepare WSL2 and storage
## Work in the Linux filesystem
Store the project under the WSL filesystem:
```bash theme={null}
mkdir -p ~/repos-native/qai-nemotron
cd ~/repos-native/qai-nemotron
```
Windows Subsystem for Linux (WSL2): Avoid doing large ONNX and checkpoint operations under `/mnt/c`. Cross-filesystem I/O is slower, and this workflow performs hundreds of gigabytes of reads and writes.
## Make enough memory visible to WSL
The first failed runs were killed by Linux even though the Windows host had 191 GB of RAM. WSL2 had its own lower memory limit.
Create this Windows-side file if it does not already exist:
```text theme={null}
C:\Users\\.wslconfig
```
Example for a very high-memory workstation:
```ini theme={null}
[wsl2]
memory=176GB
swap=96GB
```
Then run in PowerShell or Command Prompt:
```powershell theme={null}
wsl --shutdown
```
After reopening WSL, verify what Linux can see:
```bash theme={null}
free -h
swapon --show
grep -E 'MemTotal|SwapTotal' /proc/meminfo
```
**Gotcha:** the exact values must leave enough memory for Windows. The full run in this tutorial used about 173.6 GiB RSS. If your host cannot expose that much, move quantization to a server, such as [Lambda Cloud](https://lambda.ai/).
## Plan for disk use
Before starting:
```bash theme={null}
df -h ~
```
A practical recommendation is at least 200 GB free. Multiple failed or validation checkpoints can each contain a 30+ GB `model.data` file, several ONNX graphs, encodings, temporary archives, Hugging Face weights, CUDA packages, and pip/Conda caches.
***
# Create a version-aligned host environment
The environment is the most important reproducibility detail in this tutorial.
My first Python 3.12 environment with AIMET-ONNX 2.33 and ONNX Runtime GPU 1.22 completed quantization, but the deployment-shape graphs emitted multilingual token salad (™). The graph used directly for calibration could produce a correct token, while the separately exported 128-token and 1-token graphs were wrong. Quantization success messages did not guarantee a valid checkpoint.
The working environment aligned to Qualcomm's Llama 3.1 recipe wherever possible, while retaining a newer PyTorch build for the RTX 5090.
## Create a Python 3.10 Conda environment
```bash theme={null}
conda create -n qai-qcom310 python=3.10 pip -y
conda activate qai-qcom310
unset PYTHONPATH
export PYTHONNOUSERSITE=1
python -m pip install --upgrade pip setuptools wheel
```
Verify:
```bash theme={null}
which python
python -V
```
Expected:
```text theme={null}
/home//miniconda3/envs/qai-qcom310/bin/python
Python 3.10.x
```
## Install Blackwell-compatible PyTorch
Qualcomm's model-specific package originally pinned PyTorch 2.4.1/CUDA 12.1. That build recognized the RTX 5090 but lacked `sm_120` kernels. PyTorch warned that the GPU was incompatible.
Install CUDA 12.8 wheels instead:
```bash theme={null}
python -m pip install \
torch==2.7.1 \
torchvision==0.22.1 \
--index-url https://download.pytorch.org/whl/cu128
```
Test a real CUDA kernel, not just device enumeration:
```bash theme={null}
python - <<'PY'
import torch
print('torch:', torch.__version__)
print('CUDA runtime:', torch.version.cuda)
print('CUDA available:', torch.cuda.is_available())
print('GPU:', torch.cuda.get_device_name(0))
print('capability:', torch.cuda.get_device_capability(0))
x = torch.randn((1024, 1024), device='cuda')
y = x @ x
torch.cuda.synchronize()
print('CUDA matmul passed:', float(y[0, 0]))
PY
```
## Install QAI Hub Models without the Llama extra
Do not install the Llama extra directly in this environment, because it can downgrade PyTorch to the incompatible version.
```bash theme={null}
cat > /tmp/qai-qcom310-constraints.txt <<'EOF'
numpy==1.26.4
torch==2.7.1
torchvision==0.22.1
transformers==4.45.0
onnx==1.18.0
onnxsim==0.5.0
EOF
python -m pip install \
-c /tmp/qai-qcom310-constraints.txt \
numpy==1.26.4 \
qai-hub-models==0.56.0
python -m pip install \
-c /tmp/qai-qcom310-constraints.txt \
transformers==4.45.0 \
sentencepiece==0.2.1 \
psutil==6.1.1 \
onnx==1.18.0 \
onnxsim==0.5.0
```
## Install Qualcomm's AIMET-ONNX 2.26 wheel
```bash theme={null}
python -m pip install \
'https://github.com/quic/aimet/releases/download/2.26.0/aimet_onnx-2.26.0+cu121-cp310-cp310-manylinux_2_34_x86_64.whl'
```
The wheel is built specifically for CPython 3.10, which is why this environment cannot use Python 3.12.
## Install ONNX Runtime GPU last
```bash theme={null}
python -m pip uninstall -y onnxruntime onnxruntime-gpu
python -m pip install --no-deps onnxruntime-gpu==1.23.2
```
**Gotcha:** `qai-hub-models` metadata may complain that plain `onnxruntime` is absent. Do not install both CPU and GPU distributions just to satisfy metadata. Both provide the same `onnxruntime` Python module, and whichever was installed last can silently replace the other.
## Fix AIMET's `libpython3.10.so.1.0` lookup
The first AIMET 2.26 run failed with:
```text theme={null}
RuntimeError: Unable to run function PtrToInt64
libpython3.10.so.1.0: cannot open shared object file
```
The library existed inside the Conda environment, but the native loader did not search that directory.
```bash theme={null}
export LD_LIBRARY_PATH="$CONDA_PREFIX/lib${LD_LIBRARY_PATH:+:$LD_LIBRARY_PATH}"
```
Make it persistent for this environment:
```bash theme={null}
mkdir -p "$CONDA_PREFIX/etc/conda/activate.d"
cat > "$CONDA_PREFIX/etc/conda/activate.d/qai-libpython.sh" <<'EOF'
export LD_LIBRARY_PATH="$CONDA_PREFIX/lib${LD_LIBRARY_PATH:+:$LD_LIBRARY_PATH}"
EOF
```
Test:
```bash theme={null}
python - <<'PY'
import ctypes
lib = ctypes.CDLL('libpython3.10.so.1.0', mode=ctypes.RTLD_GLOBAL)
print('Loaded:', lib._name)
PY
```
## Verify the exact environment
```bash theme={null}
python - <<'PY'
import sys
from importlib.metadata import PackageNotFoundError, version
import torch
import onnxruntime as ort
import aimet_onnx
packages = [
'qai-hub-models', 'aimet-onnx', 'onnx',
'onnxruntime-gpu', 'transformers', 'torch',
'torchvision', 'numpy'
]
print('Python:', sys.version)
for package in packages:
try:
print(f'{package:22} {version(package)}')
except PackageNotFoundError:
print(f'{package:22} not installed')
print('GPU:', torch.cuda.get_device_name(0))
print('Capability:', torch.cuda.get_device_capability(0))
print('ORT providers:', ort.get_available_providers())
print('AIMET:', aimet_onnx.__file__)
PY
```
The validated core versions were:
```text theme={null}
Python 3.10.20
qai-hub-models 0.56.0
aimet-onnx 2.26.0+cu121
onnx 1.18.0
onnxruntime-gpu 1.23.2
transformers 4.45.0
torch 2.7.1+cu128
torchvision 0.22.1+cu128
```
Save the environment in case you need to restore it later:
```bash theme={null}
python -m pip freeze > qai-qcom310-successful-freeze.txt
```
***
# Verify AIMET before spending an hour on the model
## Run a tiny QuantSim test
A successful import is not enough. Exercise AIMET's native `libpymo` path and create a QuantSim session:
```bash theme={null}
python - <<'PY'
import gc
import numpy as np
from onnx import TensorProto, helper, numpy_helper
from aimet_onnx.quantsim import QuantizationSimModel
input_info = helper.make_tensor_value_info('input', TensorProto.FLOAT, [1, 4])
output_info = helper.make_tensor_value_info('output', TensorProto.FLOAT, [1, 4])
weight = numpy_helper.from_array(np.eye(4, dtype=np.float32), name='weight')
node = helper.make_node('MatMul', ['input', 'weight'], ['output'])
graph = helper.make_graph([node], 'aimet_test', [input_info], [output_info], [weight])
model = helper.make_model(graph, opset_imports=[helper.make_opsetid('', 13)])
model.ir_version = 9
sim = QuantizationSimModel(
model=model,
providers=['CUDAExecutionProvider', 'CPUExecutionProvider'],
)
print('QuantSim providers:', sim.session.get_providers())
print('AIMET libpymo test passed')
del sim
gc.collect()
PY
```
Expected:
```text theme={null}
QuantSim providers: ['CUDAExecutionProvider', 'CPUExecutionProvider']
AIMET libpymo test passed
```
A cleanup-only `__del__` warning after process exit can be ignored if the test itself passed and returned exit code zero.
***
# Quantize Nemotron
## Authenticate with Hugging Face if needed
Accept the relevant model licenses and log in:
```bash theme={null}
python -m pip install 'huggingface_hub[cli]'
hf auth login
```
## Run a small validation quantization first
```bash theme={null}
cd ~/repos-native/qai-nemotron
conda activate qai-qcom310
export LD_LIBRARY_PATH="$CONDA_PREFIX/lib${LD_LIBRARY_PATH:+:$LD_LIBRARY_PATH}"
rm -rf nemotron_validation_ckpt_py310_aimet226
PYTORCH_CUDA_ALLOC_CONF=expandable_segments:True \
python -m qai_hub_models.models.llama_v3_1_8b_instruct.quantize \
--checkpoint nvidia/Llama-3.1-Nemotron-Nano-8B-v1 \
--context-length 512 \
--calibration-sequence-length 128 \
--num-samples 1 \
--output-dir nemotron_validation_ckpt_py310_aimet226
```
This still loads the entire 8B model and can take 30-60 minutes. The smaller values reduce calibration and graph dimensions; they do not turn the model into a small model.
### Warnings that were nonfatal in this run
You may see:
```text theme={null}
TracerWarning: Converting a tensor to a Python boolean...
```
```text theme={null}
The target quantizers could not be found. MatMul exception rule does not apply...
```
```text theme={null}
Token indices sequence length is longer than the specified maximum...
```
The WikiText warning appears because the dataset loader tokenizes the concatenated corpus before slicing it into context windows. The MatMul messages indicate that individual exception rules were skipped. These warnings were present in my successful run.
## Validate the actual deployment path
Do not test only the graph used directly during calibration. Test the 128-token prompt processor and the sequence-length-1 generator together:
```bash theme={null}
python -m qai_hub_models.models.llama_v3_1_8b_instruct.demo \
--checkpoint nemotron_validation_ckpt_py310_aimet226 \
--context-length 512 \
--sequence-length 128 \
--max-output-tokens 16 \
--seed 42 \
--prompt 'Explain gravity in one short English sentence.'
```
You should see a switch similar to:
```text theme={null}
Switching from sequence_length=128 to sequence_length=1
```
The output must remain coherent after the switch.
### Why this validation matters
With the earlier AIMET 2.33 / Python 3.12 stack, quantization printed `completed successfully`, and the large calibration graph could output the correct first token. Yet the 128-token and 1-token deployment graphs generated Gerald Cooper-ish nonsense. The fix was not more calibration samples; it was the version-aligned environment.
## Run the full 4K-context quantization
```bash theme={null}
FULL_CKPT=nemotron_nano_w4a16_cl4096_py310_aimet226
rm -rf "$FULL_CKPT"
PYTORCH_CUDA_ALLOC_CONF=expandable_segments:True \
/usr/bin/time -v \
python -m qai_hub_models.models.llama_v3_1_8b_instruct.quantize \
--checkpoint nvidia/Llama-3.1-Nemotron-Nano-8B-v1 \
--context-length 4096 \
--calibration-sequence-length 2048 \
--num-samples 20 \
--output-dir "$FULL_CKPT" \
2>&1 | tee quantize_cl4096_aimet226.log
```
Validated result:
```text theme={null}
Quantization completed successfully.
Elapsed time: 44:58.61
Maximum resident set size: 182062912 KiB
Exit status: 0
```
The output directory contained:
```text theme={null}
model.encodings
model.data
model_seqlen2048_cl4096.onnx
model_seqlen128_cl4096.onnx
model_seqlen1_cl4096.onnx
config.json
tokenizer.json
tokenizer_config.json
args.json
```
The shared `model.data` file was approximately 32.1 GB.
## Validate the full checkpoint before cloud compilation
```bash theme={null}
CKPT=nemotron_nano_w4a16_cl4096_py310_aimet226
python -m qai_hub_models.models.llama_v3_1_8b_instruct.demo \
--checkpoint "$CKPT" \
--context-length 4096 \
--sequence-length 128 \
--max-output-tokens 32 \
--seed 42 \
--prompt 'Explain gravity in one short English sentence.'
```
The validated output began:
```text theme={null}
Gravity is the force that causes things to attractively accelerate towards...
```
The wording is not perfect, but the output is coherent. That is sufficient to prove that both deployment-shape graphs work locally.
***
# Compile for QCS9075 in Qualcomm AI Hub
## Configure Qualcomm AI Hub Workbench
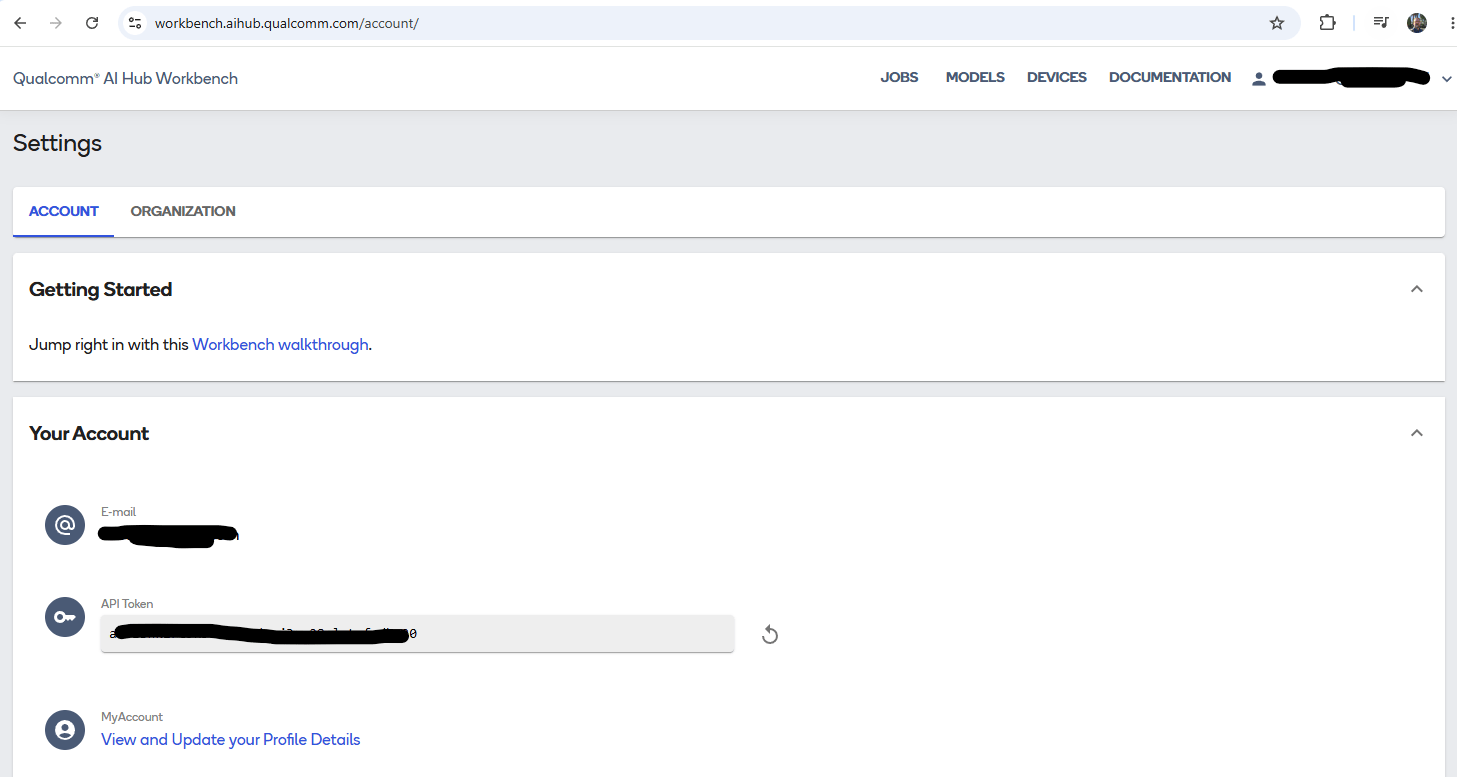
Obtain an API token from the same [Qualcomm account](https://workbench.aihub.qualcomm.com/account/) you will use to inspect jobs:
```text theme={null}
NVIDIA BF16 Hugging Face checkpoint ->
Qualcomm Llama 3.1 8B PyTorch wrapper ->
Fixed-shape ONNX graphs ->
AIMET-ONNX W4A16 calibration ->
model.encodings + model.data + ONNX graphs ->
Qualcomm AI Hub Workbench
- split into five model parts
- compile prompt processor (sequence length 128)
- compile token generator (sequence length 1)
- link shared-weight binaries for QCS9075 ->
Five-bin Genie bundle ->
QAIRT 2.45 + Genie + QnnHtp ->
Hexagon v73 on the physical IQ-9075 EVK
```
### Technical concepts
**W4A16** means most weights are represented with 4-bit integers while activations remain 16-bit. Qualcomm also keeps selected tensors, including the language-model head and KV-cache interfaces, at higher precision where needed.
**ONNX** short for Open Neural Network Exchange, is a portable model format for representing machine-learning models independently of the framework they were trained in. A model trained in PyTorch, TensorFlow, or another framework can be exported to ONNX, then optimized, quantized, compiled, or run by different inference engines and hardware toolchains. In practice, ONNX acts as an interchange layer: it describes the model graph, operators, tensor shapes, weights, and metadata in a standardized way so deployment tools can consume the model without depending directly on the original training framework.
**AIMET** short for AI Model Efficiency Toolkit, is Qualcomm’s open-source toolkit for compressing and optimizing neural networks before deployment. It is commonly used for quantization, calibration, and accuracy recovery, helping convert large floating-point models into lower-precision formats such as INT8 or W4A16 while preserving as much model quality as possible. In a Qualcomm deployment pipeline, AIMET often sits between model export, such as ONNX, and hardware compilation, producing quantization encodings and calibrated artifacts that downstream Qualcomm tools can compile for efficient inference on target accelerators.
**QuantSim** is AIMET's quantization simulation graph. It inserts quantize/dequantize operations into ONNX so calibration can estimate scales and the host can approximate on-device numerical behavior before compilation.
**Prompt processor versus token generator:** the prompt processor consumes chunks of the input, 128 tokens per invocation in this deployment. The token generator consumes one token at a time after the first output token. Both graphs must work; validating only the calibration-shape graph is insufficient.
**KV cache** stores attention keys and values from previous tokens. It avoids recomputing the whole prompt for every generated token, but its dimensions depend on context length and are therefore compiled into the deployment graphs.
**HTP/cDSP:** Qualcomm's Hexagon Tensor Processor is accessed through the compute DSP and FastRPC transport. The application uses host-side QNN libraries, DSP-side skel libraries, a kernel FastRPC device, and a userspace daemon. A failure in any layer can appear as a generic device-creation error.
**BFCL**
***
## Hardware and software used for the successful run
### Host workstation
| Component | Validated setup |
| --------------------------- | ------------------------------------------------------ |
| Host OS | Windows host with WSL2 Linux |
| GPU | NVIDIA GeForce RTX 5090, compute capability `sm_120` |
| System RAM | 192 GB |
| Python environment | Conda, Python 3.10.20 |
| Repository location | WSL-native Linux filesystem, not `/mnt/c` |
| Peak full-quantization RSS | 174 GiB |
| Full quantization wall time | 45 minutes |
| Disk use during development | More than 128 GB under the project, plus shared caches |
### Target device
| Component | Setup |
| ------------------ | ------------------------------------------------------------- |
| Board | Qualcomm Dragonwing IQ-9075 EVK |
| Chipset | QCS9075 |
| Memory | 36 GB LPDDR5 |
| Operating system | Ubuntu on the EVK |
| Accelerator | Hexagon v73 HTP/NPU |
| QAIRT runtime | `2.45.0.260326`, matching compile build `2.45.0.260326154327` |
| Runtime executable | `genie-t2t-run` |
### Why this host is unusually large
The final W4A16 checkpoint itself is only part of the story. During QuantSim creation, ONNX export, calibration, and checkpoint serialization, the host temporarily holds large graph structures and external tensor data. The successful 4K-context run reached roughly 174 GiB resident memory. A smaller workstation may complete a reduced smoke test but still fail on the full `4096 / 2048 / 20` run. A few detours arose due to compatibility issues with the RTX 5090 (sm\_120); this tutorial addresses these, as that card is the only feasibly obtainable “enthusiast-level” option capable of the task at hand.
For a lower-memory host, use a bare-metal Linux server or cloud A100/H100-class machine with at least 192-256 GB system RAM. The compiled bundle can then be copied back to the EVK.
***
# Prepare WSL2 and storage
## Work in the Linux filesystem
Store the project under the WSL filesystem:
```bash theme={null}
mkdir -p ~/repos-native/qai-nemotron
cd ~/repos-native/qai-nemotron
```
Windows Subsystem for Linux (WSL2): Avoid doing large ONNX and checkpoint operations under `/mnt/c`. Cross-filesystem I/O is slower, and this workflow performs hundreds of gigabytes of reads and writes.
## Make enough memory visible to WSL
The first failed runs were killed by Linux even though the Windows host had 191 GB of RAM. WSL2 had its own lower memory limit.
Create this Windows-side file if it does not already exist:
```text theme={null}
C:\Users\\.wslconfig
```
Example for a very high-memory workstation:
```ini theme={null}
[wsl2]
memory=176GB
swap=96GB
```
Then run in PowerShell or Command Prompt:
```powershell theme={null}
wsl --shutdown
```
After reopening WSL, verify what Linux can see:
```bash theme={null}
free -h
swapon --show
grep -E 'MemTotal|SwapTotal' /proc/meminfo
```
**Gotcha:** the exact values must leave enough memory for Windows. The full run in this tutorial used about 173.6 GiB RSS. If your host cannot expose that much, move quantization to a server, such as [Lambda Cloud](https://lambda.ai/).
## Plan for disk use
Before starting:
```bash theme={null}
df -h ~
```
A practical recommendation is at least 200 GB free. Multiple failed or validation checkpoints can each contain a 30+ GB `model.data` file, several ONNX graphs, encodings, temporary archives, Hugging Face weights, CUDA packages, and pip/Conda caches.
***
# Create a version-aligned host environment
The environment is the most important reproducibility detail in this tutorial.
My first Python 3.12 environment with AIMET-ONNX 2.33 and ONNX Runtime GPU 1.22 completed quantization, but the deployment-shape graphs emitted multilingual token salad (™). The graph used directly for calibration could produce a correct token, while the separately exported 128-token and 1-token graphs were wrong. Quantization success messages did not guarantee a valid checkpoint.
The working environment aligned to Qualcomm's Llama 3.1 recipe wherever possible, while retaining a newer PyTorch build for the RTX 5090.
## Create a Python 3.10 Conda environment
```bash theme={null}
conda create -n qai-qcom310 python=3.10 pip -y
conda activate qai-qcom310
unset PYTHONPATH
export PYTHONNOUSERSITE=1
python -m pip install --upgrade pip setuptools wheel
```
Verify:
```bash theme={null}
which python
python -V
```
Expected:
```text theme={null}
/home//miniconda3/envs/qai-qcom310/bin/python
Python 3.10.x
```
## Install Blackwell-compatible PyTorch
Qualcomm's model-specific package originally pinned PyTorch 2.4.1/CUDA 12.1. That build recognized the RTX 5090 but lacked `sm_120` kernels. PyTorch warned that the GPU was incompatible.
Install CUDA 12.8 wheels instead:
```bash theme={null}
python -m pip install \
torch==2.7.1 \
torchvision==0.22.1 \
--index-url https://download.pytorch.org/whl/cu128
```
Test a real CUDA kernel, not just device enumeration:
```bash theme={null}
python - <<'PY'
import torch
print('torch:', torch.__version__)
print('CUDA runtime:', torch.version.cuda)
print('CUDA available:', torch.cuda.is_available())
print('GPU:', torch.cuda.get_device_name(0))
print('capability:', torch.cuda.get_device_capability(0))
x = torch.randn((1024, 1024), device='cuda')
y = x @ x
torch.cuda.synchronize()
print('CUDA matmul passed:', float(y[0, 0]))
PY
```
## Install QAI Hub Models without the Llama extra
Do not install the Llama extra directly in this environment, because it can downgrade PyTorch to the incompatible version.
```bash theme={null}
cat > /tmp/qai-qcom310-constraints.txt <<'EOF'
numpy==1.26.4
torch==2.7.1
torchvision==0.22.1
transformers==4.45.0
onnx==1.18.0
onnxsim==0.5.0
EOF
python -m pip install \
-c /tmp/qai-qcom310-constraints.txt \
numpy==1.26.4 \
qai-hub-models==0.56.0
python -m pip install \
-c /tmp/qai-qcom310-constraints.txt \
transformers==4.45.0 \
sentencepiece==0.2.1 \
psutil==6.1.1 \
onnx==1.18.0 \
onnxsim==0.5.0
```
## Install Qualcomm's AIMET-ONNX 2.26 wheel
```bash theme={null}
python -m pip install \
'https://github.com/quic/aimet/releases/download/2.26.0/aimet_onnx-2.26.0+cu121-cp310-cp310-manylinux_2_34_x86_64.whl'
```
The wheel is built specifically for CPython 3.10, which is why this environment cannot use Python 3.12.
## Install ONNX Runtime GPU last
```bash theme={null}
python -m pip uninstall -y onnxruntime onnxruntime-gpu
python -m pip install --no-deps onnxruntime-gpu==1.23.2
```
**Gotcha:** `qai-hub-models` metadata may complain that plain `onnxruntime` is absent. Do not install both CPU and GPU distributions just to satisfy metadata. Both provide the same `onnxruntime` Python module, and whichever was installed last can silently replace the other.
## Fix AIMET's `libpython3.10.so.1.0` lookup
The first AIMET 2.26 run failed with:
```text theme={null}
RuntimeError: Unable to run function PtrToInt64
libpython3.10.so.1.0: cannot open shared object file
```
The library existed inside the Conda environment, but the native loader did not search that directory.
```bash theme={null}
export LD_LIBRARY_PATH="$CONDA_PREFIX/lib${LD_LIBRARY_PATH:+:$LD_LIBRARY_PATH}"
```
Make it persistent for this environment:
```bash theme={null}
mkdir -p "$CONDA_PREFIX/etc/conda/activate.d"
cat > "$CONDA_PREFIX/etc/conda/activate.d/qai-libpython.sh" <<'EOF'
export LD_LIBRARY_PATH="$CONDA_PREFIX/lib${LD_LIBRARY_PATH:+:$LD_LIBRARY_PATH}"
EOF
```
Test:
```bash theme={null}
python - <<'PY'
import ctypes
lib = ctypes.CDLL('libpython3.10.so.1.0', mode=ctypes.RTLD_GLOBAL)
print('Loaded:', lib._name)
PY
```
## Verify the exact environment
```bash theme={null}
python - <<'PY'
import sys
from importlib.metadata import PackageNotFoundError, version
import torch
import onnxruntime as ort
import aimet_onnx
packages = [
'qai-hub-models', 'aimet-onnx', 'onnx',
'onnxruntime-gpu', 'transformers', 'torch',
'torchvision', 'numpy'
]
print('Python:', sys.version)
for package in packages:
try:
print(f'{package:22} {version(package)}')
except PackageNotFoundError:
print(f'{package:22} not installed')
print('GPU:', torch.cuda.get_device_name(0))
print('Capability:', torch.cuda.get_device_capability(0))
print('ORT providers:', ort.get_available_providers())
print('AIMET:', aimet_onnx.__file__)
PY
```
The validated core versions were:
```text theme={null}
Python 3.10.20
qai-hub-models 0.56.0
aimet-onnx 2.26.0+cu121
onnx 1.18.0
onnxruntime-gpu 1.23.2
transformers 4.45.0
torch 2.7.1+cu128
torchvision 0.22.1+cu128
```
Save the environment in case you need to restore it later:
```bash theme={null}
python -m pip freeze > qai-qcom310-successful-freeze.txt
```
***
# Verify AIMET before spending an hour on the model
## Run a tiny QuantSim test
A successful import is not enough. Exercise AIMET's native `libpymo` path and create a QuantSim session:
```bash theme={null}
python - <<'PY'
import gc
import numpy as np
from onnx import TensorProto, helper, numpy_helper
from aimet_onnx.quantsim import QuantizationSimModel
input_info = helper.make_tensor_value_info('input', TensorProto.FLOAT, [1, 4])
output_info = helper.make_tensor_value_info('output', TensorProto.FLOAT, [1, 4])
weight = numpy_helper.from_array(np.eye(4, dtype=np.float32), name='weight')
node = helper.make_node('MatMul', ['input', 'weight'], ['output'])
graph = helper.make_graph([node], 'aimet_test', [input_info], [output_info], [weight])
model = helper.make_model(graph, opset_imports=[helper.make_opsetid('', 13)])
model.ir_version = 9
sim = QuantizationSimModel(
model=model,
providers=['CUDAExecutionProvider', 'CPUExecutionProvider'],
)
print('QuantSim providers:', sim.session.get_providers())
print('AIMET libpymo test passed')
del sim
gc.collect()
PY
```
Expected:
```text theme={null}
QuantSim providers: ['CUDAExecutionProvider', 'CPUExecutionProvider']
AIMET libpymo test passed
```
A cleanup-only `__del__` warning after process exit can be ignored if the test itself passed and returned exit code zero.
***
# Quantize Nemotron
## Authenticate with Hugging Face if needed
Accept the relevant model licenses and log in:
```bash theme={null}
python -m pip install 'huggingface_hub[cli]'
hf auth login
```
## Run a small validation quantization first
```bash theme={null}
cd ~/repos-native/qai-nemotron
conda activate qai-qcom310
export LD_LIBRARY_PATH="$CONDA_PREFIX/lib${LD_LIBRARY_PATH:+:$LD_LIBRARY_PATH}"
rm -rf nemotron_validation_ckpt_py310_aimet226
PYTORCH_CUDA_ALLOC_CONF=expandable_segments:True \
python -m qai_hub_models.models.llama_v3_1_8b_instruct.quantize \
--checkpoint nvidia/Llama-3.1-Nemotron-Nano-8B-v1 \
--context-length 512 \
--calibration-sequence-length 128 \
--num-samples 1 \
--output-dir nemotron_validation_ckpt_py310_aimet226
```
This still loads the entire 8B model and can take 30-60 minutes. The smaller values reduce calibration and graph dimensions; they do not turn the model into a small model.
### Warnings that were nonfatal in this run
You may see:
```text theme={null}
TracerWarning: Converting a tensor to a Python boolean...
```
```text theme={null}
The target quantizers could not be found. MatMul exception rule does not apply...
```
```text theme={null}
Token indices sequence length is longer than the specified maximum...
```
The WikiText warning appears because the dataset loader tokenizes the concatenated corpus before slicing it into context windows. The MatMul messages indicate that individual exception rules were skipped. These warnings were present in my successful run.
## Validate the actual deployment path
Do not test only the graph used directly during calibration. Test the 128-token prompt processor and the sequence-length-1 generator together:
```bash theme={null}
python -m qai_hub_models.models.llama_v3_1_8b_instruct.demo \
--checkpoint nemotron_validation_ckpt_py310_aimet226 \
--context-length 512 \
--sequence-length 128 \
--max-output-tokens 16 \
--seed 42 \
--prompt 'Explain gravity in one short English sentence.'
```
You should see a switch similar to:
```text theme={null}
Switching from sequence_length=128 to sequence_length=1
```
The output must remain coherent after the switch.
### Why this validation matters
With the earlier AIMET 2.33 / Python 3.12 stack, quantization printed `completed successfully`, and the large calibration graph could output the correct first token. Yet the 128-token and 1-token deployment graphs generated Gerald Cooper-ish nonsense. The fix was not more calibration samples; it was the version-aligned environment.
## Run the full 4K-context quantization
```bash theme={null}
FULL_CKPT=nemotron_nano_w4a16_cl4096_py310_aimet226
rm -rf "$FULL_CKPT"
PYTORCH_CUDA_ALLOC_CONF=expandable_segments:True \
/usr/bin/time -v \
python -m qai_hub_models.models.llama_v3_1_8b_instruct.quantize \
--checkpoint nvidia/Llama-3.1-Nemotron-Nano-8B-v1 \
--context-length 4096 \
--calibration-sequence-length 2048 \
--num-samples 20 \
--output-dir "$FULL_CKPT" \
2>&1 | tee quantize_cl4096_aimet226.log
```
Validated result:
```text theme={null}
Quantization completed successfully.
Elapsed time: 44:58.61
Maximum resident set size: 182062912 KiB
Exit status: 0
```
The output directory contained:
```text theme={null}
model.encodings
model.data
model_seqlen2048_cl4096.onnx
model_seqlen128_cl4096.onnx
model_seqlen1_cl4096.onnx
config.json
tokenizer.json
tokenizer_config.json
args.json
```
The shared `model.data` file was approximately 32.1 GB.
## Validate the full checkpoint before cloud compilation
```bash theme={null}
CKPT=nemotron_nano_w4a16_cl4096_py310_aimet226
python -m qai_hub_models.models.llama_v3_1_8b_instruct.demo \
--checkpoint "$CKPT" \
--context-length 4096 \
--sequence-length 128 \
--max-output-tokens 32 \
--seed 42 \
--prompt 'Explain gravity in one short English sentence.'
```
The validated output began:
```text theme={null}
Gravity is the force that causes things to attractively accelerate towards...
```
The wording is not perfect, but the output is coherent. That is sufficient to prove that both deployment-shape graphs work locally.
***
# Compile for QCS9075 in Qualcomm AI Hub
## Configure Qualcomm AI Hub Workbench
Obtain an API token from the same [Qualcomm account](https://workbench.aihub.qualcomm.com/account/) you will use to inspect jobs:
 ```bash theme={null}
qai-hub configure --api_token YOUR_API_TOKEN
```
## Export for the Dragonwing IQ-9075 EVK
```bash theme={null}
CKPT=nemotron_nano_w4a16_cl4096_py310_aimet226
OUT=nemotron_iq9075_genie
rm -rf "$OUT"
python -m qai_hub_models.models.llama_v3_1_8b_instruct.export \
--checkpoint "$CKPT" \
--device 'Dragonwing IQ-9075 EVK' \
--context-length 4096 \
--sequence-length 128,1 \
--model-cache-mode disable \
--skip-profiling \
--skip-inferencing \
--output-dir "$OUT"
```
### What this command actually does
It does **not** upload the model to your physical EVK. It uploads AIMET/ONNX artifacts to Qualcomm AI Hub Workbench, compiles them for the QCS9075 target, links them into runtime binaries, and downloads a Genie bundle back to the host.
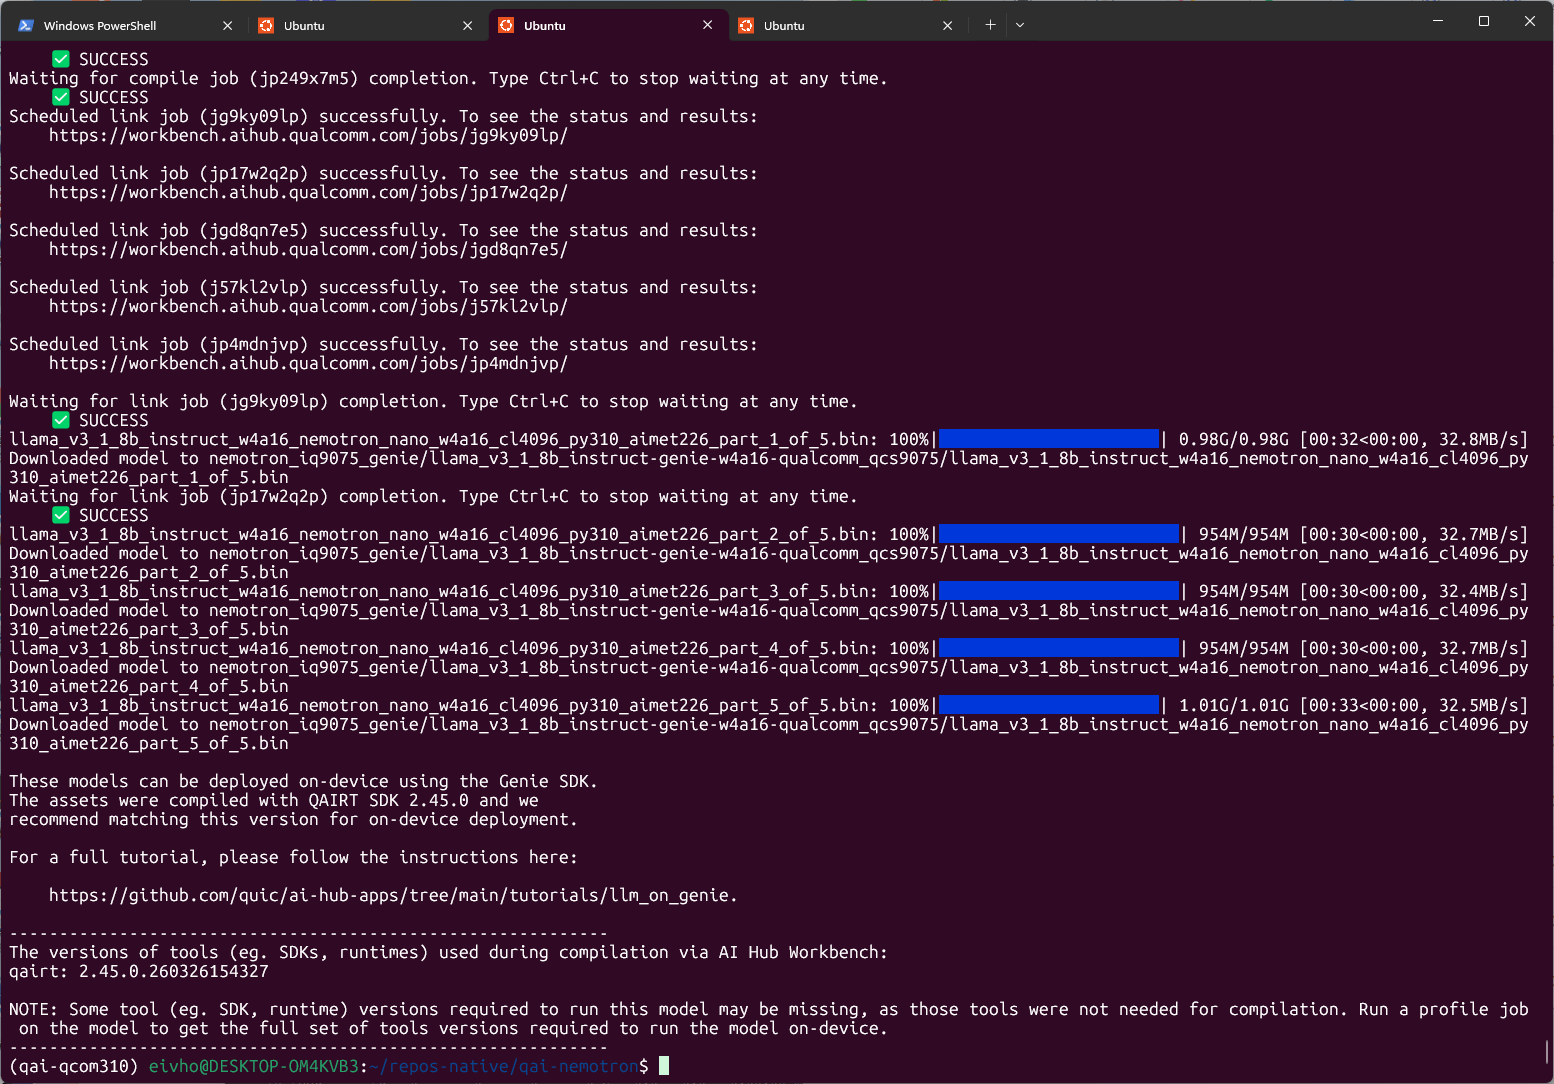
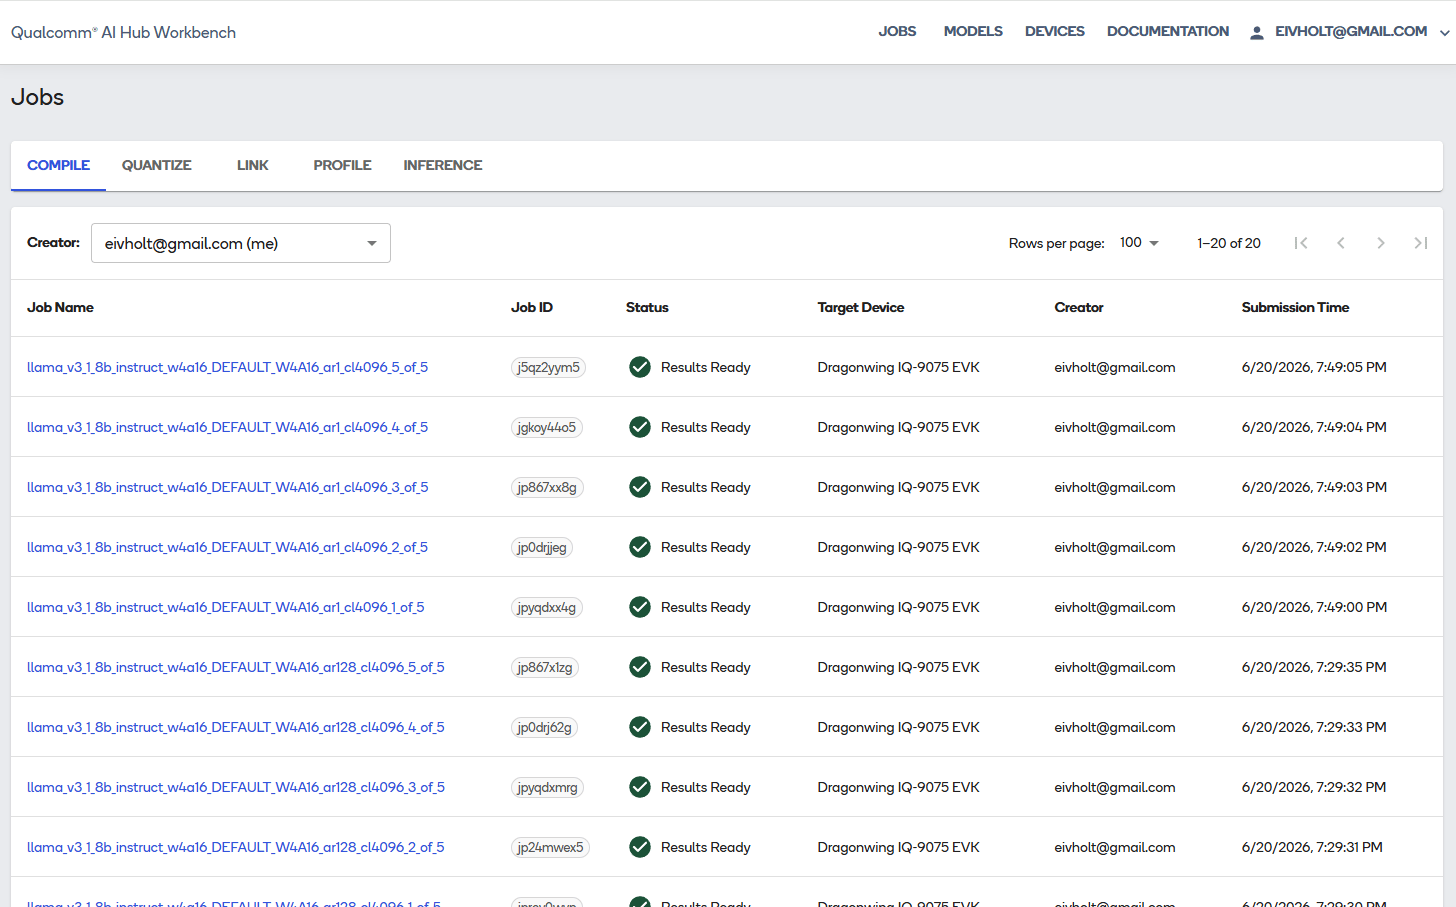
Because the model is split into five parts and needs two sequence lengths, Workbench creates:
* five compile jobs for the 128-token prompt processor;
* five compile jobs for the 1-token generator;
* five link jobs that combine corresponding parts and share weights.
This can take a while, but progress is reported both in client and web app.
```bash theme={null}
qai-hub configure --api_token YOUR_API_TOKEN
```
## Export for the Dragonwing IQ-9075 EVK
```bash theme={null}
CKPT=nemotron_nano_w4a16_cl4096_py310_aimet226
OUT=nemotron_iq9075_genie
rm -rf "$OUT"
python -m qai_hub_models.models.llama_v3_1_8b_instruct.export \
--checkpoint "$CKPT" \
--device 'Dragonwing IQ-9075 EVK' \
--context-length 4096 \
--sequence-length 128,1 \
--model-cache-mode disable \
--skip-profiling \
--skip-inferencing \
--output-dir "$OUT"
```
### What this command actually does
It does **not** upload the model to your physical EVK. It uploads AIMET/ONNX artifacts to Qualcomm AI Hub Workbench, compiles them for the QCS9075 target, links them into runtime binaries, and downloads a Genie bundle back to the host.
Because the model is split into five parts and needs two sequence lengths, Workbench creates:
* five compile jobs for the 128-token prompt processor;
* five compile jobs for the 1-token generator;
* five link jobs that combine corresponding parts and share weights.
This can take a while, but progress is reported both in client and web app.
 ### Privacy and licensing note
This step sends model-derived artifacts to Qualcomm's cloud service. Review NVIDIA, Meta, Qualcomm, and organizational policies before using proprietary or restricted checkpoints.
## Inspect the downloaded bundle
The validated bundle was written beneath:
```text theme={null}
nemotron_iq9075_genie/
llama_v3_1_8b_instruct-genie-w4a16-qualcomm_qcs9075/
```
It contained five binaries totaling roughly 5 GB:
```text theme={null}
...part_1_of_5.bin
...part_2_of_5.bin
...part_3_of_5.bin
...part_4_of_5.bin
...part_5_of_5.bin
genie_config.json
htp_backend_ext_config.json
tokenizer.json
tool-versions.yaml
```
The filenames retain `llama_v3_1_8b_instruct` because that is the Qualcomm implementation used for graph construction. The checkpoint name embedded in the filenames and the weights inside the bundle are the Nemotron checkpoint.
Check the required runtime:
```bash theme={null}
cat "$OUT"/*/tool-versions.yaml
```
Validated output:
```text theme={null}
qairt: 2.45.0.260326154327
```
***
# Copy the bundle to the EVK
## Transfer the complete directory
From the host:
```bash theme={null}
BUNDLE="$OUT/llama_v3_1_8b_instruct-genie-w4a16-qualcomm_qcs9075"
rsync -avh --progress \
"$BUNDLE/" \
ubuntu@EVK_IP:~/nemotron_genie/
```
Do not copy only the `.bin` files. Genie also needs the tokenizer and JSON configuration files.
***
# Install QAIRT on the EVK
No Python environment is required on the EVK for inference. Genie is a native QAIRT executable.
## Install QAIRT 2.45
Run on the EVK:
```bash theme={null}
sudo apt-get update
sudo apt-get install -y curl ca-certificates unzip rsync
QAIRT_VER='2.45.0.260326'
QAIRT_ZIP="/tmp/v${QAIRT_VER}.zip"
QAIRT_URL="https://softwarecenter.qualcomm.com/api/download/software/sdks/Qualcomm_AI_Runtime_Community/All/${QAIRT_VER}/v${QAIRT_VER}.zip"
curl -fL --retry 3 "$QAIRT_URL" -o "$QAIRT_ZIP"
TMP_UNZIP="$(mktemp -d)"
unzip -q "$QAIRT_ZIP" -d "$TMP_UNZIP"
sudo mkdir -p "/opt/qairt/${QAIRT_VER}"
if [ -d "$TMP_UNZIP/qairt/${QAIRT_VER}" ]; then
sudo rsync -a "$TMP_UNZIP/qairt/${QAIRT_VER}/" "/opt/qairt/${QAIRT_VER}/"
else
sudo rsync -a "$TMP_UNZIP/" "/opt/qairt/${QAIRT_VER}/"
fi
sudo ln -sfn "/opt/qairt/${QAIRT_VER}" /opt/qairt/current
sudo chmod -R a+rX "/opt/qairt/${QAIRT_VER}"
rm -rf "$TMP_UNZIP" "$QAIRT_ZIP"
```
If Software Center requires authentication, download the ZIP on your host and copy it to `/tmp` on the EVK.
## Create a clean QAIRT environment script
The IQ-9075 is QCS9075 with Hexagon v73.
```bash theme={null}
cat > "$HOME/qairt-env.sh" <<'EOF'
#!/usr/bin/env bash
export QAIRT_HOME='/opt/qairt/current'
export QAIRT_SDK_ROOT="$QAIRT_HOME"
export QNN_SDK_ROOT="$QAIRT_HOME"
export QAIRT_TARGET='aarch64-oe-linux-gcc11.2'
export PRODUCT_SOC='9075'
export DSP_ARCH='73'
# Use one QAIRT/QNN installation only.
export PATH="$QAIRT_HOME/bin/$QAIRT_TARGET:/usr/local/sbin:/usr/local/bin:/usr/sbin:/usr/bin:/sbin:/bin"
export LD_LIBRARY_PATH="$QAIRT_HOME/lib/$QAIRT_TARGET:/usr/lib/aarch64-linux-gnu:/lib/aarch64-linux-gnu"
export ADSP_LIBRARY_PATH="$QAIRT_HOME/lib/hexagon-v73/unsigned"
EOF
chmod +x "$HOME/qairt-env.sh"
source "$HOME/qairt-env.sh"
hash -r
```
Verify:
```bash theme={null}
printf 'QAIRT_HOME=%s\n' "$QAIRT_HOME"
printf 'LD_LIBRARY_PATH=%s\n' "$LD_LIBRARY_PATH"
printf 'ADSP_LIBRARY_PATH=%s\n' "$ADSP_LIBRARY_PATH"
type -a genie-t2t-run
readlink -f "$(command -v genie-t2t-run)"
```
***
# Install FastRPC and enable the DSP
## Understand error 14001
My first Genie run failed with:
```text theme={null}
Failed to create device: 14001
Device Creation failure
```
The model binaries had not failed. QNN could not create the HTP device because the EVK lacked the userspace FastRPC library, the FastRPC daemon was not provisioned, and `/dev/fastrpc-cdsp` was accessible only to root. I quickly found this issue reported in Qualcomm repo.
FastRPC is the transport between the ARM CPU process and the compute DSP. The host application loads QNN stub libraries; FastRPC communicates with the DSP process that loads the matching skel libraries.
## Install the Qualcomm FastRPC packages
```bash theme={null}
sudo apt-get update
sudo apt-get install -y software-properties-common acl
if ! grep -Rqs 'ubuntu-qcom-iot/qcom-ppa' \
/etc/apt/sources.list /etc/apt/sources.list.d 2>/dev/null; then
sudo add-apt-repository -y ppa:ubuntu-qcom-iot/qcom-ppa
fi
sudo apt-get update
sudo apt-get install -y \
qcom-fastrpc1 \
qcom-fastrpc-dev \
qcom-libdmabufheap-dev
sudo ldconfig
```
Do not install a second QNN runtime from the PPA unless you intentionally want to replace QAIRT's QNN libraries. Mixing `/usr/lib` QNN libraries with `/opt/qairt` DSP libraries can cause stub/skel version errors.
## Add the user to the FastRPC group
```bash theme={null}
sudo systemd-sysusers
getent group fastrpc || sudo groupadd --system fastrpc
sudo usermod -aG fastrpc ubuntu
sudo reboot
```
After reconnecting:
```bash theme={null}
source "$HOME/qairt-env.sh"
id
ls -l /dev/fastrpc-cdsp
ldconfig -p | grep libcdsprpc
systemctl --no-pager --full status cdsprpcd
```
The validated state was:
```text theme={null}
ubuntu is a member of fastrpc
/dev/fastrpc-cdsp is group-accessible
libcdsprpc.so resolves from /lib/aarch64-linux-gnu
cdsprpcd is active
```
## Validate the Hexagon backend independently
```bash theme={null}
qnn-platform-validator --backend dsp --coreVersion
qnn-platform-validator --backend dsp --testBackend
```
Expected summary:
```text theme={null}
Backend Hardware : Supported
Backend Libraries : Found
Core Version : Hexagon Architecture V73
Unit Test : Passed
```
An `Error in saving the results` message can be ignored when the summary reports success.
***
# Run Nemotron on the EVK
## Create a correctly formatted prompt
Use a prompt file with real newlines. Nemotron's reasoning mode is controlled through the system prompt.
```bash theme={null}
cd ~/nemotron_genie
cat > prompt.txt <<'EOF'
<|begin_of_text|><|start_header_id|>system<|end_header_id|>
detailed thinking off<|eot_id|><|start_header_id|>user<|end_header_id|>
Explain gravity in one short English sentence.<|eot_id|><|start_header_id|>assistant<|end_header_id|>
EOF
```
For reasoning-on experiments, replace the system content with:
```text theme={null}
detailed thinking on
```
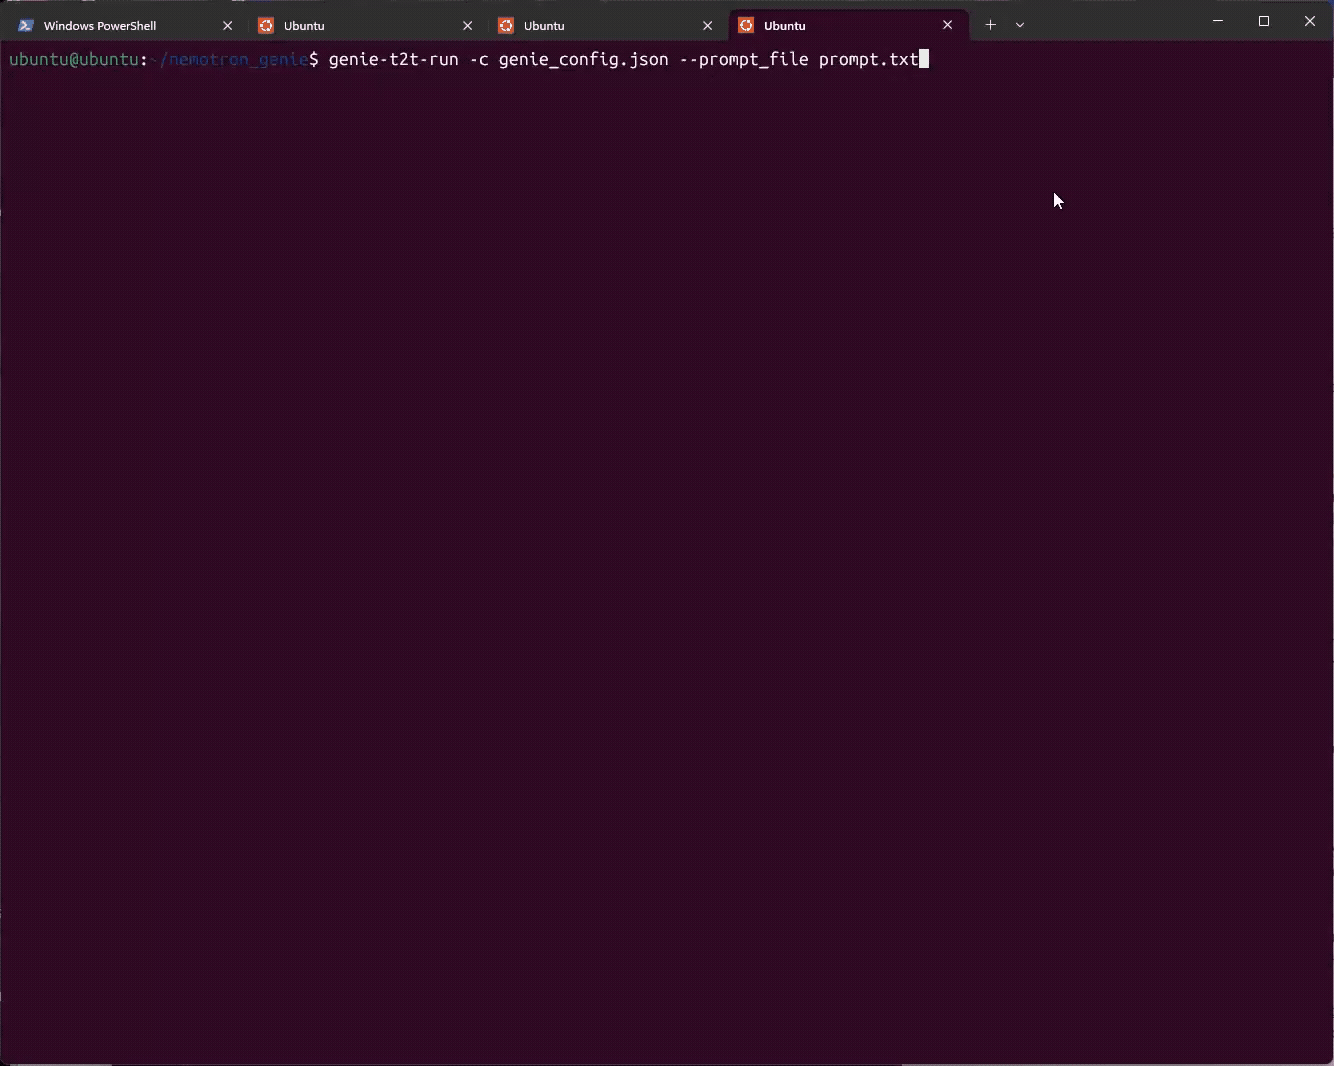
## Run Genie and save a profile
```bash theme={null}
source "$HOME/qairt-env.sh"
cd ~/nemotron_genie
set -o pipefail
genie-t2t-run \
-c genie_config.json \
--prompt_file prompt.txt \
--profile profile.txt \
2>&1 | tee genie-run.log
echo "exit code: ${PIPESTATUS[0]}"
```
Validated output:
```text theme={null}
Using libGenie.so version 1.17.0
[INFO] "Using create From Binary"
[INFO] "Allocated total size = 306545152 across 10 buffers"
[BEGIN]: Gravity is the force that pulls objects toward each other...
[END]
exit code: 0
```
The `rpcmem_android.c` dummy-call messages are informational; the runtime is using the platform FastRPC implementation.
## Interpret the profile
The successful run reported:
| Metric | Result |
| --------------------------- | --------------: |
| Model/dialog initialization | 4.06 s |
| Prompt tokens | 29 |
| Prompt-processing rate | 158.05 tokens/s |
| Time to first token | 183.5 ms |
| Generated tokens | 31 |
| Token-generation rate | 10.03 tokens/s |
| Token-generation time | 3.09 s |
The initialization cost is usually paid once in a persistent service. The 10.03 tokens/s decode rate is almost identical to Qualcomm's published result for Llama 3.1 8B W4A16 on IQ-9075, which is strong evidence that the custom Nemotron checkpoint is using the intended HTP path rather than silently falling back to CPU.
The following short demo runs on the EVK and demonstrates Nemotron Nano producing a curl command, extracting a JSON payload property:
##
### Privacy and licensing note
This step sends model-derived artifacts to Qualcomm's cloud service. Review NVIDIA, Meta, Qualcomm, and organizational policies before using proprietary or restricted checkpoints.
## Inspect the downloaded bundle
The validated bundle was written beneath:
```text theme={null}
nemotron_iq9075_genie/
llama_v3_1_8b_instruct-genie-w4a16-qualcomm_qcs9075/
```
It contained five binaries totaling roughly 5 GB:
```text theme={null}
...part_1_of_5.bin
...part_2_of_5.bin
...part_3_of_5.bin
...part_4_of_5.bin
...part_5_of_5.bin
genie_config.json
htp_backend_ext_config.json
tokenizer.json
tool-versions.yaml
```
The filenames retain `llama_v3_1_8b_instruct` because that is the Qualcomm implementation used for graph construction. The checkpoint name embedded in the filenames and the weights inside the bundle are the Nemotron checkpoint.
Check the required runtime:
```bash theme={null}
cat "$OUT"/*/tool-versions.yaml
```
Validated output:
```text theme={null}
qairt: 2.45.0.260326154327
```
***
# Copy the bundle to the EVK
## Transfer the complete directory
From the host:
```bash theme={null}
BUNDLE="$OUT/llama_v3_1_8b_instruct-genie-w4a16-qualcomm_qcs9075"
rsync -avh --progress \
"$BUNDLE/" \
ubuntu@EVK_IP:~/nemotron_genie/
```
Do not copy only the `.bin` files. Genie also needs the tokenizer and JSON configuration files.
***
# Install QAIRT on the EVK
No Python environment is required on the EVK for inference. Genie is a native QAIRT executable.
## Install QAIRT 2.45
Run on the EVK:
```bash theme={null}
sudo apt-get update
sudo apt-get install -y curl ca-certificates unzip rsync
QAIRT_VER='2.45.0.260326'
QAIRT_ZIP="/tmp/v${QAIRT_VER}.zip"
QAIRT_URL="https://softwarecenter.qualcomm.com/api/download/software/sdks/Qualcomm_AI_Runtime_Community/All/${QAIRT_VER}/v${QAIRT_VER}.zip"
curl -fL --retry 3 "$QAIRT_URL" -o "$QAIRT_ZIP"
TMP_UNZIP="$(mktemp -d)"
unzip -q "$QAIRT_ZIP" -d "$TMP_UNZIP"
sudo mkdir -p "/opt/qairt/${QAIRT_VER}"
if [ -d "$TMP_UNZIP/qairt/${QAIRT_VER}" ]; then
sudo rsync -a "$TMP_UNZIP/qairt/${QAIRT_VER}/" "/opt/qairt/${QAIRT_VER}/"
else
sudo rsync -a "$TMP_UNZIP/" "/opt/qairt/${QAIRT_VER}/"
fi
sudo ln -sfn "/opt/qairt/${QAIRT_VER}" /opt/qairt/current
sudo chmod -R a+rX "/opt/qairt/${QAIRT_VER}"
rm -rf "$TMP_UNZIP" "$QAIRT_ZIP"
```
If Software Center requires authentication, download the ZIP on your host and copy it to `/tmp` on the EVK.
## Create a clean QAIRT environment script
The IQ-9075 is QCS9075 with Hexagon v73.
```bash theme={null}
cat > "$HOME/qairt-env.sh" <<'EOF'
#!/usr/bin/env bash
export QAIRT_HOME='/opt/qairt/current'
export QAIRT_SDK_ROOT="$QAIRT_HOME"
export QNN_SDK_ROOT="$QAIRT_HOME"
export QAIRT_TARGET='aarch64-oe-linux-gcc11.2'
export PRODUCT_SOC='9075'
export DSP_ARCH='73'
# Use one QAIRT/QNN installation only.
export PATH="$QAIRT_HOME/bin/$QAIRT_TARGET:/usr/local/sbin:/usr/local/bin:/usr/sbin:/usr/bin:/sbin:/bin"
export LD_LIBRARY_PATH="$QAIRT_HOME/lib/$QAIRT_TARGET:/usr/lib/aarch64-linux-gnu:/lib/aarch64-linux-gnu"
export ADSP_LIBRARY_PATH="$QAIRT_HOME/lib/hexagon-v73/unsigned"
EOF
chmod +x "$HOME/qairt-env.sh"
source "$HOME/qairt-env.sh"
hash -r
```
Verify:
```bash theme={null}
printf 'QAIRT_HOME=%s\n' "$QAIRT_HOME"
printf 'LD_LIBRARY_PATH=%s\n' "$LD_LIBRARY_PATH"
printf 'ADSP_LIBRARY_PATH=%s\n' "$ADSP_LIBRARY_PATH"
type -a genie-t2t-run
readlink -f "$(command -v genie-t2t-run)"
```
***
# Install FastRPC and enable the DSP
## Understand error 14001
My first Genie run failed with:
```text theme={null}
Failed to create device: 14001
Device Creation failure
```
The model binaries had not failed. QNN could not create the HTP device because the EVK lacked the userspace FastRPC library, the FastRPC daemon was not provisioned, and `/dev/fastrpc-cdsp` was accessible only to root. I quickly found this issue reported in Qualcomm repo.
FastRPC is the transport between the ARM CPU process and the compute DSP. The host application loads QNN stub libraries; FastRPC communicates with the DSP process that loads the matching skel libraries.
## Install the Qualcomm FastRPC packages
```bash theme={null}
sudo apt-get update
sudo apt-get install -y software-properties-common acl
if ! grep -Rqs 'ubuntu-qcom-iot/qcom-ppa' \
/etc/apt/sources.list /etc/apt/sources.list.d 2>/dev/null; then
sudo add-apt-repository -y ppa:ubuntu-qcom-iot/qcom-ppa
fi
sudo apt-get update
sudo apt-get install -y \
qcom-fastrpc1 \
qcom-fastrpc-dev \
qcom-libdmabufheap-dev
sudo ldconfig
```
Do not install a second QNN runtime from the PPA unless you intentionally want to replace QAIRT's QNN libraries. Mixing `/usr/lib` QNN libraries with `/opt/qairt` DSP libraries can cause stub/skel version errors.
## Add the user to the FastRPC group
```bash theme={null}
sudo systemd-sysusers
getent group fastrpc || sudo groupadd --system fastrpc
sudo usermod -aG fastrpc ubuntu
sudo reboot
```
After reconnecting:
```bash theme={null}
source "$HOME/qairt-env.sh"
id
ls -l /dev/fastrpc-cdsp
ldconfig -p | grep libcdsprpc
systemctl --no-pager --full status cdsprpcd
```
The validated state was:
```text theme={null}
ubuntu is a member of fastrpc
/dev/fastrpc-cdsp is group-accessible
libcdsprpc.so resolves from /lib/aarch64-linux-gnu
cdsprpcd is active
```
## Validate the Hexagon backend independently
```bash theme={null}
qnn-platform-validator --backend dsp --coreVersion
qnn-platform-validator --backend dsp --testBackend
```
Expected summary:
```text theme={null}
Backend Hardware : Supported
Backend Libraries : Found
Core Version : Hexagon Architecture V73
Unit Test : Passed
```
An `Error in saving the results` message can be ignored when the summary reports success.
***
# Run Nemotron on the EVK
## Create a correctly formatted prompt
Use a prompt file with real newlines. Nemotron's reasoning mode is controlled through the system prompt.
```bash theme={null}
cd ~/nemotron_genie
cat > prompt.txt <<'EOF'
<|begin_of_text|><|start_header_id|>system<|end_header_id|>
detailed thinking off<|eot_id|><|start_header_id|>user<|end_header_id|>
Explain gravity in one short English sentence.<|eot_id|><|start_header_id|>assistant<|end_header_id|>
EOF
```
For reasoning-on experiments, replace the system content with:
```text theme={null}
detailed thinking on
```
## Run Genie and save a profile
```bash theme={null}
source "$HOME/qairt-env.sh"
cd ~/nemotron_genie
set -o pipefail
genie-t2t-run \
-c genie_config.json \
--prompt_file prompt.txt \
--profile profile.txt \
2>&1 | tee genie-run.log
echo "exit code: ${PIPESTATUS[0]}"
```
Validated output:
```text theme={null}
Using libGenie.so version 1.17.0
[INFO] "Using create From Binary"
[INFO] "Allocated total size = 306545152 across 10 buffers"
[BEGIN]: Gravity is the force that pulls objects toward each other...
[END]
exit code: 0
```
The `rpcmem_android.c` dummy-call messages are informational; the runtime is using the platform FastRPC implementation.
## Interpret the profile
The successful run reported:
| Metric | Result |
| --------------------------- | --------------: |
| Model/dialog initialization | 4.06 s |
| Prompt tokens | 29 |
| Prompt-processing rate | 158.05 tokens/s |
| Time to first token | 183.5 ms |
| Generated tokens | 31 |
| Token-generation rate | 10.03 tokens/s |
| Token-generation time | 3.09 s |
The initialization cost is usually paid once in a persistent service. The 10.03 tokens/s decode rate is almost identical to Qualcomm's published result for Llama 3.1 8B W4A16 on IQ-9075, which is strong evidence that the custom Nemotron checkpoint is using the intended HTP path rather than silently falling back to CPU.
The following short demo runs on the EVK and demonstrates Nemotron Nano producing a curl command, extracting a JSON payload property:
##  # What this deployment proves
## Proven
* NVIDIA's Nemotron-specific Llama 3.1 8B weights can be quantized with AIMET W4A16.
* Qualcomm AI Hub can compile the custom checkpoint for QCS9075.
* The resulting prompt processor and token generator execute through Genie/QnnHtp on Hexagon v73.
* The EVK produces coherent output at about 10 tokens/s.
* The custom checkpoint does not impose an obvious throughput penalty relative to Qualcomm's stock Llama 3.1 8B path.
# Agentic Edge AI
In the follow-up tutorial I cover how I use models like these as the LLM for on-device agentic AI.
# What this deployment proves
## Proven
* NVIDIA's Nemotron-specific Llama 3.1 8B weights can be quantized with AIMET W4A16.
* Qualcomm AI Hub can compile the custom checkpoint for QCS9075.
* The resulting prompt processor and token generator execute through Genie/QnnHtp on Hexagon v73.
* The EVK produces coherent output at about 10 tokens/s.
* The custom checkpoint does not impose an obvious throughput penalty relative to Qualcomm's stock Llama 3.1 8B path.
# Agentic Edge AI
In the follow-up tutorial I cover how I use models like these as the LLM for on-device agentic AI.