> ## Documentation Index
> Fetch the complete documentation index at: https://dragonwingdocs.qualcomm.com/llms.txt
> Use this file to discover all available pages before exploring further.

# Part 2: Paddle detection with Edge Impulse

> From dataset to live NPU inference on the IQ-8275 EVK in an afternoon. No QAIRT toolchain, no cross-compilation, no C++ daemon.

<div style={{ marginBottom: "2rem" }}>
  <div
    style={{
fontSize: "0.72rem",
fontWeight: 700,
color: "#31017D",
letterSpacing: "1.5px",
textTransform: "uppercase",
marginBottom: "0.5rem"
}}
  >
    Qualcomm Linux · Edge Impulse · Computer Vision
  </div>

  <p style={{ fontSize: "0.95rem", color: "#555", lineHeight: 1.7, margin: "0 0 0.75rem" }}>
    Train a paddle detector on Edge Impulse's platform, deploy it to the IQ-8275 EVK, and get 2 ms NPU inference without writing a line of training code.
  </p>

  <div style={{ fontSize: "0.85rem", color: "#888", display: "flex", gap: "0.5rem", flexWrap: "wrap", alignItems: "center" }}>
    <a href="https://www.linkedin.com/in/raulrosettomunoz/" target="_blank" rel="noopener noreferrer" style={{ color: "#888", textDecoration: "none" }}>Raul Muñoz</a>
    <span>·</span>
    <span>Aug 5, 2026</span>
    <span>·</span>
    <a href="/tutorials/paddle-npu-story" style={{ color: "#31017D", fontWeight: 600, textDecoration: "none" }}>← Full story</a>
  </div>
</div>

<hr style={{ border: "none", borderTop: "1px solid #eee", margin: "0 0 2rem" }} />

This is the fastest path from "I have images" to "it runs on the NPU." No QAIRT SDK (Software Development Kit), no cross-compile toolchain, no C++ daemon. The expected time is under two hours, most of which is training on Edge Impulse's servers.

**What you'll have at the end:** a native aarch64 binary running on your IQ-8275 EVK, detecting ping-pong paddles on the HTP (Hexagon Tensor Processor) NPU at **2 ms per inference**.

This tutorial assumes a freshly flashed IQ-8275 EVK running Qualcomm Linux. If you haven't set up the board yet, follow the [IQ-8275 EVK device setup guide](/Linux/devices/iq8275-evk/device-overview) first.

***

## What you need

|                      |                                                                                                                            |
| -------------------- | -------------------------------------------------------------------------------------------------------------------------- |
| Edge Impulse account | Free developer tier at [studio.edgeimpulse.com](https://studio.edgeimpulse.com)                                            |
| Board                | IQ-8275 EVK, freshly flashed with Qualcomm Linux — see the [device setup guide](/Linux/devices/iq8275-evk/device-overview) |
| A camera             | Phone, webcam, or any device that can take photos                                                                          |
| Node.js on the board | For `edge-impulse-linux-runner` — install with `apt install nodejs npm`                                                    |
| `scp`                | To copy the binary to the board                                                                                            |

***

## Step 1: Create the project

Log in to [Edge Impulse Studio](https://studio.edgeimpulse.com), click **Create new project**, name it (e.g. `pingpong-paddle`). Leave everything else as default. The project type is set when you add the learning block.

***

## Step 2: Build your dataset

This is the most important step. The model is only as good as the photos it learns from.

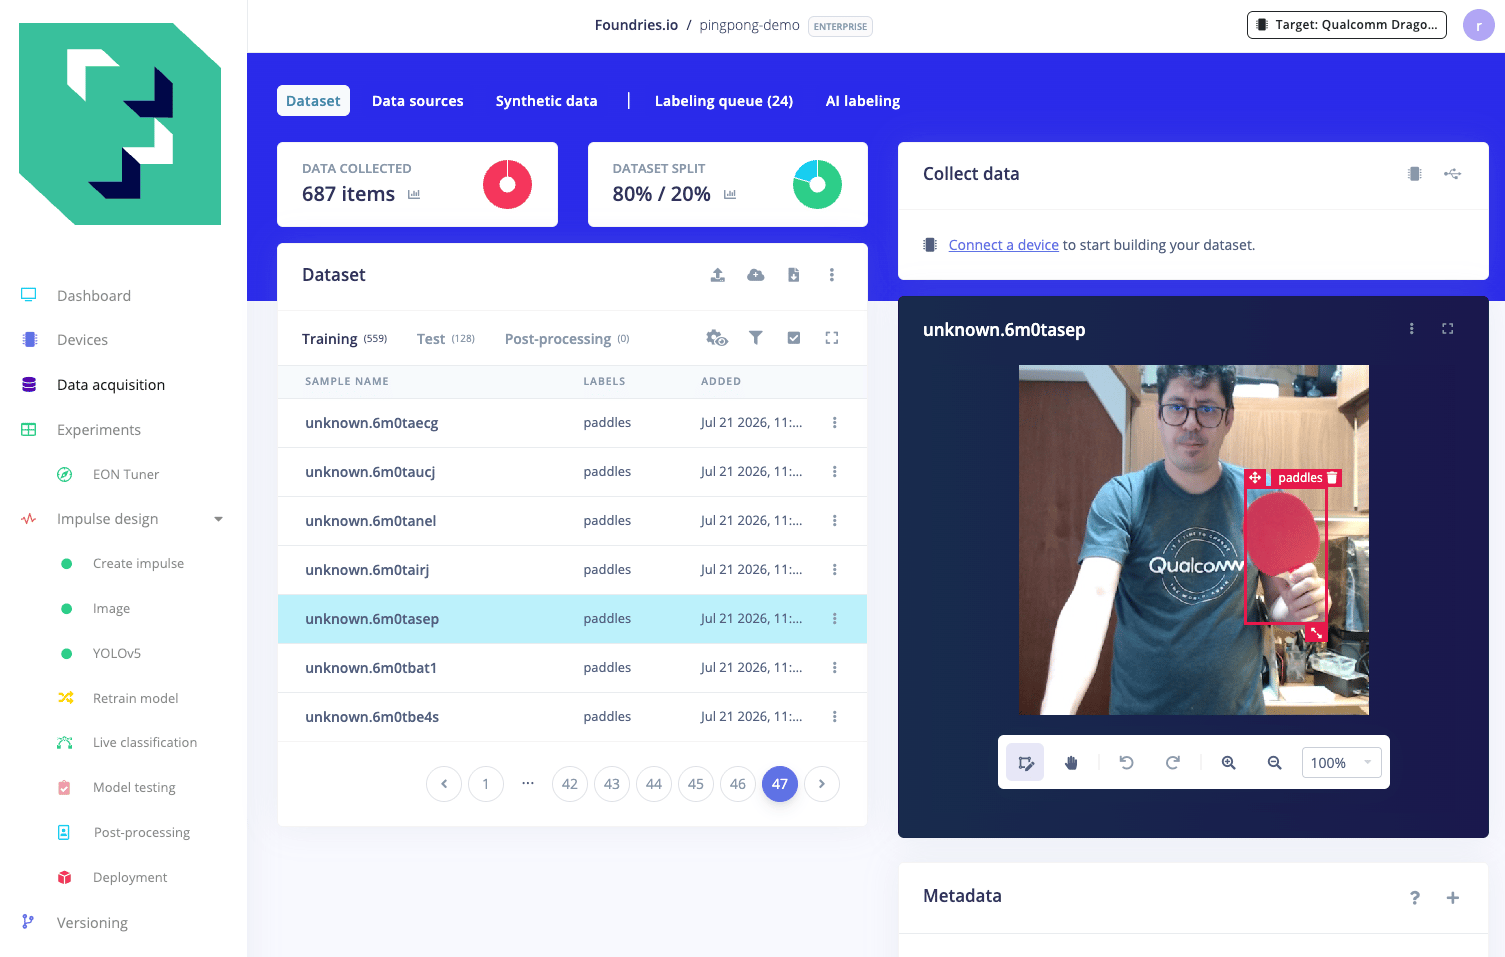
Go to **Data acquisition** in the left menu. Use **Upload data** or the Edge Impulse mobile app to collect images directly from your phone. Aim for **at least 150–200 images** across two categories:

**Photos with the paddle (`paddles` label):**

* Different distances: close-up, arm's length, across the table
* Different lighting: bright room, dim room, window light, lamp light
* Different backgrounds: desk, floor, wall, outdoors
* Different angles: straight on, tilted, partially hidden
* With and without a hand holding it

**Background photos (no label needed):**

* The same environments without the paddle — roughly 20–30% of your total images
* These teach the model what "nothing here" looks like, which is half the job for a detector

For each paddle photo, draw a bounding box around the paddle in the **Labeling queue** tab. Keep the label name consistent: use `paddles` for all boxes.

<img src="https://mintcdn.com/qualcomm-prod/ZRoYdq-twSwPVBFY/tutorials/img/paddle-npu/ei_dataset.png?fit=max&auto=format&n=ZRoYdq-twSwPVBFY&q=85&s=fbc8cd7f94552b33dc22c66c241e6559" alt="Edge Impulse Data acquisition: labeled images with bounding boxes" width="1505" height="957" data-path="tutorials/img/paddle-npu/ei_dataset.png" />

<Note>
  **Variety beats quantity.** 200 images across many scenes generalizes far better than 500 photos all taken from the same spot in the same room. If the model later fails on a specific scene (dim light, close-up, unusual angle), add more photos of that scene.
</Note>

***

## Step 3: Build the impulse

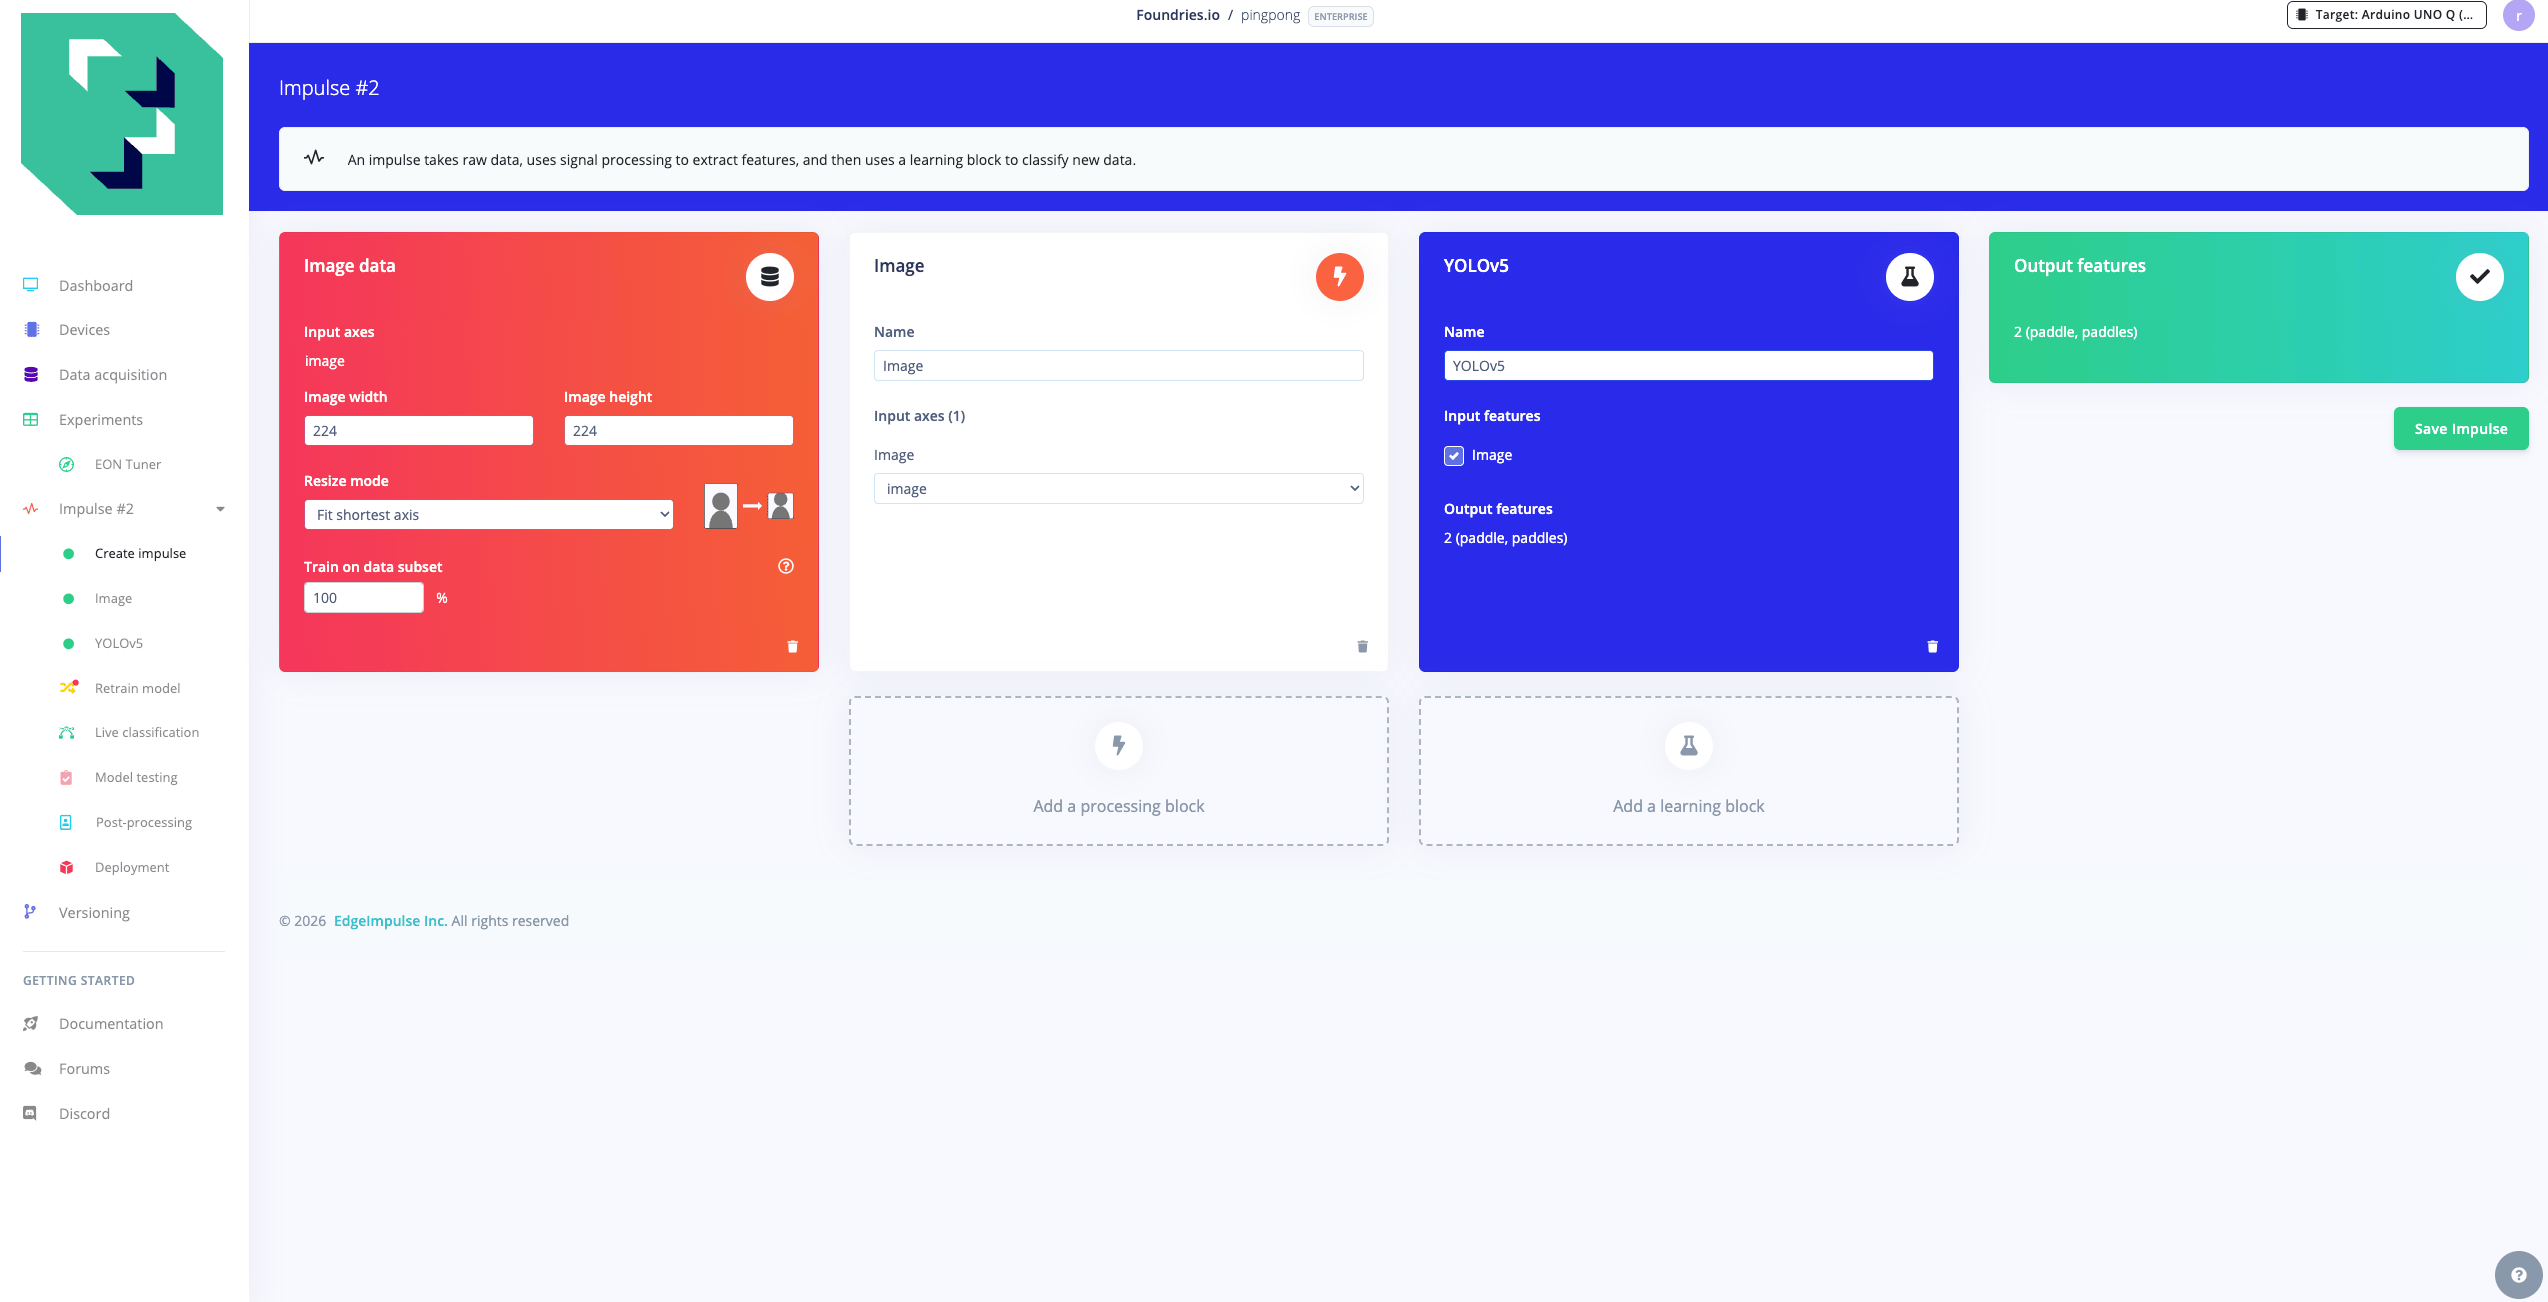
1. Left menu: **Impulse design** → **Create impulse**.
2. Input block: **Image**, 320 × 320, Resize mode: Squash.
3. Processing block: **Image** (Color depth: RGB).
4. Learning block: **Object Detection → YOLOv5** (Foundries.io).
5. Click **Save impulse**.

<img src="https://mintcdn.com/qualcomm-prod/ZRoYdq-twSwPVBFY/tutorials/img/paddle-npu/ei_impulse_design.png?fit=max&auto=format&n=ZRoYdq-twSwPVBFY&q=85&s=832e2dfba459e69fd8fe9abaa3f5976d" alt="Impulse design: 320×320 Image input + YOLOv5 learning block" width="2548" height="1302" data-path="tutorials/img/paddle-npu/ei_impulse_design.png" />

<Note>
  **YOLOv5 availability.** YOLOv5 is no longer a built-in block in Edge Impulse Studio (removed February 2025). To add it to your project, push it as a custom block from [edgeimpulse/ml-block-yolov5](https://github.com/edgeimpulse/ml-block-yolov5):

  ```bash theme={null}
  git clone https://github.com/edgeimpulse/ml-block-yolov5
  cd ml-block-yolov5
  edge-impulse-blocks init   # links to your project
  edge-impulse-blocks push
  ```

  After pushing, refresh Studio and YOLOv5 appears under **Add learning block**. Alternatively, **YOLO-Pro** (the built-in block, marked *Developer Preview*) works fine and produces equivalent results.
</Note>

***

## Step 4: Generate features

Left menu: **Image** → **Generate features** → click **Generate features**.

Wait about 1–2 minutes. Confirm the summary shows your training items and **1 class (paddles)**.

***

## Step 5: Train

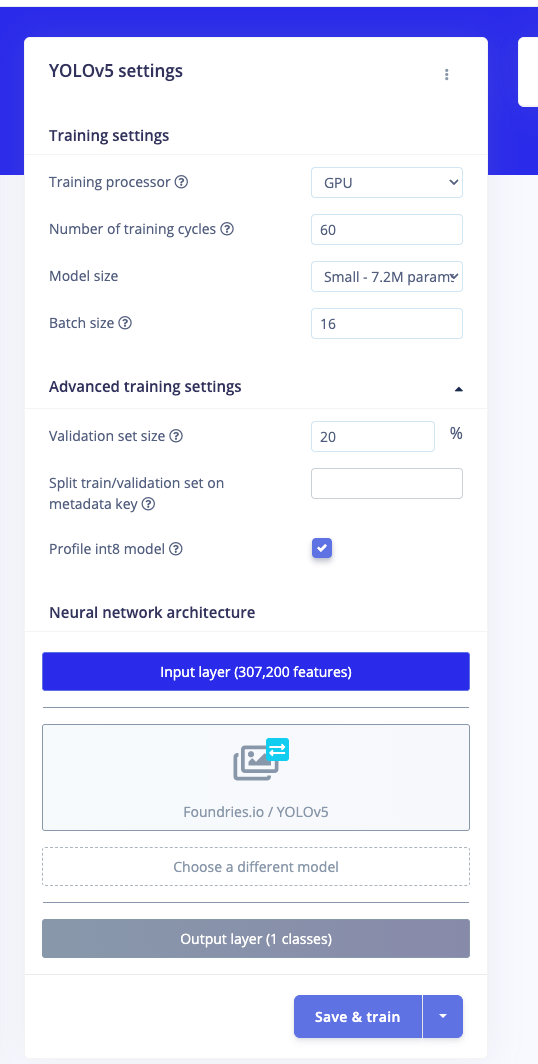
Left menu: **YOLOv5**, then configure:

| Setting             | Value               |
| ------------------- | ------------------- |
| Training processor  | GPU                 |
| Model size          | Small (7.2M params) |
| Training cycles     | 60                  |
| Pretrained weights  | True                |
| Validation set size | 20%                 |
| Profile int8 model  | **enabled**         |

Click **Save & train**. Training runs on Edge Impulse's GPU workers, about 10 to 15 minutes.

<img src="https://mintcdn.com/qualcomm-prod/ZRoYdq-twSwPVBFY/tutorials/img/paddle-npu/ei_yolov5_settings.png?fit=max&auto=format&n=ZRoYdq-twSwPVBFY&q=85&s=663dcf1d03d03c9da749ac93b0f52d07" alt="YOLOv5 settings: GPU, Small, 60 cycles, Profile int8 model enabled" width="538" height="1064" data-path="tutorials/img/paddle-npu/ei_yolov5_settings.png" />

Expected result:

| Metric        | Value  | What it means                                                                                             |
| ------------- | ------ | --------------------------------------------------------------------------------------------------------- |
| mAP\@0.5      | \~0.98 | Mean Average Precision at IoU 0.5, how accurately and completely the model finds paddles. 1.0 is perfect. |
| mAP\@0.5:0.95 | \~0.46 | Same metric averaged over stricter box-overlap thresholds (the COCO standard).                            |
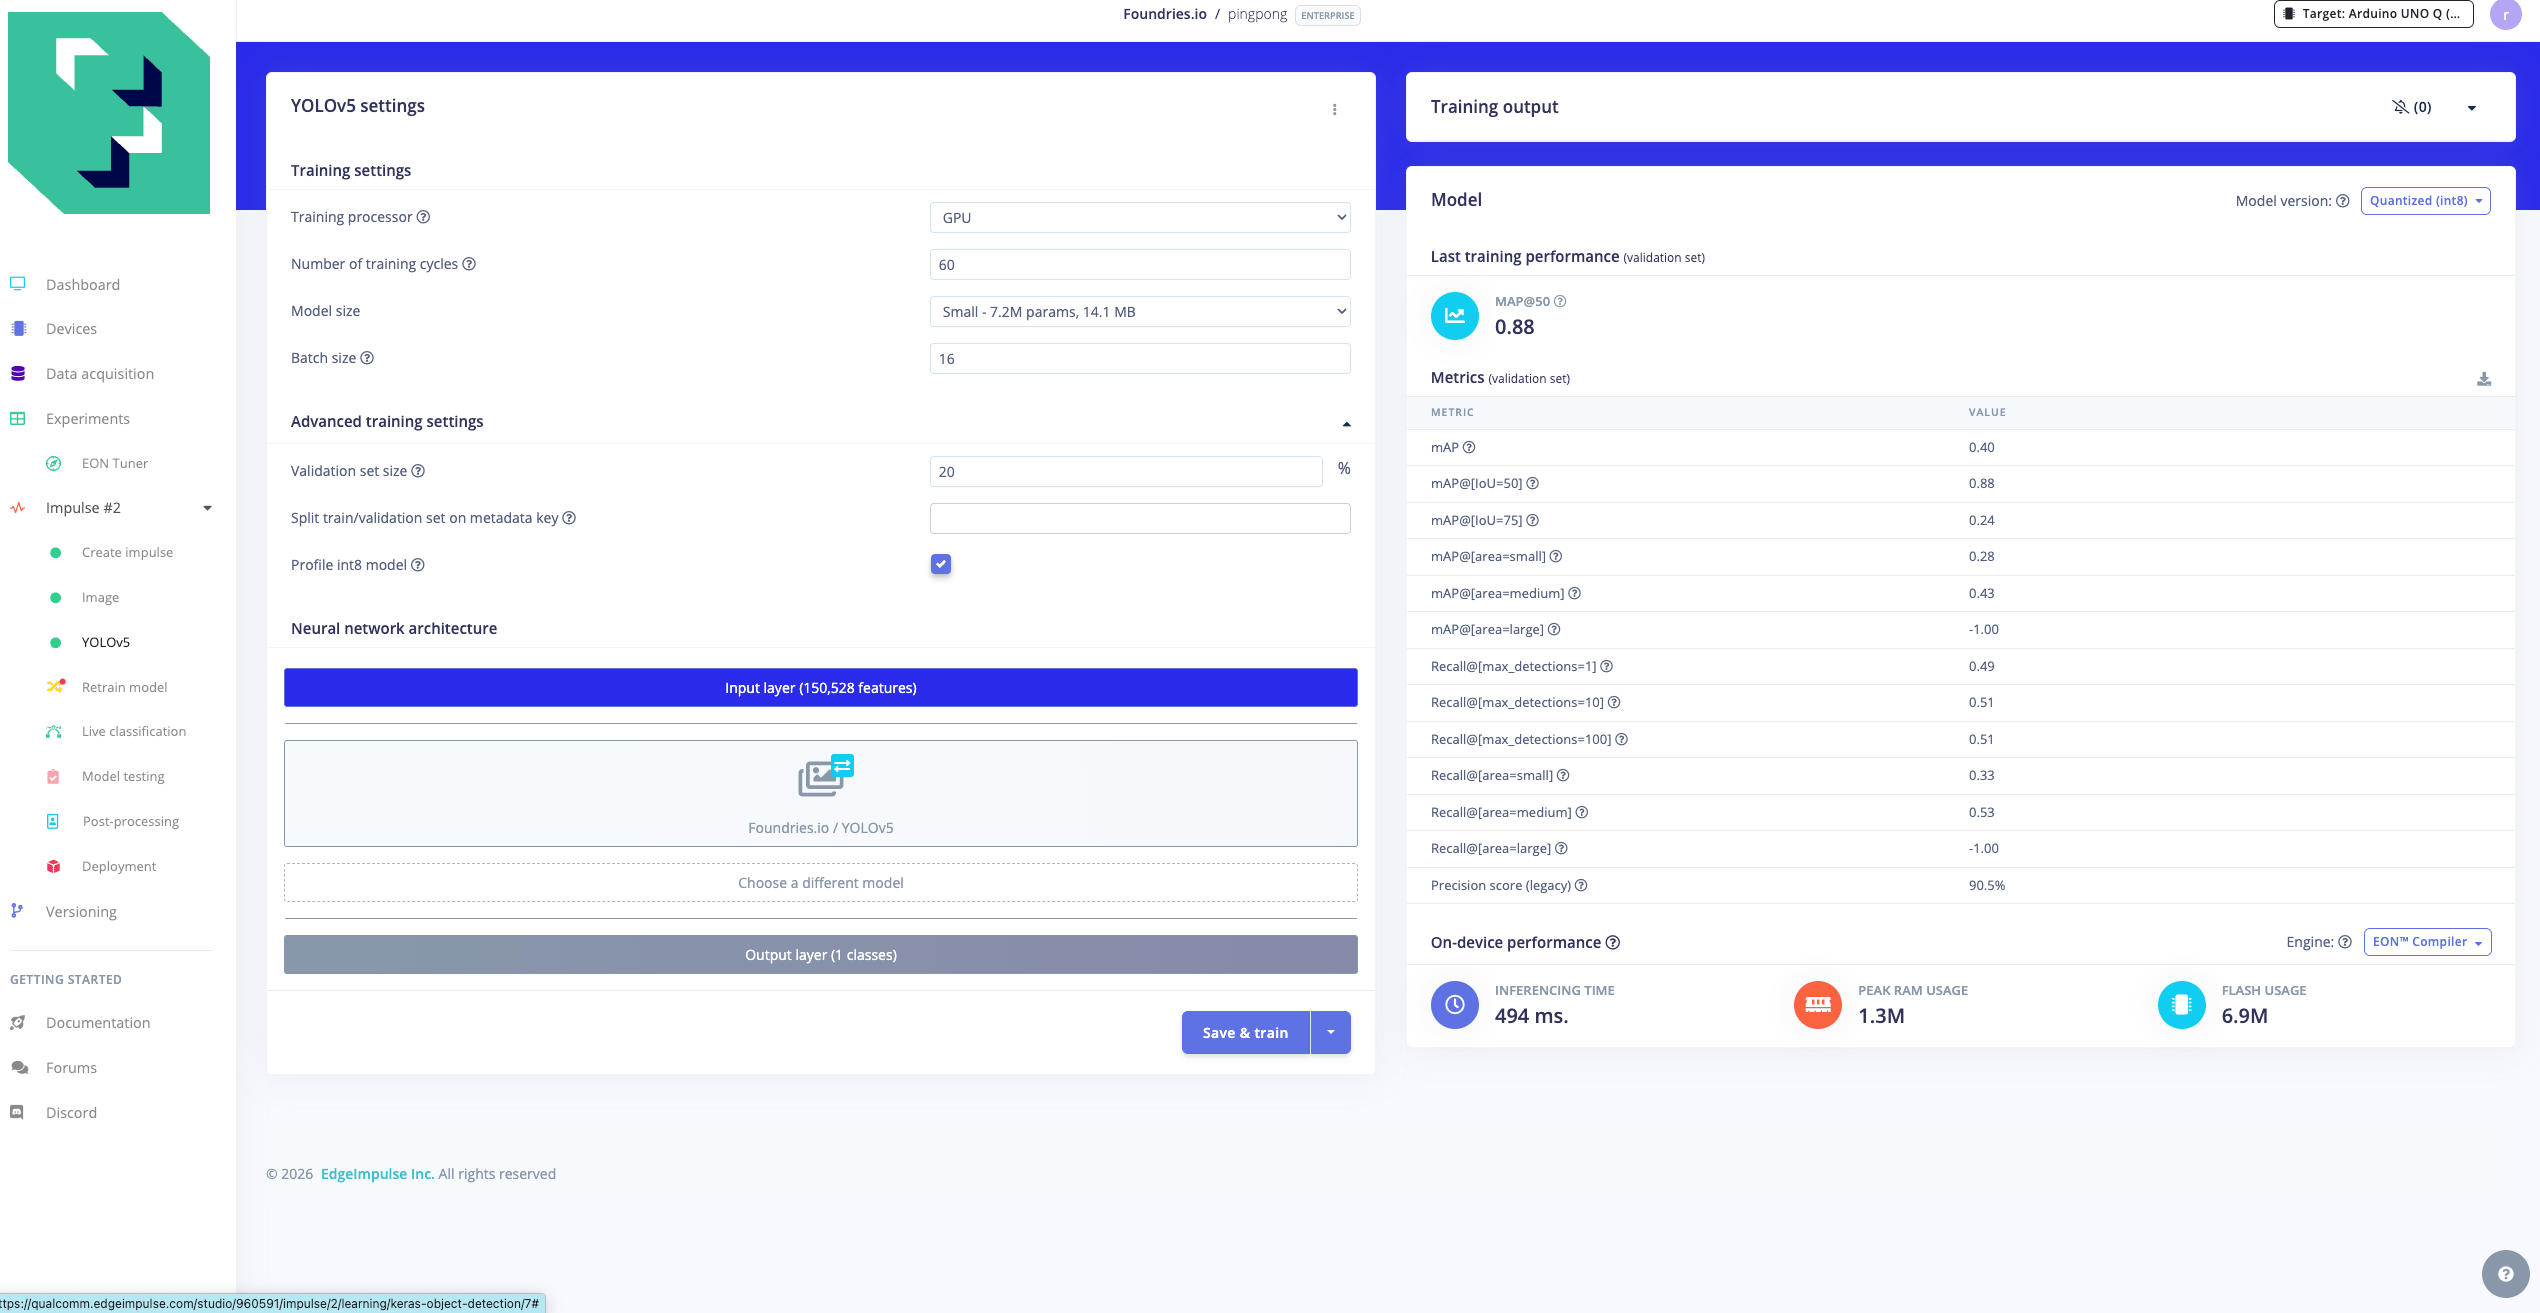
<img src="https://mintcdn.com/qualcomm-prod/ZRoYdq-twSwPVBFY/tutorials/img/paddle-npu/ei_training_result.png?fit=max&auto=format&n=ZRoYdq-twSwPVBFY&q=85&s=f823d63b87ba4f9ca3d5559eccb61b6f" alt="Training result: F1 0.88, mAP 0.980" width="2540" height="1313" data-path="tutorials/img/paddle-npu/ei_training_result.png" />

These numbers are from the \~670-image dataset built for this project, collected across many distances, lighting conditions, and backgrounds. A 150-image dataset may land lower; a well-varied 200-image set can get close.

***

## Step 6: Download the deployment binary

1. Left menu: **Deployment**.
2. Search for **"Qualcomm Dragonwing IQ 8275 EVK (AARCH64 with Qualcomm QNN)"**.
3. Click **Build**.
4. Download the `.eim` file (\~20 MB).

The `.eim` is a self-contained native aarch64 executable that embeds the model, the Edge Impulse Linux runtime, and the Qualcomm QNN (Qualcomm Neural Network) TFLite delegate. No separate runtime installation is needed on the board.

***

## Step 7: Copy to the board and run

```bash theme={null}
# Copy the binary
scp your-file.eim root@<board-ip>:/home/weston/pingpong-demo.eim

# Make executable and run
ssh root@<board-ip> "chmod +x /home/weston/pingpong-demo.eim && /home/weston/pingpong-demo.eim"
```

Default board credentials: `root` / `oelinux123`. `/home/weston` is the home directory of the `weston` user — the Wayland compositor user pre-created on every stock Qualcomm Linux image. It is not specific to this tutorial; if your image uses a different user, replace `weston` with your username throughout.

On startup the binary prints a JSON handshake confirming it's on the NPU:

```json theme={null}
{
  "inferencing_engine": {"engine_type": 4, "properties": ["qnn_delegates"]},
  "model_parameters": {
    "image_input_height": 320, "image_input_width": 320,
    "labels": ["paddles"], "model_type": "object_detection"
  }
}
```

`engine_type: 4` with `qnn_delegates` means the graph is running on the HTP NPU via the QNN TFLite delegate.

After confirming the handshake, stop the `.eim` process with **Ctrl-C** before proceeding to Step 8 — the runner below will launch the model file for live detection.

***

## Step 8: Run live detection

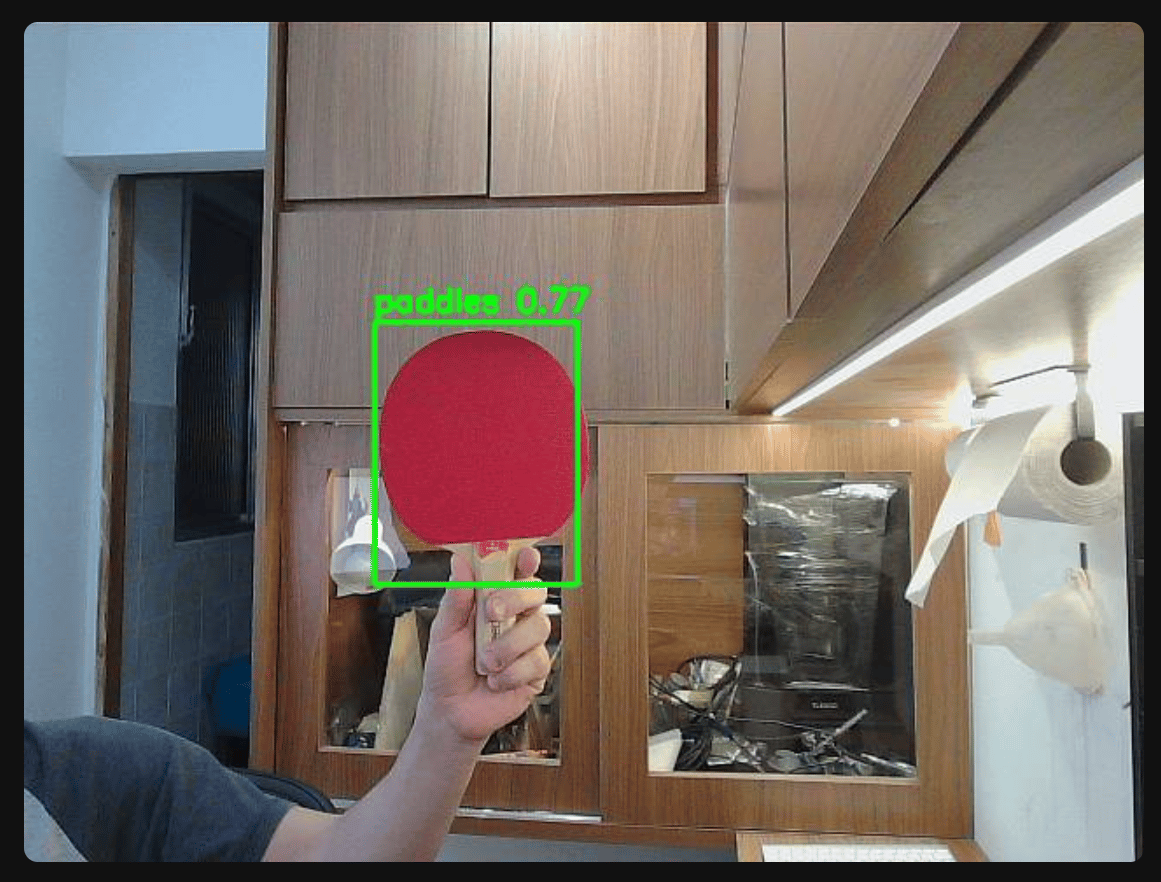
The `.eim` is a socket service: once started, it waits for frames and returns detections. To actually send it images and see results, use the `edge-impulse-linux-runner` CLI,  it opens the board's camera, streams frames to the `.eim`, and prints detections in real time.

```bash theme={null}
# On the board
npm install -g edge-impulse-linux
edge-impulse-linux-runner --model-file /home/weston/pingpong-demo.eim
```

The runner opens the camera, sends each frame to the `.eim`, and prints detection results with latency per frame. On the IQ-8275 EVK over 10 runs:

| Metric                                 | Value      |
| -------------------------------------- | ---------- |
| Warm-up (JIT compile, first inference) | \~3 ms     |
| Steady-state inference                 | **\~2 ms** |
| Inference-only FPS (theoretical)       | \~500 fps  |

The 3 ms warm-up is a one-time cost on the first call while the QNN delegate compiles the graph for the HTP. Every call after that is 2 ms, resident in NPU memory.

<img src="https://mintcdn.com/qualcomm-prod/ZRoYdq-twSwPVBFY/tutorials/img/paddle-npu/ei_live_detection.png?fit=max&auto=format&n=ZRoYdq-twSwPVBFY&q=85&s=166885cdf9d8a7014c8e7372c4722adf" alt="Live paddle detection on the IQ-8275 EVK via Edge Impulse .eim — &#x22;paddles 0.97&#x22; bounding box" width="1161" height="882" data-path="tutorials/img/paddle-npu/ei_live_detection.png" />

<Note>
  **Protocol detail.** The `.eim` speaks a JSON protocol over a UNIX socket. The correct message key for inference is `classify_shm` with features passed via POSIX shared memory, the more obvious `classify` key returns an error. The `edge-impulse-linux-runner` handles this correctly; if you build a custom client, use `classify_shm`.
</Note>

***

## What's happening under the hood

The `.eim` is the JIT deployment path: the model is stored as an INT8 TFLite graph and compiled for the HTP on the first inference call. This trades a small first-call cost (3 ms) for portability. The same binary runs on any QNN-capable board without recompilation.

The alternative is AOT (Ahead-Of-Time): compile the model offline with the QAIRT toolchain and ship a chip-specific context binary (`.bin`) that has zero warm-up but only runs on the exact HTP hardware version it was built for. Both paths reach 2 ms steady-state. The full QAIRT pipeline is documented in [Paddle detection step by step with Qualcomm tools](/tutorials/paddle-npu-reproduce).

***

## Next steps

* **The full story:** every design decision, failure, and benchmark:
  [Teaching a Qualcomm chip to spot a ping-pong paddle](/tutorials/paddle-npu-story)

* **Every command, every script, end to end:**
  [Paddle detection step by step with Qualcomm tools](/tutorials/paddle-npu-reproduce)

* **All source files inline (env.sh, conversion scripts, requirements):**
  [Companion files](/tutorials/paddle-npu-story-files)