> ## Documentation Index
> Fetch the complete documentation index at: https://dragonwingdocs.qualcomm.com/llms.txt
> Use this file to discover all available pages before exploring further.

# Part 3: Paddle detection step by step with Qualcomm tools

> The full manual pipeline on the IQ-8275 EVK: dataset, training, ONNX export, QAIRT quantization, and a resident C++ daemon running live on the NPU.

<div style={{ marginBottom: "2rem" }}>
  <div
    style={{
fontSize: "0.72rem",
fontWeight: 700,
color: "#31017D",
letterSpacing: "1.5px",
textTransform: "uppercase",
marginBottom: "0.5rem"
}}
  >
    Qualcomm Linux · Edge AI · Deep Dive
  </div>

  <p style={{ fontSize: "0.95rem", color: "#555", lineHeight: 1.7, margin: "0 0 0.75rem" }}>
    The full manual pipeline: every command, every script, every design decision explained, from first photo to a C++ daemon running live on the Qualcomm NPU at 2 ms.
  </p>

  <div style={{ fontSize: "0.85rem", color: "#888", display: "flex", gap: "0.5rem", flexWrap: "wrap", alignItems: "center" }}>
    <a href="https://www.linkedin.com/in/raulrosettomunoz/" target="_blank" rel="noopener noreferrer" style={{ color: "#888", textDecoration: "none" }}>Raul Muñoz</a>
    <span>·</span>
    <span>Aug 10, 2026</span>
    <span>·</span>
    <a href="/tutorials/paddle-npu-story" style={{ color: "#31017D", fontWeight: 600, textDecoration: "none" }}>← The full story</a>
  </div>
</div>

<hr style={{ border: "none", borderTop: "1px solid #eee", margin: "0 0 2rem" }} />

This is the no-shortcuts version. Every command is here. Every script is on the [companion files page](/tutorials/paddle-npu-story-files), copy them from there into the paths shown. Steps 1-6 run on a Mac and the board. Steps 7-9, the NPU part, need the free QAIRT (Qualcomm AI Runtime SDK) and an x86 Linux machine.

The four moves, so you always know which machine you're on:

| Move                  | What happens                      | Where                             |
| --------------------- | --------------------------------- | --------------------------------- |
| Get the data          | Collect photos, draw boxes        | Edge Impulse (browser)            |
| Train on the Mac      | Fine-tune YOLOv8n, export ONNX    | Mac (PyTorch + MPS)               |
| Run live on CPU       | Webcam → detection → browser      | Mac, then board CPU               |
| Accelerate on the NPU | Convert model, run on the AI chip | x86 Linux (convert) + board (run) |

***

## What you need

**Hardware:** A computer for training — the guide uses a Mac with Apple Silicon (PyTorch MPS (Metal Performance Shaders) backend), but Linux or Windows with a CUDA GPU (Graphics Processing Unit) works the same way; just replace `--device mps` with `--device cuda` in the training commands. IQ-8275 EVK (QCS8300, Hexagon V75 NPU), aarch64 Qualcomm Linux, Python 3.x and `onnxruntime` preinstalled on the Qualcomm Linux image. A USB webcam for the live demo. An x86-64 Linux machine for the QAIRT SDK (NPU compiler is x86-only).

**Software:** Python 3 and `git` on the Mac. The free **QAIRT SDK v2.47.0.260601** on the x86 Linux box. To build the live C++ daemon: an aarch64 cross-compiler (`aarch64-linux-gnu-g++-13`).

**Scripts:** All scripts referenced below are on the [companion files page](/tutorials/paddle-npu-story-files). Copy each one to the path shown in its header.

***

## Step 1: Build the dataset

The dataset is the foundation of everything. You need photos of the paddle with a bounding box drawn on each one, plus background frames with no paddle.

The tool for this is [Edge Impulse Studio](https://studio.edgeimpulse.com). Its Data acquisition tab lets you record images from a connected device, draw bounding boxes in the browser, and export in its own format. That's how the \~670 images in this project were labeled, no external tool required. If you followed the [Edge Impulse quickstart](/tutorials/edge-impulse-quickstart) first, you already have this dataset — skip to the export step below.

Export as **Object Detection**: in the Studio go to **Dashboard → Export → Object Detection format**. Choose the format that gives you, per split, a folder of images plus a `bounding_boxes.labels` JSON file. Aim for variety: different distances, lighting, angles, and rooms. Include \~15–20% background frames.

You'll end up with:

```
pingpong-export/
  training/
    <image>.jpg ...
    bounding_boxes.labels
  testing/
    <image>.jpg ...
    bounding_boxes.labels
```

The boxes are in **absolute pixels**, with `x,y` at the **top-left corner**. That's the convention `training/labels.py` expects.

***

## Step 2: Mac environment

Create a working folder and copy the scripts into it:

```
my-project/
  pingpong-export/        ← your dataset from Step 1
  training/
    labels.py             ← from companion files
    preprocess.py         ← from companion files
    dataset.py            ← from companion files
    model.py              ← from companion files
    train.py              ← from companion files
    export_onnx.py        ← from companion files
    requirements.txt      ← from companion files
  yolo/
    prep_yolo.py          ← from companion files
    train_yolo.py         ← from companion files
    export_yolo.py        ← from companion files
    gen_calib.py          ← from companion files
    requirements.txt      ← from companion files
  web/
    infer.py              ← from companion files
    infer_yolo.py         ← from companion files
    infer_npu.py          ← from companion files
    server.py             ← from companion files
    bench_cpu_vs_npu.py   ← from companion files
```

Sanity-check the dataset. You should see 539 training and 124 testing images:

```bash theme={null}
python3 training/labels.py
# [training] 539 images  |  with paddle: 295  |  background: 244
# [testing] 124 images   |  with paddle: 76   |  background: 48
```

We use two separate venvs on purpose: Phase A (lean PyTorch) and Phase B (Ultralytics). Keeping them apart means Phase A stays reproducible after you install the heavier YOLO stack.

```bash theme={null}
# Phase A venv
python3 -m venv training/.venv
training/.venv/bin/python -m pip install -r training/requirements.txt
```

***

## Step 3: Phase A, a CNN from scratch (the instructive baseline)

This builds a small network from nothing and trains it only on your paddle photos. It will underperform. That's the point. It's the control group that explains why Phase B works.

### 3.1 Preprocess

```bash theme={null}
training/.venv/bin/python training/preprocess.py
```

Decodes every JPEG once, resizes to 320×320, and caches the result as `.npy` arrays. The cache is memory-mapped at training time. Decoding 670 images 40 times per training run costs minutes; reading from a memory-mapped array is nearly free.

### 3.2 Train

```bash theme={null}
training/.venv/bin/python training/train.py --epochs 20
```

Uses MPS (Metal GPU backend) when available, otherwise CPU. Watch the `val_IoU` column. That's the honest measure (Intersection over Union: how much the predicted box overlaps the true one, 0 = miss, 1 = perfect). It tops out around **0.56**. The best checkpoint goes to `training/checkpoints/best.pt`.

### 3.3 Export to ONNX

```bash theme={null}
training/.venv/bin/python training/export_onnx.py \
    --ckpt training/checkpoints/best.pt --out training/checkpoints/best.onnx
```

### 3.4 Watch it fail

```bash theme={null}
training/.venv/bin/python web/server.py --model cnn
# open http://localhost:8080, pick your camera, hit start
```

Lean in close, dim the room. The CNN won't find the paddle. Crop your face out of the frame and it suddenly works. Brighten the image and the score rises. The model memorized the training album: well-lit photos of people standing back. That's the motivation for Phase B.

***

## Step 4: Phase B, fine-tune YOLOv8n (the one that works)

### 4.1 Environment

```bash theme={null}
python3 -m venv yolo/.venv
yolo/.venv/bin/python -m pip install -r yolo/requirements.txt
```

### 4.2 Convert labels to YOLO format

```bash theme={null}
yolo/.venv/bin/python yolo/prep_yolo.py
yolo/.venv/bin/python yolo/prep_yolo.py --check   # draws boxes back to verify conversion
```

### 4.3 Fine-tune

```bash theme={null}
yolo/.venv/bin/python yolo/train_yolo.py --epochs 80 --device mps
```

Downloads the COCO-pretrained YOLOv8n weights on the first run. Fine-tuning adds "paddle" as one more word to a model that already knows what "object in a hand" looks like. Result: `yolo/runs/paddle/weights/best.pt` with **mAP\@0.5 ≈ 0.979**.

### 4.4 Export to ONNX

```bash theme={null}
yolo/.venv/bin/python yolo/export_yolo.py
```

Exports with `nms=False` (NMS, Non-Maximum Suppression, lives in numpy not the graph) and `dynamic=False` (fixed 1x3x320x320, the NPU requires fixed shapes). These two flags are what make Steps 7-9 work cleanly.

***

## Step 5: Live demo in a browser (Mac)

```bash theme={null}
yolo/.venv/bin/python web/server.py --model yolo
# open http://localhost:8080, pick camera, hit start
```

The server opens the webcam, runs each frame through the detector, draws the box, and streams MJPEG to the browser. The same `--model npu` flag will plug in the NPU engine later without changing the server code.

***

## Step 6: Run on the board's CPU

```bash theme={null}
BOARD_IP=192.168.15.86   # your board's IP

ssh root@$BOARD_IP 'mkdir -p /opt/pingpong/yolo /opt/pingpong/web'
scp yolo/best.onnx  root@$BOARD_IP:/opt/pingpong/yolo/
scp web/*.py        root@$BOARD_IP:/opt/pingpong/web/

ssh root@$BOARD_IP
cd /opt/pingpong
python3 web/server.py --model yolo --cameras 26 --backend v4l2 --port 8080
# open http://<board-ip>:8080 from any machine on the network
```

The board already has `onnxruntime` installed. This gets you roughly **24 fps on the CPU**, your baseline before the NPU.

<Warning>
  If the USB camera disappears from `lsusb` and `/dev/video26` is gone, a hot-replug won't bring it back. Reboot the board.
</Warning>

***

## Step 7: Convert the model for the NPU

This step runs on the **x86-64 Linux machine**. The NPU compiler is x86-only.

Copy these scripts from the [companion files page](/tutorials/paddle-npu-story-files) to an `npu/` folder on your x86 box:

```
npu/
  env.sh              ← from companion files (edit SDK path here)
  convert_dlc.sh      ← from companion files
  requant_a16w8.sh    ← from companion files
```

### 7.0: Install the QAIRT SDK (once)

Pick a working directory with \~4 GB free. Export it as `QW`. The `env.sh` file derives all other paths from it automatically when this variable is set:

```bash theme={null}
export QW=/path/to/your/workdir   # edit once; everything below derives from it

mkdir -p "$QW" && cd "$QW"

# Download the Community edition (no login required):
wget https://softwarecenter.qualcomm.com/api/download/software/sdks/Qualcomm_AI_Runtime_Community/All/2.47.0.260601/v2.47.0.260601.zip
unzip v2.47.0.260601.zip   # creates ./qairt/2.47.0.260601/
```

Create the Python venv (`virtualenv`, since the built-in `python3 -m venv` is broken on many Ubuntu setups without sudo):

```bash theme={null}
pip install --user --break-system-packages virtualenv
python3 -m virtualenv .venv
source .venv/bin/activate
```

Install the exact dependency versions that work (these pins are real failures, not guesses):

```bash theme={null}
python3 qairt/2.47.0.260601/bin/check-python-dependency
pip install "numpy==1.26.4" "onnx==1.16.1" "onnxruntime==1.18.1"
# numpy 2.x breaks SDK native code; onnx 1.22 drops an attribute the converter reads
```

Stage the LLVM runtime libs the SDK's native tools need (a clean Ubuntu doesn't ship them):

```bash theme={null}
cd /tmp
apt-get download libc++1-18 libc++abi1-18 libunwind-18
for d in libc++1-18_*.deb libc++abi1-18_*.deb libunwind-18_*.deb; do
  dpkg-deb -x "$d" "$QW/llvm-libs"
done
cd -
```

If `$QW` is exported in your shell, you don't edit anything. The `env.sh` file derives all paths from it automatically:

```bash theme={null}
source npu/env.sh
qairt-converter --version   # confirm the tools are on PATH
```

The full `env.sh` is on the [companion files page](/tutorials/paddle-npu-story-files#env-sh).

### 7.1: Copy model and calibration data to the x86 box

Generate calibration data on the Mac first:

```bash theme={null}
# on the Mac
yolo/.venv/bin/python yolo/gen_calib.py
# -> yolo/calib/calib_0000.raw ... calib_0199.raw  (float32 NCHW, 320x320)
# -> yolo/calib/input_list.txt
```

Then copy to the x86 box:

```bash theme={null}
# on the Mac — replace user@x86-box and the remote path
rsync -av yolo/best.onnx yolo/calib user@x86-box:/path/to/workdir/
```

### 7.2: ONNX to floating-point DLC

```bash theme={null}
# on the x86 box
cd "$QW"
bash npu/convert_dlc.sh   # reads $WORK/best.onnx -> writes $WORK/best_fp.dlc
```

### 7.3: Quantize to A16W8

This is the subtle part. Quantizing everything to INT8 (8-bit Integer) collapses the confidence scores to zero. Bounding-box coordinates are large numbers (like 400 pixels), confidence scores are tiny (0.87), and the same 8-bit scale can't represent both. The fix is **A16W8**: keep weights at 8-bit (compact) but let activations use 16-bit precision to protect the score. See [Part 6 of the story](/tutorials/paddle-npu-story#npu-quantization-trap) for the full explanation.

```bash theme={null}
bash npu/requant_a16w8.sh
# reads best_fp.dlc + calib/ -> writes best_a16w8.dlc + ctx16/best_a16w8_htpv75.bin
```

The generated `best_a16w8_htpv75.bin` is the context binary, compiled ahead of time for the HTP (Hexagon Tensor Processor) V75. Copy it to the board:

```bash theme={null}
ssh root@$BOARD_IP 'mkdir -p /home/weston/npu'
scp "$QW/ctx16/best_a16w8_htpv75.bin" root@$BOARD_IP:/home/weston/npu/
```

***

## Step 8: Run on the NPU

### 8.1: One-shot test

The board already has the QNN runtime in `/usr/lib`. You don't need to copy any `.so` files from the SDK. Copy only the context binary (done above) and `run_npu16.sh` from the [companion files page](/tutorials/paddle-npu-story-files#run-npu16-sh).

`run_npu16.sh` expects a test input at `/home/weston/npu/emeet2_input.raw` — a raw float32 NCHW tensor (shape `1×3×320×320`). Generate it from any JPEG on the Mac using the same letterbox preprocessing that the model was trained with:

```bash theme={null}
# on the Mac, inside the project venv
python3 - <<'EOF'
import cv2, numpy as np, sys
img = cv2.imread("path/to/any_frame.jpg")          # any photo will do for a smoke-test
from web.infer_yolo import _letterbox, IMG_SIZE
canvas, _, _, _ = _letterbox(img, IMG_SIZE)
rgb = cv2.cvtColor(canvas, cv2.COLOR_BGR2RGB)
chw = (rgb.astype("float32") / 255.0).transpose(2, 0, 1)[None]
chw.tofile("emeet2_input.raw")
print("wrote emeet2_input.raw")
EOF

scp emeet2_input.raw root@$BOARD_IP:/home/weston/npu/
```

Then run the one-shot test:

```bash theme={null}
ssh root@$BOARD_IP "bash /home/weston/npu/run_npu16.sh"
```

The \~150-200 ms you see per call here includes process-startup overhead. That disappears with the resident daemon.

### 8.2: Live stream via the resident C++ daemon

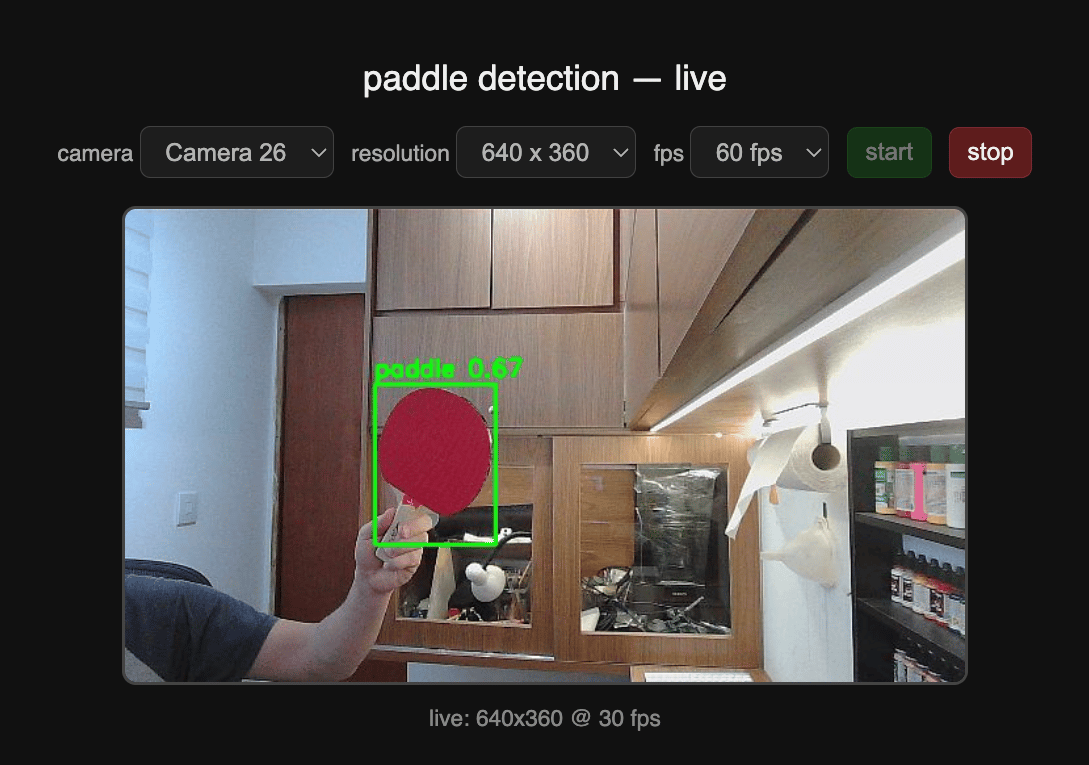
For real-time use you want the model resident: loaded once, processing frames forever. The daemon holds the QNN context in memory, reads frames from a FIFO pipe, runs inference, and streams MJPEG over HTTP.

Building it requires an aarch64 cross-compiler on the x86 box. Set `R` in `npu/env.sh` to the cross-compiler root (the dir that contains `usr/bin/aarch64-linux-gnu-g++-13`).

The daemon is a small overlay on top of the QNN SDK SampleApp. Create the three overlay files from the SDK, then apply the diffs from the [companion files page — Daemon C++ source section](/tutorials/paddle-npu-story-files#daemon-cpp-source):

```bash theme={null}
# on the x86 box, inside $QW
source npu/env.sh
mkdir -p npu/daemon

cp "$SDK/examples/QNN/SampleApp/SampleApp/src/main.cpp"        npu/daemon/main.cpp
cp "$SDK/examples/QNN/SampleApp/SampleApp/src/QnnSampleApp.cpp" npu/daemon/QnnSampleApp.cpp
cp "$SDK/examples/QNN/SampleApp/SampleApp/src/QnnSampleApp.hpp" npu/daemon/QnnSampleApp.hpp
```

Apply the diffs from the companion page to those three files, then build and copy the daemon:

```bash theme={null}
# on the x86 box, inside $QW
bash npu/build_base.sh    # builds QnnSampleApp base libs
bash npu/build_daemon.sh  # links qnn-daemon-aarch64

scp "$QW/daemon/qnn-daemon-aarch64" root@$BOARD_IP:/home/weston/npu/
```

On the board:

```bash theme={null}
ssh root@$BOARD_IP
python3 /opt/pingpong/web/server.py --model npu --cameras 26 --backend v4l2
# open http://<board-ip>:8080
```

`server.py --model npu` launches the daemon as a subprocess automatically and communicates with it via two FIFOs: `/tmp/npu_cmd.fifo` (commands) and `/tmp/npu_resp.fifo` (responses). No separate daemon startup step needed.

<img src="https://mintcdn.com/qualcomm-prod/ZRoYdq-twSwPVBFY/tutorials/img/paddle-npu/yolo_live.png?fit=max&auto=format&n=ZRoYdq-twSwPVBFY&q=85&s=e37a800e88519a10570af48028331682" alt="YOLOv8n running live via the resident NPU daemon on the IQ-8275 EVK" width="1089" height="765" data-path="tutorials/img/paddle-npu/yolo_live.png" />

***

## Step 9: Benchmark CPU vs NPU honestly

```bash theme={null}
# from your Mac/workstation — copy a test frame to the board first
scp path/to/any_frame.jpg root@$BOARD_IP:/tmp/emeet2.jpg
```

```bash theme={null}
# on the board
python3 /opt/pingpong/web/bench_cpu_vs_npu.py
```

What to expect:

|                      | CPU (onnxruntime) | NPU (daemon, in-memory path) |
| -------------------- | ----------------- | ---------------------------- |
| Raw model inference  | \~145 ms          | \~1.74 ms                    |
| End-to-end per frame | \~42 ms           | \~25 ms                      |
| Equivalent FPS       | \~24              | \~40                         |

The raw NPU math is 84x faster. The end-to-end win is 1.7x. Before the in-memory path was implemented, the NPU version was *slower* than CPU end-to-end. 307,200 float-to-int16 conversions happening one number at a time cost 30 ms. Fixing that (convert the whole frame with a vectorized call) is what produced the real-world win.

A benchmark that only measures the chip math is not a real benchmark.

***

## Source files

All the scripts referenced above are on the [companion files page](/tutorials/paddle-npu-story-files) with copy buttons.

<Note>
  The daemon C++ source files (`npu/daemon/main.cpp`, `QnnSampleApp.cpp`, `QnnSampleApp.hpp`) are not embedded on the companion page because they partially derive from the Qualcomm QNN SDK SampleApp. The exact modifications are documented as diffs in the [companion files page — Daemon C++ source section](/tutorials/paddle-npu-story-files#daemon-cpp-source). Apply them to a clean SDK SampleApp checkout using `build_daemon.sh`.
</Note>

For the Edge Impulse path (no QAIRT SDK, 2 ms in an afternoon), see [Paddle detection with Edge Impulse](/tutorials/edge-impulse-quickstart).
