> ## Documentation Index
> Fetch the complete documentation index at: https://dragonwingdocs.qualcomm.com/llms.txt
> Use this file to discover all available pages before exploring further.
# 在 Qualcomm Linux 中管理分区
以下部分介绍如何为 Qualcomm Linux 支持的机器添加、删除、修改和重命名闪存分区。分区通过 `partitions.conf` 配置文件定义。这些文件位于 [https://github.com/qualcomm-linux/qcom-ptool/tree/main/platforms](https://github.com/qualcomm-linux/qcom-ptool/tree/main/platforms)。有关更多信息,请参阅:[Ptool 工作流程](https://dragonwingdocs.qualcomm.com/Key-Documents/Yocto-Guide/manage-partitions-in-qualcomm-linux#ptool-workflow)图。
您可以修改分区配置文件以添加、删除、修改或重命名分区。例如,要使用 IQ-9075 EVK 的 UFS 分区文件,请使用以下文件:[https://github.com/qualcomm-linux/qcom-ptool/tree/main/platforms/iq-9075-evk/ufs](https://github.com/qualcomm-linux/qcom-ptool/tree/main/platforms/iq-9075-evk/ufs)
通过修改这些配置文件并将其集成到构建中,您可以生成自定义分区布局。当 Qualcomm Linux 构建中使用来自 [https://github.com/qualcomm-linux/qcom-ptool/tree/main/platforms](https://github.com/qualcomm-linux/qcom-ptool/tree/main/platforms) 的配置文件时,该工作流程涵盖 [Ptool 工作流程](https://dragonwingdocs.qualcomm.com/Key-Documents/Yocto-Guide/manage-partitions-in-qualcomm-linux#ptool-workflow)图中的所有步骤。
下表列出了分区工作流程中使用的文件和工具:
| **文件** | **说明** |
| :----------: | :------------------------------------------: |
| 分区布局文件 | 以 JSON 格式定义存储的所有分区。此文件由 gen\_partition 工具使用。 |
| 生成的分区 XML 文件 | 定义 Qualcomm 内部 XML 格式。此生成的文件由 Ptool 使用。 |
| **工具** | **说明** |
| :------------: | :------------------------------------------------: |
| gen\_partition | 读取分区布局文件并生成由 Qualcomm Ptool 处理的内部 XML 格式。 |
| Ptool | Qualcomm Ptool 将分区 XML 中的信息转换为 GUID 分区表(GPT)二进制文件。 |
## **分区布局文件**
通用闪存存储(UFS)和嵌入式多媒体卡(eMMC)上的分区存储启动链和 Linux 操作系统的各种镜像。配置文件详细说明了为特定 Qualcomm 开发套件配置的分区。以下配置文件定义了 RB3 Gen 2 开发套件的 UFS 分区和 IQ-9075 EVK 的分区:
* RB3 Gen 2 开发套件 UFS 分区:[https://github.com/qualcomm-linux/qcom-ptool/tree/main/platforms/qcs6490-rb3gen2/ufs](https://github.com/qualcomm-linux/qcom-ptool/tree/main/platforms/qcs6490-rb3gen2/ufs)
* IQ-9075 EVK UFS 分区:[https://github.com/qualcomm-linux/qcom-ptool/tree/main/platforms/iq-9075-evk/ufs](https://github.com/qualcomm-linux/qcom-ptool/tree/main/platforms/iq-9075-evk/ufs)
### **分区布局文件语法**
以下来自 `qcs6490-rb3gen2` 的 `partitions.conf` 示例展示了分区布局文件的语法。
配置文件中的第一个条目定义了磁盘类型、磁盘大小、逻辑块寻址(LBA)大小(扇区大小),以及最后一个分区是否应扩展到最后一个可用 LBA。
* 以下是 UFS 的示例:
> ```text theme={null}
> # select disk type emmc | nand | ufs Mandatory
> # disk size in bytes Mandatory
>
> --disk --type=ufs --size=137438953472 --write-protect-boundary=0 --sector-size-in-bytes=4096 --grow-last-partition
> ```
* 以下是 eMMC 的示例:
> ```text theme={null}
> # select disk type emmc | nand | ufs Mandatory
> # disk size in bytes Mandatory
>
> --disk --type=emmc --size=76841669632 --write-protect-boundary=65536 --sector-size-in-bytes=512 --grow-last-partition
> ```
`qcs6490-rb3gen2/ufs` 文件给出了以下分区示例。LUN0 中定义了几个分区,每行代表一个单独的分区。
#### **UFS**
**注意**
在以下示例中,LUN1 到 LUN5 条目中由 `partitions.conf` 的 `--filename=` 参数所指定的文件由配方 `firmware-qcom-boot-qcs6490.inc` 从 [Qualcomm 软件中心](https://softwarecenter.qualcomm.com/)下载
* 示例 1:在 LUN0 中定义了 524288 KB 的 `efi` 分区。`efi.bin` 文件在 BitBake 构建期间生成。
```text theme={null}
--partition --lun=0 --name=efi --size=524288KB --type-guid=C12A7328-F81F-11D2-BA4B-00A0C93EC93B --filename=efi.bin
```
LUN1 中定义了几个分区。每行定义一个单独的分区:
* 示例 2:为 LUN1 定义了 3604 KB 的 `xbl_a` 分区。将 `xbl.elf` 文件烧录到此分区。
```text theme={null}
#This is LUN 1 - Boot LUN A
--partition --lun=1 --name=xbl_a --size=3604KB --type-guid=DEA0BA2C-CBDD-4805-B4F9-F428251C3E98 --filename=xbl.elf
```
* 示例 3:为 LUN1 定义了 512 KB 的 `xbl_config_a` 分区。将 `xbl_config.elf` 文件烧录到此分区。
```text theme={null}
#This is LUN 1 - Boot LUN A
--partition --lun=1 --name=xbl_config_a --size=512KB --type-guid=5A325AE4-4276-B66D-0ADD-3494DF27706A --filename=xbl_config.elf
```
LUN4 中定义的分区:
* 示例 4:为 LUN4 定义了 512 KB 的 `aop_a` 分区。将 `aop.mbn` 文件烧录到此分区。
```text theme={null}
--partition --lun=4 --name=aop_a --size=512KB --type-guid=D69E90A5-4CAB-0071-F6DF-AB977F141A7F --filename=aop.mbn
```
#### **eMMC**
* 示例 1:为 LUN0 定义了 3584 KB 的 `xbl_a` 分区。将 xbl.elf 文件烧录到此分区。
```text theme={null}
#This is LUN 0 - Boot LUN A
--partition --name=xbl_a --size=3584KB --type-guid=DEA0BA2C-CBDD-4805-B4F9-F428251C3E98 --filename=xbl.elf
```
* 示例 2:为 LUN0 定义了 128 KB 的 `xbl_config_a` 分区。将 `xbl_config.elf` 文件烧录到此分区。
```text theme={null}
#This is LUN 0 - Boot LUN A
--partition --name=xbl_config_a --size=128KB --type-guid=5A325AE4-4276-B66D-0ADD-3494DF27706A --filename=xbl_feature_config.elf
```
每个分区条目使用的选项如下:
* 必选选项:
* `--lun`(UFS 必选,eMMC 不需要。以数字表示)
* `--name`(分区名称,字符串)
* `--size`(分区大小,通常以 KB 表示)
* `--type-guid`(分区的 GUID)
* 可选选项:
* `--attributes`(可选的 64 位属性,例如 1000000000000004)
* `--filename`(烧录到该分区的文件名)
* `--readonly`(分区是否应为只读,值为 true 或 false)
* `--sparse`(分区是否用于稀疏镜像,值为 true 或 false)
## **Linux 操作系统分区**
| **分区** | **说明** |
| :-------: | :--------------------------------------------------------------------------------------------------------------------------------------------------------------------------------------------------------------------------------------: |
| EFI 分区 | EFI 系统分区(ESP)包含 `Esp.bin` 和一个 `vfat` 文件。它包含 UEFI 启用 systemd-boot 所需的所有详细信息。有关此镜像的更多信息,请参阅 [EFI 镜像](https://dragonwingdocs.qualcomm.com/Key-Documents/Yocto-Guide/configure-and-secure-boot-with-systemd-boot-and-uki#efi-image-section)。 |
| Rootfs 分区 | 此分区包含 `rootfs.img` 镜像文件。该镜像由所有用户空间库和二进制文件组成。 |
## **分区工具(Ptool)**
Ptool 生成 GUID 分区表二进制文件,QDL 工具使用它对存储进行分区。
下图展示了 Ptool 工作流程:
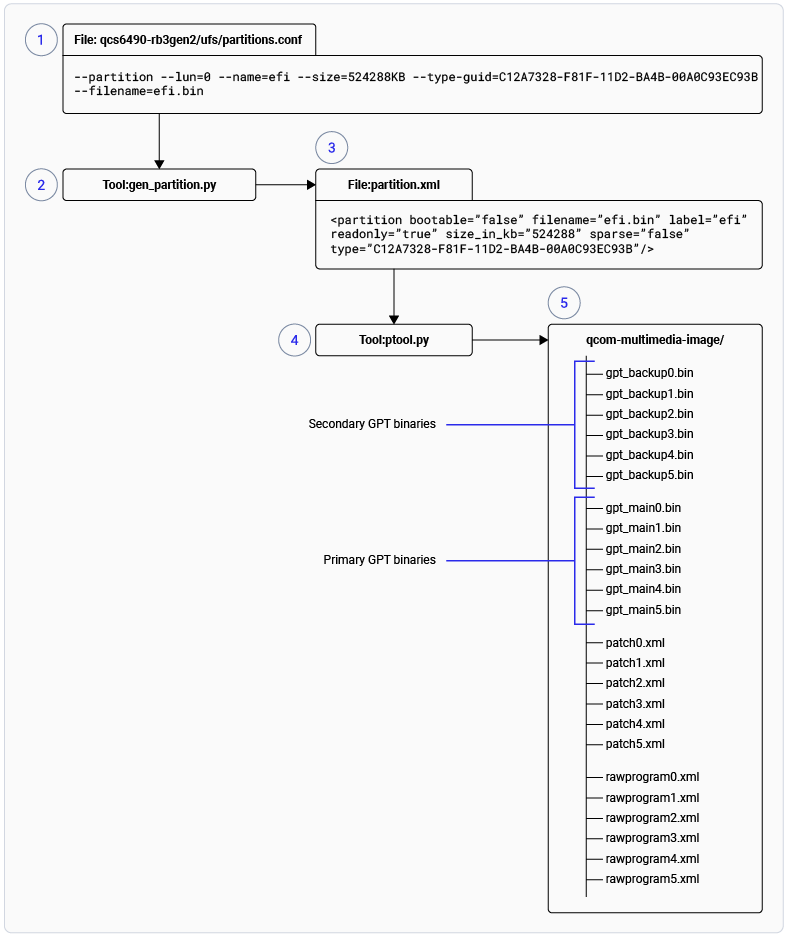
图:Ptool 工作流程
为 QCS6490 RB3 Gen 2 Vision 开发套件生成的 Ptool 二进制文件位于 `build/tmp/deploy/images/rb3gen2-core-kit/qcomflash` 目录中。
### **修改分区**
位于 [https://github.com/qualcomm-linux/qcom-ptool/tree/main/platforms/qcs6490-rb3gen2/ufs](https://github.com/qualcomm-linux/qcom-ptool/tree/main/platforms/qcs6490-rb3gen2/ufs) 的 `partitions.conf` 文件定义了 QCS6490 RB3 Gen 2 Core 开发套件的分区。`gen_partition.py` 工具处理并生成 `partition.xml`,这是 `ptool.py` 的必需输入。作为最后一步,Ptool 生成 `rawprogram.xml`、`patch.xml`、`gpt_main*.bin` 和 `gpt_backup*.bin` 文件,QDL 工具需要这些文件才能将系统镜像烧录到设备上。
1. 要添加分区,请在特定设备的配置文件 `partitions.conf` 中添加分区条目。
2. 运行 BitBake 命令生成所有必需文件:
```text theme={null}
bitbake
```
3. 镜像构建完成后,如果 MACHINE 为 `rb3gen2-core-kit` 且选择的镜像配方为 `qcom-multimedia-image`,请运行以下命令烧录镜像:
```text theme={null}
cd /build/tmp/deploy/images/rb3gen2-core-kit/qcom-multimedia-image-rb3gen2-core-kit.rootfs-.qcomflash
./qdl prog_firehose_ddr.elf rawprogram*.xml patch*.xml
```
## **最佳实践**
* 许多分区对功能至关重要。在移除或调整分区大小之前,请仔细查阅分区布局文档。
* 要使 `partitions.conf` 中的更改生效,请更新机器配置中的 `QCOM_PARTITION_CONF` 变量。
* 对于 UFS 设备,请始终为每个分区条目指定 `--lun` 选项。
## **后续步骤**
* 要使用 Yocto 构建添加、删除或重命名分区,请参阅[修改分区布局](./modify-partition-layout)。
* 有关 persist 分区,请参阅 [Persist 分区](./persist-partition)。
* 有关存储类型配置,请参阅[如何为 Yocto BSP 构建配置存储类型](./how-to-configure-storage-type)。