> ## Documentation Index
> Fetch the complete documentation index at: https://dragonwingdocs.qualcomm.com/llms.txt
> Use this file to discover all available pages before exploring further.
# 风扇
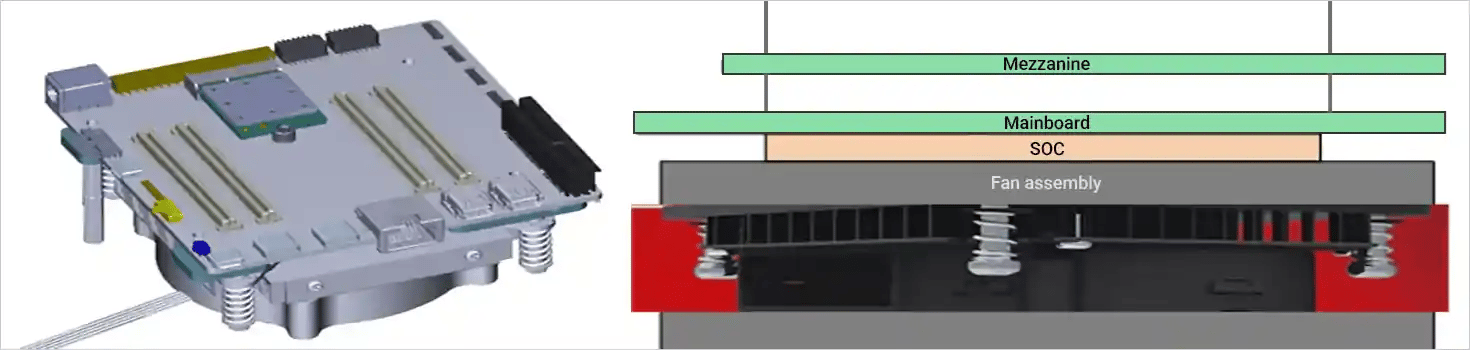
Dragonwing IQ‑8275 EVK 的设计功耗最高可达 70 W,因此需要强有力的散热解决方案。默认的散热方案基于风扇,使用安装在设备底部的 CPU 散热器。
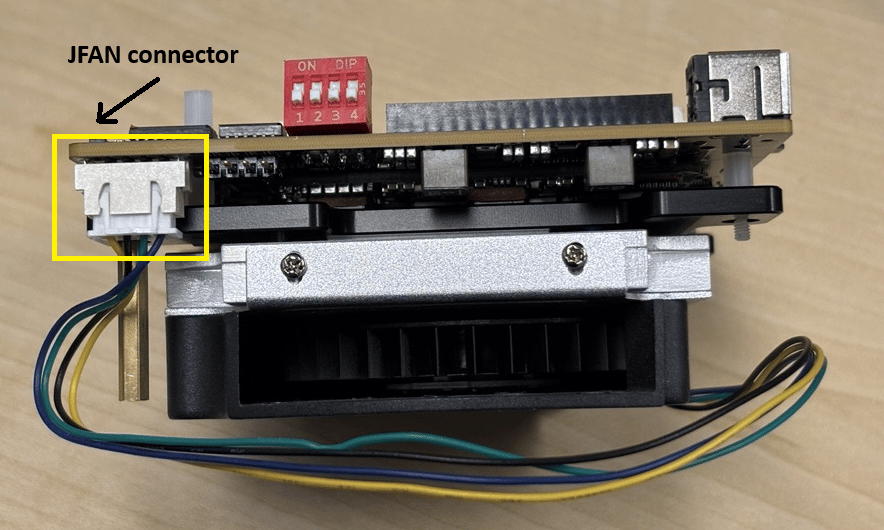
本板卡使用的风扇控制器是 Texas Instruments AMC6821SQDBQRQ1 PWM 风扇控制器 IC。风扇通过主板上的 JFAN 连接器(S6B‑XH‑SM4‑TB(LF)(SN))连接。
 **IQ-8275 EVK 主板上的风扇连接器详情:**
 ## 概述
风扇控制器根据温度输入调节风扇转速,以确保最佳的散热性能和能效。它支持多种工作模式,并可通过系统节点动态配置。
## 特性
* 支持两种工作模式:手动模式和自动模式(模式 2)
* 基于温度输入的动态风扇转速控制
## 工作模式
| 模式 | 说明 |
| -------------- | ------------------------------- |
| **手动模式(模式 1)** | 风扇转速由用户手动设置。不进行基于温度的自动控制。 |
| **自动模式(模式 2)** | 风扇转速根据远程温度传感器的读数自动控制。这是当前启用的模式。 |
## 工作原理
系统启动并加载风扇控制器配置。
将 `pwm1_enable` 节点设置为 `2` 以启用自动模式。
远程温度传感器持续监测系统温度。
控制器根据温度调节 PWM 信号(0–255)以控制风扇转速。
风扇转速(`fan1_input`)相应地增加或减少。
如果温度降至 `temp2_auto_point1_temp` 以下,风扇将关闭。
## 模式详情与验证
### 说明
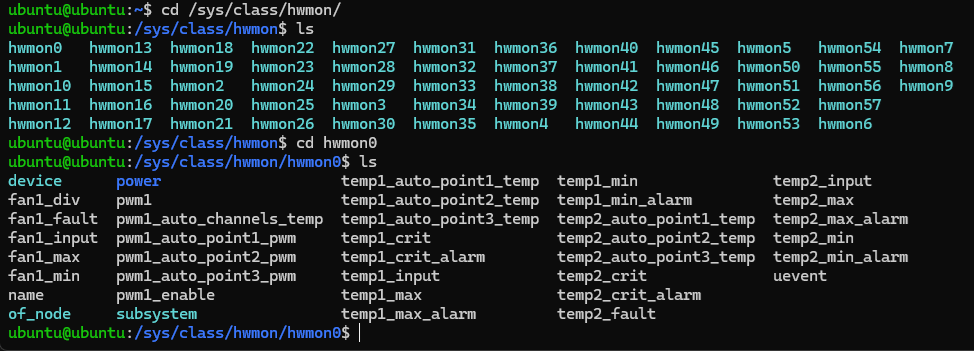
在自动模式下,风扇转速根据远程温度传感器(`temp2_input`)自动控制。系统根据预定义的温度阈值调整风扇功率和转速,以确保高效散热。
### 节点路径
所有相关节点位于:
```bash theme={null}
/sys/class/hwmon/hwmonX/
```
## 概述
风扇控制器根据温度输入调节风扇转速,以确保最佳的散热性能和能效。它支持多种工作模式,并可通过系统节点动态配置。
## 特性
* 支持两种工作模式:手动模式和自动模式(模式 2)
* 基于温度输入的动态风扇转速控制
## 工作模式
| 模式 | 说明 |
| -------------- | ------------------------------- |
| **手动模式(模式 1)** | 风扇转速由用户手动设置。不进行基于温度的自动控制。 |
| **自动模式(模式 2)** | 风扇转速根据远程温度传感器的读数自动控制。这是当前启用的模式。 |
## 工作原理
系统启动并加载风扇控制器配置。
将 `pwm1_enable` 节点设置为 `2` 以启用自动模式。
远程温度传感器持续监测系统温度。
控制器根据温度调节 PWM 信号(0–255)以控制风扇转速。
风扇转速(`fan1_input`)相应地增加或减少。
如果温度降至 `temp2_auto_point1_temp` 以下,风扇将关闭。
## 模式详情与验证
### 说明
在自动模式下,风扇转速根据远程温度传感器(`temp2_input`)自动控制。系统根据预定义的温度阈值调整风扇功率和转速,以确保高效散热。
### 节点路径
所有相关节点位于:
```bash theme={null}
/sys/class/hwmon/hwmonX/
```
 ### 温度阈值
| 温度范围(°C) | 节点值(毫摄氏度) | 风扇行为 | 功率(PWM1) |
| ----------- | ----------------------------------------------------------- | --------- | -------- |
| 低于 0°C | `temp2_auto_point1_temp` = 0 | 风扇停止 | 0 |
| 0°C – 48°C | `temp2_auto_point1_temp` 至 `temp2_auto_point2_temp` = 48000 | 风扇以最低转速运行 | \~85 |
| 48°C – 58°C | `temp2_auto_point2_temp` 至 `temp2_auto_point3_temp` = 58000 | 风扇高速运行 | 255 |
### 关键节点
| 节点 | 用途 |
| ------------------------ | ----------------- |
| `pwm1_enable` | 设置为 `2` 以启用自动模式 |
| `temp2_input` | 当前远程温度 |
| `fan1_input` | 当前风扇转速(RPM) |
| `pwm1` | 当前输入到风扇的功率(0–255) |
| `temp2_auto_point1_temp` | 下限阈值(风扇关闭) |
| `temp2_auto_point2_temp` | 中间阈值(低速) |
| `temp2_auto_point3_temp` | 上限阈值(高速) |
### 验证
对于 IQ-8275,`amc6821` 位于 `hwmon0`,因此 `X` = `0`。
```bash theme={null}
cat /sys/class/hwmon/hwmonX/pwm1_enable
```
确保输出为 `2`。
```bash theme={null}
cat /sys/class/hwmon/hwmonX/temp2_input
```
```bash theme={null}
cat /sys/class/hwmon/hwmonX/fan1_input
```
```bash theme={null}
cat /sys/class/hwmon/hwmonX/pwm1
```
* 低于 `temp2_auto_point1_temp`:风扇应停止(`fan1_input` = 0,`pwm1` = 0)
* 在 point1 与 point2 之间:风扇低速运行(`pwm1` ≈ 85)
* 在 point2 与 point3 之间:风扇全速运行(`pwm1` = 255)
### 说明
在手动模式下,风扇转速由用户设置,与温度无关。通过 `pwm1` 节点调整输入到风扇控制器的功率。
### 节点路径
所有相关节点位于:
```bash theme={null}
/sys/class/hwmon/hwmonX/
```
### 关键节点
| 节点 | 用途 |
| ------------- | -------------------- |
| `pwm1_enable` | 设置为 `1` 以启用手动模式 |
| `pwm1` | 设置功率输入以控制风扇转速(0–255) |
### 验证
```bash theme={null}
cat /sys/class/hwmon/hwmonX/pwm1_enable
```
确保输出为 `1`。
```bash theme={null}
echo > /sys/class/hwmon/hwmonX/pwm1
```
设置所需的功率输入值(0–255)。
```bash theme={null}
cat /sys/class/hwmon/hwmonX/fan1_input
```
确保风扇转速随设置的功率输入而变化。
AMC6821 风扇控制器的实际 hwmon 编号可能会有所不同。要确定正确的编号:
```bash theme={null}
grep "amc6821" hwmon*/name
```
预期输出:
```bash theme={null}
ubuntu@ubuntu:/sys/class/hwmon$ grep "amc6821" hwmon*/name
hwmon0/name:amc6821
```
### 温度阈值
| 温度范围(°C) | 节点值(毫摄氏度) | 风扇行为 | 功率(PWM1) |
| ----------- | ----------------------------------------------------------- | --------- | -------- |
| 低于 0°C | `temp2_auto_point1_temp` = 0 | 风扇停止 | 0 |
| 0°C – 48°C | `temp2_auto_point1_temp` 至 `temp2_auto_point2_temp` = 48000 | 风扇以最低转速运行 | \~85 |
| 48°C – 58°C | `temp2_auto_point2_temp` 至 `temp2_auto_point3_temp` = 58000 | 风扇高速运行 | 255 |
### 关键节点
| 节点 | 用途 |
| ------------------------ | ----------------- |
| `pwm1_enable` | 设置为 `2` 以启用自动模式 |
| `temp2_input` | 当前远程温度 |
| `fan1_input` | 当前风扇转速(RPM) |
| `pwm1` | 当前输入到风扇的功率(0–255) |
| `temp2_auto_point1_temp` | 下限阈值(风扇关闭) |
| `temp2_auto_point2_temp` | 中间阈值(低速) |
| `temp2_auto_point3_temp` | 上限阈值(高速) |
### 验证
对于 IQ-8275,`amc6821` 位于 `hwmon0`,因此 `X` = `0`。
```bash theme={null}
cat /sys/class/hwmon/hwmonX/pwm1_enable
```
确保输出为 `2`。
```bash theme={null}
cat /sys/class/hwmon/hwmonX/temp2_input
```
```bash theme={null}
cat /sys/class/hwmon/hwmonX/fan1_input
```
```bash theme={null}
cat /sys/class/hwmon/hwmonX/pwm1
```
* 低于 `temp2_auto_point1_temp`:风扇应停止(`fan1_input` = 0,`pwm1` = 0)
* 在 point1 与 point2 之间:风扇低速运行(`pwm1` ≈ 85)
* 在 point2 与 point3 之间:风扇全速运行(`pwm1` = 255)
### 说明
在手动模式下,风扇转速由用户设置,与温度无关。通过 `pwm1` 节点调整输入到风扇控制器的功率。
### 节点路径
所有相关节点位于:
```bash theme={null}
/sys/class/hwmon/hwmonX/
```
### 关键节点
| 节点 | 用途 |
| ------------- | -------------------- |
| `pwm1_enable` | 设置为 `1` 以启用手动模式 |
| `pwm1` | 设置功率输入以控制风扇转速(0–255) |
### 验证
```bash theme={null}
cat /sys/class/hwmon/hwmonX/pwm1_enable
```
确保输出为 `1`。
```bash theme={null}
echo > /sys/class/hwmon/hwmonX/pwm1
```
设置所需的功率输入值(0–255)。
```bash theme={null}
cat /sys/class/hwmon/hwmonX/fan1_input
```
确保风扇转速随设置的功率输入而变化。
AMC6821 风扇控制器的实际 hwmon 编号可能会有所不同。要确定正确的编号:
```bash theme={null}
grep "amc6821" hwmon*/name
```
预期输出:
```bash theme={null}
ubuntu@ubuntu:/sys/class/hwmon$ grep "amc6821" hwmon*/name
hwmon0/name:amc6821
```