> ## Documentation Index
> Fetch the complete documentation index at: https://dragonwingdocs.qualcomm.com/llms.txt
> Use this file to discover all available pages before exploring further.
# 使用 Qualcomm® Launcher 刷写 Qualcomm Linux
> 使用 Qualcomm Launcher GUI 工具,从任意主机操作系统下载并将 Qualcomm Linux 刷写到 IQ-9075 EVK。
**Qualcomm® Launcher** 是一款图形化工具,用于将操作系统镜像下载并刷写到 Qualcomm 开发套件上。它可在 **Windows、Linux 和 macOS** 上运行,无需命令行设置。该工具端到端地管理镜像下载和刷写过程。
如果您偏好 GUI 工作流程,请使用此方法。如果您需要完全控制或正在编写自动化设置脚本,请改用[**使用 QDL 刷写 Qualcomm Linux**](./flash-over-qli)。
刷写会擦除设备上的所有数据。开始前请备份所有重要内容。
## 所需物品
* IQ-9075 EVK 及 12 V 电源
* USB Type-C 线缆(EVK 上的 USB0 端口 → 主机)
* Micro-USB 线缆(用于刷写后的 UART 设置步骤)
* 运行 Windows、Linux 或 macOS 的主机
## 步骤 1:安装 Qualcomm Launcher
1. 访问 Qualcomm Software Center:[**https://softwarecenter.qualcomm.com/catalog/item/Qualcomm\_Launcher**](https://softwarecenter.qualcomm.com/catalog/item/Qualcomm_Launcher)
2. 下载最新版本并运行安装程序。
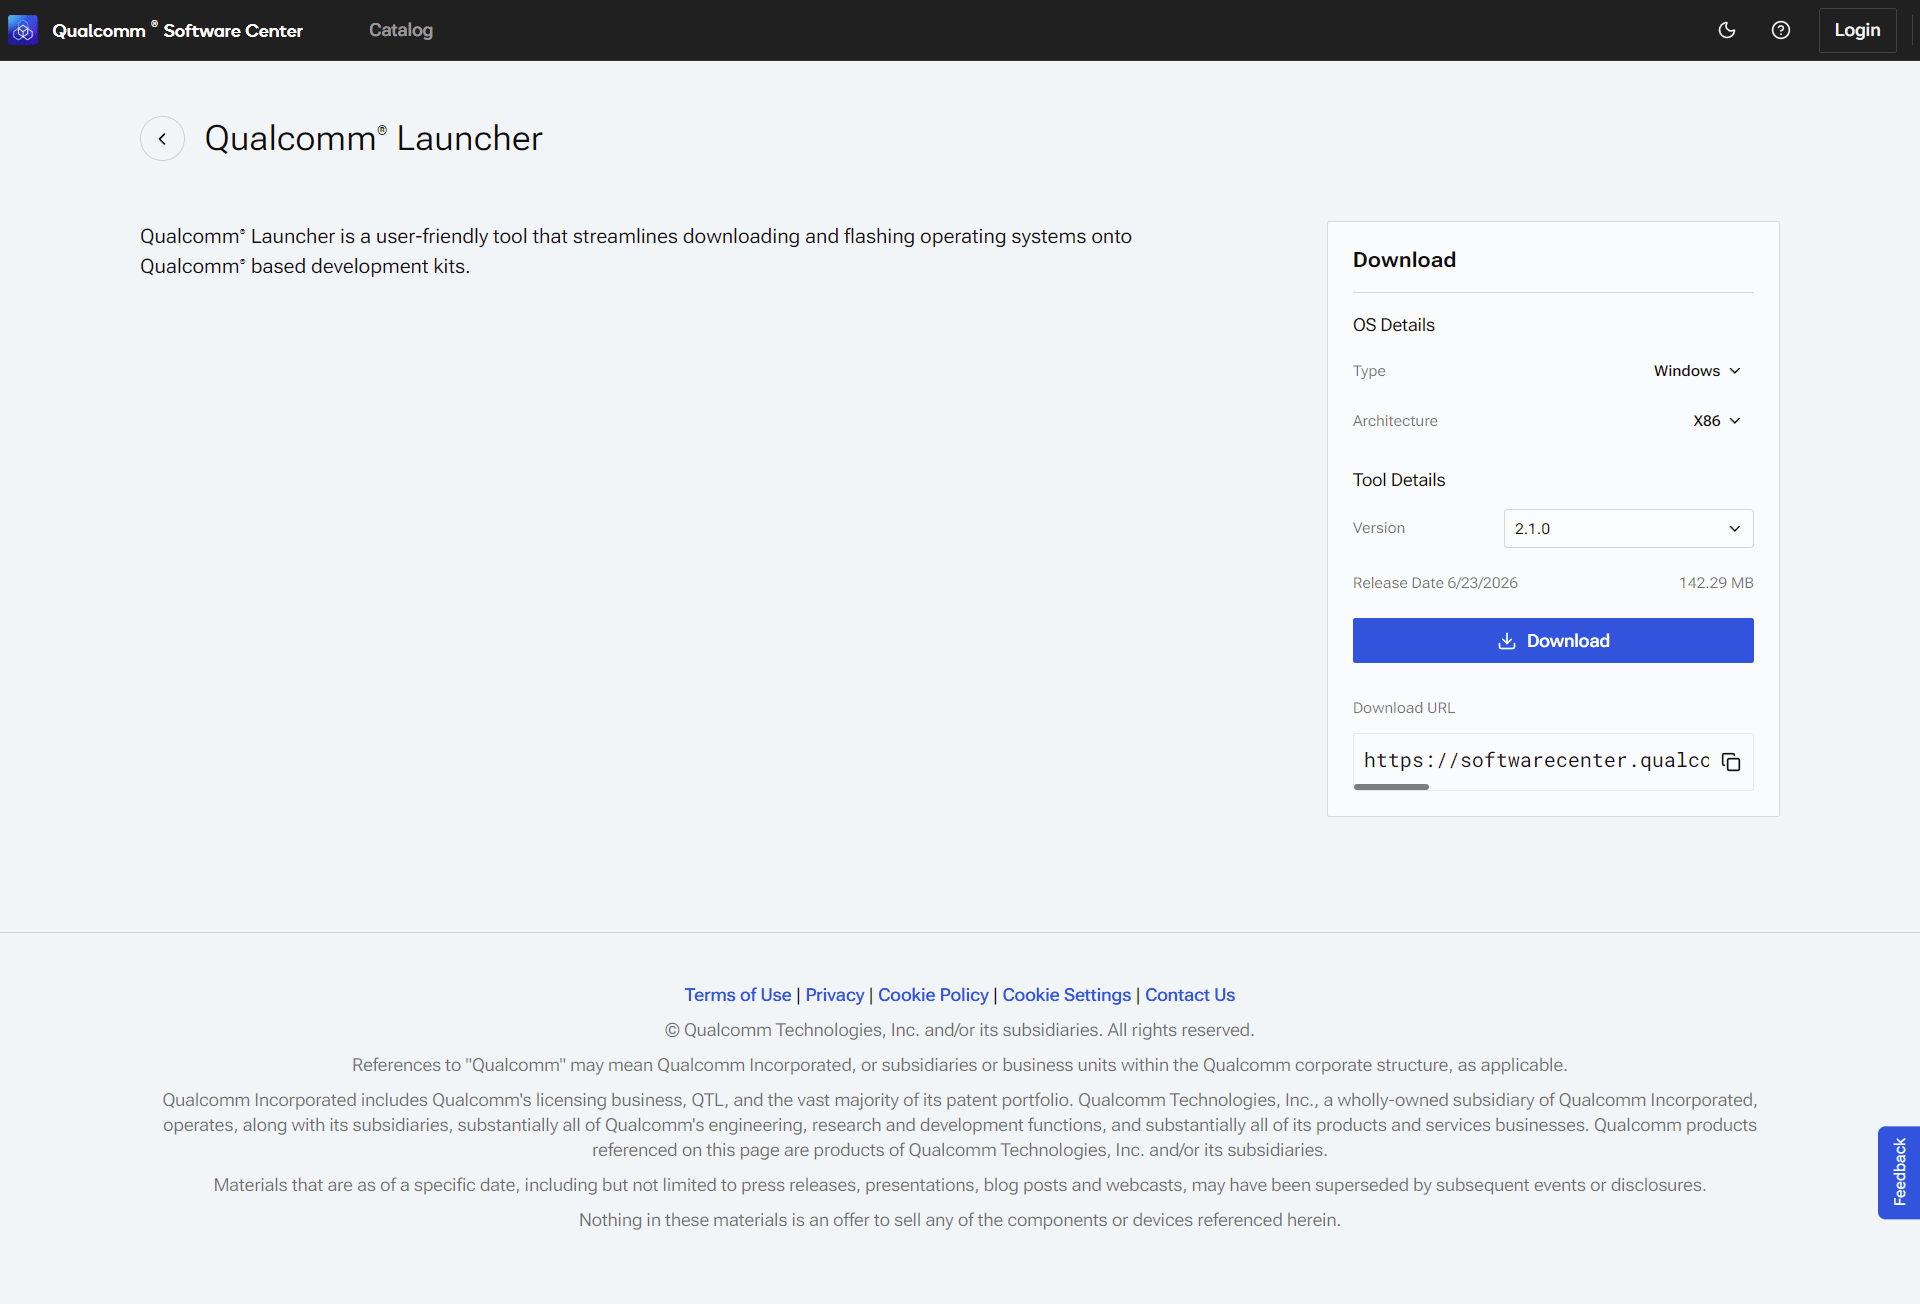 安装完成后,打开 **Qualcomm Launcher** 应用程序。
在 Ubuntu 上,内核需要一条 udev 规则,才能在设备进入 EDL 模式时授予与设备通信的权限。没有此规则,即使设备已连接并上电,Launcher 也无法检测到设备。
**1. 检查规则是否已存在:**
```shell theme={null}
ls /etc/udev/rules.d/51-qcom-usb.rules
```
**2. 如果该文件不存在,可用一条命令创建:**
```shell theme={null}
echo 'SUBSYSTEMS=="usb", ATTRS{idVendor}=="05c6", ATTRS{idProduct}=="9008", MODE="0664", GROUP="plugdev"' | sudo tee /etc/udev/rules.d/51-qcom-usb.rules
```
如果该文件已存在,请确认规则已包含在内:
```shell theme={null}
cat /etc/udev/rules.d/51-qcom-usb.rules
```
**3. 重新加载 udev:**
```shell theme={null}
sudo systemctl restart udev
```
如果 USB 线缆已连接,请断开后重新连接。
此操作只需执行一次。之后,Launcher 会自动检测设备。
在安装 Qualcomm Launcher 之前,请确保卸载任何现有的 Qualcomm USB 驱动(QUD)— 它们会与 QDL 驱动冲突。
打开**设备管理器**,找到您的设备,如已安装 QUD 则将其卸载。设备**不应**出现在 COM 端口下。
如不执行此操作,通过 Qualcomm Launcher 进行的刷写操作将会失败。
## 步骤 2:选择您的开发套件
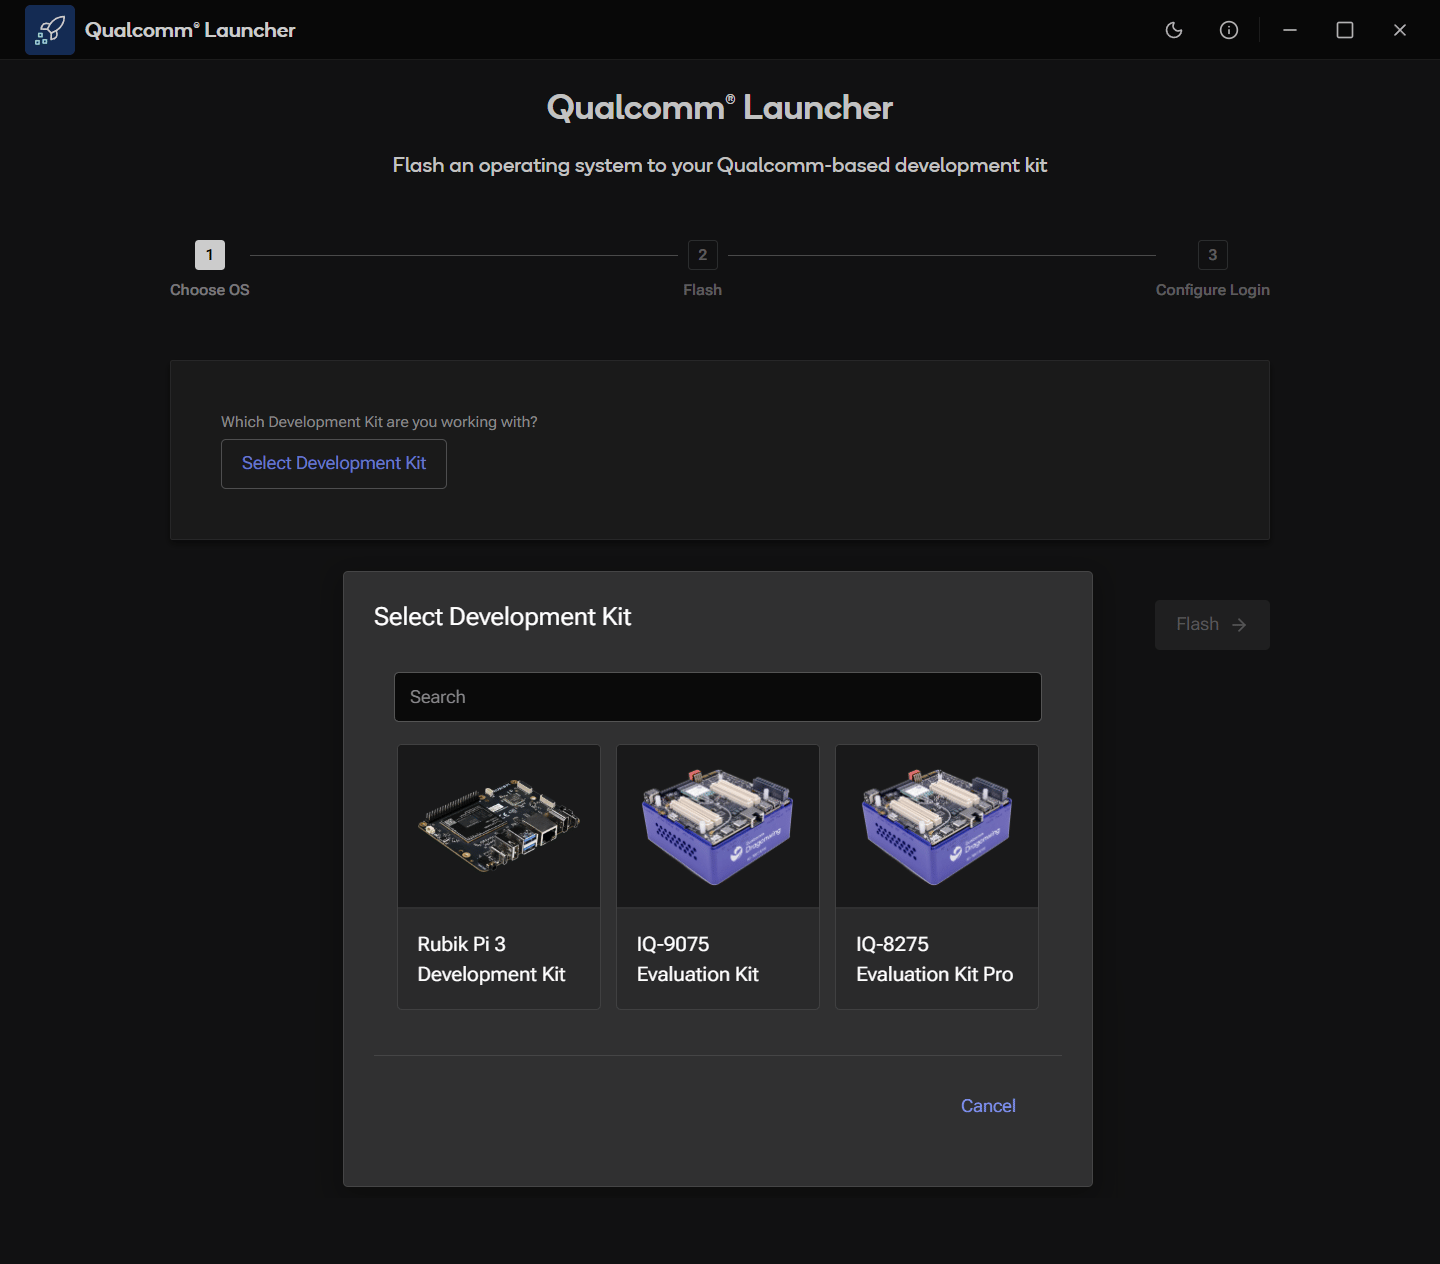
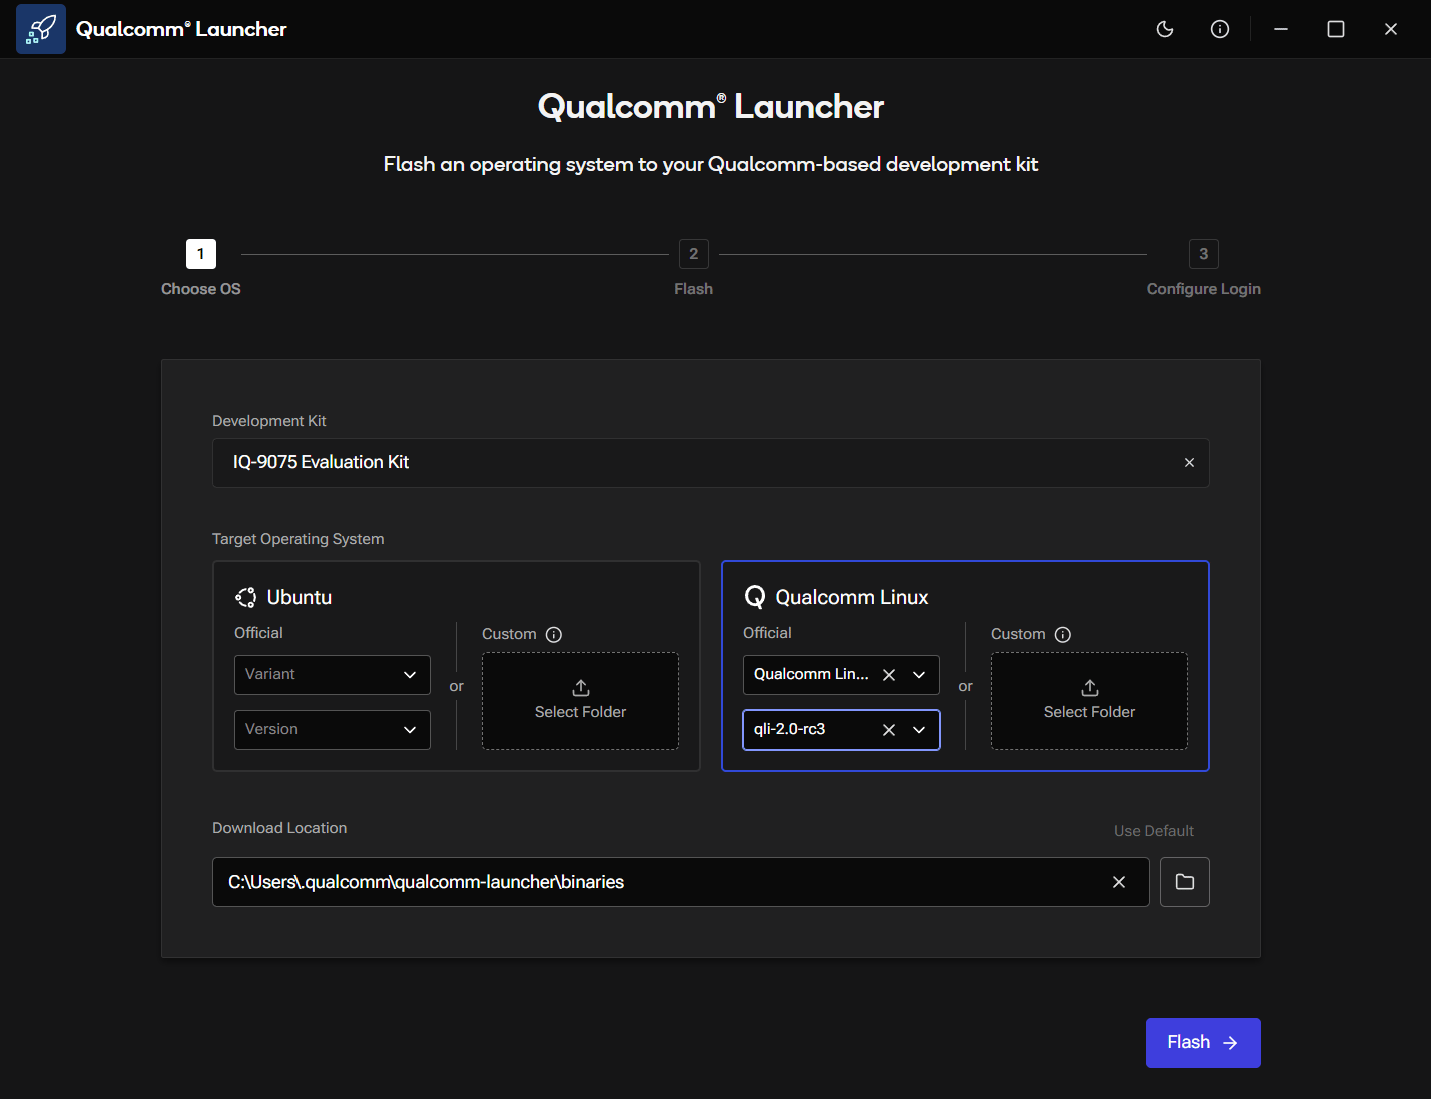
在 **Choose OS** 界面上,点击 **Select Development Kit**,然后从列表中选择 **IQ-9075 Evaluation Kit**。
安装完成后,打开 **Qualcomm Launcher** 应用程序。
在 Ubuntu 上,内核需要一条 udev 规则,才能在设备进入 EDL 模式时授予与设备通信的权限。没有此规则,即使设备已连接并上电,Launcher 也无法检测到设备。
**1. 检查规则是否已存在:**
```shell theme={null}
ls /etc/udev/rules.d/51-qcom-usb.rules
```
**2. 如果该文件不存在,可用一条命令创建:**
```shell theme={null}
echo 'SUBSYSTEMS=="usb", ATTRS{idVendor}=="05c6", ATTRS{idProduct}=="9008", MODE="0664", GROUP="plugdev"' | sudo tee /etc/udev/rules.d/51-qcom-usb.rules
```
如果该文件已存在,请确认规则已包含在内:
```shell theme={null}
cat /etc/udev/rules.d/51-qcom-usb.rules
```
**3. 重新加载 udev:**
```shell theme={null}
sudo systemctl restart udev
```
如果 USB 线缆已连接,请断开后重新连接。
此操作只需执行一次。之后,Launcher 会自动检测设备。
在安装 Qualcomm Launcher 之前,请确保卸载任何现有的 Qualcomm USB 驱动(QUD)— 它们会与 QDL 驱动冲突。
打开**设备管理器**,找到您的设备,如已安装 QUD 则将其卸载。设备**不应**出现在 COM 端口下。
如不执行此操作,通过 Qualcomm Launcher 进行的刷写操作将会失败。
## 步骤 2:选择您的开发套件
在 **Choose OS** 界面上,点击 **Select Development Kit**,然后从列表中选择 **IQ-9075 Evaluation Kit**。
 ## 步骤 3:选择操作系统镜像
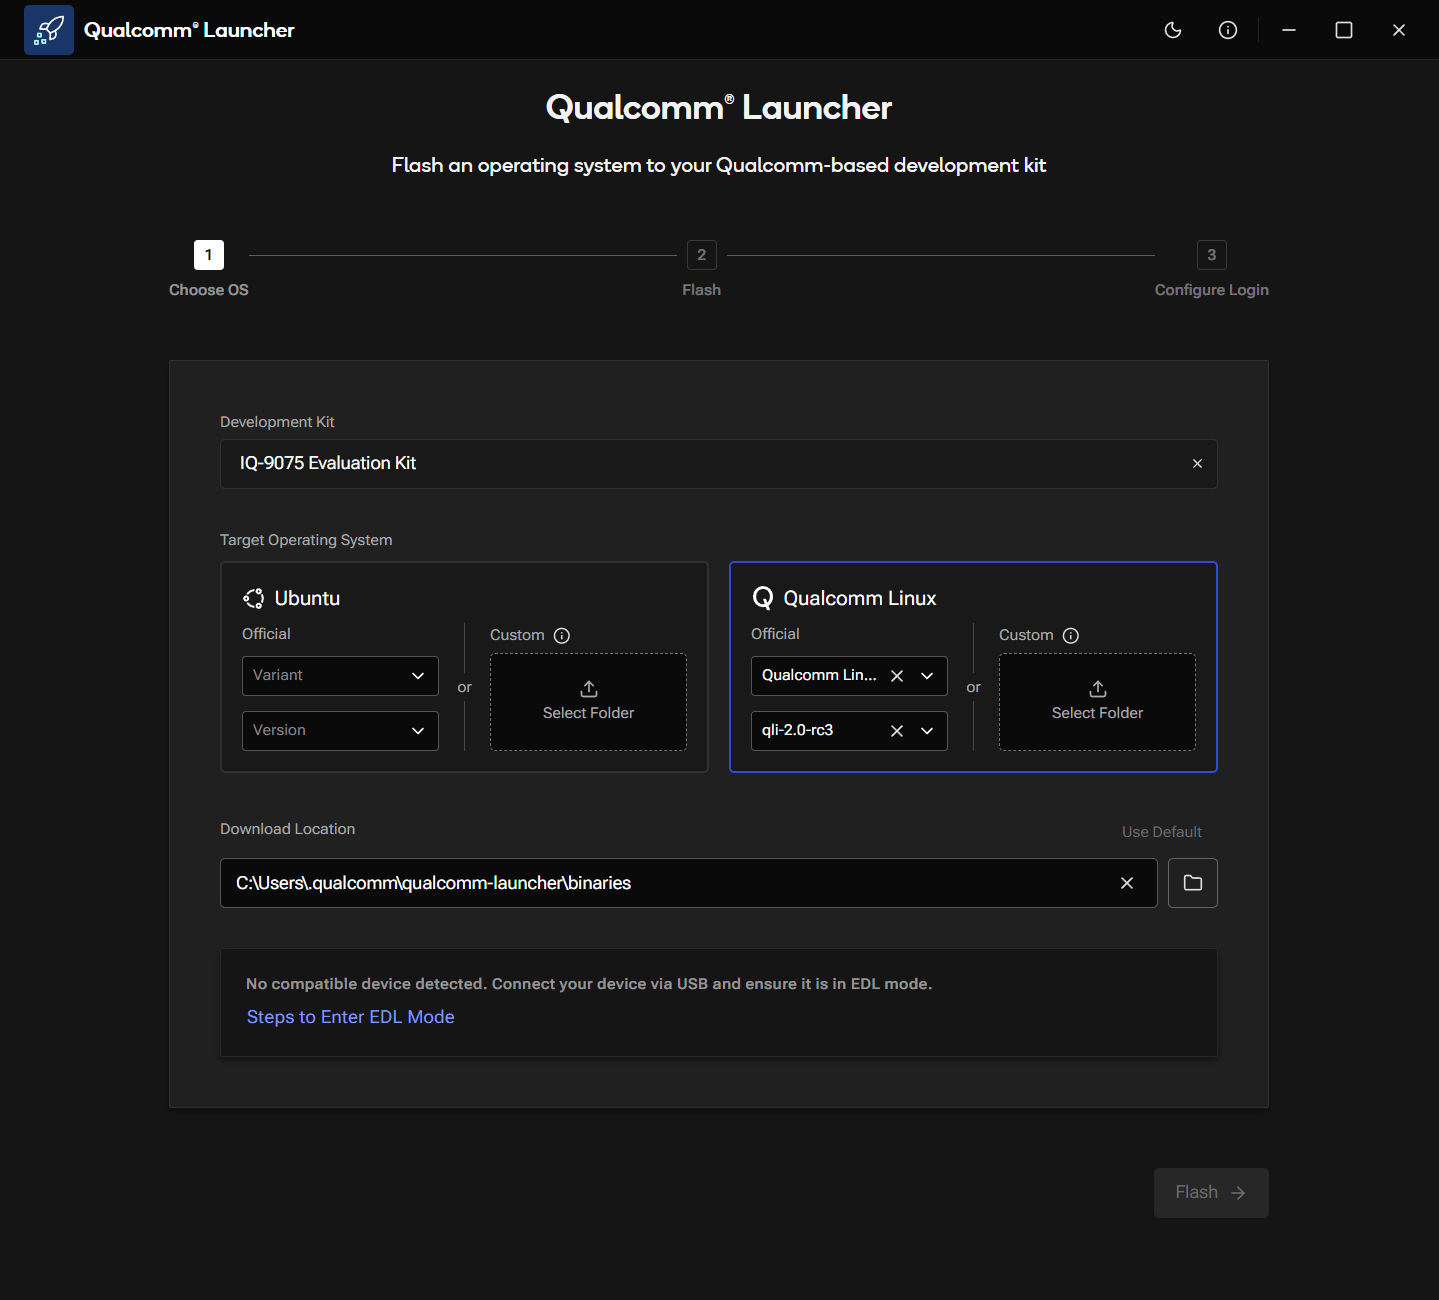
选定套件后,**Choose OS** 界面会显示操作系统选项。
1. 在 **Target Operating System** 下,选择 **Qualcomm Linux** 卡片。
2. 选择加载构建版本的方式:
使用 **Variant** 下拉菜单选择镜像类型(**Qualcomm Linux Proprietary** 或 **Qualcomm Linux Open Source**),然后使用 **Version** 下拉菜单选择版本。
## 步骤 3:选择操作系统镜像
选定套件后,**Choose OS** 界面会显示操作系统选项。
1. 在 **Target Operating System** 下,选择 **Qualcomm Linux** 卡片。
2. 选择加载构建版本的方式:
使用 **Variant** 下拉菜单选择镜像类型(**Qualcomm Linux Proprietary** 或 **Qualcomm Linux Open Source**),然后使用 **Version** 下拉菜单选择版本。
 使用此选项刷写本地构建或下载的镜像。
1. 在来源切换开关中选择 **Custom**。
使用此选项刷写本地构建或下载的镜像。
1. 在来源切换开关中选择 **Custom**。
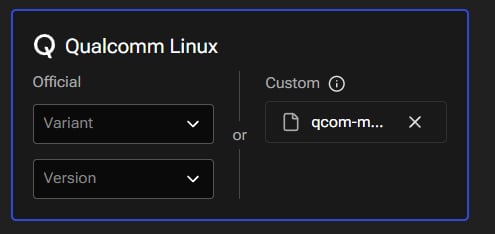 2. 解压来自构建输出或下载的镜像压缩包(`.zip` 或 `.tar.gz`)。
3. 点击 **Select Folder**,选择包含刷写描述文件(`rawprogram*.xml`、`patch*.xml`)和分区镜像(`.bin` / `.img`)的文件夹。
对于官方 Qualcomm Linux 镜像,该文件夹通常位于解压后压缩包内的:
`images/iq-9075-evk/qcom-multimedia-proprietary-image-iq-9075-evk`
3. 保持 **Download Location** 为默认值,或选择一个有足够空间的自定义文件夹。
## 步骤 4:使设备进入 EDL 模式
紧急下载(Emergency Download,EDL)模式使设备可以通过 USB 接收新的固件镜像。在检测到设备之前,**Choose OS** 界面会显示 *No compatible device detected*,且 **Flash** 按钮保持禁用状态。
1. 将 SW2-3 DIP 开关向上推以**打开**它。
2. 解压来自构建输出或下载的镜像压缩包(`.zip` 或 `.tar.gz`)。
3. 点击 **Select Folder**,选择包含刷写描述文件(`rawprogram*.xml`、`patch*.xml`)和分区镜像(`.bin` / `.img`)的文件夹。
对于官方 Qualcomm Linux 镜像,该文件夹通常位于解压后压缩包内的:
`images/iq-9075-evk/qcom-multimedia-proprietary-image-iq-9075-evk`
3. 保持 **Download Location** 为默认值,或选择一个有足够空间的自定义文件夹。
## 步骤 4:使设备进入 EDL 模式
紧急下载(Emergency Download,EDL)模式使设备可以通过 USB 接收新的固件镜像。在检测到设备之前,**Choose OS** 界面会显示 *No compatible device detected*,且 **Flash** 按钮保持禁用状态。
1. 将 SW2-3 DIP 开关向上推以**打开**它。
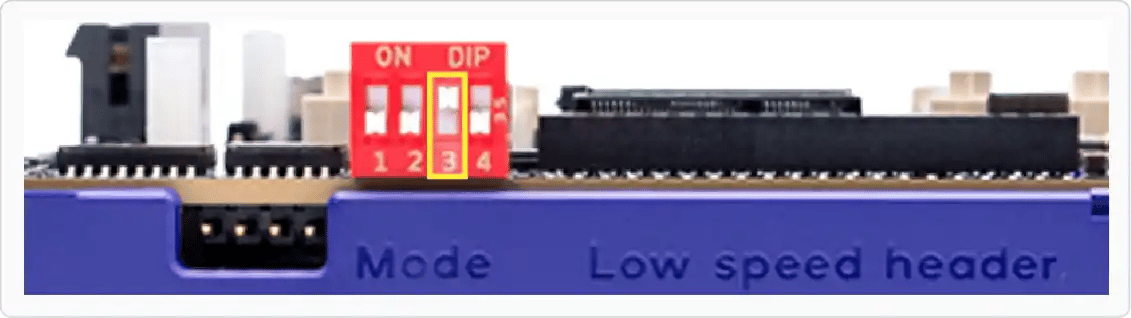 2. 将 **12 V 电源**连接到 EVK。
3. 使用 **USB Type-C 线缆**将 EVK 上的 **USB0** 连接到主机。
2. 将 **12 V 电源**连接到 EVK。
3. 使用 **USB Type-C 线缆**将 EVK 上的 **USB0** 连接到主机。
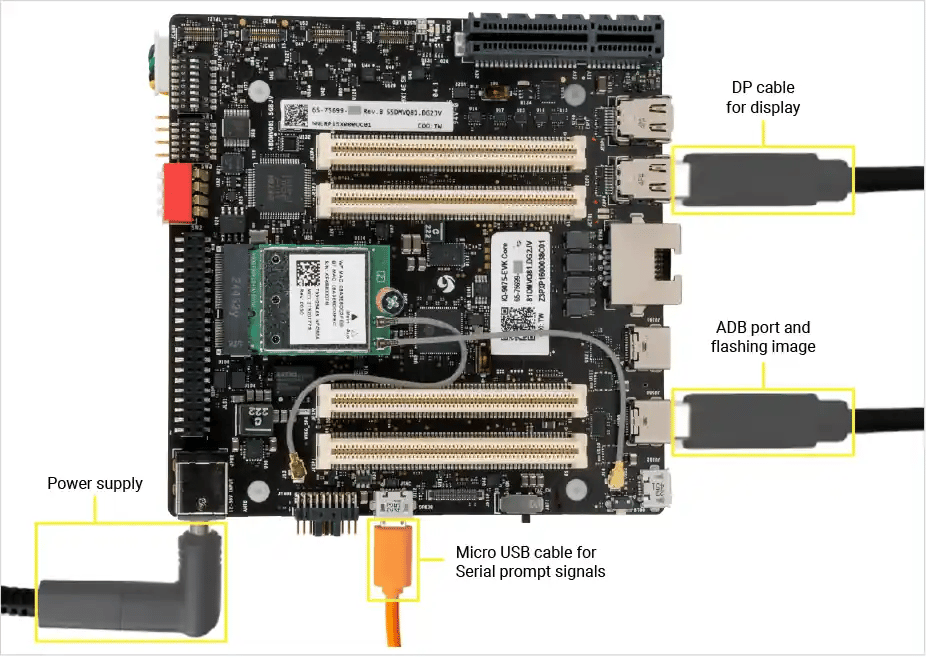 4. 拨动**电源开关**打开设备。
设备以 EDL 模式枚举后,**Flash** 按钮将变为可用。
4. 拨动**电源开关**打开设备。
设备以 EDL 模式枚举后,**Flash** 按钮将变为可用。
 ## 步骤 5:刷写
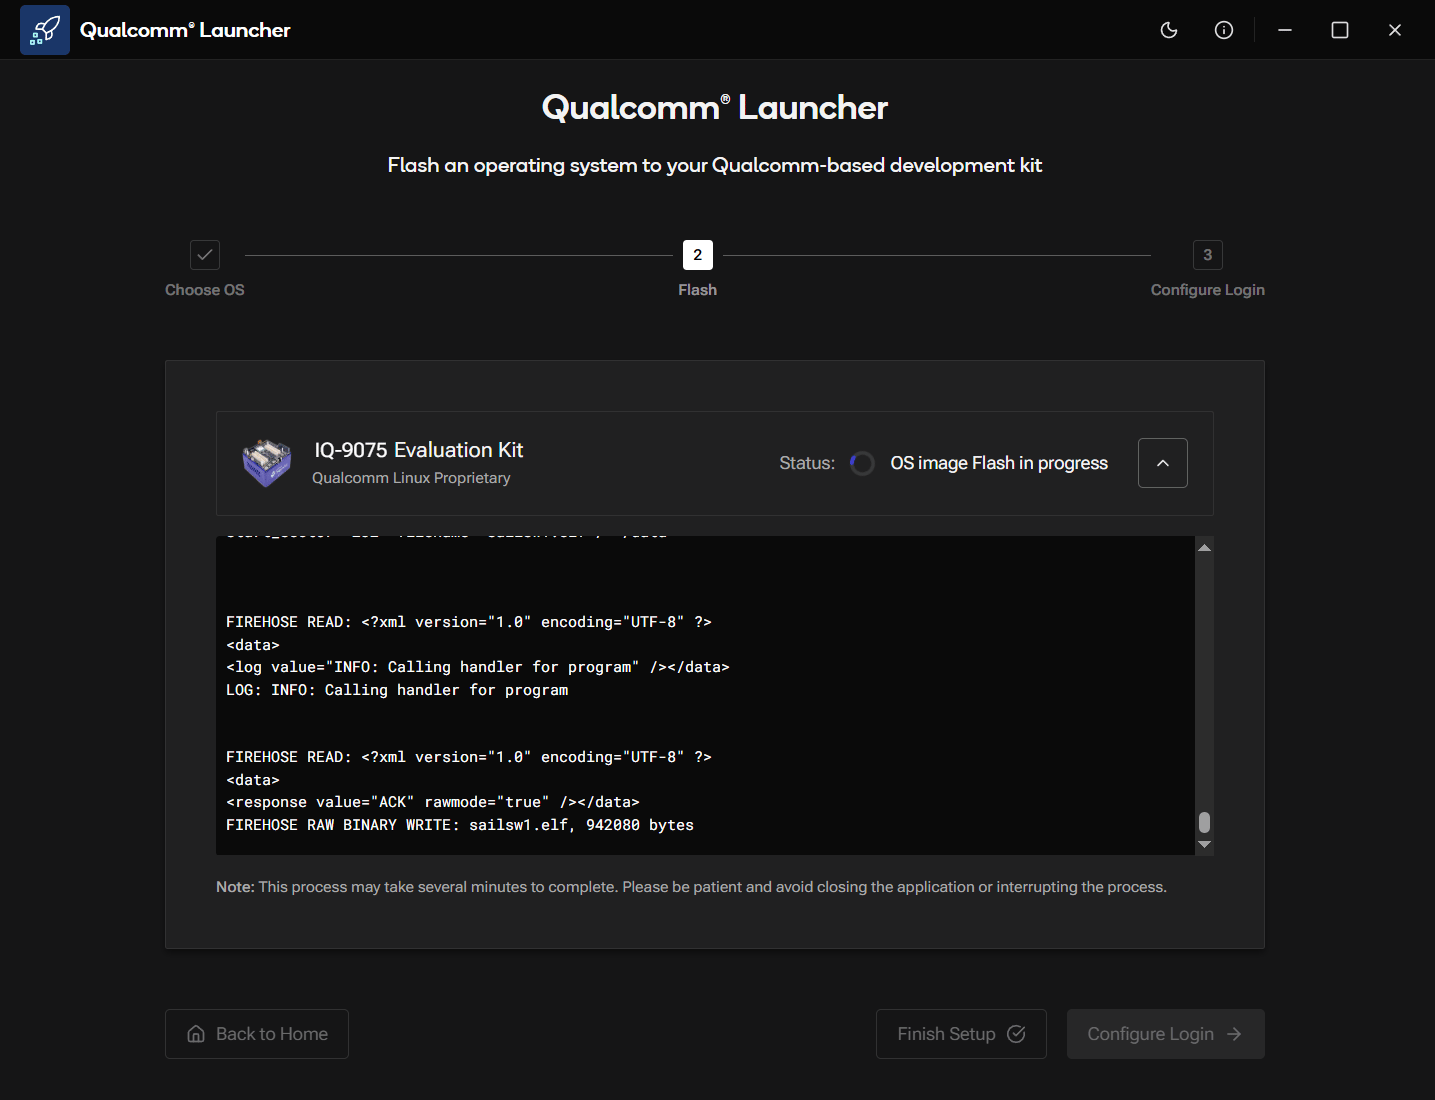
点击 **Flash** 按钮。Launcher 会先下载操作系统镜像,然后分两个阶段刷写设备。
**阶段 1:附加固件。** Launcher 会对 UFS 存储进行配置(provision)并写入 CDT,然后进入操作系统镜像阶段。此阶段完成后,它会暂停并要求您将设备重新置于 EDL 模式:
## 步骤 5:刷写
点击 **Flash** 按钮。Launcher 会先下载操作系统镜像,然后分两个阶段刷写设备。
**阶段 1:附加固件。** Launcher 会对 UFS 存储进行配置(provision)并写入 CDT,然后进入操作系统镜像阶段。此阶段完成后,它会暂停并要求您将设备重新置于 EDL 模式:
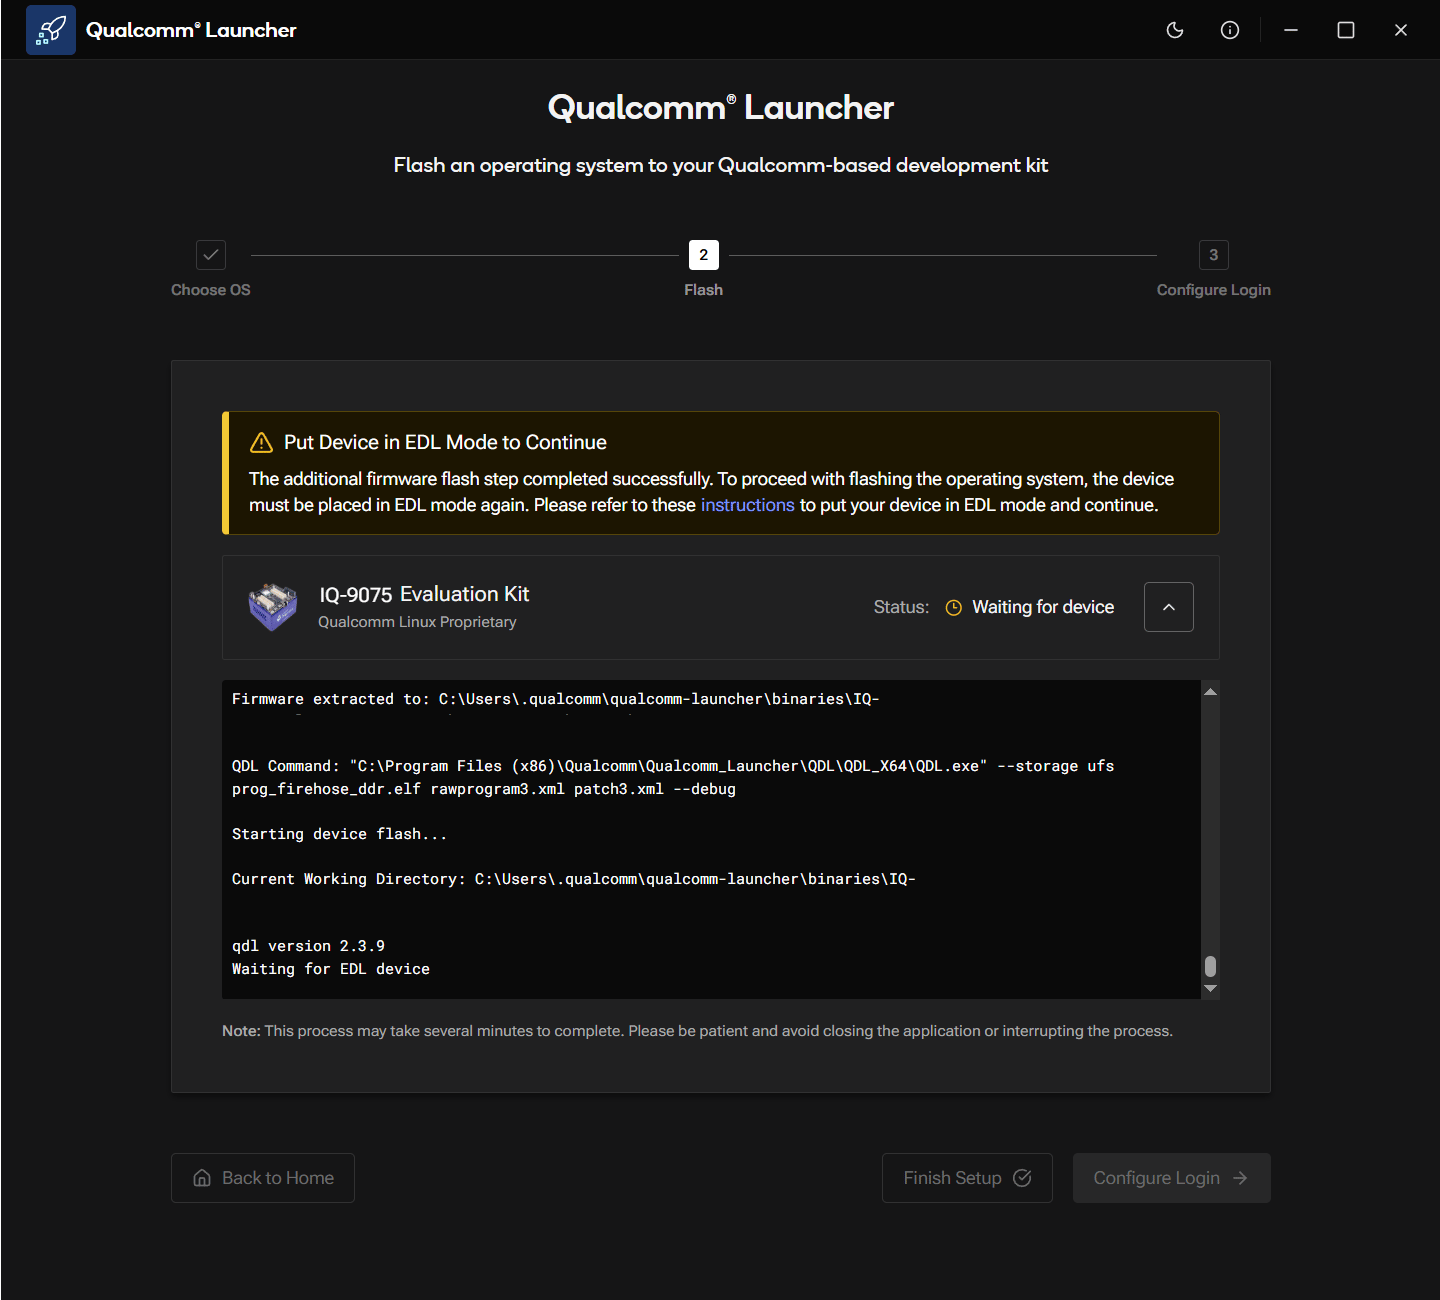 SW2-3 DIP 开关仍处于向上位置,因此只需**关闭再打开电源开关**。设备将重新进入 EDL 模式,Launcher 会自动继续。
**阶段 2:操作系统镜像。** Launcher 写入操作系统镜像。整个过程中请保持电源和 USB 连接。如果 Launcher 看起来在等待设备时卡住,请关闭再打开电源开关;它会重新连接并继续。
SW2-3 DIP 开关仍处于向上位置,因此只需**关闭再打开电源开关**。设备将重新进入 EDL 模式,Launcher 会自动继续。
**阶段 2:操作系统镜像。** Launcher 写入操作系统镜像。整个过程中请保持电源和 USB 连接。如果 Launcher 看起来在等待设备时卡住,请关闭再打开电源开关;它会重新连接并继续。
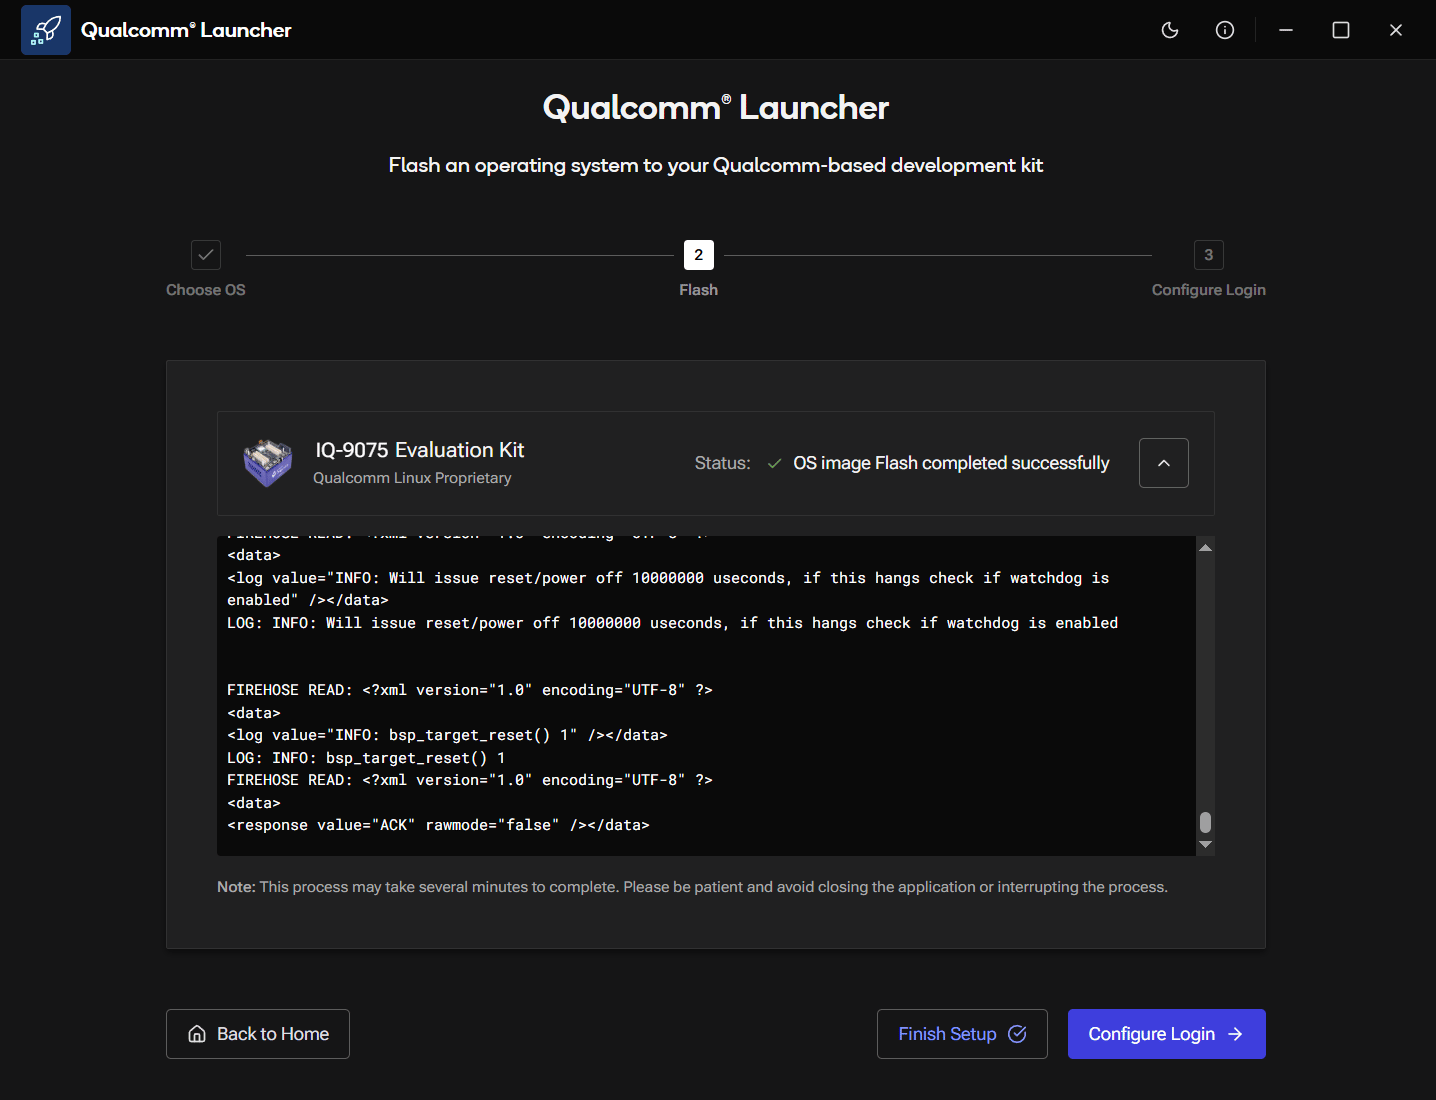
 刷写完成后,状态显示 **OS image Flash completed successfully**,且 **Configure Login** 按钮变为可用。
 ## 步骤 6:配置登录
Launcher 可以自动引导您完成串口和网络设置。您可以在此处完成该步骤,也可以跳过并按照[**设置设备**](../set-up-the-device)中的手动说明操作。
**要继续使用 Launcher:**
1. 将 **SW2-3 DIP 开关**向**下**推以关闭它。开关向下时,设备会正常启动进入操作系统,而不会进入 EDL 模式。
2. 使用 **micro-USB 线缆**将 EVK 上的 **micro-USB(调试)端口**连接到主机。
3. 重新上电设备(使用电源开关先关闭再打开)。
4. 点击 **Configure Login**。
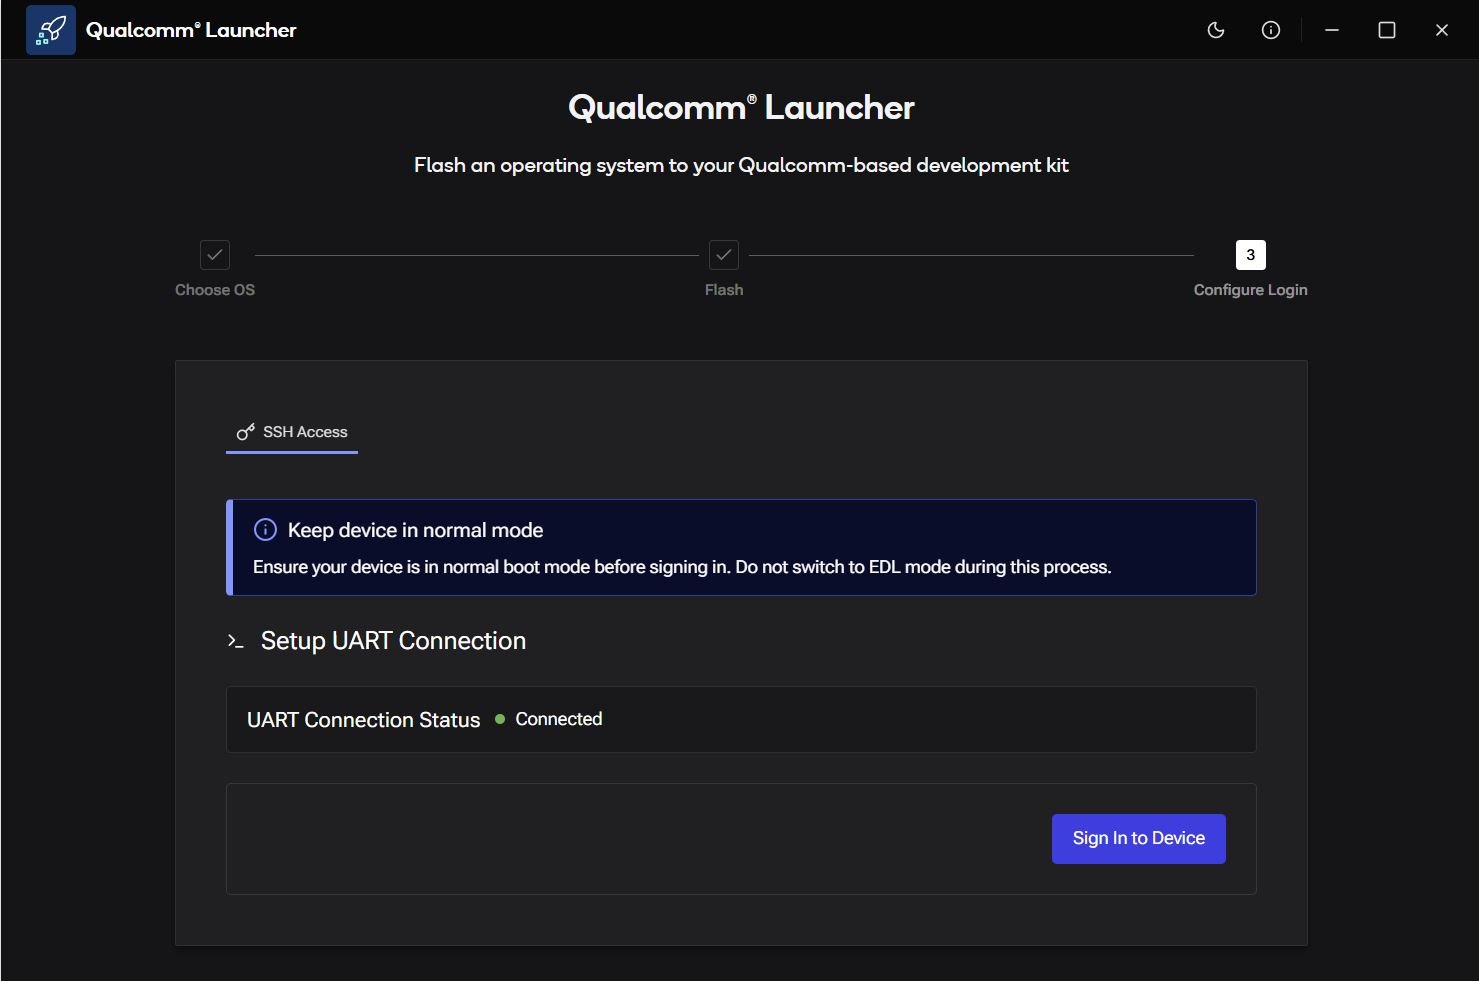
设备将启动进入正常模式。Launcher 会自动检测 UART 连接并显示 **UART Connection Status: Connected**。点击 **Sign In to Device**。
## 步骤 6:配置登录
Launcher 可以自动引导您完成串口和网络设置。您可以在此处完成该步骤,也可以跳过并按照[**设置设备**](../set-up-the-device)中的手动说明操作。
**要继续使用 Launcher:**
1. 将 **SW2-3 DIP 开关**向**下**推以关闭它。开关向下时,设备会正常启动进入操作系统,而不会进入 EDL 模式。
2. 使用 **micro-USB 线缆**将 EVK 上的 **micro-USB(调试)端口**连接到主机。
3. 重新上电设备(使用电源开关先关闭再打开)。
4. 点击 **Configure Login**。
设备将启动进入正常模式。Launcher 会自动检测 UART 连接并显示 **UART Connection Status: Connected**。点击 **Sign In to Device**。
 ## 步骤 7:设置 Wi-Fi
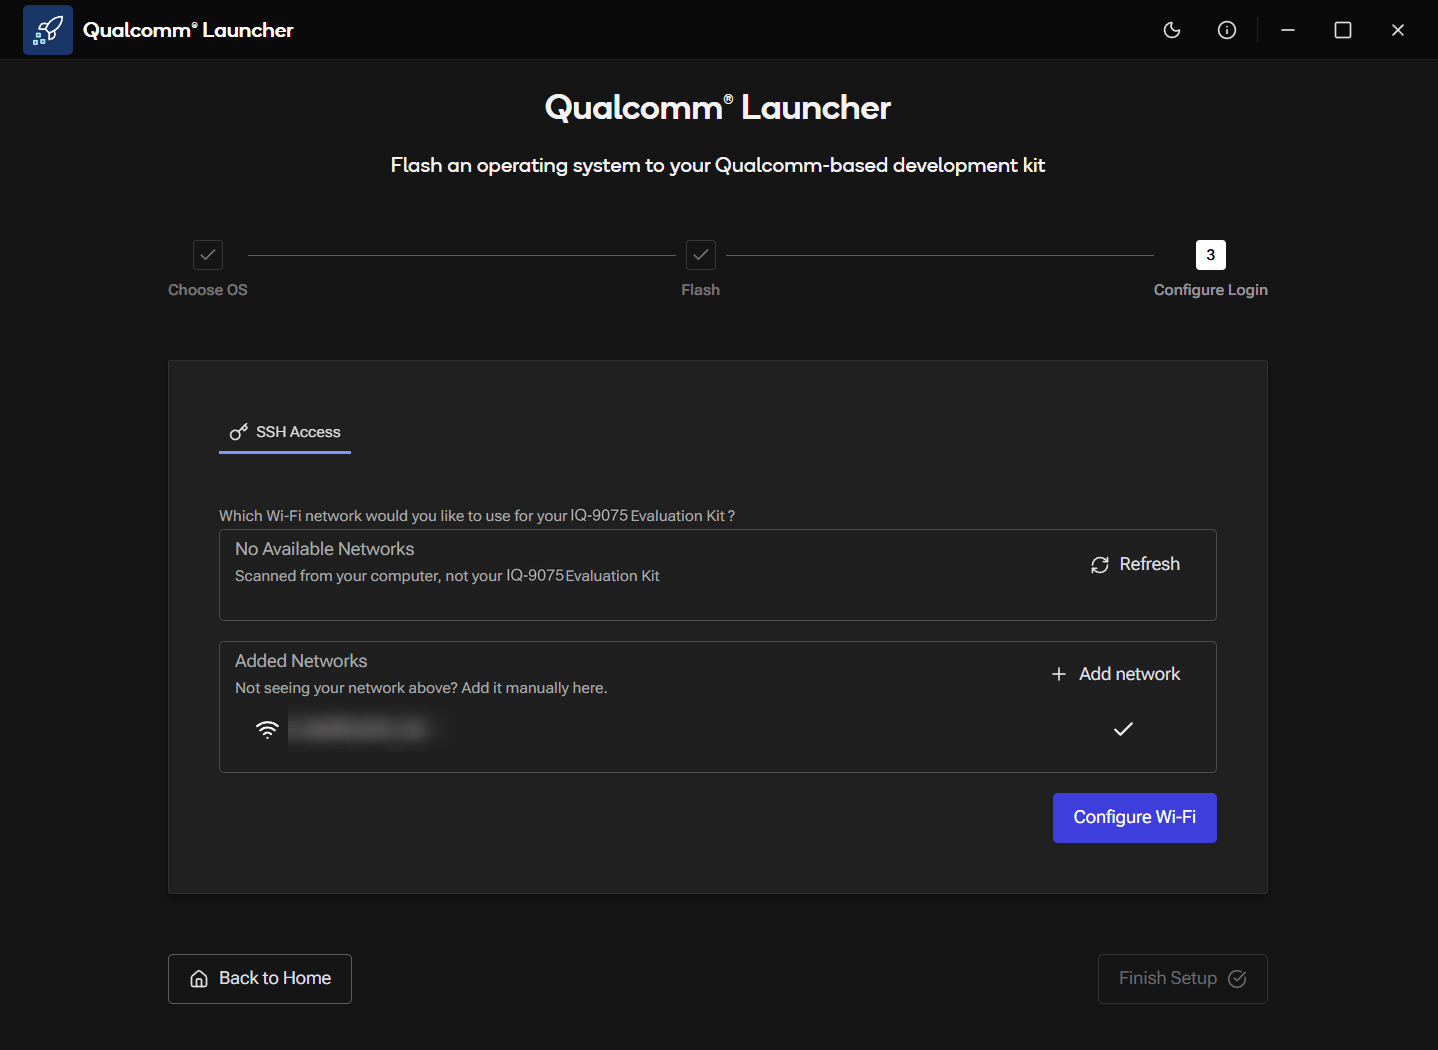
**SSH Access** 界面会显示可用的 Wi-Fi 网络。
* 从列表中选择一个网络,或点击 **+ Add network** 手动输入凭据。
* 点击 **Configure Wi-Fi**。
设备将连接到该网络。
## 步骤 7:设置 Wi-Fi
**SSH Access** 界面会显示可用的 Wi-Fi 网络。
* 从列表中选择一个网络,或点击 **+ Add network** 手动输入凭据。
* 点击 **Configure Wi-Fi**。
设备将连接到该网络。
 ## 步骤 8:设置完成
Wi-Fi 配置完成后,Launcher 会显示 **Configuration Summary**,其中包含设备 IP 地址和可直接复制的 SSH 命令。设备会重启一次以应用刷写后的配置。
## 步骤 8:设置完成
Wi-Fi 配置完成后,Launcher 会显示 **Configuration Summary**,其中包含设备 IP 地址和可直接复制的 SSH 命令。设备会重启一次以应用刷写后的配置。
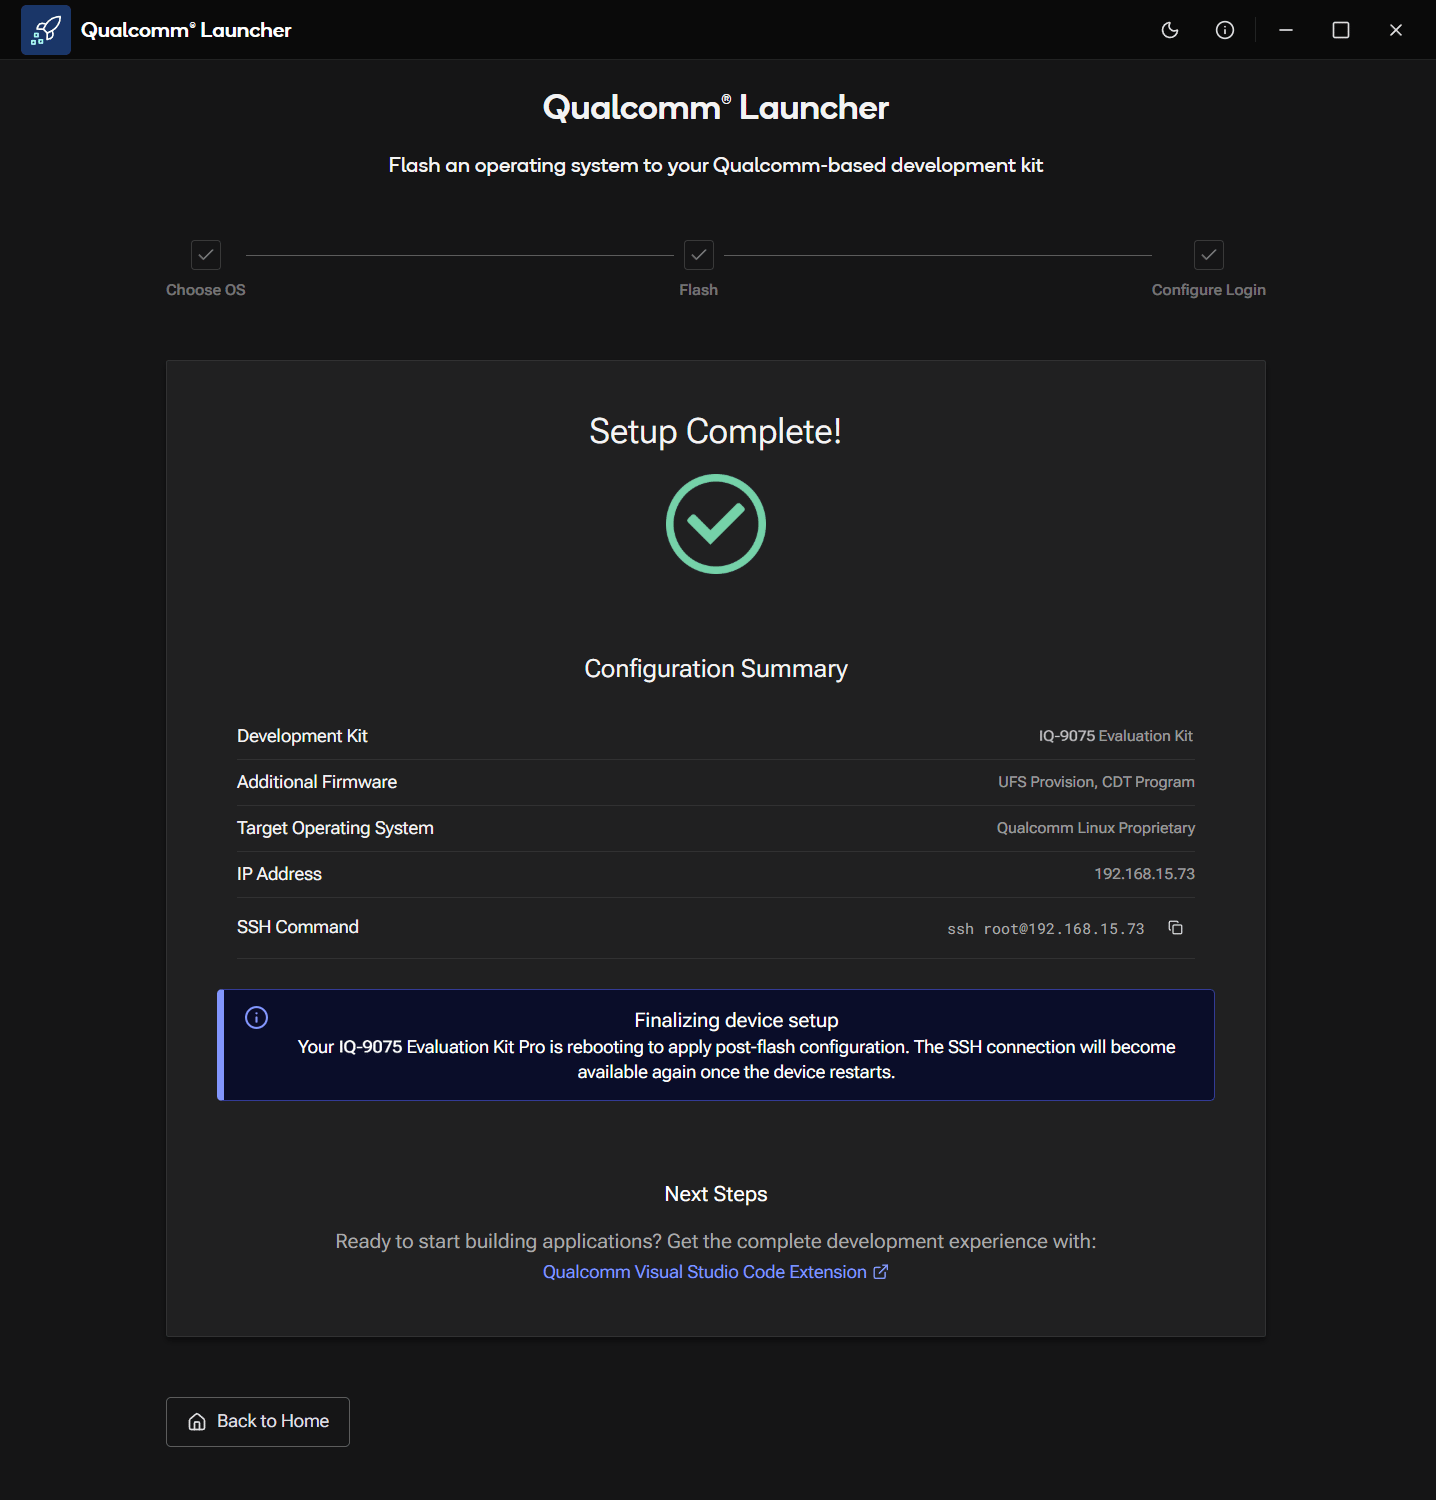 现在您可以使用默认凭据(`root` / `oelinux123`)直接 SSH 连接到设备:
```shell theme={null}
ssh root@
```
如果 Qualcomm Launcher 在您的主机上无法工作或无法检测到设备,请使用[**使用 QDL 刷写 Qualcomm Linux**](./flash-over-qli)作为替代方案。
## 后续步骤
* [**设置设备**](../set-up-the-device)。如果您跳过了上面的 UART/Wi-Fi 设置,请按照那里的手动说明操作。
现在您可以使用默认凭据(`root` / `oelinux123`)直接 SSH 连接到设备:
```shell theme={null}
ssh root@
```
如果 Qualcomm Launcher 在您的主机上无法工作或无法检测到设备,请使用[**使用 QDL 刷写 Qualcomm Linux**](./flash-over-qli)作为替代方案。
## 后续步骤
* [**设置设备**](../set-up-the-device)。如果您跳过了上面的 UART/Wi-Fi 设置,请按照那里的手动说明操作。