> ## Documentation Index
> Fetch the complete documentation index at: https://dragonwingdocs.qualcomm.com/llms.txt
> Use this file to discover all available pages before exploring further.
# 端到端示例
> 使用已发布的输入图像运行图像分类和手部检测的 AI 示例。这些示例无需摄像头。
无需任何摄像头即可端到端运行 QIR SDK 的 AI 视觉示例。两个示例都使用 `image_publisher` 以固定频率发布捆绑的图像,然后将帧推送到与摄像头启动方式相同的 QNN 推理管线。这些示例可在运行 Qualcomm Linux 或 Ubuntu 的 IQ-9075 EVK 上运行,也可在运行 Ubuntu 的 Qualcomm Dragonwing™ RB3 Gen 2 Vision Kit 上运行。
## 前提条件
在开始任一示例之前,请确认以下内容。
* 有关更多信息,请参阅[场景](./scenarios#evaluate)页面上的评估标签页。
* 主机和设备可以使用 `ping` 命令在网络上相互访问。
* 主机和设备上都提供 ROS 2 Jazzy,且 `ROS_DOMAIN_ID` 一致。
* 设备运行 `qcom-robotics-proprietary-image`(Qualcomm Linux)或 `qirp-sdk` 或 `qirp-sdk-desktop`(Ubuntu)。
## 运行 AI 示例
按照您要运行的示例对应的标签页操作。两个示例都通过 `image_publisher` 发布输入图像,因此无需摄像头。
端到端运行 `sample_resnet101`,通过 Qualcomm® AI Engine Direct SDK (QNN) 使用 ResNet-101 模型对捆绑图像进行分类。
### 管线图
下图展示了管线中的 ROS 2 节点和话题。
```mermaid theme={null}
flowchart TD
A[image_publisher]:::proprietary -->|/image_raw| B[Image classification preprocess]:::proprietary
B -->|/qrb_inference_input_tensor| C[qrb_ros_nn_inference]:::proprietary
C -->|/qrb_inference_output_tensor| D[Image classification postprocess]:::proprietary
D -->|/resnet101_output| E[Consumer or rqt]:::neutral
classDef proprietary fill:#31017D,color:#ffffff,stroke:#31017D
classDef neutral fill:#eeeeee,color:#000000,stroke:#999999
```
### 运行示例
按照操作系统标签页操作。两种路径均使用内置的图像发布器启动,默认以 10 Hz 发布 `glasses.jpg`。
通过 SSH 连接到设备:
```bash theme={null}
source /usr/share/qirp-setup.sh -m
export ROS_DOMAIN_ID=123
```
```bash theme={null}
ros2 launch sample_resnet101 launch_with_image_publisher.py
```
在第二个 SSH 会话中:
```bash theme={null}
ros2 topic echo /resnet101_output
```
```bash theme={null}
sudo apt install ros-jazzy-sample-resnet101
```
```bash theme={null}
source /opt/ros/jazzy/setup.bash
export ROS_DOMAIN_ID=123
```
```bash theme={null}
ros2 launch sample_resnet101 launch_with_image_publisher.py
```
```bash theme={null}
ros2 topic echo /resnet101_output
```
### 预期结果
以下输出显示 `/resnet101_output` 上稳定的分类流。
```text theme={null}
data: 'sunglass'
---
data: 'sunglass'
---
data: 'sunglass'
```
在启动命令中传入 `image_path:=` 可更改输入图像;标签会相应更新。
端到端运行 `sample_hand_detection`,通过 QNN 使用 MediaPipe Hand Landmark Detector 检测手掌和手部关键点。这个两阶段管线先执行手掌检测,再执行关键点回归,然后在源帧上进行标注。
### 管线图
下图展示了两阶段管线中的 ROS 2 节点和话题。
```mermaid theme={null}
flowchart TD
A[image_publisher]:::proprietary -->|/image_raw| B[palm_preprocessor]:::proprietary
B -->|/palm_detector_input_tensor| C[qrb_ros_nn_inference]:::proprietary
C -->|/palm_detector_output_tensor| D[palm_postprocessor]:::proprietary
D --> E[landmark_preprocessor]:::proprietary
E -->|/landmark_detector_input_tensor| F[qrb_ros_nn_inference]:::proprietary
F -->|/landmark_detector_output_tensor| G[landmark_postprocessor]:::proprietary
G -->|/handlandmark_result| H[rqt Image View]:::neutral
classDef proprietary fill:#31017D,color:#ffffff,stroke:#31017D
classDef neutral fill:#eeeeee,color:#000000,stroke:#999999
```
### 运行示例
按照操作系统标签页操作。两种路径均使用内置的图像发布器启动,因此无需摄像头。
通过 SSH 连接到设备:
```bash theme={null}
source /usr/share/qirp-setup.sh -m
export ROS_DOMAIN_ID=123
export PYTHONPATH=$PYTHONPATH:/opt/ros/jazzy/lib/python3.14/site-packages/sample_hand_detection
```
```bash theme={null}
ros2 launch sample_hand_detection launch_with_image_publisher.py model_path:=/opt/model/
```
在主机终端中:
```bash theme={null}
export DISPLAY=YOUR_HOST_IP:0
export ROS_DOMAIN_ID=123
rqt
```
在 `rqt` 中,选择 **Plugins** → **Visualization** → **Image View**,然后选择 `/handlandmark_result`。
```bash theme={null}
sudo apt install ros-jazzy-sample-hand-detection
```
```bash theme={null}
source /opt/ros/jazzy/setup.bash
export ROS_DOMAIN_ID=123
```
```bash theme={null}
ros2 launch sample_hand_detection launch_with_image_publisher.py
```
在主机上打开 `rqt`,选择 **Plugins** → **Visualization** → **Image View**,然后选择 `/handlandmark_result`。
### 预期结果
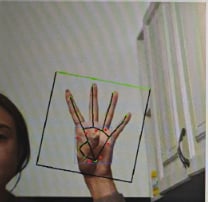
下图显示当发布一张完全张开手掌的图像时,带有手掌边界框和 21 个关键点标记的标注帧。
 ## 后续步骤
* [QIR SDK 用户指南(Qualcomm Linux)](/zh/SDKs/QIR-SDK-2.0/) — 面向运行 Qualcomm Linux 软件的 Qualcomm Dragonwing 设备的完整 QIR SDK 用户指南,包括 SDK 概述、安装、镜像变体、交叉编译工具链、overlay 机制、迁移指南和故障排除。
* [QIR SDK 用户指南(Ubuntu)](/zh/SDKs/QIR-SDK-Ubuntu) — 面向运行 Ubuntu 的 Qualcomm Dragonwing 设备的完整 QIR SDK 用户指南,包括软件架构、安装和示例应用。
* 试用更多示例应用
[示例](/zh/SDKs/QIR-SDK-2.0/qir-sdk-sample-applications)
[示例](/zh/SDKs/QIR-SDK-Ubuntu/sample-applications)
## 后续步骤
* [QIR SDK 用户指南(Qualcomm Linux)](/zh/SDKs/QIR-SDK-2.0/) — 面向运行 Qualcomm Linux 软件的 Qualcomm Dragonwing 设备的完整 QIR SDK 用户指南,包括 SDK 概述、安装、镜像变体、交叉编译工具链、overlay 机制、迁移指南和故障排除。
* [QIR SDK 用户指南(Ubuntu)](/zh/SDKs/QIR-SDK-Ubuntu) — 面向运行 Ubuntu 的 Qualcomm Dragonwing 设备的完整 QIR SDK 用户指南,包括软件架构、安装和示例应用。
* 试用更多示例应用
[示例](/zh/SDKs/QIR-SDK-2.0/qir-sdk-sample-applications)
[示例](/zh/SDKs/QIR-SDK-Ubuntu/sample-applications)