> ## Documentation Index
> Fetch the complete documentation index at: https://dragonwingdocs.qualcomm.com/llms.txt
> Use this file to discover all available pages before exploring further.

# 从主机运行

> 从 Windows<sup>®</sup>、Ubuntu 或 macOS<sup>®</sup> 主机在 Dragonwing 评估套件上运行多媒体和 AI 示例应用。

Qualcomm <sup>®</sup> Linux <sup>®</sup> 提供多种示例应用。每个应用适用于不同的用例，例如零售、Qualcomm <sup>®</sup> 边缘 AI 盒子解决方案（Edge AI Box Solutions）和 IP 摄像机。示例应用可分为以下几类：

* 多媒体示例应用，展示摄像头、视频和音频功能。
* AI 示例应用，展示 AI 和机器学习（ML）能力。

<h2 id="prerequisites">
  先决条件
</h2>

开始之前，请先完成 [IQ-8275](https://dragonwingdocs.qualcomm.com/Linux/devices/iq8275-evk/set-up-the-device) 设备的设置。

要使用摄像头，请在目标设备上运行以下命令启用 `camx`：

```shell theme={null}
echo -n "camx" > /var/data
efivar -n 882f8c2b-9646-435f-8de5-f208ff80c1bd-VendorDtbOverlays -w -f /var/data
efivar -n 882f8c2b-9646-435f-8de5-f208ff80c1bd-VendorDtbOverlays -p
sync
reboot
```

## 运行多媒体示例应用

多媒体示例应用展示了 Dragonwing EVK 上摄像头、显示和视频流的用例。

### 多摄像头流传输或编码（行车记录仪）

**说明：** [**gst-multi-camera-example**](https://github.com/qualcomm/gst-plugins-imsdk/tree/main/gst-sample-apps/gst-multi-camera-example) 应用允许您同时从两个摄像头传感器采集视频流。该应用将摄像头画面并排合成后显示在屏幕上，或将视频流编码并保存到文件。

需要多路摄像头输入的用例包括行车记录仪或立体摄像头。您可以以此应用为参考构建您的用例。例如，一个需要从多个摄像头采集视频的安防系统。您可以实时查看视频，也可以将其存档以备日后回看。

下图展示了多路摄像头流的流水线。有关此流水线中使用的元素的更多信息，请参见[流水线流程。](#multi-camera-pipeline-flow)

<img src="https://mintcdn.com/qualcomm-prod/jy6NQT2Y7J_sAxdX/Linux/images/run-sample-applications/gst_multicamera_example_pipeline.svg?fit=max&auto=format&n=jy6NQT2Y7J_sAxdX&q=85&s=f8e3fc89f7a9fcfc877e1fb5f933df5c" alt="多摄像头流水线" width="1080" height="420" data-path="Linux/images/run-sample-applications/gst_multicamera_example_pipeline.svg" />

**图：gst-multi-camera-stream-example 流水线**

**应用：** [`gst-multi-camera-example`](https://github.com/qualcomm/gst-plugins-imsdk/tree/main/gst-sample-apps/gst-multi-camera-example)

<Accordion title="动手试试">
  ### 运行应用

  <Note>
    **注意：** 在以下命令中，请提供必要的参数，例如宽度、高度和输出类型。宽度和高度的更改仅适用于主摄像头。
  </Note>

  <Steps>
    <Step title="完成先决条件">
      确保已完成[先决条件](#prerequisites)。
    </Step>

    <Step title="在目标设备的终端中，选择以下任一用例并运行相应命令：">
      **Waylandsink 用例：** 查看 Waylandsink 输出：

      ```bash theme={null}
      gst-multi-camera-example -o 0 -w 1920 -h 1080
      ```

      **编码器用例：** 查看编码器输出：

      ```bash theme={null}
      gst-multi-camera-example -o 1 -w 1920 -h 1080
      ```
    </Step>

    <Step title="停止正在运行的用例">
      按 `Ctrl + C`。
    </Step>

    <Step title="在目标设备的终端中，运行以下命令显示可用的帮助选项：">
      ```bash theme={null}
      gst-multi-camera-example --help
      ```
    </Step>

    <Step title="在主机的终端中，运行以下命令从目标设备拉取文件：">
      ```bash theme={null}
      scp root@<IP address of target device>:/etc/media/<filename to pull>
      ```
    </Step>
  </Steps>

  ### 预期输出

  输出会显示在屏幕上并保存到文件。

  * 如果输出类型是显示，您可以在显示器上预览视频流。

  * 如果输出类型是视频编码，则编码后的文件分别保存在
    `/etc/media/cam1_vid.mp4`（摄像头 1）和 `/etc/media/cam2_vid.mp4`（摄像头 2）。

  <img src="https://mintcdn.com/qualcomm-prod/jy6NQT2Y7J_sAxdX/Linux/images/run-sample-applications/multi-camera-example-output.png?fit=max&auto=format&n=jy6NQT2Y7J_sAxdX&q=85&s=2e1b19f45822901bd09756841760501a" alt="摄像头预览输出" width="954" height="391" data-path="Linux/images/run-sample-applications/multi-camera-example-output.png" />

  **图：gst-multi-camera-example 应用的预期输出 – 预览**

  <h3 id="multi-camera-pipeline-flow">
    流水线流程
  </h3>

  下表列出了多摄像头流传输流水线中使用的插件：

  <table>
    <thead>
      <tr>
        <th>流水线</th>
        <th>说明</th>
      </tr>
    </thead>

    <tbody>
      <tr>
        <td>在显示器上预览</td>

        <td>
          <ol>
            <li>`qticamsrc` 从 camera0 和 camera1 同时采集视频。</li>
            <li>应用 `Capsfilter` 对原始视频数据施加约束。</li>
            <li>`qtivcomposer` 合成视频流，并将合成后的视频数据发送到 Wayland 显示 sink。</li>
            <li>`waylandsink` 显示实时预览。</li>
          </ol>
        </td>
      </tr>

      <tr>
        <td>在设备上保存编码文件</td>

        <td>
          <ol>
            <li>`qticamsrc` 从 camera0 和 camera1 同时采集视频。</li>
            <li>应用 `Capsfilter` 对原始视频数据施加约束。</li>
            <li>使用 `v4l2h264enc` 以 H.264 格式编码视频。</li>
            <li>使用 `H264parse` 解析视频。</li>
            <li>使用 `Mp4mux` 将视频复用到 MP4 容器中。</li>
            <li>使用 `Filesink` 将视频写入文件。</li>
          </ol>
        </td>
      </tr>
    </tbody>
  </table>
</Accordion>

### 多通道视频解码与合成（视频墙）

**说明：** [**gst-concurrent-videoplay-composition**](https://github.com/qualcomm/gst-plugins-imsdk/tree/main/gst-sample-apps/gst-concurrent-videoplay-composition) 应用支持 MP4 AVC (H.264) 视频的并发播放，并在视频墙显示器上执行合成。

在并发视频播放和合成流水线中，四条解码和合成流水线并发运行。有关此流水线中使用的插件的更多信息，请参见[流水线流程。](#video-wall)

<img src="https://mintcdn.com/qualcomm-prod/jy6NQT2Y7J_sAxdX/Linux/images/run-sample-applications/gst_concurrent_videoplay_composition.svg?fit=max&auto=format&n=jy6NQT2Y7J_sAxdX&q=85&s=a899ee5d2cb64e99d67dba1c54190603" alt="单摄像头流水线" width="1150" height="420" data-path="Linux/images/run-sample-applications/gst_concurrent_videoplay_composition.svg" />

**图：包含四路流的 gst-concurrent-videoplay-composition 流水线**

**应用：** [`gst-concurrent-videoplay-composition`](https://github.com/qualcomm/gst-plugins-imsdk/tree/main/gst-sample-apps/gst-concurrent-videoplay-composition)

<Accordion title="动手试试">
  ### 运行应用

  下表列出了 gst-concurrent-videoplay-composition 应用支持的用例：

  <table>
    <thead>
      <tr>
        <th>用例</th>
        <th>说明</th>
      </tr>
    </thead>

    <tbody>
      <tr>
        <td>视频会议</td>

        <td>
          <ul>
            <li>同时解码多个参会者的视频流。</li>
            <li>适用于应用需要管理多路视频流的多方视频会议场景。</li>
          </ul>
        </td>
      </tr>

      <tr>
        <td>监控系统</td>

        <td>
          <ul>
            <li>并发解码来自两个独立摄像头的视频画面。</li>
          </ul>
        </td>
      </tr>

      <tr>
        <td>数字标牌</td>

        <td>
          <ul>
            <li>允许对在多个地点以电子方式显示的集中管理信息进行同步更改或更新。</li>
          </ul>
        </td>
      </tr>
    </tbody>
  </table>

  要运行这些用例，请执行以下操作：

  <Steps>
    <Step title="完成先决条件">
      确保已完成[先决条件。](#prerequisites)
    </Step>

    <Step title="准备输入视频文件">
      在目标设备上添加至少一个 `MP4 AVC (H.264)` 视频文件。
    </Step>

    <Step title="运行用例">
      在目标设备的终端中运行：

      ```bash theme={null}
      gst-concurrent-videoplay-composition -c <number-of-streams> -i <input-file-1>.mp4 -i <input-file-2>.mp4
      ```

      **命令行参数**

      | 参数   | 说明                                |
      | ---- | --------------------------------- |
      | `-c` | 用于合成的解码流数量。支持的值：`2`、`4`、`8`、`16`。 |
      | `-i` | 输入视频文件的绝对路径。                      |

      **示例**

      * **两个会话的并发播放**

        ```bash theme={null}

        gst-concurrent-videoplay-composition -c 2 -i /etc/media/video_avc.mp4 -i /etc/media/video_avc.mp4
        ```
      * **四个会话的并发播放**
        ```bash theme={null}

        gst-concurrent-videoplay-composition -c 4 -i /etc/media/video_avc.mp4 -i /etc/media/video_avc.mp4 -i /etc/media/video_avc.mp4 -i /etc/media/video_avc.mp4
        ```
    </Step>

    <Step title="停止正在运行的用例">
      按 `Ctrl + C`。
    </Step>

    <Step title="在目标设备的终端中，运行以下命令显示可用的帮助选项：">
      ```bash theme={null}
      gst-concurrent-videoplay-composition --help
      ```
    </Step>
  </Steps>

  ### 预期输出

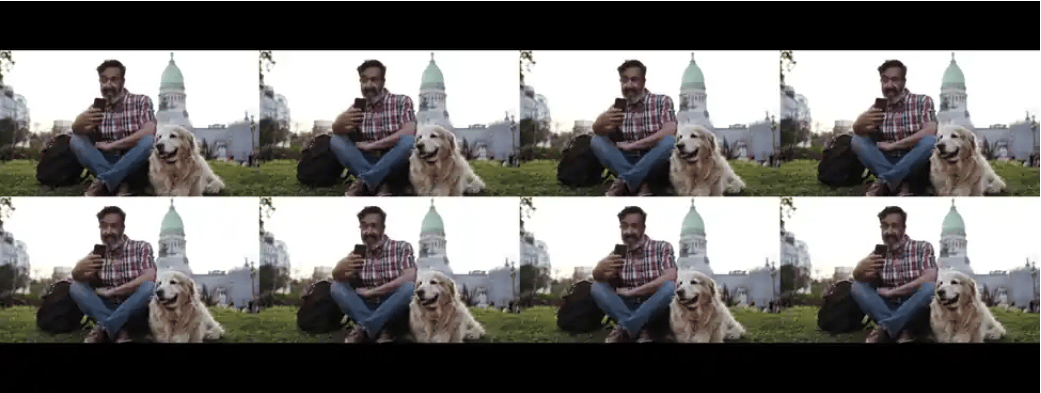
  各路合成的视频流平铺在一起，显示为一个统一的视频流。

  <img src="https://mintcdn.com/qualcomm-prod/jy6NQT2Y7J_sAxdX/Linux/images/run-sample-applications/video-wall-output.png?fit=max&auto=format&n=jy6NQT2Y7J_sAxdX&q=85&s=3fcbf46b7dea58fefc0bca2c94a08b78" alt="视频墙输出" width="1041" height="393" data-path="Linux/images/run-sample-applications/video-wall-output.png" />

  **图：gst-concurrent-videoplay-composition 应用的预期输出**

  <h3 id="video-wall">
    流水线流程
  </h3>

  下表列出了运行视频墙流水线所使用的插件：

  <table>
    <thead>
      <tr>
        <th>插件</th>
        <th>说明</th>
      </tr>
    </thead>

    <tbody>
      <tr>
        <td>filesrc</td>

        <td>
          <ol>
            读取视频数据。
          </ol>
        </td>
      </tr>

      <tr>
        <td>qtdemux</td>

        <td>
          <ol>
            解复用视频数据。
          </ol>
        </td>
      </tr>

      <tr>
        <td>h264parse</td>

        <td>
          <ol>
            解析 H.264 视频流。
          </ol>
        </td>
      </tr>

      <tr>
        <td>v4l2h264dec</td>

        <td>
          <ol>
            解码 H.264 视频流。
          </ol>
        </td>
      </tr>

      <tr>
        <td>qtivcomposer</td>

        <td>
          <ol>
            合成解码后的视频流并发送到显示器。
          </ol>
        </td>
      </tr>

      <tr>
        <td>waylandsink</td>

        <td>
          <ol>
            在 Wayland 显示器上显示合成后的视频流。
          </ol>
        </td>
      </tr>
    </tbody>
  </table>
</Accordion>

## 运行 AI 示例应用

AI 示例应用展示了在 Dragonwing EVK 上对来自摄像头、视频文件或实时流传输协议（RTSP）流的输入进行目标检测、多流推理和并行推理的用例。

<h3 id="download-ai-models">
  下载并传输 AI 模型和标签
</h3>

要运行 AI 示例应用，请使用以下方法之一下载所需的模型和标签：

* 从 [Qualcomm® AI Hub](https://aihub.qualcomm.com/iot/models) 下载 AI 模型，并从 GitHub 下载标签
* 使用 `download_artifacts.sh` 脚本下载 AI 模型和标签

  在目标设备上，获取 `download_artifacts.sh` 脚本，设置可执行权限，并运行它以下载模型、媒体和标签文件：

  ```bash theme={null}
  cd /tmp/
  curl -L -O https://raw.githubusercontent.com/qualcomm/sample-apps-for-qualcomm-linux/refs/heads/main/qualcomm-linux/scripts/download_artifacts.sh
  chmod +x download_artifacts.sh
  ./download_artifacts.sh
  ```

要运行目标检测、并行推理和多流推理 AI 用例，应用使用以下 AI 模型：

| 示例应用     | 所需模型                                                                                                                                                                                                                                                                                                                               |
| -------- | ---------------------------------------------------------------------------------------------------------------------------------------------------------------------------------------------------------------------------------------------------------------------------------------------------------------------------------- |
| AI 目标检测  | [yolox\_quantized.tflite](https://aihub.qualcomm.com/iot/models/yolox?searchTerm=yolo*)                                                                                                                                                                                                                                            |
| 并行 AI 推理 | [yolox\_quantized.tflite](https://aihub.qualcomm.com/iot/models/yolox?searchTerm=yolo*)<br />[Inception-v3](https://aihub.qualcomm.com/iot/models/inception_v3)<br />[HRNetPose](https://aihub.qualcomm.com/iot/models/hrnet_pose)<br />[DeepLabV3-Plus-MobileNet](https://aihub.qualcomm.com/iot/models/deeplabv3_plus_mobilenet) |
| 多流推理     | [yolox\_quantized.tflite](https://aihub.qualcomm.com/iot/models/yolox?searchTerm=yolo*)<br />[Inception-v3](https://aihub.qualcomm.com/iot/models/inception_v3)                                                                                                                                                                    |

### AI 目标检测

**说明：** [**gst-ai-object-detection**](https://github.com/qualcomm/gst-plugins-imsdk/blob/main/gst-sample-apps/gst-ai-object-detection/main.c) 应用可用于检测图像和视频中的目标。这些用例展示了在 Qualcomm AI 硬件加速器上执行 [**YOLOv5**](https://github.com/ultralytics/yolov5)、[**YOLOv8**](https://github.com/ultralytics/ultralytics) 和 [**YOLOX**](https://github.com/Megvii-BaseDetection/YOLOX/blob/main/README.md)。

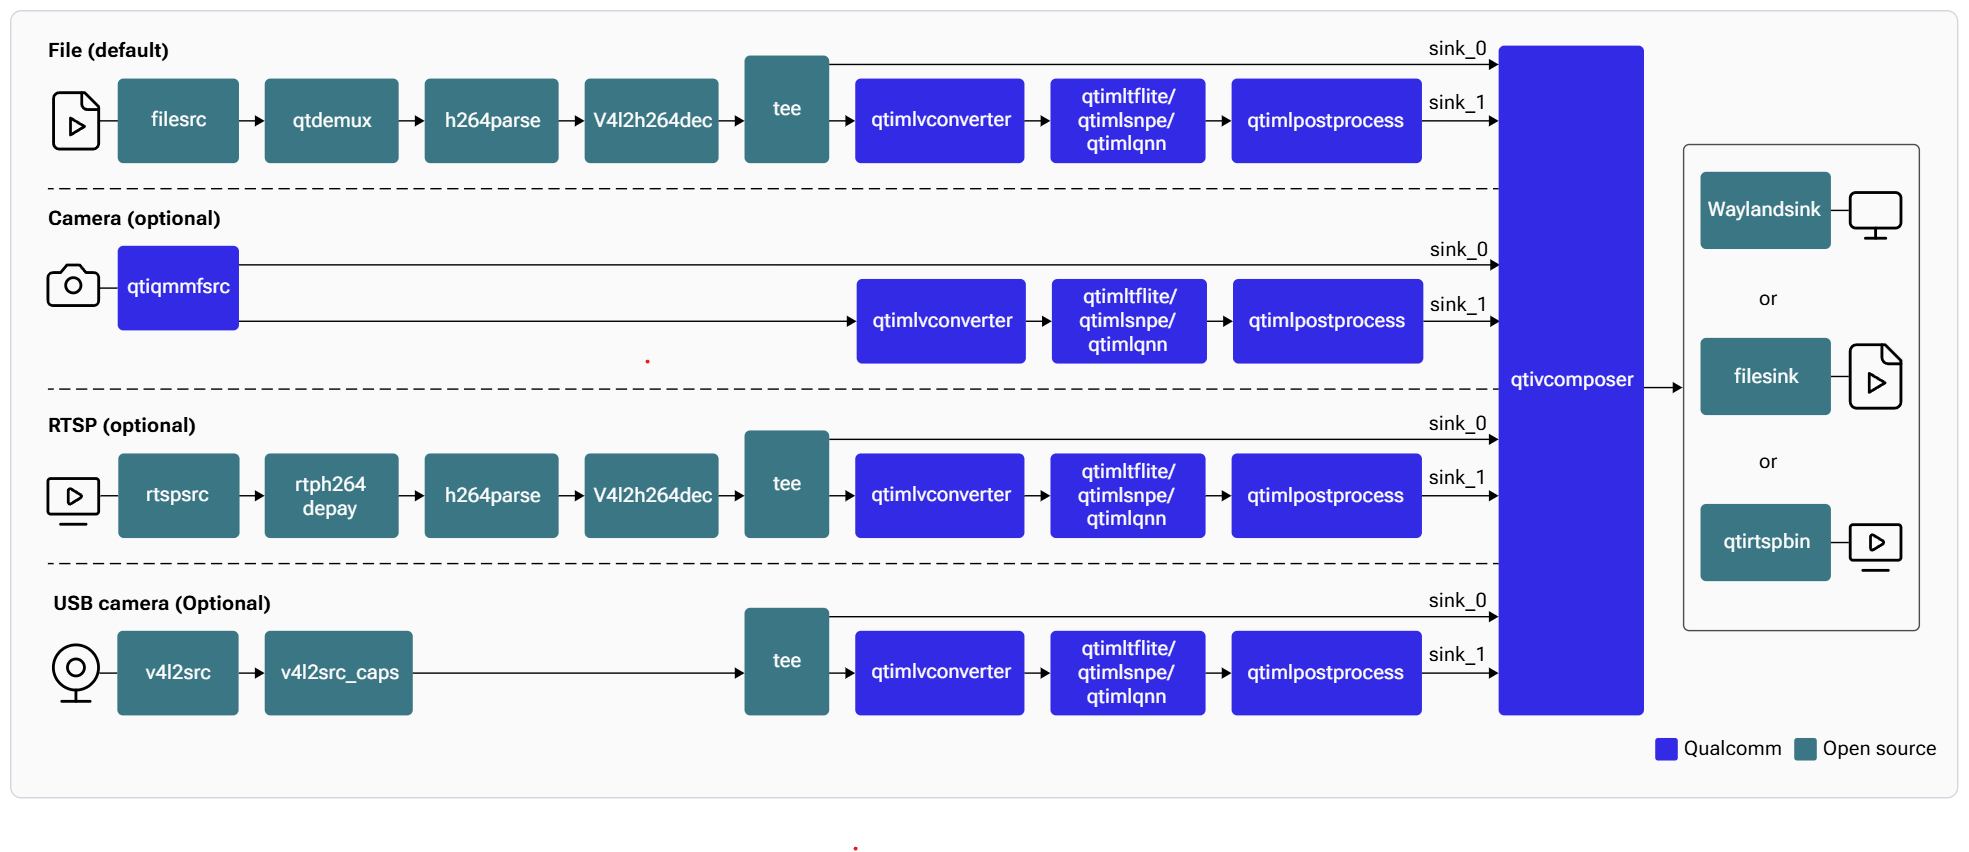
下图展示了该流水线，它从实时摄像头画面、文件、USB 源或 RTSP 流接收输入，对其进行预处理，并在 AI 硬件上运行推理。结果或显示在屏幕上，或保存为编码的 MP4 文件，或通过 RTSP 服务器进行流传输。有关流水线流程中使用的插件的信息，请参见[**流水线流程**](#object-detection-pipeline-flow)

<img src="https://mintcdn.com/qualcomm-prod/jy6NQT2Y7J_sAxdX/Linux/images/run-sample-applications/ai-sample-applications-object-detection-pipeline-flow.png?fit=max&auto=format&n=jy6NQT2Y7J_sAxdX&q=85&s=119c6c0d1e0e1a333f600fdb162a7da6" alt="流水线示意图" caption="Pipeline Diagram" width="1969" height="852" data-path="Linux/images/run-sample-applications/ai-sample-applications-object-detection-pipeline-flow.png" />

**应用：** [`gst-ai-object-detection`](https://github.com/qualcomm/gst-plugins-imsdk/blob/main/gst-sample-apps/gst-ai-object-detection/main.c)
<Accordion title="动手试试">
  当软件镜像包含 **qticamsrc** 插件时，摄像头框架默认使用它。如果不存在，框架会改用 **libcamera**。由于 Config #1 不支持 **qticamsrc**，系统默认使用 **libcamera**。

  #### 输入和输出能力

  | 配置        | 文件源 | RTSP | USB 摄像头 | MIPI 摄像头 | IMX577 摄像头 | 文件输出 | 显示 | RTSP 输出 |
  | --------- | --- | ---- | ------- | -------- | ---------- | ---- | -- | ------- |
  | Config #1 | 是   | 是    | 是       | 否        | 是          | 是    | 是  | 是       |
  | Config #2 | 是   | 是    | 是       | 是        | 是          | 是    | 是  | 是       |

  #### 示例模型和标签文件

  | 运行时                            | 模型文件                                                     | 标签文件           |
  | ------------------------------ | -------------------------------------------------------- | -------------- |
  | Qualcomm Neural Processing SDK | `yolonas.dlc`                                            | `yolonas.json` |
  | LiteRT                         | `yolov8_det_quantized.tflite` / `yolox_quantized.tflite` | `yolox.json`   |
  | Qualcomm AI Engine Direct      | `yolov8_det_quantized.bin`                               | `yolov8.json`  |

  #### 在目标设备上运行应用

  <Steps>
    <Step title="下载产物">
      确保已将所有必需的产物[下载](#download-ai-models)到目标设备。
    </Step>

    <Step title="运行应用">
      ```bash theme={null}
      gst-ai-object-detection --config-file=/etc/configs/config_detection.json
      ```

      示例应用使用 `/etc/configs/config_detection.json` 文件读取输入参数。

      显示所有可用选项：

      ```bash theme={null}
      gst-ai-object-detection -h
      ```

      要停止用例，请按 **CTRL + C**。
    </Step>
  </Steps>

  #### 配置

  gst-ai-object-detection 应用使用 `/etc/configs/config_detection.json` 文件。请更新其属性以匹配您的模型、输入流和输出。有关所有字段，请参见[**配置 JSON 字段说明**](#object-detection-config-json-description)。

  ```json theme={null}
  {
    "file-path": "<path-to-input-video>",
    "ml-framework": "<snpe or tflite or qnn framework>",
    "yolo-model-type": "<yolov8 or yolonas or yolov5 or yolox>"
    "model": "<path-to-model-file>",
    "labels": "<path-to-label-file>",
    "threshold": <post processsing threshold, integer value from 1 to 100>,
    "runtime": "<dsp, gpu, cpu runtime>",
    "output-type": "waylandsink or filesink or rtspsink"
    "snpe-tensors": "<model output tensor name>"
  }
  ```

  <Note>
    对于 USB 摄像头输入，请在配置文件中设置 `video-format`、`resolution` 和 `framerate` 参数，
    使其与摄像头能力匹配，参见[配置 USB 摄像头](https://dragonwingdocs.qualcomm.com/System/Interfaces/usb#configure-usb-camera)。
  </Note>

  <Note>
    `snpe-tensors` 字段仅适用于 SNPE 运行时。要获取 DLC 模型的输出张量名称，请在 [**Netron**](https://netron.app/) 中打开模型。
  </Note>

  <Note>
    使用来自 AI Hub 的 DLC 模型时，`snpe-tensors` 字段为可选。
  </Note>

  <Accordion title="可用配置">
    <Tabs>
      <Tab title="Config #2">
        摄像头源、LiteRT 模型、DSP 运行时

        ```json theme={null}
        {
          "camera": 0,
          "ml-framework": "tflite",
          "yolo-model-type": "yolox",
          "model": "/etc/models/yolox_quantized.tflite",
          "labels": "/etc/labels/yolox.json",
          "threshold": 40,
          "runtime": "dsp",
          "output-type": "waylandsink",
          "snpe-tensors": "<Model output tensor name>"
        }
        ```
      </Tab>

      <Tab title="Config #1">
        摄像头源、LiteRT 模型、CPU 运行时

        ```json theme={null}
        {
          "ml-framework": "tflite",
          "yolo-model-type": "yolox",
          "model": "/etc/models/yolox_quantized.tflite",
          "labels": "/etc/labels/yolox.json",
          "threshold": 40,
          "runtime": "cpu",
          "output-type": "waylandsink",
          "snpe-tensors": "<Model output tensor name>"
        }
        ```

        <Note>
          Config #1 仅支持 LiteRT 模型和 CPU 运行时。
        </Note>
      </Tab>
    </Tabs>
  </Accordion>

  #### 预期输出

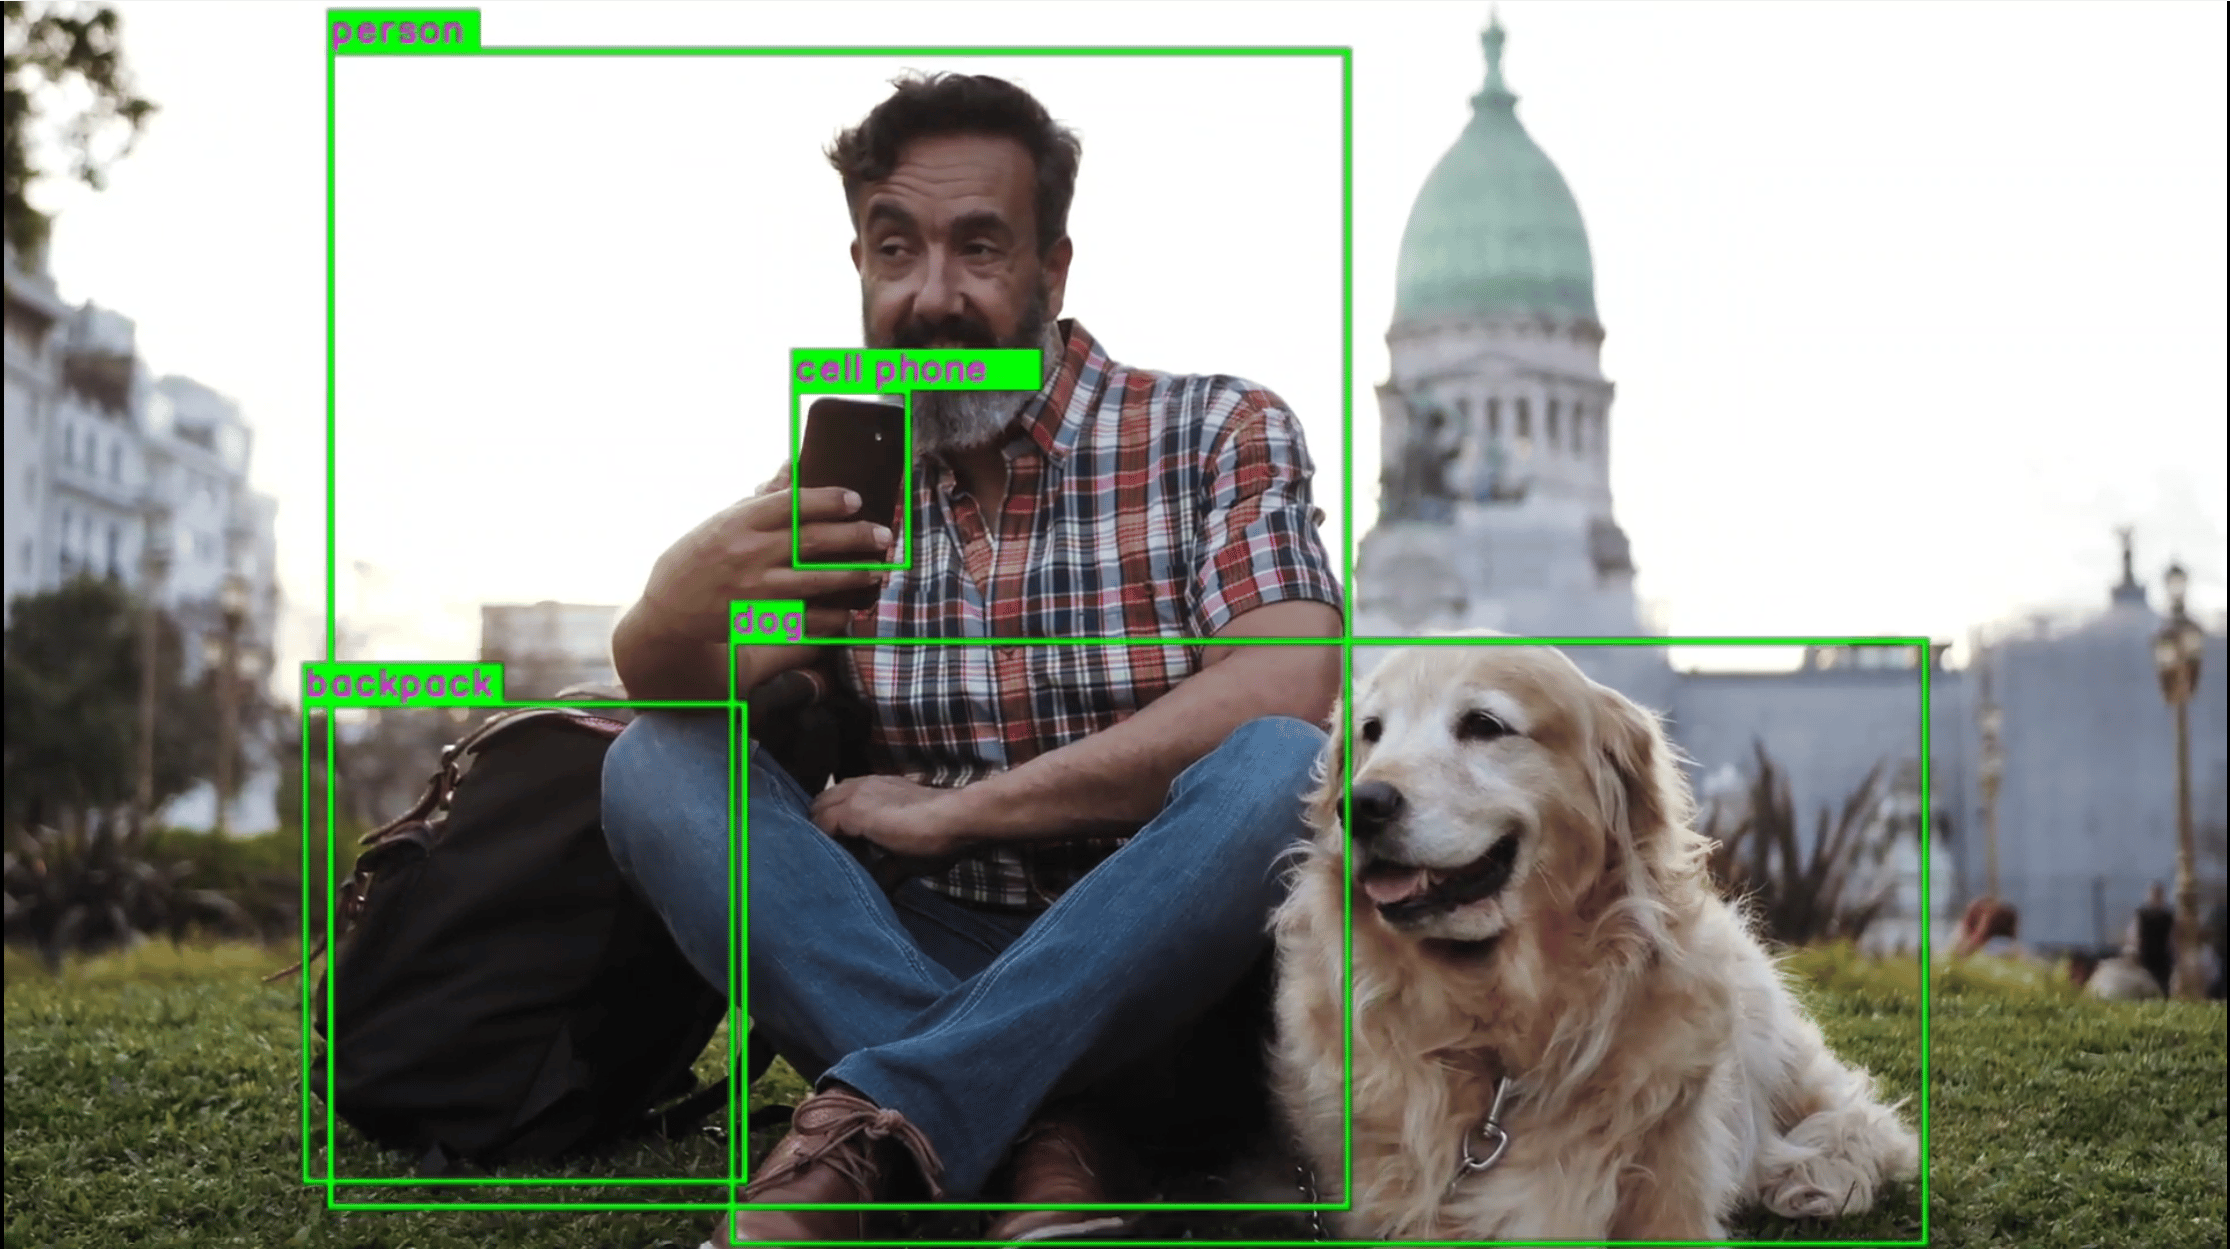
  检测到的目标带有边界框和标签，叠加在视频上并显示在本地显示器上。

  <img src="https://mintcdn.com/qualcomm-prod/jy6NQT2Y7J_sAxdX/Linux/images/run-sample-applications/gst-ai-object-detection.png?fit=max&auto=format&n=jy6NQT2Y7J_sAxdX&q=85&s=cee38493713409bc1074881522a9f7c4" alt="输出示意图" width="2230" height="1249" data-path="Linux/images/run-sample-applications/gst-ai-object-detection.png" />

  <h4 id="object-detection-pipeline-flow">
    流水线流程
  </h4>

  下表列出了目标检测流水线中使用的插件：

  | 插件                                                                                                                                                                       | 说明                                                                                                                                                                 |
  | :----------------------------------------------------------------------------------------------------------------------------------------------------------------------- | :----------------------------------------------------------------------------------------------------------------------------------------------------------------- |
  | [`qticamsrc`](https://imsdkdocs.qualcomm.com/plugin-reference/qticamsrc)                                                                                                 | • 从摄像头采集实时流。<br /> • 使用 `tee` 分流以进行推理。                                                                                                                             |
  | `filesrc`                                                                                                                                                                | • 使用 `filesrc` 采集视频流，随后由 `qtdemux` 对流进行解复用。<br />• 使用 `tee` 分流以进行推理。                                                                                               |
  | `rtspsrc`                                                                                                                                                                | • 使用 `rtspsrc` 采集 RTSP 流，随后由 `rtph264depay` 提取视频。<br />• 使用 `tee` 分流以进行推理。                                                                                         |
  | `v4l2src`                                                                                                                                                                | • 从 USB 摄像头采集实时流。<br />• 使用 `tee` 分流以进行推理。                                                                                                                         |
  | `h264parse`                                                                                                                                                              | 解析 H.264 视频码流。                                                                                                                                                     |
  | [`v4l2h264dec`](https://imsdkdocs.qualcomm.com/plugin-reference/v4l2h264dec)                                                                                             | 通过硬件将 H.264 视频解码为原始帧。                                                                                                                                              |
  | [`qtimlvconverter`](https://imsdkdocs.qualcomm.com/plugin-reference/qtimlvconverter)                                                                                     | 1. 在其 sink pad 上接收视频流。<br />2. 对流数据执行以下预处理：<br />   • 颜色转换<br />   • 缩放（放大或缩小）<br />   • 归一化<br />3. 将预处理后的视频流转换为张量流。<br />该张量流用于流水线后续阶段的推理。                       |
  | [`qtimlsnpe`](https://imsdkdocs.qualcomm.com/plugin-reference/qtimlsnpe)<br />[`qtimltflite`](plugin-reference/qtimltflite)<br />[`qtimlqnn`](plugin-reference/qtimlqnn) | 1. 推理运行时在其 sink pad 上接收到张量流后，使用提供的模型运行推理。<br />2. 在其 source pad 上生成包含推理结果的张量流。                                                                                     |
  | [`qtimlpostprocess`](https://imsdkdocs.qualcomm.com/plugin-reference/qtimlpostprocess)                                                                                   | 处理来自任何目标检测模型的推理结果。<br />1. 对选定数量的结果应用阈值。<br />2. 加载 YOLO（YOLOv5、YOLOv8 或 YOLO-NAS）模块。<br />3. 生成仅包含可叠加在目标上的边界框的视频帧。<br />4. 将这些处理后的帧发送到 `qtivcomposer` 的 sink pad。 |
  | [`qtivcomposer`](https://imsdkdocs.qualcomm.com/plugin-reference/qtivcomposer)                                                                                           | 1. 使用其各 sink pad 的内容合成帧。<br />2. 将包含这些合成帧的 GStreamer 缓冲区推送到其 source pad。                                                                                           |
  | [`waylandsink`](https://imsdkdocs.qualcomm.com/plugin-reference/waylandsink)                                                                                             | 1. 将其 sink pad 上接收到的视频流提交给 Weston。<br />2. Weston 在本地显示器上渲染视频流。                                                                                                    |
  | `filesink`                                                                                                                                                               | 在 sink pad 上接收视频流，并将其保存为 H.264 编码的 MP4 文件。                                                                                                                         |
  | [`qtirtspbin`](https://imsdkdocs.qualcomm.com/plugin-reference/qtirtspbin)                                                                                               | 1. 充当网络 sink。<br />2. 向网络发送 UDP 数据包。                                                                                                                               |

  <h4 id="object-detection-config-json-description">
    配置 JSON 字段说明
  </h4>

  | 字段                                       | 取值 / 说明                                                                                                                                                                                          |   |
  | :--------------------------------------- | :----------------------------------------------------------------------------------------------------------------------------------------------------------------------------------------------- | - |
  | `ml-framework`                           | 支持的 ML 框架：<br />• `snpe`（Qualcomm Neural Processing SDK）<br />• `tflite`（LiteRT）<br />• `qnn`（Qualcomm AI Engine Direct）                                                                         |   |
  | `yolo-model-type`                        | 支持的 YOLO 架构：<br />• `yolov8`<br />• `yolonas`<br />• `yolov5`<br />• `yolox`                                                                                                                     |   |
  | `runtime`                                | 硬件运行时：<br />• `cpu`<br />• `gpu`<br />• `dsp`                                                                                                                                                    |   |
  | `Input source`                           | 支持的输入源：<br />• `camera`（0=主摄像头，1=副摄像头）<br />• `file-path`<br />• `rtsp-ip-port`<br />• `usb-camera`（将 `enable-usb-camera` 设置为 `TRUE`）                                                            |   |
  | `output-ip-address`                      | 输出 RTSP 服务器 IP 地址                                                                                                                                                                                |   |
  | `port`                                   | 输出 RTSP 服务器端口                                                                                                                                                                                    |   |
  | `output-type`                            | 支持的输出 sink：<br />• `waylandsink`（显示）<br />• `filesink`（MP4 文件）<br />• `rtspsink`（RTSP 流）                                                                                                         |   |
  | `snpe-tensors`                           | `["output-tensor-name", "output-tensor-name"]`                                                                                                                                                   |   |
  | `USB camera video-format and resolution` | 1. 使用以下 `video-format` 选项之一：<br />   • `waylandsink`（显示）<br />   • `filesink`（MP4 文件）<br />   • `rtspsink`（RTSP 流）<br />2. 使用以下分辨率字段：<br />   • `width`<br />   • `height`<br />   • `framerate` |   |
  | `output-file`                            | 输出文件名。默认输出文件为 `output_object_detection.mp4`。                                                                                                                                                     |   |
</Accordion>

### 并行 AI 推理

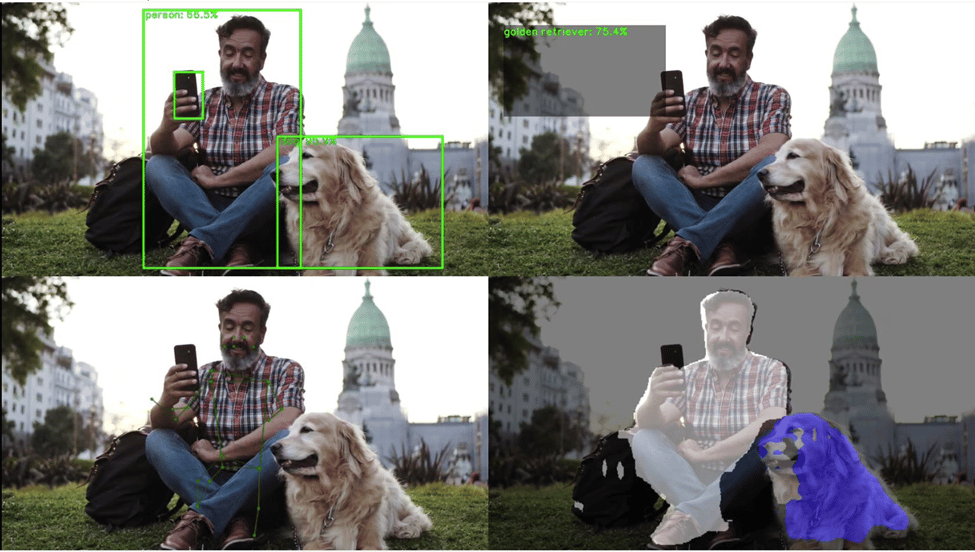
**说明**：[**gst-ai-parallel-inference**](https://github.com/qualcomm/gst-plugins-imsdk/blob/main/gst-sample-apps/gst-ai-parallel-inference/main.c) 应用允许您对来自摄像头、文件或 RTSP 网络等不同来源的输入流执行目标检测、目标分类、姿态检测和图像分割。这些用例使用 LiteRT 模型实现目标检测、图像分割、分类和姿态检测。

下图展示了该流水线，它从摄像头、文件或 RTSP 流接收输入流，针对四个用例执行并行推理，并将结果并排显示在屏幕上。

<Note>
  由于不支持 CPU 运行时，此应用在 `QLI 2.0` 发行版的 `Config #1` 中不受支持。
</Note>

有关此流水线中使用的插件的信息，请参见[**流水线流程**](#parallel-inference-pipeline-flow)。

<img src="https://mintcdn.com/qualcomm-prod/jy6NQT2Y7J_sAxdX/Linux/images/run-sample-applications/gst_ai_parallel_inference_pipeline.svg?fit=max&auto=format&n=jy6NQT2Y7J_sAxdX&q=85&s=da9276cde8186a5db37127a4c9eb2eb9" alt="流水线示意图" caption="Pipeline Diagram" width="1303" height="407" data-path="Linux/images/run-sample-applications/gst_ai_parallel_inference_pipeline.svg" />

**应用：** [`gst-ai-parallel-inference`](https://github.com/qualcomm/gst-plugins-imsdk/blob/main/gst-sample-apps/gst-ai-parallel-inference/main.c)
<Accordion title="动手试试">
  #### 输入和输出能力

  | 配置        | 文件源 | RTSP | USB 摄像头 | MIPI 摄像头 | 文件输出 | 显示 | RTSP 输出 |
  | --------- | --- | ---- | ------- | -------- | ---- | -- | ------- |
  | Config #2 | 是   | 是    | 否       | 是        | 否    | 是  | 否       |

  #### 示例模型和标签文件

  | 运行时    | 模型文件                                                                                                                                                          | 标签文件                                                                                                                            |
  | ------ | ------------------------------------------------------------------------------------------------------------------------------------------------------------- | ------------------------------------------------------------------------------------------------------------------------------- |
  | LiteRT | 检测：`yolox_quantized.tflite`<br />分类：`inception_v3_quantized.tflite`<br />分割：`deeplabv3_plus_mobilenet_quantized.tflite`<br />姿态：`hrnet_pose_quantized.tflite` | 检测：`yolox.json`<br />分类：`classification.json`<br />分割：`deeplabv3_resnet50.json`<br />姿态：`hrnet_pose.json`、`hrnet_settings.json` |

  #### 在目标设备上运行应用

  <Steps>
    <Step title="下载产物">
      确保已将所有必需的产物[下载](#download-ai-models)到目标设备。
    </Step>

    <Step title="运行应用">
      ```bash theme={null}
      gst-ai-parallel-inference --config-file=/etc/configs/config-parallel-inference.json
      ```

      示例应用使用 `/etc/configs/config-parallel-inference.json` 文件读取输入参数。

      显示所有可用选项：

      ```bash theme={null}
      gst-ai-parallel-inference -h
      ```

      要停止用例，请按 **CTRL + C**。
    </Step>
  </Steps>

  #### 配置

  gst-ai-parallel-inference 应用使用 `/etc/configs/config-parallel-inference.json` 文件。请更新其属性以匹配您的模型、输入流和输出。有关所有字段，请参见[**配置 JSON 字段说明**](#parallel-inference-config-json-description)。

  ```json theme={null}
  {
    "camera": "<camera-id>",
    "file-path": "<input-video-path>",
    "rtsp-ip-port": "<RTSP-IP-Port-address>",
    "detection-model": "<path-to-detection model>",
    "detection-labels": "<path-to-detection-labels>",
    "pose-model": "<path-to-pose-model>",
    "pose-labels": "<path-to-pose-label>",
    "pose-settings-path": "<path-to-pose-settings-file>",
    "segmentation-model": "<path-to-segmentation-model>",
    "segmentation-labels": "<path-to-segmentation-labels>",
    "classification-model": "<path-to-classification-model>",
    "classification-labels": "<path-to-classification-labels>"
  }
  ```

  <Note>
    对于 QCS6490，如果配置文件中不存在 `file-path` 和 `rtsp-ip-port`，则选择摄像头输入。
  </Note>

  <Accordion title="可用配置">
    <Tabs>
      <Tab title="Config #2">
        文件源、LiteRT 模型、DSP 运行时

        ```json theme={null}
        {
            "file-path": "/etc/media/video.mp4",
            "detection-model": "/etc/models/yolox_quantized.tflite",
            "detection-labels": "/etc/labels/yolox.json",
            "pose-model": "/etc/models/hrnet_pose_quantized.tflite",
            "pose-labels": "/etc/labels/hrnet_pose.json",
            "pose-settings-path": "/etc/labels/hrnet_settings.json",
            "segmentation-model": "/etc/models/deeplabv3_plus_mobilenet_quantized.tflite",
            "segmentation-labels": "/etc/labels/deeplabv3_resnet50.json",
            "classification-model": "/etc/models/inception_v3_quantized.tflite",
            "classification-labels": "/etc/labels/classification.json"
        }
        ```
      </Tab>
    </Tabs>
  </Accordion>

  #### 预期输出

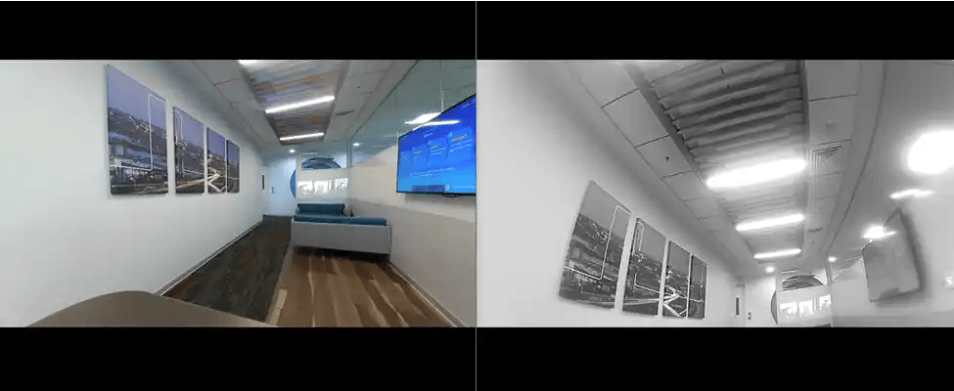
  执行四路并行推理后，结果并排显示在屏幕上。

  <img src="https://mintcdn.com/qualcomm-prod/jy6NQT2Y7J_sAxdX/Linux/images/run-sample-applications/expected_output_gst-ai-parallel-inference.png?fit=max&auto=format&n=jy6NQT2Y7J_sAxdX&q=85&s=94e7742c378c96e7a6cf7fc5180ef398" alt="流水线示意图" caption="Pipeline Diagram" width="975" height="552" data-path="Linux/images/run-sample-applications/expected_output_gst-ai-parallel-inference.png" />

  <h4 id="parallel-inference-pipeline-flow">
    流水线流程
  </h4>

  下表列出了元数据解析器流水线中使用的插件：

  | 插件                                                                                          | 说明                                                                                                                                                                                                                                              |
  | ------------------------------------------------------------------------------------------- | ----------------------------------------------------------------------------------------------------------------------------------------------------------------------------------------------------------------------------------------------- |
  | [`qticamsrc`](https://imsdkdocs.qualcomm.com/plugin-reference/qticamsrc)                    | • 从摄像头采集实时流。<br />• 使用 `tee` 分流以进行推理。                                                                                                                                                                                                           |
  | `filesrc`                                                                                   | • 使用 `filesrc` 采集视频流。<br />• 随后由 `qtdemux` 对流进行解复用。<br />• 使用 `tee` 分流以进行推理。                                                                                                                                                                    |
  | `rtspsrc`                                                                                   | • 使用 `rtspsrc` 采集 RTSP 流。<br />• 随后由 `rtph264depay` 提取视频。<br />• 使用 `tee` 分流以进行推理。                                                                                                                                                              |
  | `h264parse`                                                                                 | 解析 H.264 视频。                                                                                                                                                                                                                                    |
  | [`v4l2h264dec`](https://imsdkdocs.qualcomm.com/plugin-reference/v4l2h264dec)                | 解码视频。                                                                                                                                                                                                                                           |
  | [`qtimlvconverter`](https://imsdkdocs.qualcomm.com/plugin-reference/qtimlvconverter)        | 1. 在其 sink pad 上接收视频流。<br />2. 当模型期望以浮点值作为输入时，对流数据执行以下预处理：<br />  • 颜色转换<br />  • 缩放（放大或缩小）<br />  • 归一化<br />3. 该张量流用于流水线后续阶段的推理。                                                                                                              |
  | [`qtimltflite`](https://imsdkdocs.qualcomm.com/plugin-reference/qtimltflite)                | • 推理运行时在其 sink pad 上接收到张量流后运行推理。<br />• 在其 source pad 上生成包含推理结果的张量流。                                                                                                                                                                            |
  | [`qtimlpostprocess`](https://imsdkdocs.qualcomm.com/plugin-reference/qtimlpostprocess) — 检测 | a. 接收来自目标检测模型的推理张量。<br />b. 将其 sink pad 上的推理张量转换为多媒体插件后续可处理的格式，如视频或文本。<br />c. 对选定数量的结果应用阈值。<br />d. 为检测模型加载相应的模块。<br />在此用例中，`qtimlpostprocess` 会执行以下操作：<br />  • 加载 YOLOv8 子模块。<br />  • 生成文本结构形式的结果。<br />  • 将其发送到 `qtimetamux` 的 sink pad。 |
  | [`qtimlpostprocess`](https://imsdkdocs.qualcomm.com/plugin-reference/qtimlpostprocess) — 分类 | a. 接收来自分类模型的推理张量。<br />b. 将其 sink pad 上的推理张量转换为多媒体插件后续可处理的格式，如视频或文本。<br />c. 对选定数量的结果应用阈值。<br />d. 为分类模型加载相应的模块。<br />在此用例中，`qtimlpostprocess` 会执行以下操作：<br />  • 加载模型的子模块。<br />  • 生成带有分类标签的视频帧结果。<br />  • 将其发送到 `qtivcomposer` 的 sink pad。   |
  | [`qtimlpostprocess`](https://imsdkdocs.qualcomm.com/plugin-reference/qtimlpostprocess) — 分割 | a. 在其 sink pad 上接收推理张量。<br />b. 将推理张量转换为多媒体插件后续可处理的视频格式。<br />c. 生成该帧的语义分割结果。<br />d. 为分割模型加载相应的模块。<br />在此用例中，`qtimlpostprocess` 会执行以下操作：<br />  • 加载 deeplab-argmax 子模块。<br />  • 生成带有分割掩码的视频帧。<br />  • 将其发送到 `qtivcomposer` 的 sink pad。     |
  | [`qtimlpostprocess`](https://imsdkdocs.qualcomm.com/plugin-reference/qtimlpostprocess) — 姿态 | a. 在其 sink pad 上接收推理张量。<br />b. 将推理张量转换为多媒体插件后续可处理的视频格式。<br />c. 对选定数量的结果应用阈值。<br />d. 为各种姿态估计模型加载相应的模块。<br />在此用例中，`qtimlpostprocess` 会执行以下操作：<br />  • 加载 HRNet 模块。<br />  • 生成绘制有姿态的视频帧结果。<br />  • 将其发送到 `qtivcomposer` 的 sink pad。         |
  | [`qtivcomposer`](https://imsdkdocs.qualcomm.com/plugin-reference/qtivcomposer)              | 1. 使用其各 sink pad 的内容合成帧。<br />2. 将包含这些合成帧的 GStreamer 缓冲区推送到其 source pad。                                                                                                                                                                        |
  | [`waylandsink`](https://imsdkdocs.qualcomm.com/plugin-reference/waylandsink)                | 1. 将其 sink pad 上接收到的视频流提交给 Weston。<br />2. Weston 在本地显示器上渲染视频流。                                                                                                                                                                                 |

  <h4 id="parallel-inference-config-json-description">
    配置 JSON 字段说明
  </h4>

  | 字段                  | 取值/说明                                                                                                                                                                                                                                                                                |
  | ------------------- | ------------------------------------------------------------------------------------------------------------------------------------------------------------------------------------------------------------------------------------------------------------------------------------ |
  | `Input source`      | 使用以下输入源之一：<br />• `camera`：主摄像头（`0`）或副摄像头（`1`）。<br />• `file-path`：视频文件的目录路径。<br />• `rtsp-ip-port`：RTSP 流的地址：`rtsp://<ip>:<port>/<stream>`                                                                                                                                          |
  | `Models and labels` | • `detection-model`：检测模型的路径。<br />• `detection-labels`：检测标签的路径。<br />• `pose-model`：姿态模型的路径。<br />• `pose-labels`：姿态标签的路径。<br />• `segmentation-model`：分割模型的路径。<br />• `segmentation-labels`：分割标签的路径。<br />• `classification-model`：分类模型的路径。<br />• `classification-labels`：分类标签的路径。 |
</Accordion>

### 多流推理

**说明**：[**gst-ai-multistream-inference**](https://github.com/qualcomm/gst-plugins-imsdk/blob/main/gst-sample-apps/gst-ai-multistream-inference/main.c) 应用演示了对最多 32 路来自摄像头、文件或 RTSP 流的输入流进行 AI 推理（目标检测和分类）。

下图展示了该流水线，它接收多路输入流，对其进行预处理、运行 AI 推理，然后组合各路流并将它们全部合并为单一视频输出。

在 1080P 和 720P 下验证的各 SoC 支持的最大输入流数量如下：

* QCS6490–8

* Dragonwing IQ-8275–16

* Dragonwing IQ-9075–32
  <Note>
    由于不支持 CPU 运行时，此应用在 `QLI 2.0` 发行版的 `Config #1` 中不受支持。
  </Note>
  输出会显示在 HDMI 显示器上、保存为 H.264 编码的 MP4 文件，或转换为 RTSP 流。

有关此流水线中使用的插件的信息，请参见[**流水线流程**](#multistream-inference-pipeline-flow)。

<img src="https://mintcdn.com/qualcomm-prod/jy6NQT2Y7J_sAxdX/Linux/images/run-sample-applications/gst_ai_multistream_inference_pipeline.svg?fit=max&auto=format&n=jy6NQT2Y7J_sAxdX&q=85&s=6aaf1c18139d289b43637b34e8ad9ca9" alt="流水线示意图" caption="Pipeline Diagram" width="1525" height="1365" data-path="Linux/images/run-sample-applications/gst_ai_multistream_inference_pipeline.svg" />

**应用：** [`gst-ai-multistream-inference`](https://github.com/qualcomm/gst-plugins-imsdk/blob/main/gst-sample-apps/gst-ai-multistream-inference/main.c)

<Accordion title="动手试试">
  #### 输入和输出能力

  | 配置        | 文件源 | RTSP | USB 摄像头 | MIPI 摄像头 | 文件输出 | 显示 | RTSP 输出 |
  | --------- | --- | ---- | ------- | -------- | ---- | -- | ------- |
  | Config #2 | 是   | 是    | 否       | 是        | 是    | 是  | 是       |

  #### 示例模型和标签文件

  | 运行时    | 模型文件                                                                | 标签文件                                          |
  | ------ | ------------------------------------------------------------------- | --------------------------------------------- |
  | LiteRT | 检测：`yolox_quantized.tflite`<br />分类：`inception_v3_quantized.tflite` | 检测：`yolox.json`<br />分类：`classification.json` |

  #### 在目标设备上运行应用

  <Steps>
    <Step title="下载产物">
      确保已完成[`先决条件`](#prerequisites)。这会将所有必需的产物下载到目标设备。
    </Step>

    <Step title="运行应用">
      ```bash theme={null}
      gst-ai-multistream-inference --config-file=/etc/configs/config-multistream-inference.json
      ```

      示例应用使用 `/etc/configs/config-multistream-inference.json` 文件读取输入参数。

      显示所有可用选项：

      ```bash theme={null}
      gst-ai-multistream-inference -h
      ```

      要停止用例，请按 **CTRL + C**。
    </Step>
  </Steps>

  #### 配置

  gst-ai-multistream-inference 应用使用 `/etc/configs/config-multistream-inference.json` 文件。请更新其属性以匹配您的模型、输入流和输出。有关所有字段，请参见[**配置 JSON 字段说明**](#multistream-inference-config-json-description)。

  ```json theme={null}
  {
    "input-file-path": ["<input file 1>", "<input file 2>"],
    "input-rtsp-path": ["<rtsp stream 1>", "<rtsp stream 2 >"],
    "input-type": "<h264 or h265>",
    "model": "<path to model file>",
    "labels": "<path to label file>",
    "output-display": "<0 or 1>",
    "output-file-path": "<output file path>",
    "output-ip-address": "<ip address of test kit>",
    "output-port-number": "<port number over which rtsp stream can be listened>",
    "use-case": "<0 or 1>"
  }
  ```

  <Note>
    如果观察到性能下降，可以使用 YOLOv8 LiteRT 模型。有关 YOLOv8 的导出说明，请参见[**先决条件**](#prerequisites)。
  </Note>

  <Accordion title="可用配置">
    <Tabs>
      <Tab title="Config #2">
        对 8 路 H.264 文件输入进行目标检测、LiteRT 模型、DSP 运行时

        ```json theme={null}
        {
          "input-file-path":
            [
              "/etc/media/video.mp4",
              "/etc/media/video.mp4",
              "/etc/media/video.mp4",
              "/etc/media/video.mp4",
              "/etc/media/video.mp4",
              "/etc/media/video.mp4",
              "/etc/media/video.mp4",
              "/etc/media/video.mp4"
            ],
          "model": "/etc/models/yolox_quantized.tflite",
          "labels": "/etc/labels/yolox.json",
          "input-type": "h264",
          "output-display": 1,
          "use-case": 0
        }
        ```
      </Tab>
    </Tabs>
  </Accordion>

  #### 预期输出

  <img src="https://mintcdn.com/qualcomm-prod/jy6NQT2Y7J_sAxdX/Linux/images/run-sample-applications/multistream.png?fit=max&auto=format&n=jy6NQT2Y7J_sAxdX&q=85&s=aafc6ef6bb8288f2f5b2e6d82762484e" alt="流水线示意图" caption="Pipeline Diagram" width="1795" height="1009" data-path="Linux/images/run-sample-applications/multistream.png" />

  <h4 id="multistream-inference-pipeline-flow">
    流水线流程
  </h4>

  下表列出了元数据解析器流水线中使用的插件：

  | 插件                                                                                     | 说明                                                                                                                                                                                                                                                                                                             |
  | :------------------------------------------------------------------------------------- | :------------------------------------------------------------------------------------------------------------------------------------------------------------------------------------------------------------------------------------------------------------------------------------------------------------- |
  | [`qticamsrc`](https://imsdkdocs.qualcomm.com/plugin-reference/qticamsrc)               | • 从摄像头采集实时流。<br />• 使用 `tee` 分流以进行推理。                                                                                                                                                                                                                                                                          |
  | `filesrc`                                                                              | • 使用 `filesrc` 采集视频流，随后由 `qtdemux` 对流进行解复用。<br />• 使用 `tee` 分流以进行推理。                                                                                                                                                                                                                                           |
  | `rtspsrc`                                                                              | • 使用 `rtspsrc` 采集 RTSP 流，随后由 `rtph264depay` 提取视频。<br />• 使用 `tee` 分流以进行推理。                                                                                                                                                                                                                                     |
  | `h264parse`                                                                            | • 解析 H.264 视频。                                                                                                                                                                                                                                                                                                 |
  | [`v4l2h264dec`](https://imsdkdocs.qualcomm.com/plugin-reference/v4l2h264dec)           | • 解码视频。                                                                                                                                                                                                                                                                                                        |
  | [`qtimlvconverter`](https://imsdkdocs.qualcomm.com/plugin-reference/qtimlvconverter)   | 1. 在其 sink pad 上接收视频流。<br />2. 对流数据执行以下预处理。此预处理在模型期望以浮点值作为输入时执行：<br />   • 颜色转换<br />   • 缩放（放大或缩小）<br />   • 归一化<br />3. 在其 source pad 上将预处理后的视频流转换为张量流。<br />该张量流用于流水线后续阶段的推理。                                                                                                                               |
  | [`qtimltflite`](https://imsdkdocs.qualcomm.com/plugin-reference/qtimltflite)           | 1. 推理运行时在其 sink pad 上接收到张量流后运行推理。<br />2. 在其 source pad 上生成包含推理结果的张量流。                                                                                                                                                                                                                                         |
  | [`qtimlpostprocess`](https://imsdkdocs.qualcomm.com/plugin-reference/qtimlpostprocess) | 处理来自任何目标检测、分类、姿态检测和分割模型的推理结果。<br /><br />**检测用例：**<br />   • 对选定数量的结果应用阈值。<br />   • 加载 YOLOv8 模块。<br />   • 生成仅包含可叠加在目标上的边界框的视频帧，并将其发送到 `qtivcomposer` 的 sink pad。<br /><br />**分类用例：**<br />   • 对选定数量的结果应用阈值。<br />   • 加载 MobileNet-softmax 模块。<br />   • 生成带有分类标签的视频帧结果，并将其发送到 `qtivcomposer` 的 sink pad。 |
  | [`qtivcomposer`](https://imsdkdocs.qualcomm.com/plugin-reference/qtivcomposer)         | 1. 使用其各 sink pad 的内容合成帧。<br />2. 将包含这些合成帧的 GStreamer 缓冲区推送到其 source pad。                                                                                                                                                                                                                                       |
  | [`waylandsink`](https://imsdkdocs.qualcomm.com/plugin-reference/waylandsink)           | 1. `waylandsink` 将其 sink pad 上接收到的视频流提交给 Weston。<br />2. Weston 在本地显示器上渲染视频流。                                                                                                                                                                                                                                  |
  | `filesink`                                                                             | 1. 在其 sink pad 上接收视频流。<br />2. 将流保存为 H.264 编码的 MP4 文件。                                                                                                                                                                                                                                                         |
  | [`qtirtspbin`](https://imsdkdocs.qualcomm.com/plugin-reference/qtirtspbin)             | 1. 充当网络 sink。<br />2. 向网络发送 UDP 数据包。                                                                                                                                                                                                                                                                           |

  <h4 id="multistream-inference-config-json-description">
    配置 JSON 字段说明
  </h4>

  | 字段             | 取值 / 说明                                                                                                                                                                                                         |
  | :------------- | :-------------------------------------------------------------------------------------------------------------------------------------------------------------------------------------------------------------- |
  | `Input source` | 使用以下输入源之一：<br />   • `num-camera`：来自摄像头的输入数量。<br />   • `camera`：当 `num-camera=1` 时使用的输入摄像头。<br />   • `input-file-path`：视频文件的目录路径。<br />   • `input-rtsp-path`：RTSP 流的地址：`rtsp://<ip>:<port>/<stream>`         |
  | `input-type`   | 文件和 RTSP 输入的视频编码类型：<br />   • `H.264`<br />   • `H.265`                                                                                                                                                         |
  | `Output`       | 使用以下输出之一：<br />   • `output-file-path`：保存输出文件的目录路径。<br />   • `output-ip-address`：可播放 RTSP 流的设备的 IP 地址。<br />   • `output-port-number`：可播放 RTSP 流的设备的端口号。<br />   • `output-display`：用于预览的已连接显示设备。选择 `1` 启用此选项。 |
</Accordion>