> ## Documentation Index
> Fetch the complete documentation index at: https://dragonwingdocs.qualcomm.com/llms.txt
> Use this file to discover all available pages before exploring further.
# 安装扩展
> 直接在您的 Dragonwing 设备上下载并安装 Qualcomm® VS Code 扩展。
## 前提条件
继续操作前,请先在设备上安装 VS Code。
确保设备上已配置并启用 WiFi。
设备需要互联网访问,或者可以通过 SSH 连接到具有互联网访问的主机。
如果您的设备无法访问互联网,某些功能将受到限制。例如,将无法通过 AI Hub 进行 AI 模型性能测量。
如果您的设备不满足这些前提条件,我们建议改用\*\*托管 IDE(Hosted IDE)\*\*设置 — 即 IDE 运行在您的笔记本电脑或开发机上,并远程连接到设备。请参阅[在主机上设置](../setup/install-vscode)章节开始操作。
## 在设备上获取扩展
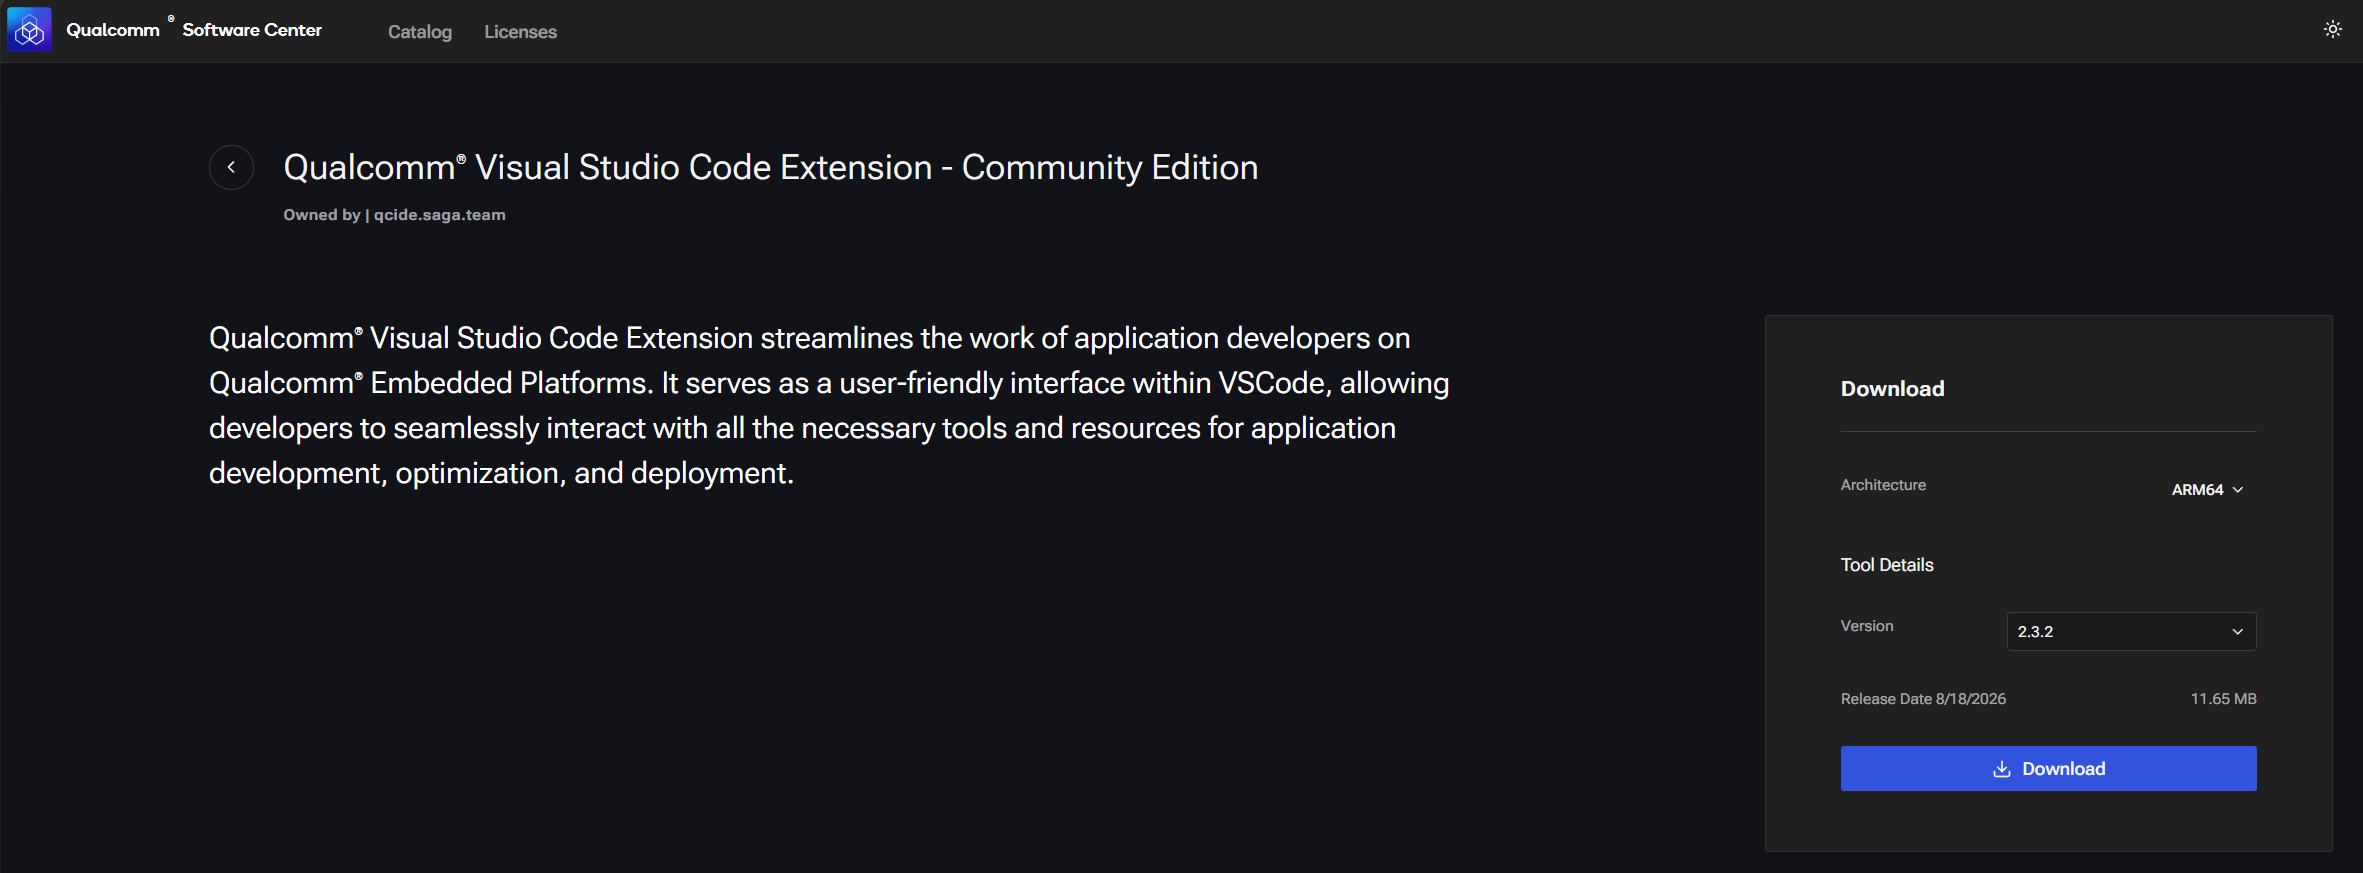
扩展可在 [Qualcomm® Software Center (QSC)](https://softwarecenter.qualcomm.com/catalog/item/qualcomm_ide_developer_edition) 上获取 — **无需账户或登录**。
在目录页面上查找 **Qualcomm IDE Developer Edition**。下载内容是一个 `.vsix` 文件或一个包含 vsix 文件的 `.zip` 文件。
这需要设备具有互联网连接。
在设备上打开浏览器并访问 [Qualcomm® Software Center](https://softwarecenter.qualcomm.com/catalog/item/qualcomm_ide_developer_edition)。将 `.vsix` 文件直接下载到设备上。
 如果设备无法访问互联网(例如在受限网络或 VPN 环境中),请使用此方法。
在您的主机上,访问 [Qualcomm® Software Center](https://softwarecenter.qualcomm.com/catalog/item/qualcomm_ide_developer_edition) 并下载 `.vsix` 文件。然后使用以下方法之一将其传输到设备:
**通过 SSH(设备和主机位于同一本地网络)**
```bash theme={null}
scp qualcomm-ide-*.vsix @:~/
```
将 `` 和 `` 替换为您的设备凭据。
**通过 U 盘(无需网络)**
将 `.vsix` 文件复制到 U 盘,将其插入设备,然后复制到主目录:
```bash theme={null}
cp /media///qualcomm-ide-*.vsix ~/
```
## 在 VS Code 中安装
点击活动栏中的扩展图标(或按 `Ctrl+Shift+X`)。
点击扩展面板顶部的 `…` 溢出菜单并选择 **Install from VSIX…**
如果设备无法访问互联网(例如在受限网络或 VPN 环境中),请使用此方法。
在您的主机上,访问 [Qualcomm® Software Center](https://softwarecenter.qualcomm.com/catalog/item/qualcomm_ide_developer_edition) 并下载 `.vsix` 文件。然后使用以下方法之一将其传输到设备:
**通过 SSH(设备和主机位于同一本地网络)**
```bash theme={null}
scp qualcomm-ide-*.vsix @:~/
```
将 `` 和 `` 替换为您的设备凭据。
**通过 U 盘(无需网络)**
将 `.vsix` 文件复制到 U 盘,将其插入设备,然后复制到主目录:
```bash theme={null}
cp /media///qualcomm-ide-*.vsix ~/
```
## 在 VS Code 中安装
点击活动栏中的扩展图标(或按 `Ctrl+Shift+X`)。
点击扩展面板顶部的 `…` 溢出菜单并选择 **Install from VSIX…**
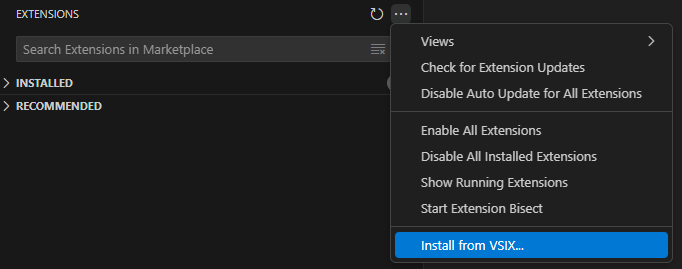 浏览到您下载的 `.vsix` 文件。
安装后,活动栏中会出现一个 **Qualcomm Visual Studio Code Extension** 图标。点击它。
浏览到您下载的 `.vsix` 文件。
安装后,活动栏中会出现一个 **Qualcomm Visual Studio Code Extension** 图标。点击它。
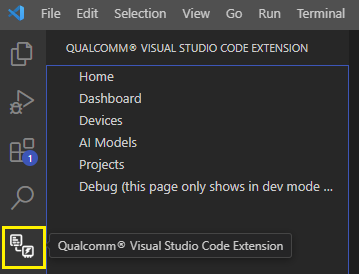 在侧边栏中选择 **Home**,然后点击 **Go to Dashboard** 前往 Devices 页面。
## 验证安装
**Home** 页面加载并显示 **Get Started** 和 **Go to Dashboard** 按钮 — 您已准备好在设备上使用扩展。
在侧边栏中选择 **Home**,然后点击 **Go to Dashboard** 前往 Devices 页面。
## 验证安装
**Home** 页面加载并显示 **Get Started** 和 **Go to Dashboard** 按钮 — 您已准备好在设备上使用扩展。