> ## Documentation Index
> Fetch the complete documentation index at: https://dragonwingdocs.qualcomm.com/llms.txt
> Use this file to discover all available pages before exploring further.
# 安装 QSC
# 安装 QSC
首先,请在 [Qualcomm](https://myaccount.qualcomm.com/signup) 注册以获取 Qualcomm ID。
## 机器要求
* Linux (Ubuntu 22.04)、Windows、Mac (arm)
* 可连接到 Qualcomm 后端服务器的网络(请参阅[防火墙要求](https://dragonwingdocs.qualcomm.com/Tools/Qualcomm-Software-Center/troubleshooting#firewall-requirements))。
* 至少 300 GB 可用存储空间,用于下载和编译软件产品构建。
* 至少 16 GB RAM。
## Windows
### 下载适用于 Windows 的 QSC
1. 使用您的 Qualcomm ID 登录 [https://softwarecenter.qualcomm.com/catalog/item/Qualcomm\_Software\_Center](https://softwarecenter.qualcomm.com/catalog/item/Qualcomm_Software_Center)。
2. 选择 **Install**。
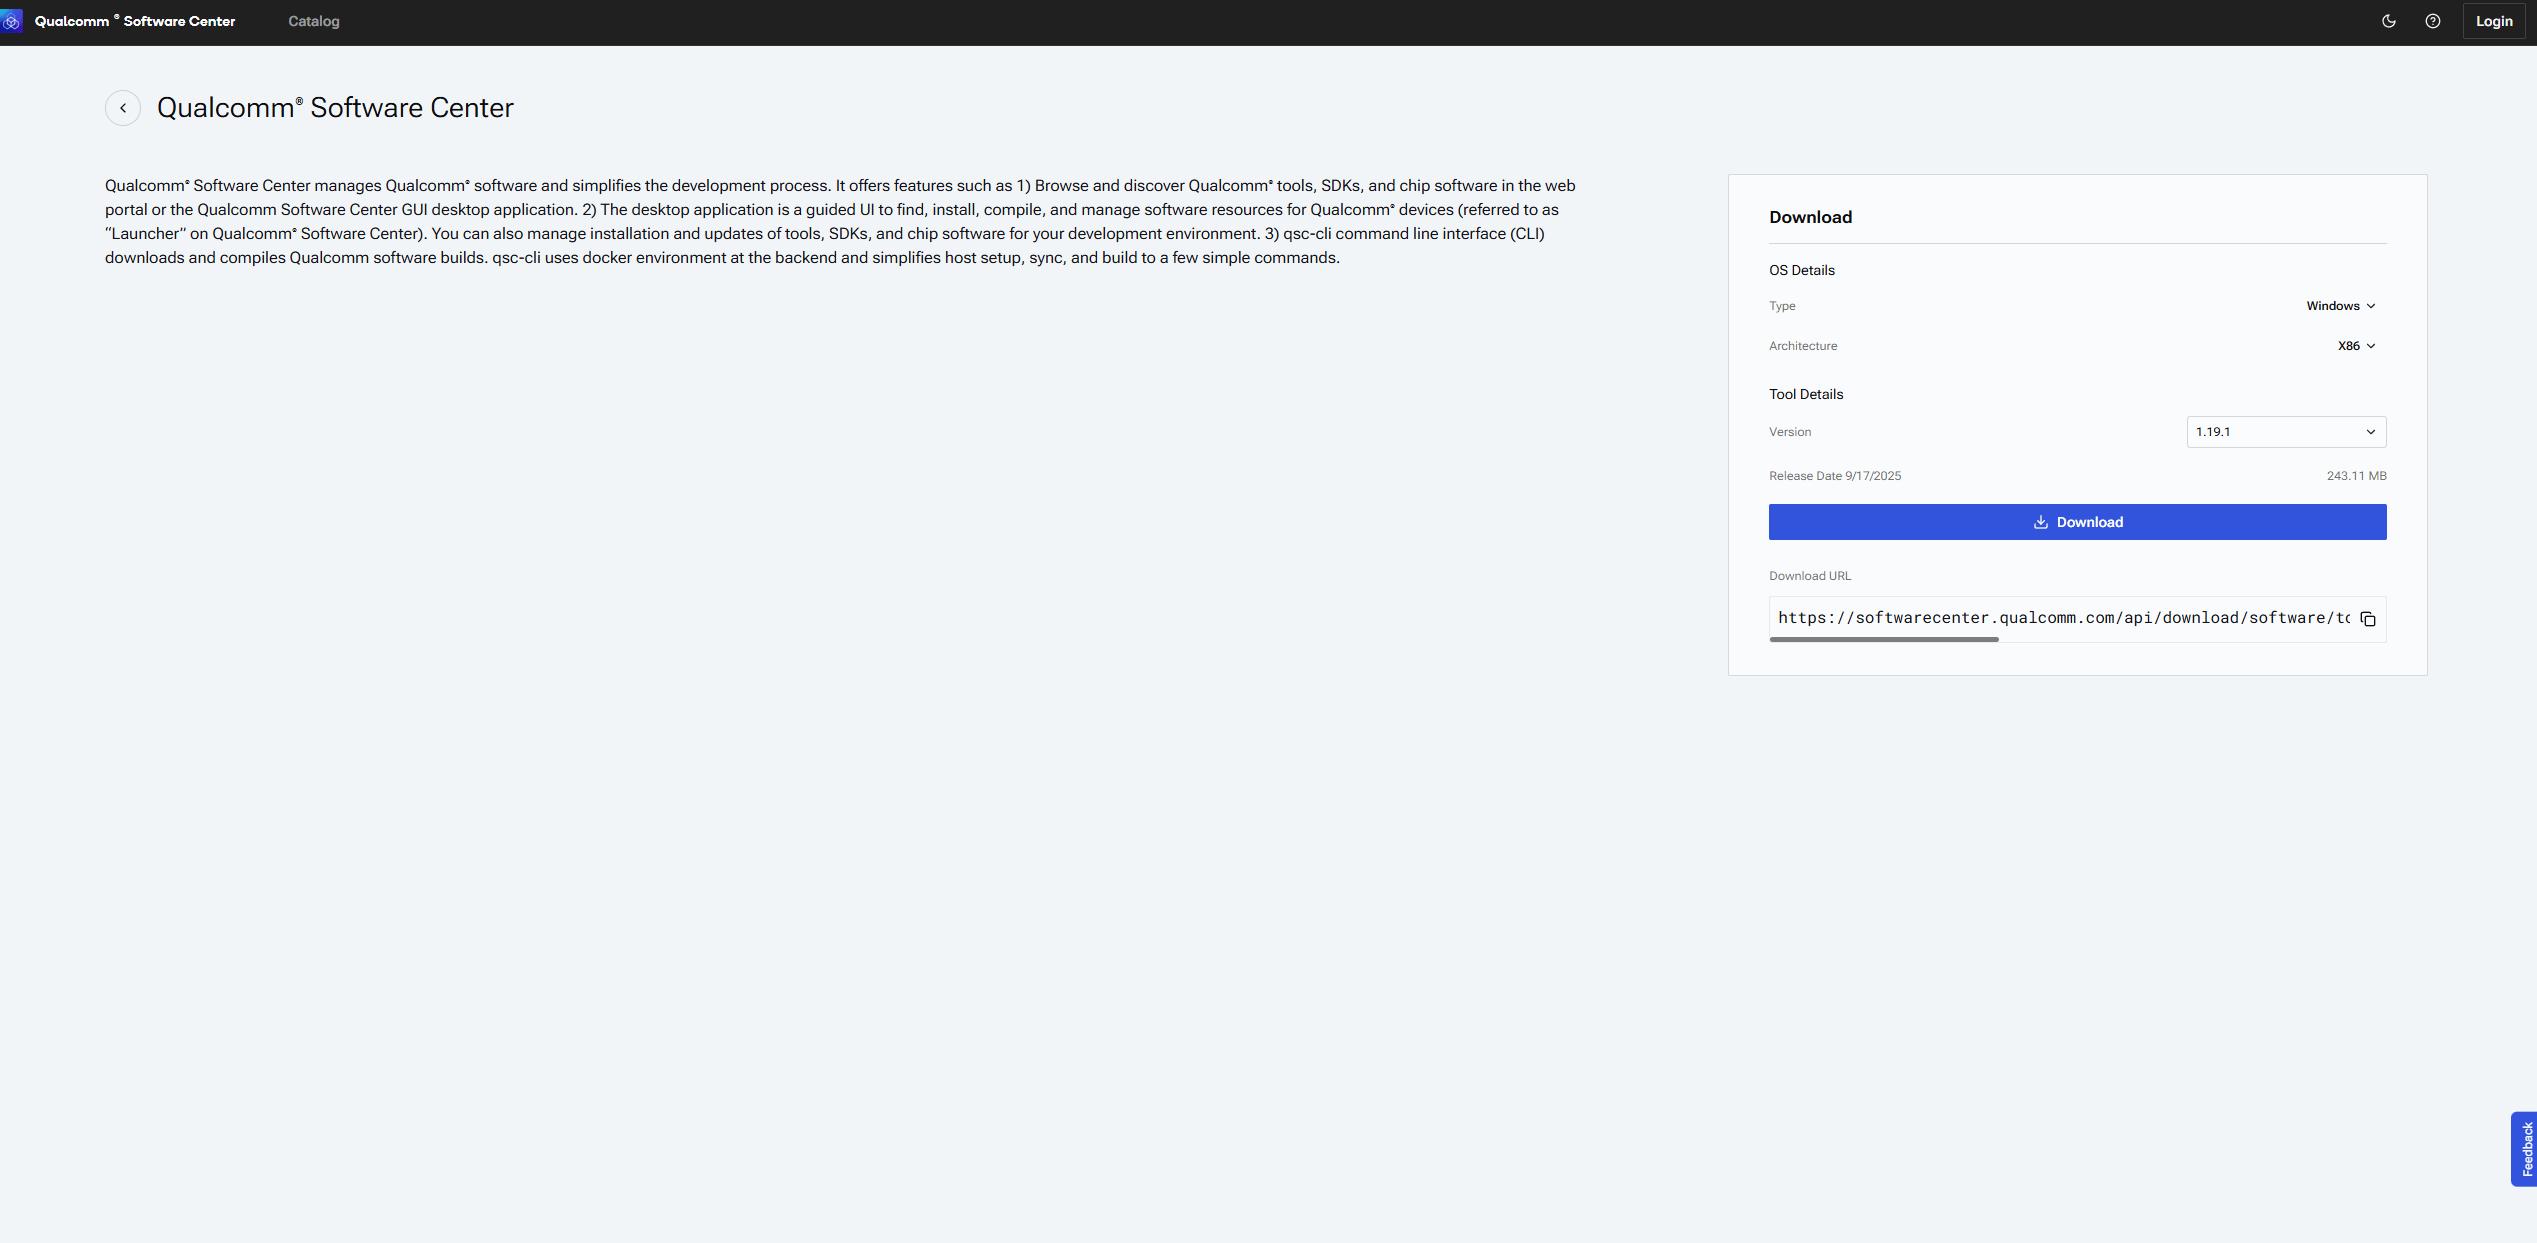 QSC 可执行文件将下载到您的 Windows 机器。
### 安装适用于 Windows 的 QSC
1. 选择 QSC .exe 可执行文件开始安装。
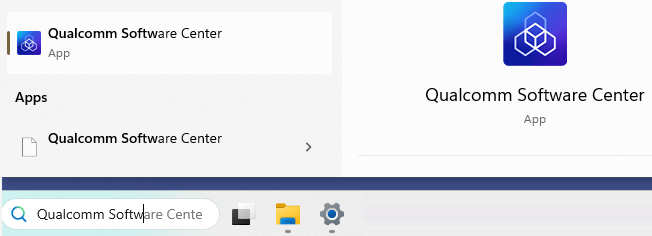
2. 安装完成后,若要打开 Qualcomm Software Center 桌面应用程序,请在 Windows 搜索框中搜索 **Qualcomm Software Center**。
QSC 可执行文件将下载到您的 Windows 机器。
### 安装适用于 Windows 的 QSC
1. 选择 QSC .exe 可执行文件开始安装。
2. 安装完成后,若要打开 Qualcomm Software Center 桌面应用程序,请在 Windows 搜索框中搜索 **Qualcomm Software Center**。
 ## Linux
### 下载适用于 Linux 的 QSC
使用以下方式下载适用于 Linux 的 Qualcomm Software Center。
#### GUI
1. 使用您的 Qualcomm ID 登录 [https://softwarecenter.qualcomm.com/catalog/item/Qualcomm\_Software\_Center](https://softwarecenter.qualcomm.com/catalog/item/Qualcomm_Software_Center)。
2. 选择 **Install**。
## Linux
### 下载适用于 Linux 的 QSC
使用以下方式下载适用于 Linux 的 Qualcomm Software Center。
#### GUI
1. 使用您的 Qualcomm ID 登录 [https://softwarecenter.qualcomm.com/catalog/item/Qualcomm\_Software\_Center](https://softwarecenter.qualcomm.com/catalog/item/Qualcomm_Software_Center)。
2. 选择 **Install**。
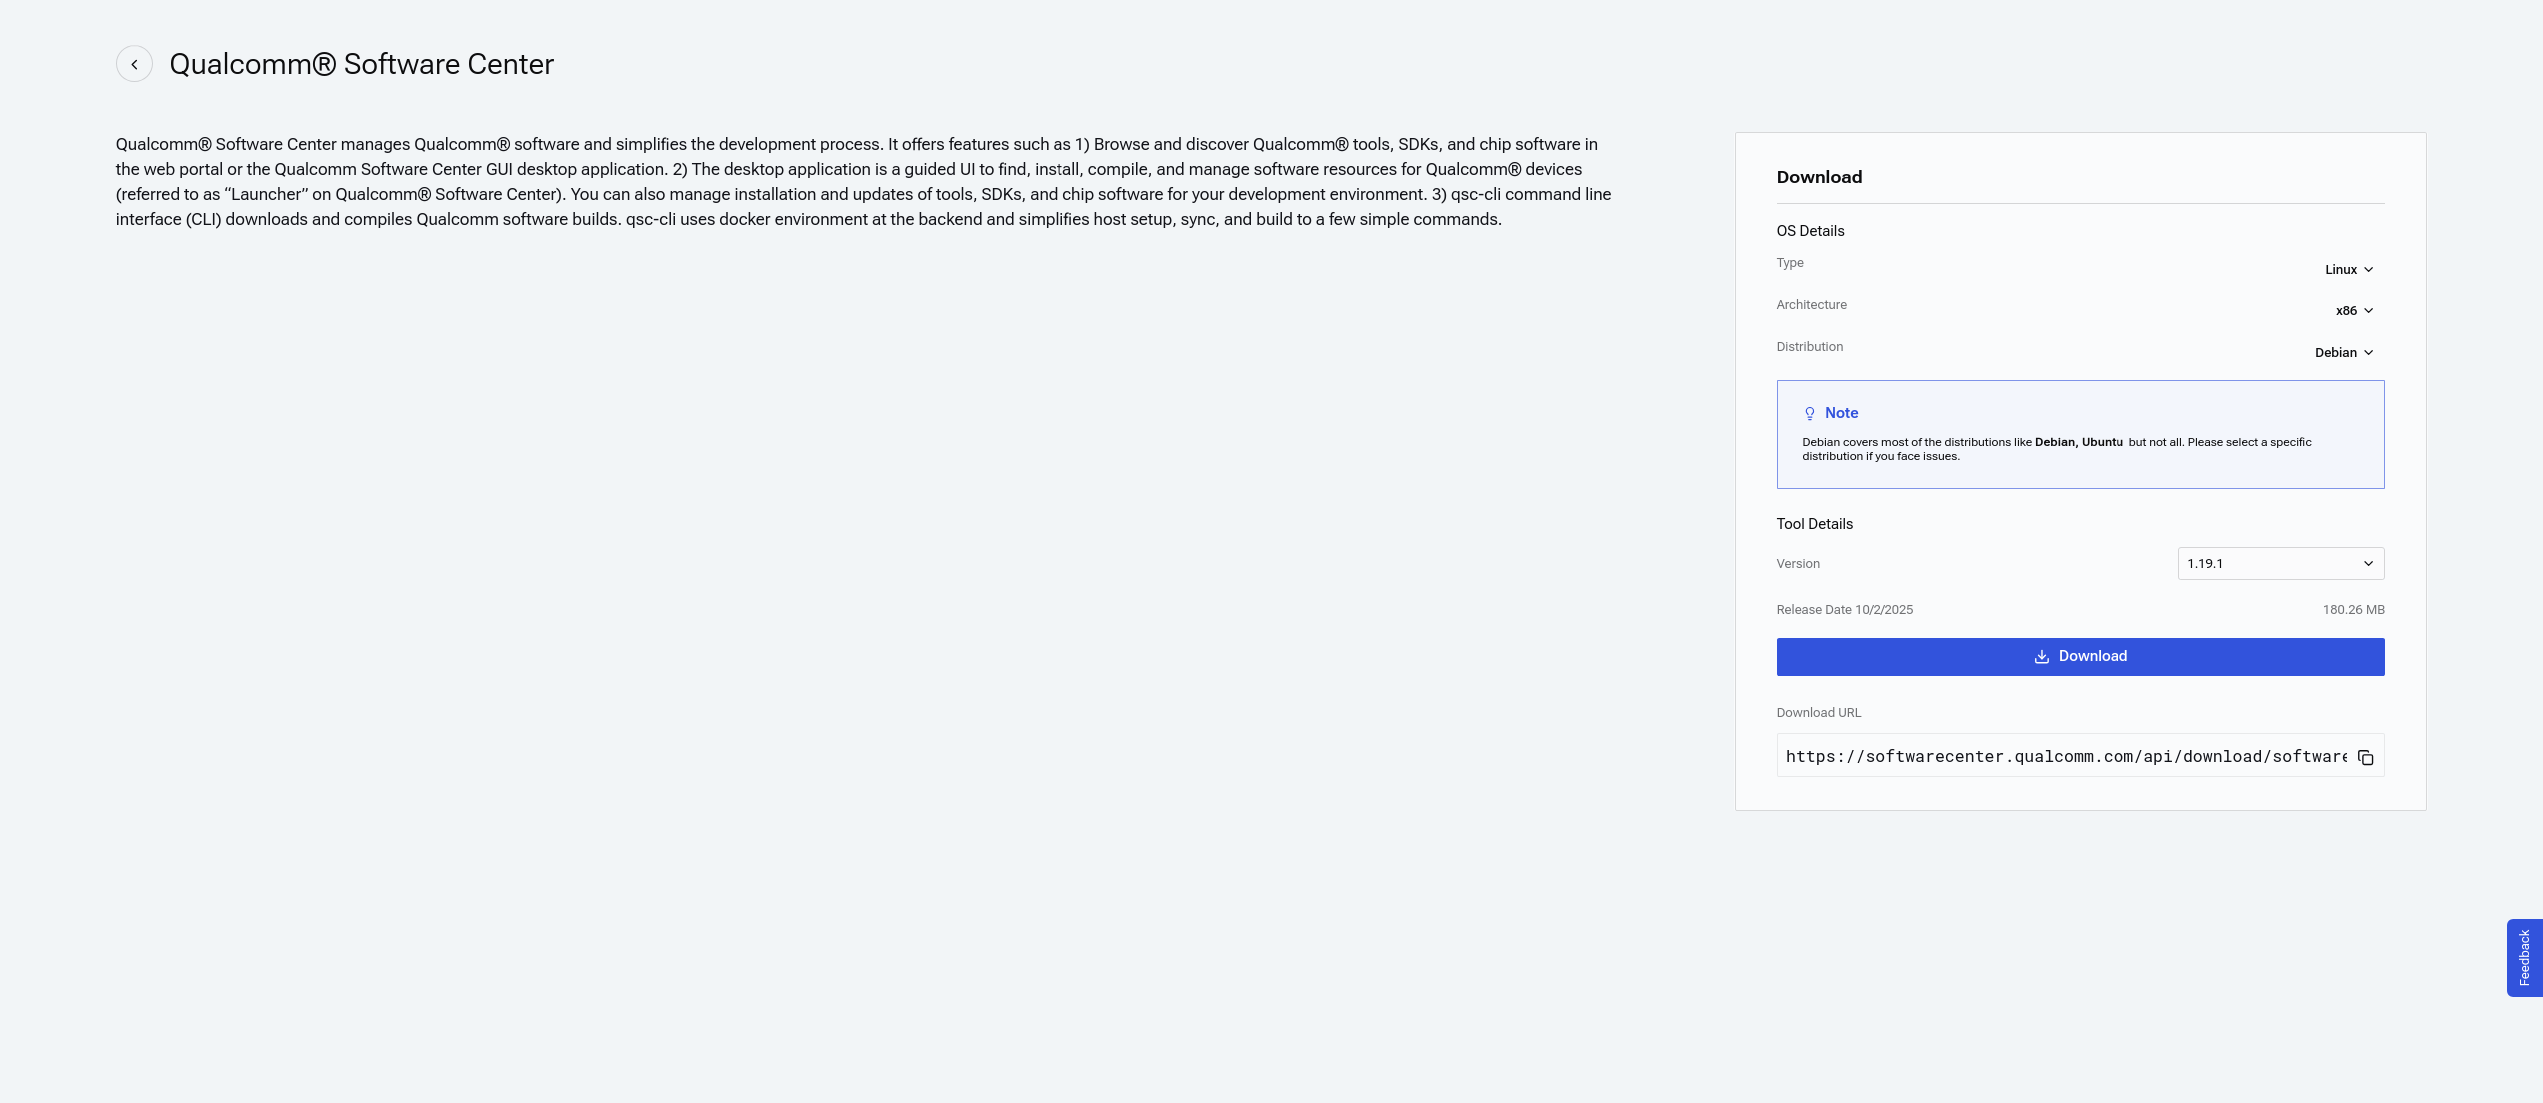 QSC Debian 软件包将下载到您的机器。
#### CLI
1. 如果尚未安装,请运行以下命令安装 curl。
`sudo apt install curl`
1. 要下载适用于 x86 的 QSC 安装程序,请运行以下命令。
`curl -L https://softwarecenter.qualcomm.com/api/download/software/tools/Qualcomm_Software_Center/Linux/Debian/latest.deb -o qsc_installer.deb`
对于 ARM64,安装程序路径为 `[https://softwarecenter.qualcomm.com/api/download/software/qsc/linux-arm64/latest.deb`.]\([https://softwarecenter.qualcomm.com/api/download/software/qsc/linux-arm64/latest.deb\`](https://softwarecenter.qualcomm.com/api/download/software/qsc/linux-arm64/latest.deb`).)
### 安装适用于 Linux 的 QSC
使用以下方式安装适用于 Linux 的 Qualcomm Software Center。
#### GUI
使用 Ubuntu GNOME GUI (GDebi) 安装已下载的 QSC Debian 软件包。
要安装 GDebi,请在终端窗口中运行以下命令。
`sudo apt install gdebi`
QSC Debian 软件包将下载到您的机器。
#### CLI
1. 如果尚未安装,请运行以下命令安装 curl。
`sudo apt install curl`
1. 要下载适用于 x86 的 QSC 安装程序,请运行以下命令。
`curl -L https://softwarecenter.qualcomm.com/api/download/software/tools/Qualcomm_Software_Center/Linux/Debian/latest.deb -o qsc_installer.deb`
对于 ARM64,安装程序路径为 `[https://softwarecenter.qualcomm.com/api/download/software/qsc/linux-arm64/latest.deb`.]\([https://softwarecenter.qualcomm.com/api/download/software/qsc/linux-arm64/latest.deb\`](https://softwarecenter.qualcomm.com/api/download/software/qsc/linux-arm64/latest.deb`).)
### 安装适用于 Linux 的 QSC
使用以下方式安装适用于 Linux 的 Qualcomm Software Center。
#### GUI
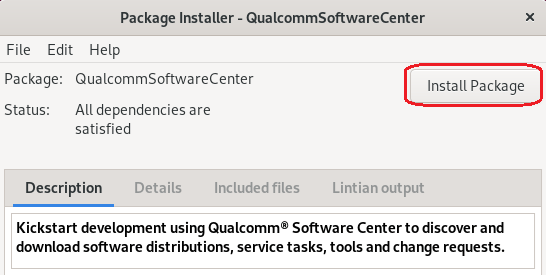
使用 Ubuntu GNOME GUI (GDebi) 安装已下载的 QSC Debian 软件包。
要安装 GDebi,请在终端窗口中运行以下命令。
`sudo apt install gdebi`
 #### CLI
要安装该 Debian 软件包,请运行以下命令。
`sudo apt update`
`sudo apt install ./qsc_installer.deb`
如果出现以下错误消息,请忽略:
`o/p:: N: Download is performed unsandboxed as root as file '/home/ubuntu22/qsc_installer.deb' couldn't be accessed by user '_apt'. - pkgAcquire::Run (13: Permission denied)`
安装成功后,会显示 `Installed Qualcomm Software Center v1.X.X successfully` 消息。
要使 Launcher 工作流能够检测已连接的设备并烧写软件构建,必须在主机上安装 PCAT 和 QUD。请按照说明使用 qsc-cli 安装 PCAT 和 QUD。
## Mac (arm)
### 下载适用于 Mac 的 QSC
1. 使用您的 Qualcomm ID 登录 [Qualcomm Software Center](https://softwarecenter.qualcomm.com/catalog/item/Qualcomm_Software_Center?osArch=ARM64\&osType=macOS)。
2. 选择 **Install**。
:alt: Download software center
:scale: 60
QSC 可执行文件将下载到您的机器。
### 安装适用于 Mac 的 QSC
要在 Mac 设备上安装 QSC,请使用以下方式之一。
1. 使用终端,导航到 **Downloads** 文件夹并运行以下命令。
`sudo installer -pkg <path_to_downloaded_installer> -target /`
1. 使用 Finder,导航到 **Downloads** 位置并双击安装程序。按照屏幕上的说明完成安装。
## Windows Subsystem for Linux (WSL)
### 机器要求
* Windows 11 或 Windows 10 Build 18362.1049 或更高版本。
* 至少 32 GB RAM。按照"加速 qsc-cli 操作"中的说明为 WSL 分配可用 RAM。
* 至少 500 GB 可用存储空间。
### 前提条件
在安装 WSL2 之前,请确保已启用以下 Windows 功能。
* Microsoft-Windows-Subsystem-Linux
* VirtualMachinePlatform
要启用它们,请在 Windows 搜索栏中搜索 **Turn Windows features on or off**(启用或关闭 Windows 功能)。将弹出一个包含可用功能列表的新窗口。请确保按下图所示启用 Microsoft-Windows-Subsystem-Linux 和 VirtualMachinePlatform 功能:
#### CLI
要安装该 Debian 软件包,请运行以下命令。
`sudo apt update`
`sudo apt install ./qsc_installer.deb`
如果出现以下错误消息,请忽略:
`o/p:: N: Download is performed unsandboxed as root as file '/home/ubuntu22/qsc_installer.deb' couldn't be accessed by user '_apt'. - pkgAcquire::Run (13: Permission denied)`
安装成功后,会显示 `Installed Qualcomm Software Center v1.X.X successfully` 消息。
要使 Launcher 工作流能够检测已连接的设备并烧写软件构建,必须在主机上安装 PCAT 和 QUD。请按照说明使用 qsc-cli 安装 PCAT 和 QUD。
## Mac (arm)
### 下载适用于 Mac 的 QSC
1. 使用您的 Qualcomm ID 登录 [Qualcomm Software Center](https://softwarecenter.qualcomm.com/catalog/item/Qualcomm_Software_Center?osArch=ARM64\&osType=macOS)。
2. 选择 **Install**。
:alt: Download software center
:scale: 60
QSC 可执行文件将下载到您的机器。
### 安装适用于 Mac 的 QSC
要在 Mac 设备上安装 QSC,请使用以下方式之一。
1. 使用终端,导航到 **Downloads** 文件夹并运行以下命令。
`sudo installer -pkg <path_to_downloaded_installer> -target /`
1. 使用 Finder,导航到 **Downloads** 位置并双击安装程序。按照屏幕上的说明完成安装。
## Windows Subsystem for Linux (WSL)
### 机器要求
* Windows 11 或 Windows 10 Build 18362.1049 或更高版本。
* 至少 32 GB RAM。按照"加速 qsc-cli 操作"中的说明为 WSL 分配可用 RAM。
* 至少 500 GB 可用存储空间。
### 前提条件
在安装 WSL2 之前,请确保已启用以下 Windows 功能。
* Microsoft-Windows-Subsystem-Linux
* VirtualMachinePlatform
要启用它们,请在 Windows 搜索栏中搜索 **Turn Windows features on or off**(启用或关闭 Windows 功能)。将弹出一个包含可用功能列表的新窗口。请确保按下图所示启用 Microsoft-Windows-Subsystem-Linux 和 VirtualMachinePlatform 功能:
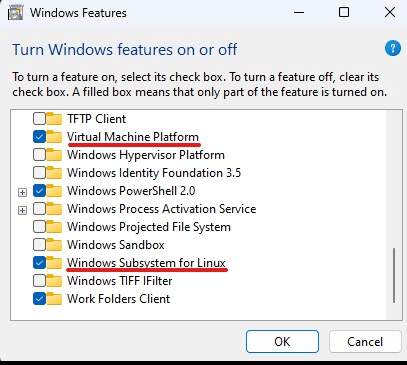 如果您需要启用上述任一或两项功能,Windows 可能会要求您重启机器。请先重启机器,然后再继续后续步骤。
### 安装适用于 WSL 的 QSC
1. 按照 [https://learn.microsoft.com/en-us/windows/wsl/install.](https://learn.microsoft.com/en-us/windows/wsl/install.) 中的步骤安装 WSL。
要将 WSL2 设置为默认 WSL 版本,请在管理员模式的 Windows PowerShell 中运行以下命令。
`wsl --set-default-version 2`
1. 在管理员模式的 Windows PowerShell 中运行以下命令安装 Ubuntu 发行版。
`wsl --install -d Ubuntu-22.04`
安装完成后,创建新的用户名和密码。账户创建后,您将默认以该用户身份登录。
1. 在 Ubuntu 会话中运行以下命令安装 qsc-cli。
`curl -L https://softwarecenter.qualcomm.com/api/download/software/tools/Qualcomm_Software_Center/Linux/Debian/latest.deb -o qsc_installer.deb`
`sudo apt update`
`sudo apt install ./qsc_installer.deb`
如果出现以下错误消息,请忽略:
`o/p:: N: Download is performed unsandboxed as root as file '/home/ubuntu22/qsc_installer.deb' couldn't be accessed by user '_apt'. - pkgAcquire::Run (13: Permission denied)`
1. 等待约 5 分钟,然后使用以下命令安装 docker。
`curl -fsSL https://get.docker.com -o get-docker.sh`
`sudo sh get-docker.sh`
`sudo usermod -aG docker $USER`
`sudo service docker start`
1. 打开 `/etc/wsl.conf` 并添加以下行(如果不存在),将 docker 设置为自动启动。
```
[boot]
command = sudo service docker start
```
1. 在管理员模式的 Windows PowerShell 中运行以下命令以使更改生效。
`wsl --shutdown`
要使 Launcher 工作流能够检测已连接的设备并烧写软件构建,必须在 Windows 主机上安装 PCAT 和 QUD。请按照说明使用 qsc-cli 安装 PCAT 和 QUD。
### 后续步骤
安装 WSL 后,需要进行以下优化。
#### 优化 WSL 性能
默认情况下,Ubuntu 安装在 C 盘上,而 C 盘可能没有足够的空间。如果您有另一个存储空间更大的驱动器,可以更改 Ubuntu 发行版的安装位置以优化性能。
1. 在管理员模式的 Windows PowerShell 中运行以下命令。
`wsl --shutdown`
1. 在 Windows 搜索栏中打开 **Add or Remove Programs**(添加或删除程序)。
2. 在应用列表中找到 Ubuntu-22.04。
3. 选择该应用,然后选择 **Move**(移动)。
4. 使用下拉菜单选择新位置,然后选择 **Move**(移动)。
移动可能需要一些时间才能完成。
#### 优化 QSC CLI 操作速度
系统将 WSL 的 RAM 使用量限制为 Windows 总 RAM 的 50%。例如,即使主机上有 32 GB 可用 RAM,也只有 16 GB 会被分配给 WSL。此限制的解决方法是更新 .wslconfig 文件,您可以在其中为 WSL 分配可用 RAM。
1. 创建一个 `%UserProfile%.wslconfig` 文件,内容如下。
这些值仅供参考。请逐一核对这些设置,使其与您机器的规格匹配。
```
# Settings apply across all Linux distros running on WSL 2
[wsl2]
# Limits VM memory to use no more than 64 GB, this can be set as whole numbers using GB or MB
memory=64GB
# Sets the VM to use 16 virtual processors.
processors=16
# Sets amount of swap storage space to 64GB, default is 25% of available RAM
swap=64GB
# Sets swapfile path location, default is %USERPROFILE%\AppData\Local\Temp\swap.vhdx
swapfile=E:\\wsl-swap.vhdx
# Enable experimental features
[experimental]
# Automatically releases cached memory after detecting idle CPU usage. Set to gradual for slow release, and dropcache for instant release of cached memory.
autoMemoryReclaim=dropcache
```
1. 在管理员模式的 Windows PowerShell 中运行以下命令。
`wsl --shutdown`
1. 再次启动 Ubuntu 发行版即可开始使用 qsc-cli。
WSL 上仅支持 qsc-cli。Qualcomm Software Center 桌面应用程序可能无法在 WSL 上运行。
### 支持
* 有关常见的 WSL 相关问题,请参阅 [Microsoft 故障排除](https://learn.microsoft.com/en-us/windows/wsl/troubleshooting)。
* 有关网络相关问题,请参阅 [Microsoft GitHub](https://github.com/microsoft/WSL/issues/8365)。
* 有关其他故障排除,请参阅 WSL 支持。
## Mac 上的 UTM
### 机器要求
* 主机操作系统:macOS Big Sur 11.3 或更高版本
* 架构:ARM64
* 处理器:基于 ARM 的 Apple Silicon 处理器
* 至少 18 GB RAM
* 至少 500 GB 可用存储空间(300 GB 空闲空间)
### 下载 UTM 并设置 VM
1. 从 Ubuntu 网站下载适用的 Ubuntu ISO 镜像。
如果您的 Mac 笔记本使用 ARM 架构,请下载 ARM ISO 镜像。
a. 前往 [https://ubuntu.com/download/server/arm.](https://ubuntu.com/download/server/arm.)
b. 选择 **Alternative and previous releases**。
c. 下载 22.04 ISO 镜像。
2. 下载并安装 UTM。
a. 前往 [https://mac.getutm.app/](https://mac.getutm.app/) 并选择 **Download**。
b. 双击下载的 .dmg 文件,将 UTM 拖放到您的 Applications 文件夹。
c. 前往 Applications 并打开 UTM。
3. 安装 Ubuntu。
a. 选择 **Create a New Virtual Machine**。
b. 选择 **Virtualize**。
c. 选择 **Linux** 作为操作系统。对于 **Boot ISO Image**,选择 **Browse** 导航并选择先前下载的 Ubuntu ISO 镜像文件。
d. 选择 **Continue**
e. 选择 RAM 和 CPU 核心数(建议最低为 10 GB RAM 和 6 核),然后选择 **Continue**。
为获得更好的性能,请使用主机配置的 70%。
要查看 Mac 上的系统配置,请选择苹果菜单 > **系统设置**,然后在侧边栏中选择**通用**。您可能需要向下滚动。在右侧选择**关于本机**,然后选择**系统报告**。
f. 指定存储大小(建议至少 300 GB,用于下载和编译软件产品构建),然后选择 **Continue**。
g. 选择可在 VM 内访问的共享目录(例如下载文件夹),然后选择 **Continue**。
h. 更新系统名称(默认为 *Linux*),然后选择 **Save** 保存系统配置。
1. 通过点击虚拟机的播放按钮打开并设置 Ubuntu。
Tab 键会移动光标。空格键会选中选项。
a. 选择 **Try or Install Ubuntu Server**。
b. 选择首选语言。
c. 选择键盘布局。
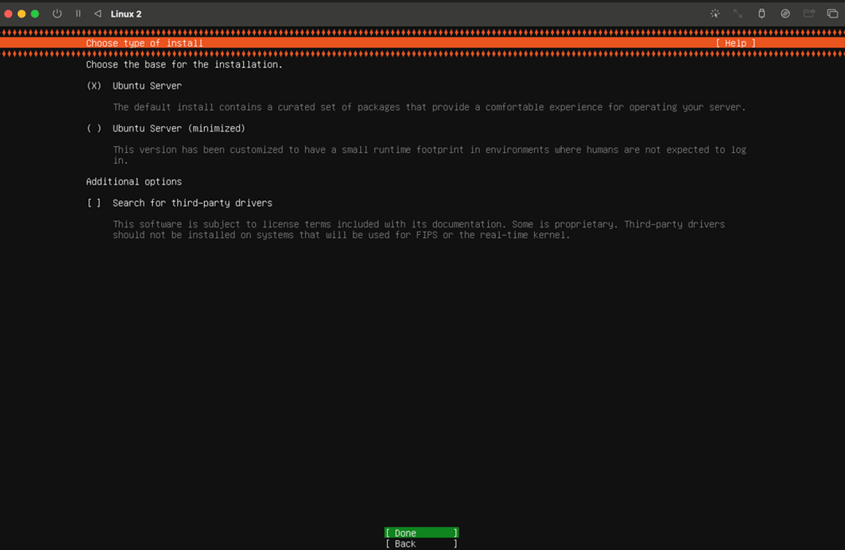
d. 选择 **Ubuntu Server**(默认)作为安装类型。
如果您需要启用上述任一或两项功能,Windows 可能会要求您重启机器。请先重启机器,然后再继续后续步骤。
### 安装适用于 WSL 的 QSC
1. 按照 [https://learn.microsoft.com/en-us/windows/wsl/install.](https://learn.microsoft.com/en-us/windows/wsl/install.) 中的步骤安装 WSL。
要将 WSL2 设置为默认 WSL 版本,请在管理员模式的 Windows PowerShell 中运行以下命令。
`wsl --set-default-version 2`
1. 在管理员模式的 Windows PowerShell 中运行以下命令安装 Ubuntu 发行版。
`wsl --install -d Ubuntu-22.04`
安装完成后,创建新的用户名和密码。账户创建后,您将默认以该用户身份登录。
1. 在 Ubuntu 会话中运行以下命令安装 qsc-cli。
`curl -L https://softwarecenter.qualcomm.com/api/download/software/tools/Qualcomm_Software_Center/Linux/Debian/latest.deb -o qsc_installer.deb`
`sudo apt update`
`sudo apt install ./qsc_installer.deb`
如果出现以下错误消息,请忽略:
`o/p:: N: Download is performed unsandboxed as root as file '/home/ubuntu22/qsc_installer.deb' couldn't be accessed by user '_apt'. - pkgAcquire::Run (13: Permission denied)`
1. 等待约 5 分钟,然后使用以下命令安装 docker。
`curl -fsSL https://get.docker.com -o get-docker.sh`
`sudo sh get-docker.sh`
`sudo usermod -aG docker $USER`
`sudo service docker start`
1. 打开 `/etc/wsl.conf` 并添加以下行(如果不存在),将 docker 设置为自动启动。
```
[boot]
command = sudo service docker start
```
1. 在管理员模式的 Windows PowerShell 中运行以下命令以使更改生效。
`wsl --shutdown`
要使 Launcher 工作流能够检测已连接的设备并烧写软件构建,必须在 Windows 主机上安装 PCAT 和 QUD。请按照说明使用 qsc-cli 安装 PCAT 和 QUD。
### 后续步骤
安装 WSL 后,需要进行以下优化。
#### 优化 WSL 性能
默认情况下,Ubuntu 安装在 C 盘上,而 C 盘可能没有足够的空间。如果您有另一个存储空间更大的驱动器,可以更改 Ubuntu 发行版的安装位置以优化性能。
1. 在管理员模式的 Windows PowerShell 中运行以下命令。
`wsl --shutdown`
1. 在 Windows 搜索栏中打开 **Add or Remove Programs**(添加或删除程序)。
2. 在应用列表中找到 Ubuntu-22.04。
3. 选择该应用,然后选择 **Move**(移动)。
4. 使用下拉菜单选择新位置,然后选择 **Move**(移动)。
移动可能需要一些时间才能完成。
#### 优化 QSC CLI 操作速度
系统将 WSL 的 RAM 使用量限制为 Windows 总 RAM 的 50%。例如,即使主机上有 32 GB 可用 RAM,也只有 16 GB 会被分配给 WSL。此限制的解决方法是更新 .wslconfig 文件,您可以在其中为 WSL 分配可用 RAM。
1. 创建一个 `%UserProfile%.wslconfig` 文件,内容如下。
这些值仅供参考。请逐一核对这些设置,使其与您机器的规格匹配。
```
# Settings apply across all Linux distros running on WSL 2
[wsl2]
# Limits VM memory to use no more than 64 GB, this can be set as whole numbers using GB or MB
memory=64GB
# Sets the VM to use 16 virtual processors.
processors=16
# Sets amount of swap storage space to 64GB, default is 25% of available RAM
swap=64GB
# Sets swapfile path location, default is %USERPROFILE%\AppData\Local\Temp\swap.vhdx
swapfile=E:\\wsl-swap.vhdx
# Enable experimental features
[experimental]
# Automatically releases cached memory after detecting idle CPU usage. Set to gradual for slow release, and dropcache for instant release of cached memory.
autoMemoryReclaim=dropcache
```
1. 在管理员模式的 Windows PowerShell 中运行以下命令。
`wsl --shutdown`
1. 再次启动 Ubuntu 发行版即可开始使用 qsc-cli。
WSL 上仅支持 qsc-cli。Qualcomm Software Center 桌面应用程序可能无法在 WSL 上运行。
### 支持
* 有关常见的 WSL 相关问题,请参阅 [Microsoft 故障排除](https://learn.microsoft.com/en-us/windows/wsl/troubleshooting)。
* 有关网络相关问题,请参阅 [Microsoft GitHub](https://github.com/microsoft/WSL/issues/8365)。
* 有关其他故障排除,请参阅 WSL 支持。
## Mac 上的 UTM
### 机器要求
* 主机操作系统:macOS Big Sur 11.3 或更高版本
* 架构:ARM64
* 处理器:基于 ARM 的 Apple Silicon 处理器
* 至少 18 GB RAM
* 至少 500 GB 可用存储空间(300 GB 空闲空间)
### 下载 UTM 并设置 VM
1. 从 Ubuntu 网站下载适用的 Ubuntu ISO 镜像。
如果您的 Mac 笔记本使用 ARM 架构,请下载 ARM ISO 镜像。
a. 前往 [https://ubuntu.com/download/server/arm.](https://ubuntu.com/download/server/arm.)
b. 选择 **Alternative and previous releases**。
c. 下载 22.04 ISO 镜像。
2. 下载并安装 UTM。
a. 前往 [https://mac.getutm.app/](https://mac.getutm.app/) 并选择 **Download**。
b. 双击下载的 .dmg 文件,将 UTM 拖放到您的 Applications 文件夹。
c. 前往 Applications 并打开 UTM。
3. 安装 Ubuntu。
a. 选择 **Create a New Virtual Machine**。
b. 选择 **Virtualize**。
c. 选择 **Linux** 作为操作系统。对于 **Boot ISO Image**,选择 **Browse** 导航并选择先前下载的 Ubuntu ISO 镜像文件。
d. 选择 **Continue**
e. 选择 RAM 和 CPU 核心数(建议最低为 10 GB RAM 和 6 核),然后选择 **Continue**。
为获得更好的性能,请使用主机配置的 70%。
要查看 Mac 上的系统配置,请选择苹果菜单 > **系统设置**,然后在侧边栏中选择**通用**。您可能需要向下滚动。在右侧选择**关于本机**,然后选择**系统报告**。
f. 指定存储大小(建议至少 300 GB,用于下载和编译软件产品构建),然后选择 **Continue**。
g. 选择可在 VM 内访问的共享目录(例如下载文件夹),然后选择 **Continue**。
h. 更新系统名称(默认为 *Linux*),然后选择 **Save** 保存系统配置。
1. 通过点击虚拟机的播放按钮打开并设置 Ubuntu。
Tab 键会移动光标。空格键会选中选项。
a. 选择 **Try or Install Ubuntu Server**。
b. 选择首选语言。
c. 选择键盘布局。
d. 选择 **Ubuntu Server**(默认)作为安装类型。
 e. 选择默认网络接口。
f. 选择默认的 Ubuntu 归档镜像源。
g. 选择默认的引导式存储配置。
e. 选择默认网络接口。
f. 选择默认的 Ubuntu 归档镜像源。
g. 选择默认的引导式存储配置。
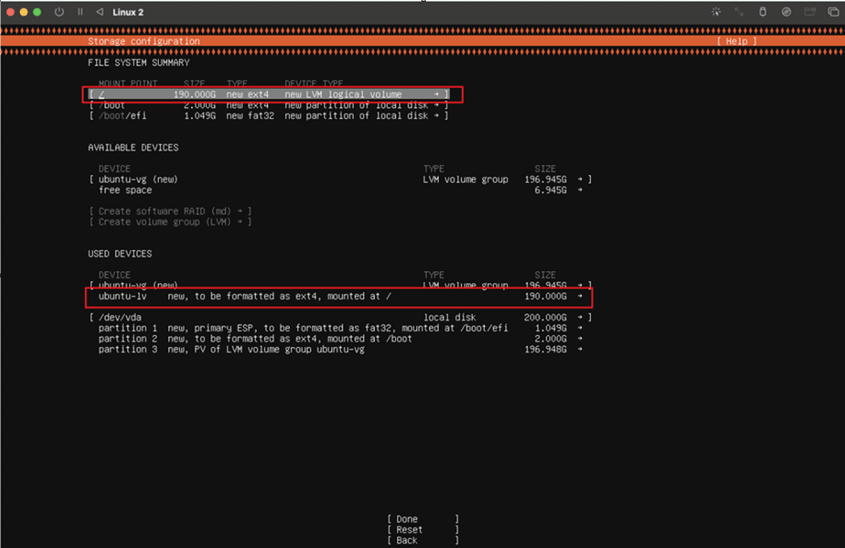 h. 在 Storage Configuration 页面上,转到 **USED DEVICES**,按 Tab 选择 **ubuntu-lv new, to be formatted as ext4, mounted at**,然后按回车更改 ubuntu-lv 的大小(例如,如果 ubuntu-vg 为 196,则将 ubuntu-lv 保持为 190)。
i. 在 Confirm destructive action 页面上,选择 **Continue**。
这不会删除 macOS 内的内容。
j. 在 Profile setup 页面上,为 Ubuntu VM 输入必要的信息。
该用户名和密码将成为 VM 的登录凭据。
k. 在 Upgrade to Ubuntu Pro 页面上,选择 **Skip for now**。
l. 如果您想为服务器启用 SSH,请安装 OpenSSH 服务器软件包。要跳过 SSH 设置,请选择 **Done**。
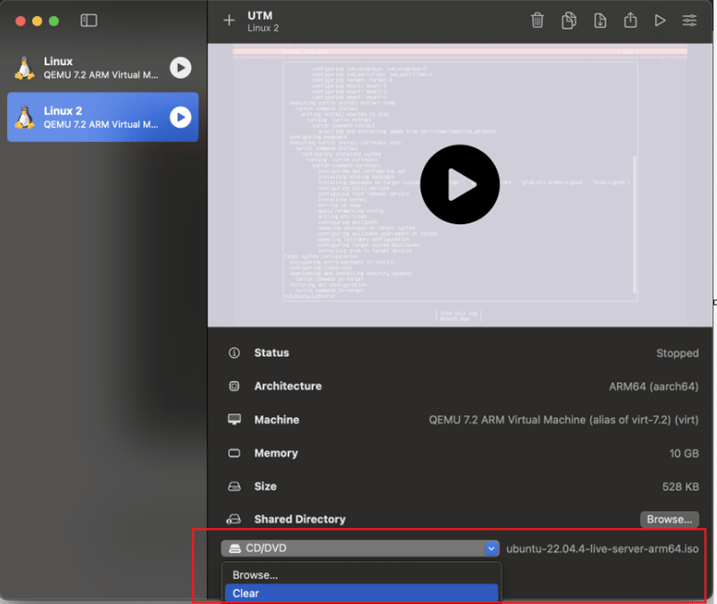
m. Ubuntu 系统将开始安装。完成后,从 VM 中卸载 CD/DVD 并重启。
h. 在 Storage Configuration 页面上,转到 **USED DEVICES**,按 Tab 选择 **ubuntu-lv new, to be formatted as ext4, mounted at**,然后按回车更改 ubuntu-lv 的大小(例如,如果 ubuntu-vg 为 196,则将 ubuntu-lv 保持为 190)。
i. 在 Confirm destructive action 页面上,选择 **Continue**。
这不会删除 macOS 内的内容。
j. 在 Profile setup 页面上,为 Ubuntu VM 输入必要的信息。
该用户名和密码将成为 VM 的登录凭据。
k. 在 Upgrade to Ubuntu Pro 页面上,选择 **Skip for now**。
l. 如果您想为服务器启用 SSH,请安装 OpenSSH 服务器软件包。要跳过 SSH 设置,请选择 **Done**。
m. Ubuntu 系统将开始安装。完成后,从 VM 中卸载 CD/DVD 并重启。
 1. 要使用该 VM,请点击播放按钮并登录。Ubuntu 登录屏幕可能需要一些时间才能显示。如果未能出现,请重启 UTM 并启动 VM。
2. 安装 Ubuntu 桌面。
a. 在 Ubuntu 终端中,运行以下命令更新系统。
`sudo apt update && sudo apt upgrade -y`
b. 安装 Ubuntu 桌面。
`sudo apt install ubuntu-desktop -y`
c. 重启系统。
`reboot`
Ubuntu 桌面现已安装完成。
1. 将 USB 连接到机器。VM 会询问是否允许连接该 USB。
在 Ubuntu 桌面上,点击右上角的 USB 符号查看最近连接的 USB。
可在 Ubuntu 终端中运行以下命令获取可用 USB 的列表。
`lsusb`
### 安装 QSC-CLI
1. 设置完成后,在 Ubuntu 会话中运行以下命令安装 qsc-cli。
`curl -L https://softwarecenter.qualcomm.com/api/download/software/qsc/linux-arm64/latest.deb -o qsc_installer.deb`
`sudo apt update`
`sudo apt install ./qsc_installer.deb`
如果出现以下错误消息,请忽略:
`o/p:: N: Download is performed unsandboxed as root as file '/home/ubuntu22/qsc_installer.deb' couldn't be accessed by user '_apt'. - pkgAcquire::Run (13: Permission denied)`
开始使用 qsc-cli 下载并编译软件产品构建。
要使 Launcher 工作流能够检测已连接的设备并烧写软件构建,必须在 UTM 上安装 PCAT 和 QUD。请按照说明使用 qsc-cli 安装 PCAT 和 QUD。
1. 要使用该 VM,请点击播放按钮并登录。Ubuntu 登录屏幕可能需要一些时间才能显示。如果未能出现,请重启 UTM 并启动 VM。
2. 安装 Ubuntu 桌面。
a. 在 Ubuntu 终端中,运行以下命令更新系统。
`sudo apt update && sudo apt upgrade -y`
b. 安装 Ubuntu 桌面。
`sudo apt install ubuntu-desktop -y`
c. 重启系统。
`reboot`
Ubuntu 桌面现已安装完成。
1. 将 USB 连接到机器。VM 会询问是否允许连接该 USB。
在 Ubuntu 桌面上,点击右上角的 USB 符号查看最近连接的 USB。
可在 Ubuntu 终端中运行以下命令获取可用 USB 的列表。
`lsusb`
### 安装 QSC-CLI
1. 设置完成后,在 Ubuntu 会话中运行以下命令安装 qsc-cli。
`curl -L https://softwarecenter.qualcomm.com/api/download/software/qsc/linux-arm64/latest.deb -o qsc_installer.deb`
`sudo apt update`
`sudo apt install ./qsc_installer.deb`
如果出现以下错误消息,请忽略:
`o/p:: N: Download is performed unsandboxed as root as file '/home/ubuntu22/qsc_installer.deb' couldn't be accessed by user '_apt'. - pkgAcquire::Run (13: Permission denied)`
开始使用 qsc-cli 下载并编译软件产品构建。
要使 Launcher 工作流能够检测已连接的设备并烧写软件构建,必须在 UTM 上安装 PCAT 和 QUD。请按照说明使用 qsc-cli 安装 PCAT 和 QUD。