> ## Documentation Index
> Fetch the complete documentation index at: https://dragonwingdocs.qualcomm.com/llms.txt
> Use this file to discover all available pages before exploring further.
# 摄像头
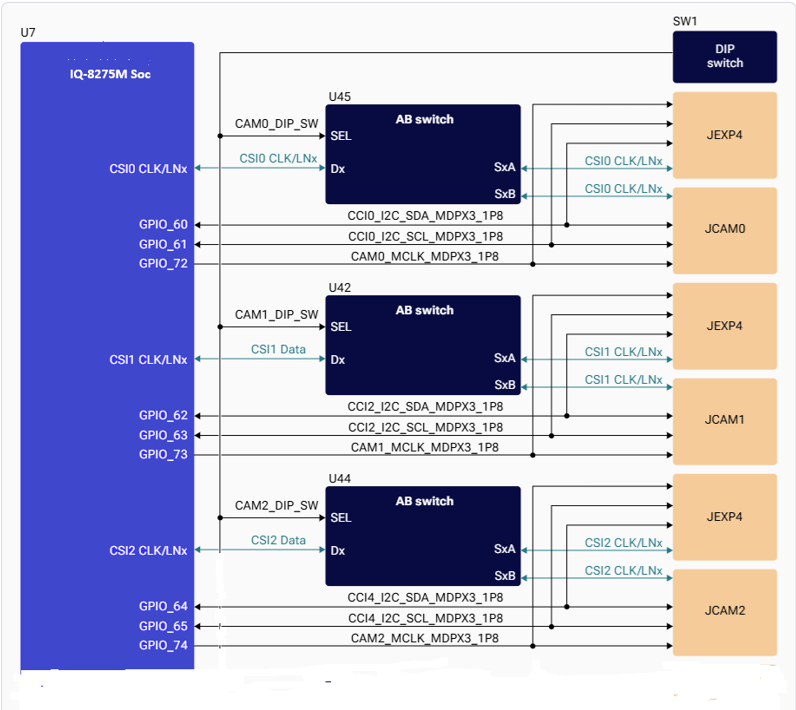
IQ8-EVK 通过三个 MIPI CSI 接口支持摄像头传感器连接,支持 C-PHY 和 D-PHY 两种模式。
## 硬件架构
### CSI 接口映射
| CSI 接口 | 模拟开关 | 摄像头连接器 | B2B 连接器 |
| ------ | ----------------- | ------ | ---------------- |
| CSI0 | U45 (TMUX646ZECR) | JCAM0 | JEXP4,引脚 111–120 |
| CSI1 | U42 (TMUX646ZECR) | JCAM1 | JEXP4,引脚 51–60 |
| CSI2 | U44 (TMUX646ZECR) | JCAM2 | JEXP4,引脚 40–49 |
 ### DIP 开关配置
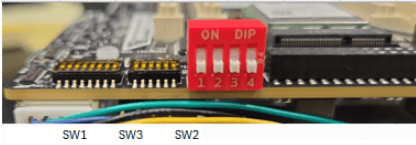 | 开关 | ON | OFF(默认) |
| ----- | ----------------------- | --------- |
| SW1-5 | CSI0 → GMSL Mezzanine 板 | CSI0 → 主板 |
| SW1-6 | CSI1 → GMSL Mezzanine 板 | CSI1 → 主板 |
| SW1-7 | CSI2 → GMSL Mezzanine 板 | CSI2 → 主板 |
## 支持的 MIPI CSI 摄像头传感器
### ov9282 摄像头传感器
| 开关 | ON | OFF(默认) |
| ----- | ----------------------- | --------- |
| SW1-5 | CSI0 → GMSL Mezzanine 板 | CSI0 → 主板 |
| SW1-6 | CSI1 → GMSL Mezzanine 板 | CSI1 → 主板 |
| SW1-7 | CSI2 → GMSL Mezzanine 板 | CSI2 → 主板 |
## 支持的 MIPI CSI 摄像头传感器
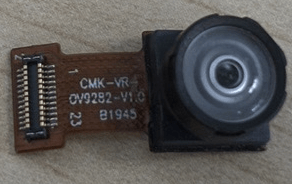
### ov9282 摄像头传感器
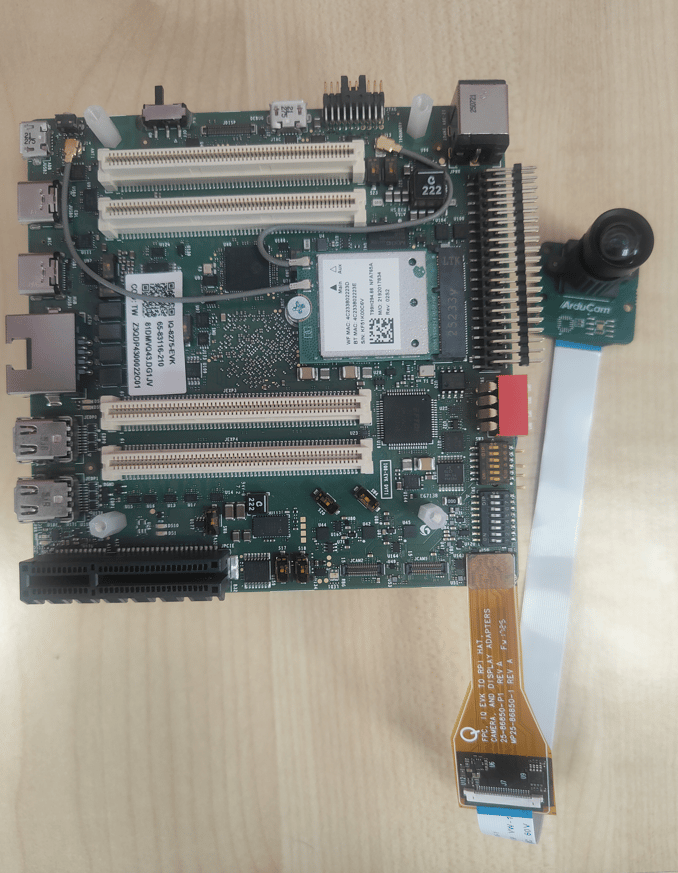
 ### Arducam imx577 摄像头传感器
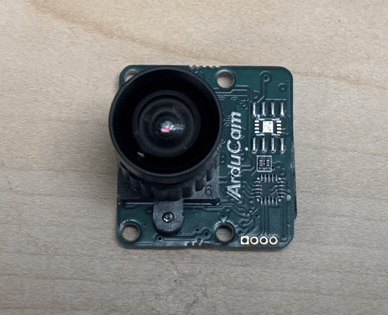 **Arducam 传感器需要额外的转换板(Arducam 22 针转 Qualcomm 30 针 CSI 适配器)**
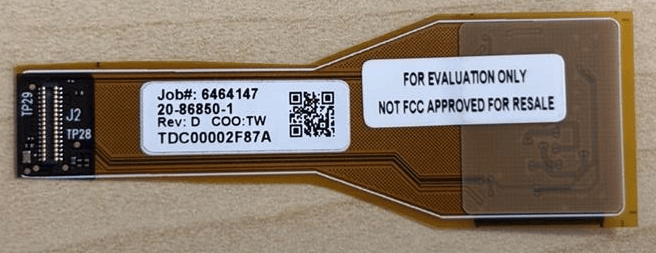
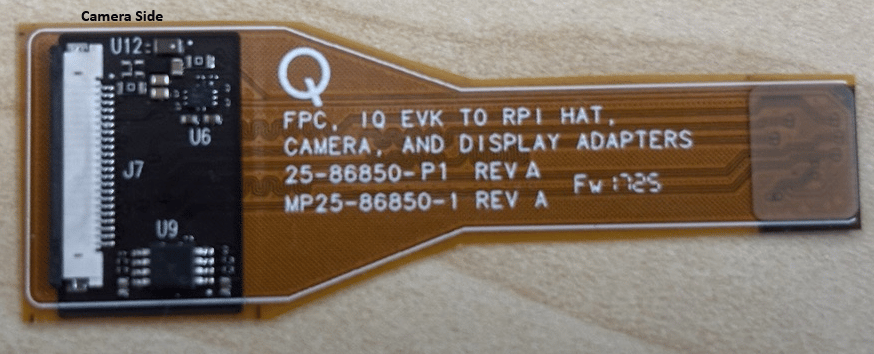 **Arducam imx577 传感器 + 22 针排线 + 转换板**
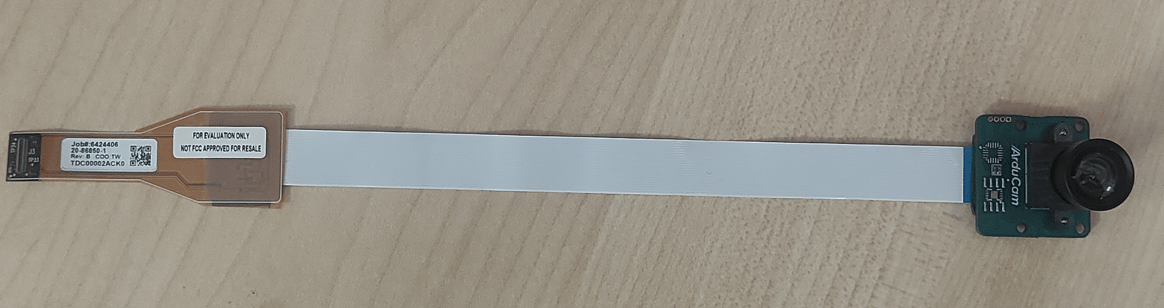
 ### Arducam imx577 摄像头传感器与 iq8275 的连接
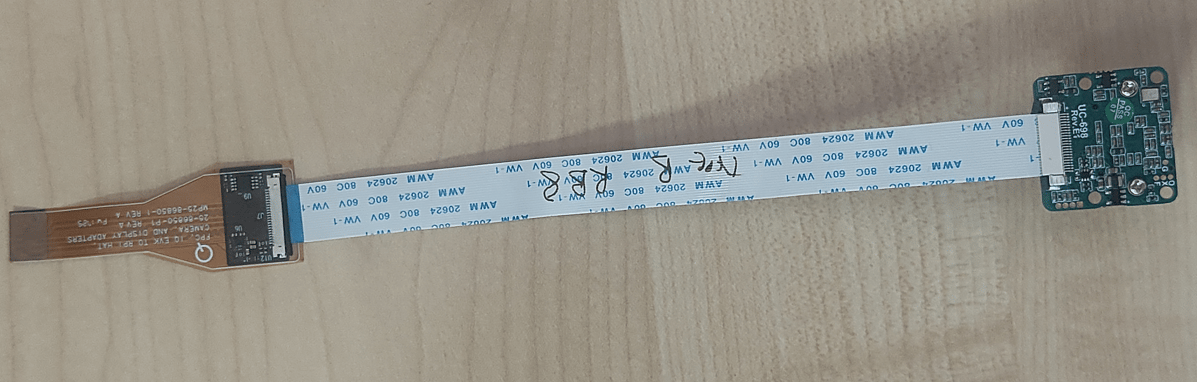
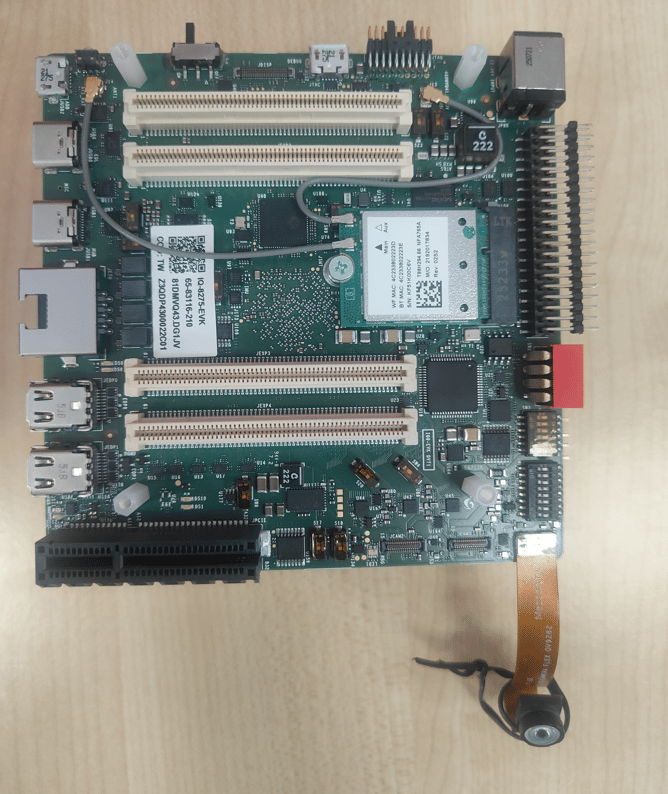
 ### ov9282 摄像头传感器与 iq8275 的连接
 ## 支持的分辨率
| 分辨率 | 宽高比 | IMX577 | OV9282 |
| ----------- | ---- | ------ | ------ |
| 4000 × 3000 | 4:3 | 是 | 否 |
| 3840 × 2160 | 16:9 | 是 | 否 |
| 1920 × 1080 | 16:9 | 是 | 否 |
| 1280 × 720 | 16:9 | 是 | 是 |
| 1024 × 768 | 4:3 | 是 | 是 |
| 640 × 480 | 4:3 | 是 | 是 |
| 320 × 240 | 4:3 | 是 | 是 |
* IQ-8275 不支持 SHDR、LDC 和 EIS 等高级功能。
* 没有硬件 JPEG 编码器 — 快照使用在 CPU 上运行的软件编码器。
## 摄像头串流
### 单摄像头串流
```bash theme={null}
gst-launch-1.0 -e qtiqmmfsrc name=camsrc camera=0 ! \
'video/x-raw,format=NV12,width=1280,height=720,framerate=30/1' ! fakesink
```
上述命令以 720p、30 FPS 的配置启动摄像头。
来自摄像头传感器的帧会被 fakesink 丢弃。
如果 gst 流水线状态变为如下所示的"PLAYING",则表明摄像头正在运行。
由于此命令将摄像头帧转储到 fakesink,设备上不会保存任何内容。
如果流水线状态变为 `PLAYING`,则摄像头正在运行。按 `Ctrl+C` 停止。
```bash theme={null}
gbm_create_device(187): Info: backend name is: msm_drm
Setting pipeline to PAUSED ...
Pipeline is live and does not need PREROLL ...
Setting pipeline to PLAYING ...
New clock: GstSystemClock
```
### 视频编码
```bash theme={null}
gst-launch-1.0 -e qtiqmmfsrc name=camsrc camera=0 ! \
video/x-raw,format=NV12,width=1280,height=720,framerate=30/1,\
interlace-mode=progressive,colorimetry=bt601 ! \
v4l2h264enc capture-io-mode=4 output-io-mode=5 \
extra-controls="controls,video_bitrate=6000000,video_bitrate_mode=0;" ! \
h264parse ! mp4mux ! filesink location=/home/ubuntu/mux_avc.mp4
```
### 目标检测流水线
首先下载所需的模型和资源:
```bash theme={null}
cd /home/ubuntu
curl -L -O https://raw.githubusercontent.com/quic/sample-apps-for-qualcomm-linux/refs/heads/main/qualcomm-linux/scripts/download_artifacts.sh
sudo chmod +x download_artifacts.sh && sudo ./download_artifacts.sh
```
## 使用离线 IFE 的多摄像头
IQ-8275 具有两个用于实时 Bayer 转 YUV 处理的 IFE。**离线 IFE(Offline IFE)** 功能允许单个 IFE 以离线模式处理两路摄像头,从而实现全部四路摄像头的并发串流。
## 支持的分辨率
| 分辨率 | 宽高比 | IMX577 | OV9282 |
| ----------- | ---- | ------ | ------ |
| 4000 × 3000 | 4:3 | 是 | 否 |
| 3840 × 2160 | 16:9 | 是 | 否 |
| 1920 × 1080 | 16:9 | 是 | 否 |
| 1280 × 720 | 16:9 | 是 | 是 |
| 1024 × 768 | 4:3 | 是 | 是 |
| 640 × 480 | 4:3 | 是 | 是 |
| 320 × 240 | 4:3 | 是 | 是 |
* IQ-8275 不支持 SHDR、LDC 和 EIS 等高级功能。
* 没有硬件 JPEG 编码器 — 快照使用在 CPU 上运行的软件编码器。
## 摄像头串流
### 单摄像头串流
```bash theme={null}
gst-launch-1.0 -e qtiqmmfsrc name=camsrc camera=0 ! \
'video/x-raw,format=NV12,width=1280,height=720,framerate=30/1' ! fakesink
```
上述命令以 720p、30 FPS 的配置启动摄像头。
来自摄像头传感器的帧会被 fakesink 丢弃。
如果 gst 流水线状态变为如下所示的"PLAYING",则表明摄像头正在运行。
由于此命令将摄像头帧转储到 fakesink,设备上不会保存任何内容。
如果流水线状态变为 `PLAYING`,则摄像头正在运行。按 `Ctrl+C` 停止。
```bash theme={null}
gbm_create_device(187): Info: backend name is: msm_drm
Setting pipeline to PAUSED ...
Pipeline is live and does not need PREROLL ...
Setting pipeline to PLAYING ...
New clock: GstSystemClock
```
### 视频编码
```bash theme={null}
gst-launch-1.0 -e qtiqmmfsrc name=camsrc camera=0 ! \
video/x-raw,format=NV12,width=1280,height=720,framerate=30/1,\
interlace-mode=progressive,colorimetry=bt601 ! \
v4l2h264enc capture-io-mode=4 output-io-mode=5 \
extra-controls="controls,video_bitrate=6000000,video_bitrate_mode=0;" ! \
h264parse ! mp4mux ! filesink location=/home/ubuntu/mux_avc.mp4
```
### 目标检测流水线
首先下载所需的模型和资源:
```bash theme={null}
cd /home/ubuntu
curl -L -O https://raw.githubusercontent.com/quic/sample-apps-for-qualcomm-linux/refs/heads/main/qualcomm-linux/scripts/download_artifacts.sh
sudo chmod +x download_artifacts.sh && sudo ./download_artifacts.sh
```
## 使用离线 IFE 的多摄像头
IQ-8275 具有两个用于实时 Bayer 转 YUV 处理的 IFE。**离线 IFE(Offline IFE)** 功能允许单个 IFE 以离线模式处理两路摄像头,从而实现全部四路摄像头的并发串流。
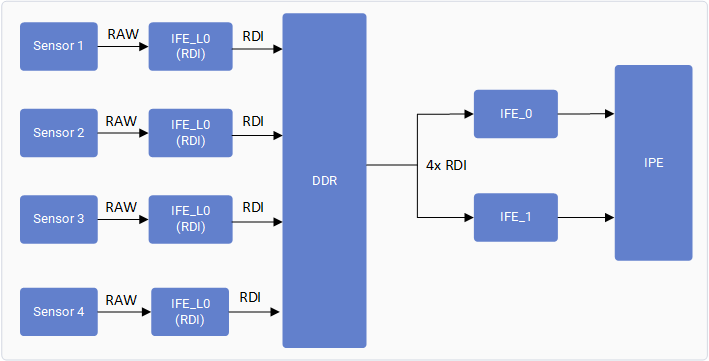 使用实时 IFE 时,最多两路摄像头可以并发工作。使用离线 IFE 功能,全部四路摄像头都可以并发工作。
## 故障排除
```bash theme={null}
systemctl restart cam-server
```
```bash theme={null}
gst-launch-1.0 -e qtiqmmfsrc name=camsrc camera=0 ! \
video/x-raw,format=NV12,width=1280,height=720,framerate=30/1 ! fakesink
```
```bash theme={null}
journalctl -f > /home/ubuntu/log.txt
```
查找:`CAM_INFO: CAM-SENSOR: Probe success, slot:0, ...`
如果未出现探测成功的信息,请检查排线连接或摄像头模块。
```bash theme={null}
sudo su
echo 3 > /sys/kernel/debug/camera/ife/ife_csid_debug
dmesg -w > /home/ubuntu/dmesg.txt
```
## 资源
| 主题 | 链接 |
| ------------ | --------------------------------------------------------------------------------------------------------------------------------------- |
| 摄像头架构 | [Camera Architecture](https://docs.qualcomm.com/doc/80-70023-17A/topic/camera-architecture.html) |
| 摄像头传感器驱动开发 | [Camera Sensor Driver Development](https://docs.qualcomm.com/doc/80-70023-17A/topic/camera-sensor-driver-development.html) |
| 自定义摄像头用例和流水线 | [Customize Camera Use Case and Pipeline](https://docs.qualcomm.com/doc/80-70023-17A/topic/customize-camera-use-case-and-pipelines.html) |
使用实时 IFE 时,最多两路摄像头可以并发工作。使用离线 IFE 功能,全部四路摄像头都可以并发工作。
## 故障排除
```bash theme={null}
systemctl restart cam-server
```
```bash theme={null}
gst-launch-1.0 -e qtiqmmfsrc name=camsrc camera=0 ! \
video/x-raw,format=NV12,width=1280,height=720,framerate=30/1 ! fakesink
```
```bash theme={null}
journalctl -f > /home/ubuntu/log.txt
```
查找:`CAM_INFO: CAM-SENSOR: Probe success, slot:0, ...`
如果未出现探测成功的信息,请检查排线连接或摄像头模块。
```bash theme={null}
sudo su
echo 3 > /sys/kernel/debug/camera/ife/ife_csid_debug
dmesg -w > /home/ubuntu/dmesg.txt
```
## 资源
| 主题 | 链接 |
| ------------ | --------------------------------------------------------------------------------------------------------------------------------------- |
| 摄像头架构 | [Camera Architecture](https://docs.qualcomm.com/doc/80-70023-17A/topic/camera-architecture.html) |
| 摄像头传感器驱动开发 | [Camera Sensor Driver Development](https://docs.qualcomm.com/doc/80-70023-17A/topic/camera-sensor-driver-development.html) |
| 自定义摄像头用例和流水线 | [Customize Camera Use Case and Pipeline](https://docs.qualcomm.com/doc/80-70023-17A/topic/customize-camera-use-case-and-pipelines.html) |