> ## Documentation Index
> Fetch the complete documentation index at: https://dragonwingdocs.qualcomm.com/llms.txt
> Use this file to discover all available pages before exploring further.
# 40 针低速连接器
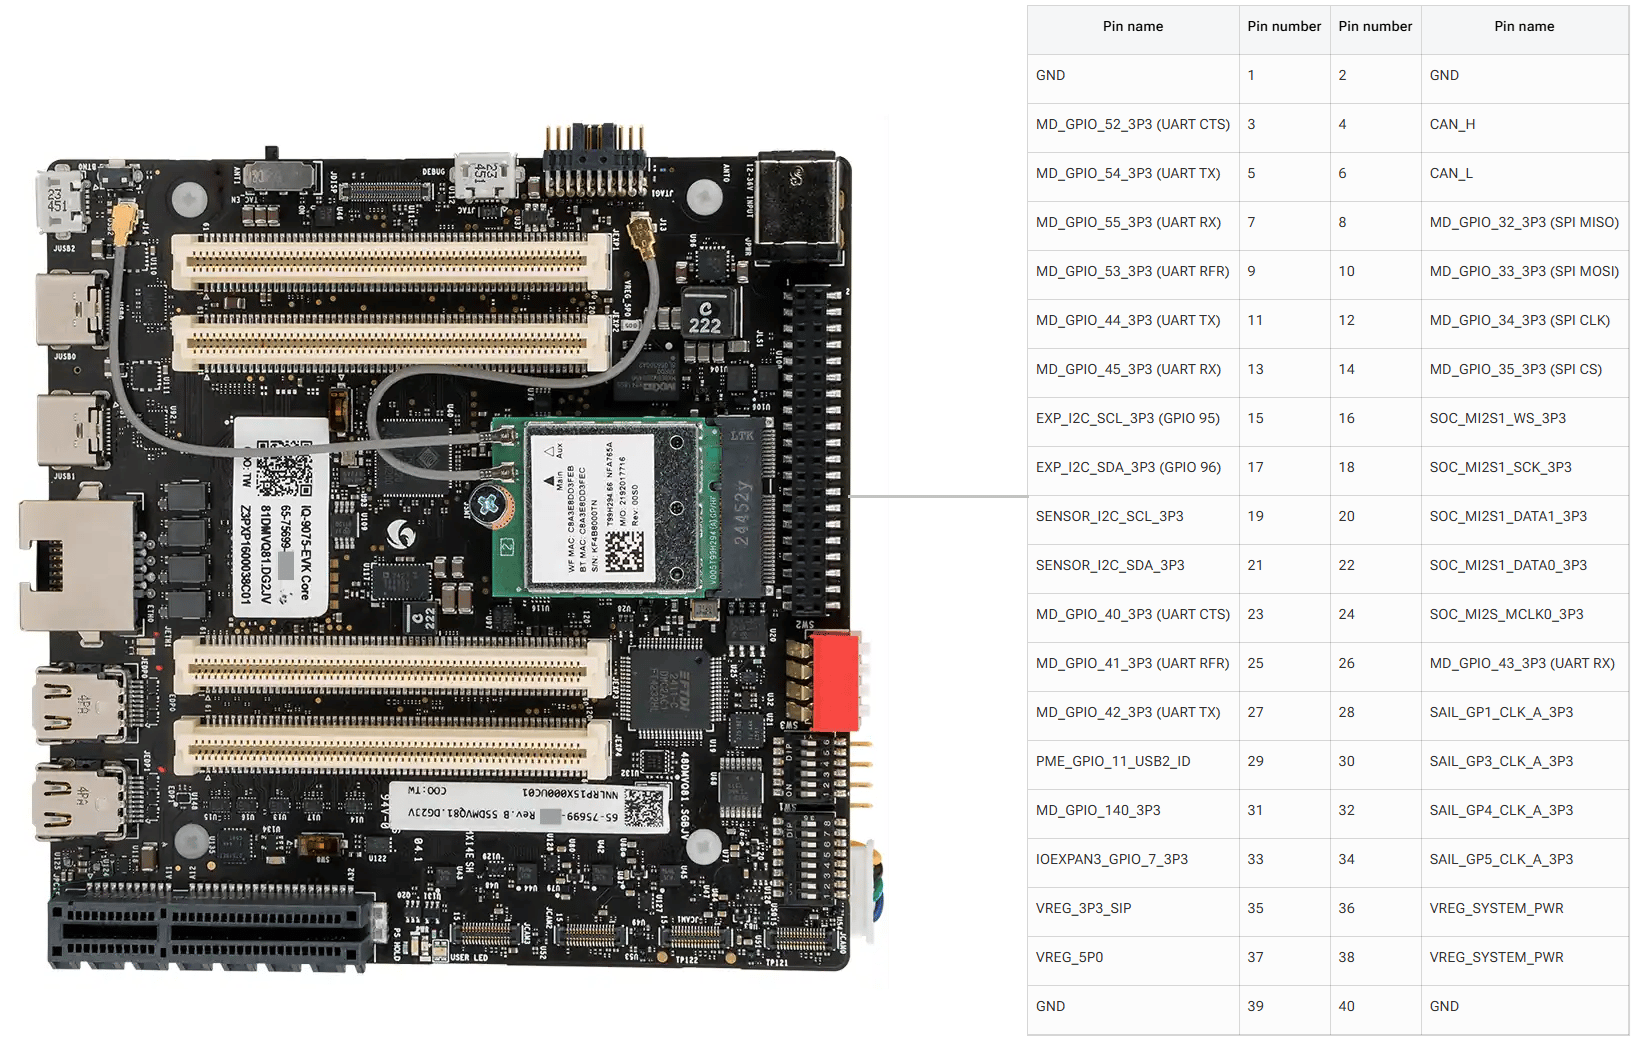
Dragonwing IQ8-EVK 包含一个低速连接器(JLS1),可访问各种 GPIO、CAN、QUP 和其他接口。
## 引脚定义
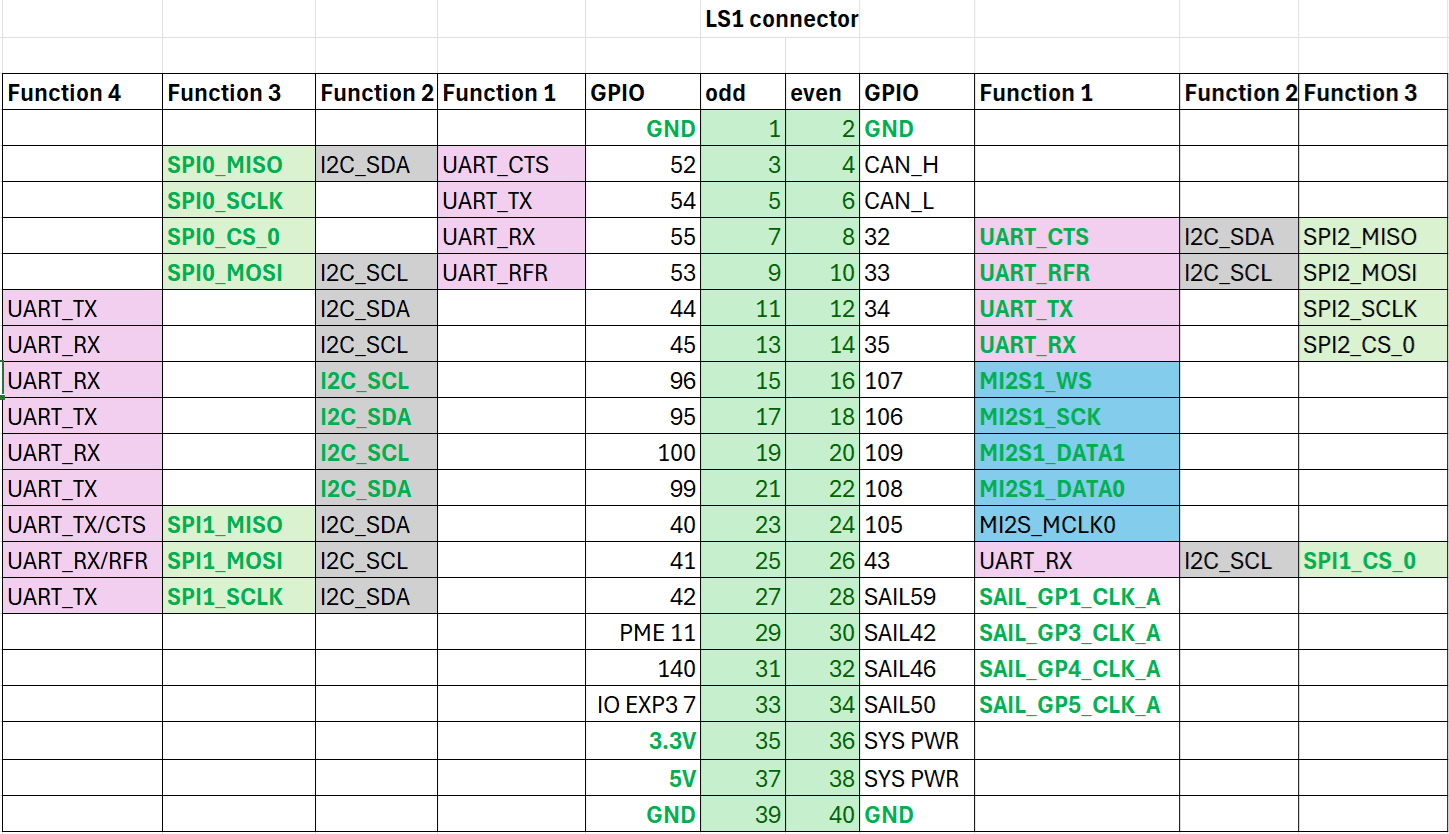
下图展示了 IQ-8275 EVK 40 针 LS 连接器的默认功能。
 ## GPIO
以下命令需要 root 权限。使用 `sudo su` 切换到 root 用户。
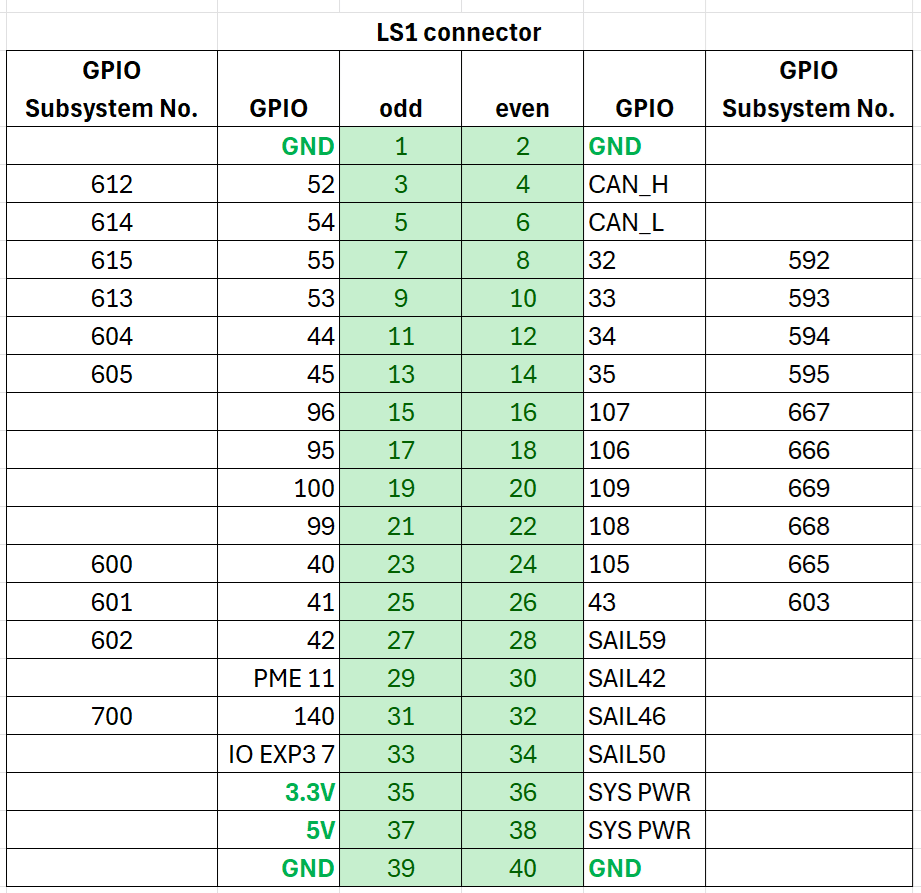
### 确定 GPIO 子系统编号
运行以下命令并查找 `platform/f000000.pinctrl`(gpiochip4)以确定 GPIO 基数。对于 IQ-8275,基数为 **560**。
```bash theme={null}
cat /sys/kernel/debug/gpio
```
**示例:** 对于 LS 连接器引脚 5,GPIO 编号为 54。GPIO 子系统编号为:560 + 54 = **614**。
## GPIO
以下命令需要 root 权限。使用 `sudo su` 切换到 root 用户。
### 确定 GPIO 子系统编号
运行以下命令并查找 `platform/f000000.pinctrl`(gpiochip4)以确定 GPIO 基数。对于 IQ-8275,基数为 **560**。
```bash theme={null}
cat /sys/kernel/debug/gpio
```
**示例:** 对于 LS 连接器引脚 5,GPIO 编号为 54。GPIO 子系统编号为:560 + 54 = **614**。
 ### 通过 sysfs 控制 GPIO
```bash theme={null}
cd /sys/class/gpio
echo 614 > export
```
```bash theme={null}
cd gpio614
echo out > direction
echo 1 > value
```
| 属性 | 取值 |
| ----------- | -------------------------------- |
| `direction` | `in`(输入)、`out`(输出) |
| `value` | `0`(低电平)、`1`(高电平) |
| `edge` | `rising`、`falling`、`both`、`none` |
```bash theme={null}
cd ..
echo 614 > unexport
```
### GPIO 代码示例
将引脚 5 设置为输出,引脚 7 设置为输入,并循环检测引脚 7 的电平。
```bash theme={null}
gcc gpio.c -o gpio
```
使用杜邦线将引脚 5 和引脚 7 短接。
注意引脚顺序。请勿短接电源和接地引脚 — 这可能损坏板卡。
```bash theme={null}
./gpio
```
安装 `python3-periphery`:
```bash theme={null}
apt install python3-periphery
```
使用杜邦线将引脚 5 和引脚 7 短接。
注意引脚顺序。请勿短接电源和接地引脚 — 这可能损坏板卡。
```bash theme={null}
python3 gpio.py
```
## UART
引脚 5 和 7 默认配置为 UART(GPIO 线 54 和 55,映射到 `uart12 = qup1_se5 (0xa98000)`)。
按照[修改串行引擎节点](./peripheral_interface_overview#modify-serial-engine-node)的步骤启用 UART 接口。启用后,设备节点出现在 `/dev/ttyHS3`。
使用杜邦线将引脚 5 和引脚 7 短接。
请勿短接电源和接地引脚。
```bash theme={null}
sudo stty -F /dev/ttyHS3 ispeed 115200 ospeed 115200
sudo stty -F /dev/ttyHS3 115200 -echo -icanon -isig -iexten -icrnl -ixon -opost
```
**终端 1(RX):** `sudo cat /dev/ttyHS3`
**终端 2(TX):** `echo "hello world!" > /dev/ttyHS3`
## I2C
引脚 8 和 10 默认配置为 I2C(GPIO 线 32 和 33,映射到 `i2c4 = qup0_se4 (0x990000)`)。
按照[修改串行引擎节点](./peripheral_interface_overview#modify-serial-engine-node)的步骤启用 I2C 接口。
```bash theme={null}
ls /dev/i2c*
sudo apt install -y i2c-tools
i2cdetect -l
i2cdetect -a -y -r 20
```
## SPI
引脚 11 和 13 默认配置为 SPI(GPIO 线 44 和 45,映射到 `spi10 = qup1_se3 (0xa8c000)`)。
按照[修改串行引擎节点](./peripheral_interface_overview#modify-serial-engine-node)的步骤启用 SPI 接口。
```bash theme={null}
sudo apt install python3-spidev
```
### 通过 sysfs 控制 GPIO
```bash theme={null}
cd /sys/class/gpio
echo 614 > export
```
```bash theme={null}
cd gpio614
echo out > direction
echo 1 > value
```
| 属性 | 取值 |
| ----------- | -------------------------------- |
| `direction` | `in`(输入)、`out`(输出) |
| `value` | `0`(低电平)、`1`(高电平) |
| `edge` | `rising`、`falling`、`both`、`none` |
```bash theme={null}
cd ..
echo 614 > unexport
```
### GPIO 代码示例
将引脚 5 设置为输出,引脚 7 设置为输入,并循环检测引脚 7 的电平。
```bash theme={null}
gcc gpio.c -o gpio
```
使用杜邦线将引脚 5 和引脚 7 短接。
注意引脚顺序。请勿短接电源和接地引脚 — 这可能损坏板卡。
```bash theme={null}
./gpio
```
安装 `python3-periphery`:
```bash theme={null}
apt install python3-periphery
```
使用杜邦线将引脚 5 和引脚 7 短接。
注意引脚顺序。请勿短接电源和接地引脚 — 这可能损坏板卡。
```bash theme={null}
python3 gpio.py
```
## UART
引脚 5 和 7 默认配置为 UART(GPIO 线 54 和 55,映射到 `uart12 = qup1_se5 (0xa98000)`)。
按照[修改串行引擎节点](./peripheral_interface_overview#modify-serial-engine-node)的步骤启用 UART 接口。启用后,设备节点出现在 `/dev/ttyHS3`。
使用杜邦线将引脚 5 和引脚 7 短接。
请勿短接电源和接地引脚。
```bash theme={null}
sudo stty -F /dev/ttyHS3 ispeed 115200 ospeed 115200
sudo stty -F /dev/ttyHS3 115200 -echo -icanon -isig -iexten -icrnl -ixon -opost
```
**终端 1(RX):** `sudo cat /dev/ttyHS3`
**终端 2(TX):** `echo "hello world!" > /dev/ttyHS3`
## I2C
引脚 8 和 10 默认配置为 I2C(GPIO 线 32 和 33,映射到 `i2c4 = qup0_se4 (0x990000)`)。
按照[修改串行引擎节点](./peripheral_interface_overview#modify-serial-engine-node)的步骤启用 I2C 接口。
```bash theme={null}
ls /dev/i2c*
sudo apt install -y i2c-tools
i2cdetect -l
i2cdetect -a -y -r 20
```
## SPI
引脚 11 和 13 默认配置为 SPI(GPIO 线 44 和 45,映射到 `spi10 = qup1_se3 (0xa8c000)`)。
按照[修改串行引擎节点](./peripheral_interface_overview#modify-serial-engine-node)的步骤启用 SPI 接口。
```bash theme={null}
sudo apt install python3-spidev
```