> ## Documentation Index
> Fetch the complete documentation index at: https://dragonwingdocs.qualcomm.com/llms.txt
> Use this file to discover all available pages before exploring further.
# 在 Dragonwing IQ-9075 上部署 NVIDIA Nemotron Nano
> 使用 AIMET W4A16 对 NVIDIA Llama-3.1-Nemotron-Nano-8B-v1 进行量化,在 Qualcomm AI Hub 中编译,并通过 Genie/QnnHtp 在 IQ-9075 EVK 上运行。
**代码仓库:** [github.com/eivholt/qai-nemotron](https://github.com/eivholt/qai-nemotron)\
**目标设备:** [Qualcomm Dragonwing IQ-9075 EVK / QCS9075 / Hexagon v73](https://www.qualcomm.com/developer/hardware/qualcomm-iq-9075-evaluation-kit-evk)。硬件由 Qualcomm 慷慨赞助。\
**模型:** [nvidia/Llama-3.1-Nemotron-Nano-8B-v1](https://huggingface.co/nvidia/Llama-3.1-Nemotron-Nano-8B-v1)\
**运行时结果:** 在 EVK 上首个 token 时间 183 ms,生成速度 10.03 tokens/s
部署在边缘侧的语言模型正处于成为传统控制流编程有用替代方案的临界点。虽然令人兴奋,但本地模型的选择可能很棘手,这与大型前沿模型形成鲜明对比。较大的模型是更宽容的多面手,而可部署到边缘的小模型则需要精心挑选。官方模型基准测试和排行榜可以让你大致了解某个模型擅长什么,但它们往往掩盖了实际使用中的怪癖或局限。评估一个模型唯一可靠的方法,就是把它跑在终端设备上并运行一些有代表性的测试。
## 本教程实现的内容
在本教程中,我将分享我的完整历程:拿到 NVIDIA 的 BF16 `Llama-3.1-Nemotron-Nano-8B-v1` 检查点,将其量化为 Qualcomm 的 W4A16 部署格式,在 Qualcomm AI Hub Workbench 中为 QCS9075 编译,在物理 IQ-9075 EVK 上安装匹配的 QAIRT 运行时,并通过 Genie 在 Hexagon HTP/NPU 上运行该模型。
我的朋友创造了一个说法:"就像爵士音乐会上的掌声"。正如不听爵士乐的人可能会对 23 分钟爵士即兴演奏中间突然爆发的欢呼感到困惑一样,这项技术练习的成就可能并不显而易见,也很容易被误解。
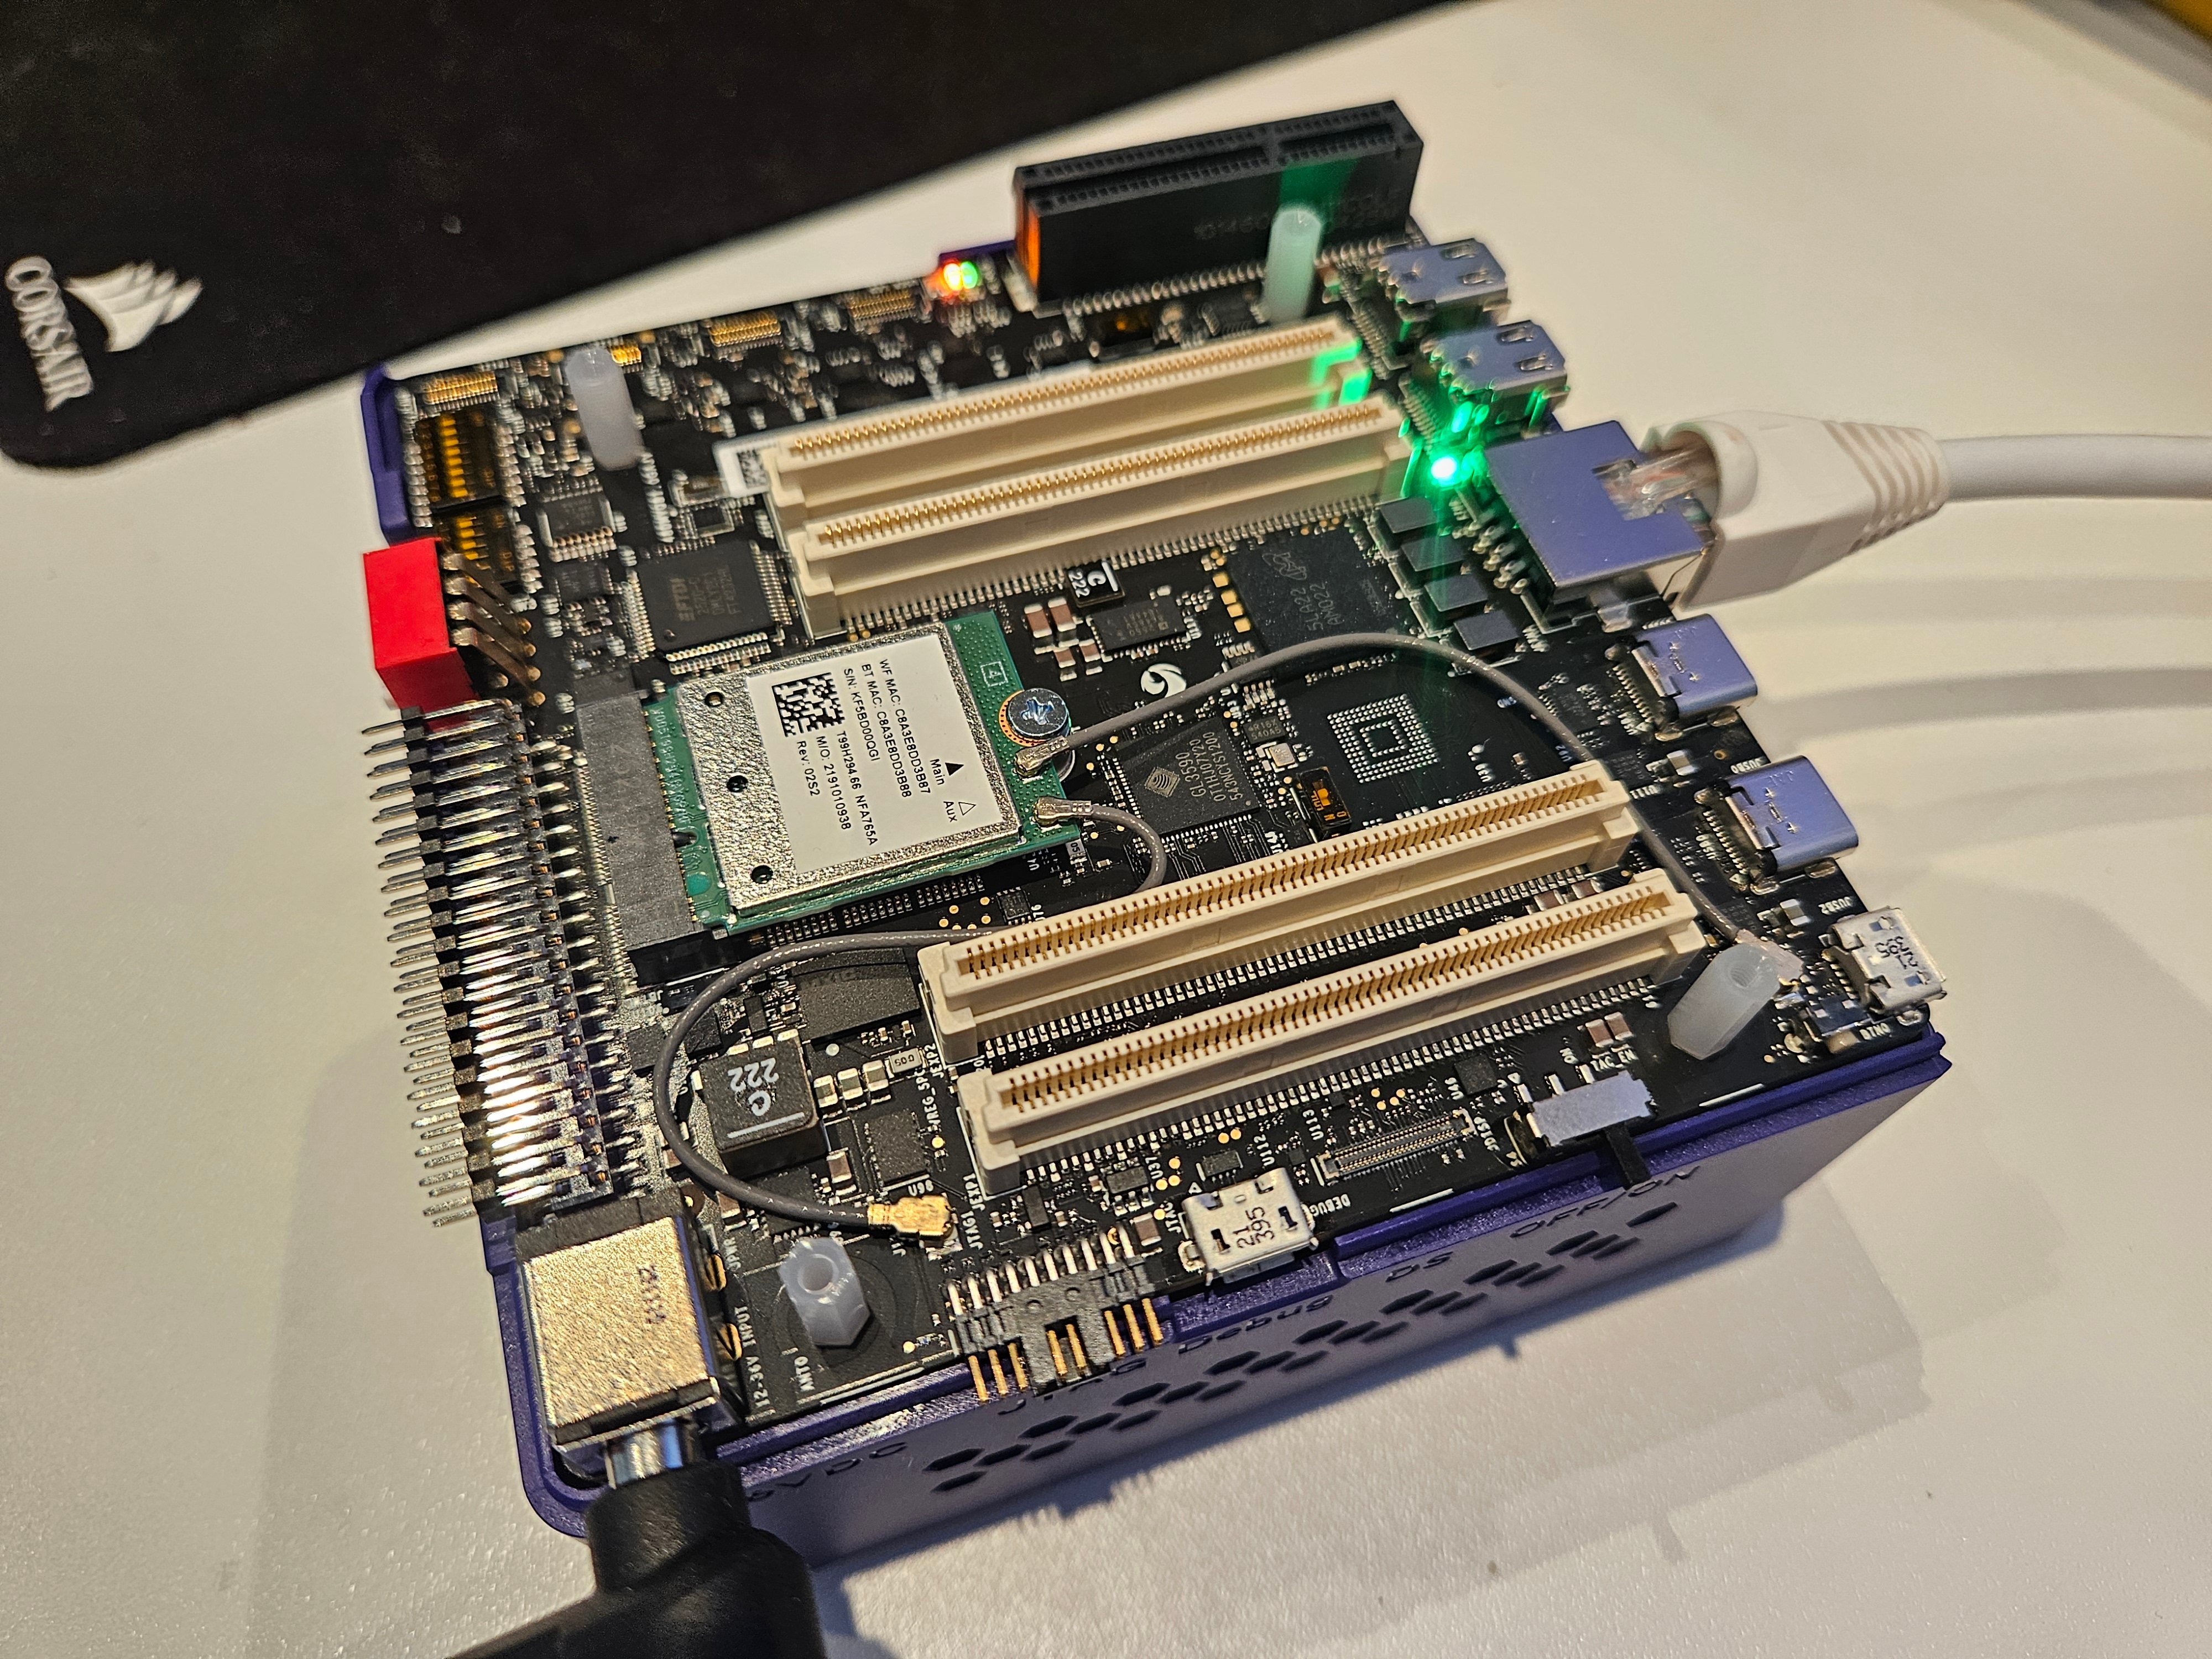 这个结果并不是一个仅用 CPU 的 GGUF 实验。最终的部署包使用 `QnnHtp` 后端和物理 EVK 的 Hexagon v73 DSP。在经过验证的运行中,模型以 10.03 tokens/s 的速度生成连贯输出,基本与 Qualcomm 公布的原版 Llama 3.1 8B 在同一平台上的性能持平。
### 一个重要的架构澄清
这个特定的 Nemotron 模型**不是**新的 Mamba 或混合专家(mixture-of-experts)网络。NVIDIA 将其定义为一个稠密的仅解码器 Transformer,网络架构与 Llama 3.1 8B Instruct 相同。它的差异化在于 NVIDIA 的后训练:推理开/关行为、工具调用、RAG、编码、指令遵循、偏好优化和强化学习。
正是这种架构兼容性,使得 Qualcomm 现有的 Llama 3.1 8B 实现可以用作部署脚手架。因此,本次成就是:
> 让 NVIDIA 针对 Nemotron 的后训练权重运行在 Qualcomm 优化过的 Llama 3.1 执行路径上,而不是向 QAIRT 添加新的 Mamba/MoE 算子栈。
### Nemotron Nano 在 Qualcomm Dragonwing IQ-9075 EVK 上的定位
正如后续教程中详细介绍的那样,如果目标是简单的 BFCL 风格的智能体工具使用——选择正确的工具、填写参数、在不需要工具时选择不调用、以及发起简单的并行调用——那么为 IQ9075 量化并导出 Nemotron Nano 是很合适的。在修复了 Nemotron 原生解析器之后,它在我的小型 EVK BFCL 风格测试集上的表现超过了已量化的 QC AI Hub Llama 3.1 8B 模型。像 Ministral 3B Q4 这样的模型在这类简单任务上更弱,但在复杂的多步智能体工作流上仍然强得多。
> 对于任何给定应用的模型选择,魔鬼都在细节中。模型卡中的聚合基准测试结果可能显示模型的优势,但为每个应用专门构建的基准测试是必不可少的!
***
## 端到端流水线
这个结果并不是一个仅用 CPU 的 GGUF 实验。最终的部署包使用 `QnnHtp` 后端和物理 EVK 的 Hexagon v73 DSP。在经过验证的运行中,模型以 10.03 tokens/s 的速度生成连贯输出,基本与 Qualcomm 公布的原版 Llama 3.1 8B 在同一平台上的性能持平。
### 一个重要的架构澄清
这个特定的 Nemotron 模型**不是**新的 Mamba 或混合专家(mixture-of-experts)网络。NVIDIA 将其定义为一个稠密的仅解码器 Transformer,网络架构与 Llama 3.1 8B Instruct 相同。它的差异化在于 NVIDIA 的后训练:推理开/关行为、工具调用、RAG、编码、指令遵循、偏好优化和强化学习。
正是这种架构兼容性,使得 Qualcomm 现有的 Llama 3.1 8B 实现可以用作部署脚手架。因此,本次成就是:
> 让 NVIDIA 针对 Nemotron 的后训练权重运行在 Qualcomm 优化过的 Llama 3.1 执行路径上,而不是向 QAIRT 添加新的 Mamba/MoE 算子栈。
### Nemotron Nano 在 Qualcomm Dragonwing IQ-9075 EVK 上的定位
正如后续教程中详细介绍的那样,如果目标是简单的 BFCL 风格的智能体工具使用——选择正确的工具、填写参数、在不需要工具时选择不调用、以及发起简单的并行调用——那么为 IQ9075 量化并导出 Nemotron Nano 是很合适的。在修复了 Nemotron 原生解析器之后,它在我的小型 EVK BFCL 风格测试集上的表现超过了已量化的 QC AI Hub Llama 3.1 8B 模型。像 Ministral 3B Q4 这样的模型在这类简单任务上更弱,但在复杂的多步智能体工作流上仍然强得多。
> 对于任何给定应用的模型选择,魔鬼都在细节中。模型卡中的聚合基准测试结果可能显示模型的优势,但为每个应用专门构建的基准测试是必不可少的!
***
## 端到端流水线
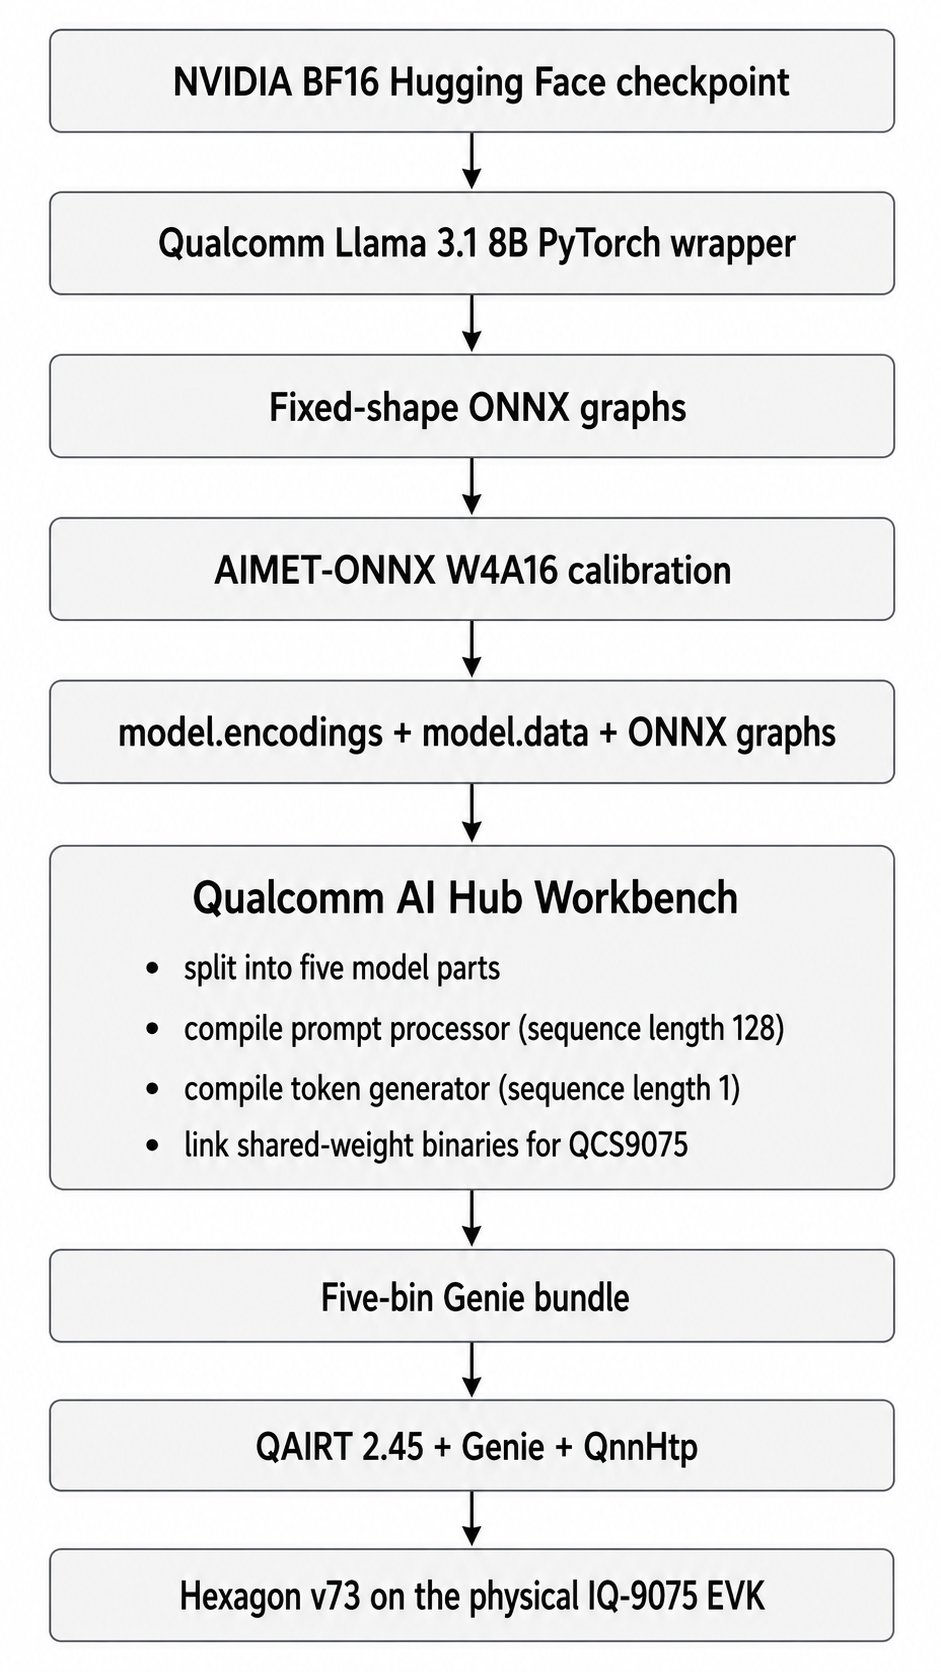 ```text theme={null}
NVIDIA BF16 Hugging Face checkpoint ->
Qualcomm Llama 3.1 8B PyTorch wrapper ->
Fixed-shape ONNX graphs ->
AIMET-ONNX W4A16 calibration ->
model.encodings + model.data + ONNX graphs ->
Qualcomm AI Hub Workbench
- split into five model parts
- compile prompt processor (sequence length 128)
- compile token generator (sequence length 1)
- link shared-weight binaries for QCS9075 ->
Five-bin Genie bundle ->
QAIRT 2.45 + Genie + QnnHtp ->
Hexagon v73 on the physical IQ-9075 EVK
```
### 技术概念
**W4A16** 表示大多数权重用 4 位整数表示,而激活值保持 16 位。Qualcomm 还在需要的地方将特定张量(包括语言模型头和 KV 缓存接口)保持在更高精度。
**ONNX** 是 Open Neural Network Exchange 的缩写,是一种可移植的模型格式,用于以独立于训练框架的方式表示机器学习模型。在 PyTorch、TensorFlow 或其他框架中训练的模型可以导出为 ONNX,然后由不同的推理引擎和硬件工具链进行优化、量化、编译或运行。在实践中,ONNX 充当交换层:它以标准化方式描述模型计算图、算子、张量形状、权重和元数据,使部署工具可以使用模型,而无需直接依赖原始训练框架。
**AIMET** 是 AI Model Efficiency Toolkit 的缩写,是 Qualcomm 的开源工具包,用于在部署前压缩和优化神经网络。它通常用于量化、校准和精度恢复,帮助将大型浮点模型转换为 INT8 或 W4A16 等更低精度的格式,同时尽可能保持模型质量。在 Qualcomm 部署流水线中,AIMET 通常位于模型导出(如 ONNX)和硬件编译之间,生成量化编码和校准产物,供下游 Qualcomm 工具编译,以便在目标加速器上高效推理。
**QuantSim** 是 AIMET 的量化模拟计算图。它在 ONNX 中插入量化/反量化操作,使校准能够估计缩放系数,并让主机在编译前近似模拟设备上的数值行为。
**提示处理器(prompt processor)与 token 生成器(token generator):** 提示处理器分块消费输入,在本次部署中每次调用处理 128 个 token。token 生成器在第一个输出 token 之后每次消费一个 token。两个计算图都必须正常工作;仅验证校准形状的计算图是不够的。
**KV 缓存**存储先前 token 的注意力键和值。它避免为每个生成的 token 重新计算整个提示,但其维度取决于上下文长度,因此被编译进部署计算图。
**HTP/cDSP:** Qualcomm 的 Hexagon Tensor Processor 通过计算 DSP 和 FastRPC 传输访问。应用程序使用主机侧 QNN 库、DSP 侧 skel 库、内核 FastRPC 设备和用户态守护进程。任何一层出现故障,都可能表现为一个笼统的设备创建错误。
**BFCL**
***
## 本次成功运行使用的硬件和软件
### 主机工作站
| 组件 | 经过验证的配置 |
| ---------- | ------------------------------------- |
| 主机操作系统 | Windows 主机 + WSL2 Linux |
| GPU | NVIDIA GeForce RTX 5090,计算能力 `sm_120` |
| 系统内存 | 192 GB |
| Python 环境 | Conda,Python 3.10.20 |
| 仓库位置 | WSL 原生 Linux 文件系统,而非 `/mnt/c` |
| 完整量化峰值 RSS | 174 GiB |
| 完整量化耗时 | 45 分钟 |
| 开发期间磁盘用量 | 项目目录下超过 128 GB,外加共享缓存 |
### 目标设备
| 组件 | 配置 |
| --------- | ---------------------------------------------- |
| 开发板 | Qualcomm Dragonwing IQ-9075 EVK |
| 芯片组 | QCS9075 |
| 内存 | 36 GB LPDDR5 |
| 操作系统 | EVK 上的 Ubuntu |
| 加速器 | Hexagon v73 HTP/NPU |
| QAIRT 运行时 | `2.45.0.260326`,与编译构建 `2.45.0.260326154327` 匹配 |
| 运行时可执行文件 | `genie-t2t-run` |
### 为什么这台主机的配置异常庞大
最终的 W4A16 检查点本身只是故事的一部分。在 QuantSim 创建、ONNX 导出、校准和检查点序列化期间,主机会临时持有大型计算图结构和外部张量数据。成功的 4K 上下文运行的常驻内存达到约 174 GiB。较小的工作站也许可以完成缩小规模的冒烟测试,但在完整的 `4096 / 2048 / 20` 运行中仍会失败。由于 RTX 5090(sm\_120)的兼容性问题出现了一些弯路;本教程会解决这些问题,因为这张显卡是唯一现实可得、且能胜任此任务的"发烧级"选择。
对于内存较小的主机,请使用裸机 Linux 服务器或至少 192-256 GB 系统内存的云端 A100/H100 级别机器。编译好的部署包随后可以复制回 EVK。
***
# 准备 WSL2 和存储
## 在 Linux 文件系统中工作
将项目存放在 WSL 文件系统下:
```bash theme={null}
mkdir -p ~/repos-native/qai-nemotron
cd ~/repos-native/qai-nemotron
```
Windows Subsystem for Linux(WSL2):避免在 `/mnt/c` 下进行大型 ONNX 和检查点操作。跨文件系统 I/O 更慢,而此工作流会执行数百 GB 的读写。
## 让 WSL 能看到足够的内存
最初几次失败的运行被 Linux 杀掉了,尽管 Windows 主机有 191 GB 内存。WSL2 自身有一个更低的内存上限。
如果尚不存在,请在 Windows 侧创建此文件:
```text theme={null}
C:\Users\\.wslconfig
```
超大内存工作站的示例:
```ini theme={null}
[wsl2]
memory=176GB
swap=96GB
```
然后在 PowerShell 或命令提示符中运行:
```powershell theme={null}
wsl --shutdown
```
重新打开 WSL 后,验证 Linux 能看到多少内存:
```bash theme={null}
free -h
swapon --show
grep -E 'MemTotal|SwapTotal' /proc/meminfo
```
**注意事项:** 具体数值必须为 Windows 留出足够内存。本教程中的完整运行使用了约 173.6 GiB RSS。如果你的主机无法提供这么多内存,请将量化移到服务器上进行,例如 [Lambda Cloud](https://lambda.ai/)。
## 规划磁盘用量
开始之前:
```bash theme={null}
df -h ~
```
实际建议至少留出 200 GB 可用空间。多个失败或验证用的检查点,每个都可能包含一个 30+ GB 的 `model.data` 文件、多个 ONNX 计算图、编码文件、临时归档、Hugging Face 权重、CUDA 软件包以及 pip/Conda 缓存。
***
# 创建版本对齐的主机环境
环境是本教程中最重要的可复现性细节。
我最初使用 AIMET-ONNX 2.33 和 ONNX Runtime GPU 1.22 的 Python 3.12 环境完成了量化,但部署形状的计算图输出了多语言乱码 token(™)。直接用于校准的计算图能产生正确的 token,而单独导出的 128-token 和 1-token 计算图却是错的。量化成功的提示信息并不保证检查点有效。
可用的环境尽可能与 Qualcomm 的 Llama 3.1 配方对齐,同时为 RTX 5090 保留了较新的 PyTorch 构建。
## 创建 Python 3.10 Conda 环境
```bash theme={null}
conda create -n qai-qcom310 python=3.10 pip -y
conda activate qai-qcom310
unset PYTHONPATH
export PYTHONNOUSERSITE=1
python -m pip install --upgrade pip setuptools wheel
```
验证:
```bash theme={null}
which python
python -V
```
预期结果:
```text theme={null}
/home//miniconda3/envs/qai-qcom310/bin/python
Python 3.10.x
```
## 安装兼容 Blackwell 的 PyTorch
Qualcomm 针对该模型的软件包最初固定为 PyTorch 2.4.1/CUDA 12.1。该构建能识别 RTX 5090,但缺少 `sm_120` 内核。PyTorch 警告 GPU 不兼容。
改为安装 CUDA 12.8 的 wheel:
```bash theme={null}
python -m pip install \
torch==2.7.1 \
torchvision==0.22.1 \
--index-url https://download.pytorch.org/whl/cu128
```
测试真正的 CUDA 内核,而不仅仅是设备枚举:
```bash theme={null}
python - <<'PY'
import torch
print('torch:', torch.__version__)
print('CUDA runtime:', torch.version.cuda)
print('CUDA available:', torch.cuda.is_available())
print('GPU:', torch.cuda.get_device_name(0))
print('capability:', torch.cuda.get_device_capability(0))
x = torch.randn((1024, 1024), device='cuda')
y = x @ x
torch.cuda.synchronize()
print('CUDA matmul passed:', float(y[0, 0]))
PY
```
## 安装 QAI Hub Models(不带 Llama extra)
不要在此环境中直接安装 Llama extra,因为它可能会将 PyTorch 降级到不兼容的版本。
```bash theme={null}
cat > /tmp/qai-qcom310-constraints.txt <<'EOF'
numpy==1.26.4
torch==2.7.1
torchvision==0.22.1
transformers==4.45.0
onnx==1.18.0
onnxsim==0.5.0
EOF
python -m pip install \
-c /tmp/qai-qcom310-constraints.txt \
numpy==1.26.4 \
qai-hub-models==0.56.0
python -m pip install \
-c /tmp/qai-qcom310-constraints.txt \
transformers==4.45.0 \
sentencepiece==0.2.1 \
psutil==6.1.1 \
onnx==1.18.0 \
onnxsim==0.5.0
```
## 安装 Qualcomm 的 AIMET-ONNX 2.26 wheel
```bash theme={null}
python -m pip install \
'https://github.com/quic/aimet/releases/download/2.26.0/aimet_onnx-2.26.0+cu121-cp310-cp310-manylinux_2_34_x86_64.whl'
```
该 wheel 专为 CPython 3.10 构建,这就是此环境不能使用 Python 3.12 的原因。
## 最后安装 ONNX Runtime GPU
```bash theme={null}
python -m pip uninstall -y onnxruntime onnxruntime-gpu
python -m pip install --no-deps onnxruntime-gpu==1.23.2
```
**注意事项:** `qai-hub-models` 的元数据可能会抱怨缺少普通的 `onnxruntime`。不要为了满足元数据而同时安装 CPU 和 GPU 发行版。两者都提供同一个 `onnxruntime` Python 模块,后安装的那个会悄悄替换另一个。
## 修复 AIMET 的 `libpython3.10.so.1.0` 查找问题
第一次 AIMET 2.26 运行失败并报错:
```text theme={null}
RuntimeError: Unable to run function PtrToInt64
libpython3.10.so.1.0: cannot open shared object file
```
该库存在于 Conda 环境中,但原生加载器不会搜索那个目录。
```bash theme={null}
export LD_LIBRARY_PATH="$CONDA_PREFIX/lib${LD_LIBRARY_PATH:+:$LD_LIBRARY_PATH}"
```
为此环境永久生效:
```bash theme={null}
mkdir -p "$CONDA_PREFIX/etc/conda/activate.d"
cat > "$CONDA_PREFIX/etc/conda/activate.d/qai-libpython.sh" <<'EOF'
export LD_LIBRARY_PATH="$CONDA_PREFIX/lib${LD_LIBRARY_PATH:+:$LD_LIBRARY_PATH}"
EOF
```
测试:
```bash theme={null}
python - <<'PY'
import ctypes
lib = ctypes.CDLL('libpython3.10.so.1.0', mode=ctypes.RTLD_GLOBAL)
print('Loaded:', lib._name)
PY
```
## 验证确切的环境
```bash theme={null}
python - <<'PY'
import sys
from importlib.metadata import PackageNotFoundError, version
import torch
import onnxruntime as ort
import aimet_onnx
packages = [
'qai-hub-models', 'aimet-onnx', 'onnx',
'onnxruntime-gpu', 'transformers', 'torch',
'torchvision', 'numpy'
]
print('Python:', sys.version)
for package in packages:
try:
print(f'{package:22} {version(package)}')
except PackageNotFoundError:
print(f'{package:22} not installed')
print('GPU:', torch.cuda.get_device_name(0))
print('Capability:', torch.cuda.get_device_capability(0))
print('ORT providers:', ort.get_available_providers())
print('AIMET:', aimet_onnx.__file__)
PY
```
经过验证的核心版本为:
```text theme={null}
Python 3.10.20
qai-hub-models 0.56.0
aimet-onnx 2.26.0+cu121
onnx 1.18.0
onnxruntime-gpu 1.23.2
transformers 4.45.0
torch 2.7.1+cu128
torchvision 0.22.1+cu128
```
保存环境,以备后续需要恢复:
```bash theme={null}
python -m pip freeze > qai-qcom310-successful-freeze.txt
```
***
# 在花一小时处理模型之前先验证 AIMET
## 运行一个微型 QuantSim 测试
导入成功还不够。要实际调用 AIMET 的原生 `libpymo` 路径并创建一个 QuantSim 会话:
```bash theme={null}
python - <<'PY'
import gc
import numpy as np
from onnx import TensorProto, helper, numpy_helper
from aimet_onnx.quantsim import QuantizationSimModel
input_info = helper.make_tensor_value_info('input', TensorProto.FLOAT, [1, 4])
output_info = helper.make_tensor_value_info('output', TensorProto.FLOAT, [1, 4])
weight = numpy_helper.from_array(np.eye(4, dtype=np.float32), name='weight')
node = helper.make_node('MatMul', ['input', 'weight'], ['output'])
graph = helper.make_graph([node], 'aimet_test', [input_info], [output_info], [weight])
model = helper.make_model(graph, opset_imports=[helper.make_opsetid('', 13)])
model.ir_version = 9
sim = QuantizationSimModel(
model=model,
providers=['CUDAExecutionProvider', 'CPUExecutionProvider'],
)
print('QuantSim providers:', sim.session.get_providers())
print('AIMET libpymo test passed')
del sim
gc.collect()
PY
```
预期结果:
```text theme={null}
QuantSim providers: ['CUDAExecutionProvider', 'CPUExecutionProvider']
AIMET libpymo test passed
```
如果测试本身通过且返回退出码为零,进程退出后仅与清理相关的 `__del__` 警告可以忽略。
***
# 量化 Nemotron
## 如有需要,先进行 Hugging Face 认证
接受相关模型许可证并登录:
```bash theme={null}
python -m pip install 'huggingface_hub[cli]'
hf auth login
```
## 先运行一次小规模验证量化
```bash theme={null}
cd ~/repos-native/qai-nemotron
conda activate qai-qcom310
export LD_LIBRARY_PATH="$CONDA_PREFIX/lib${LD_LIBRARY_PATH:+:$LD_LIBRARY_PATH}"
rm -rf nemotron_validation_ckpt_py310_aimet226
PYTORCH_CUDA_ALLOC_CONF=expandable_segments:True \
python -m qai_hub_models.models.llama_v3_1_8b_instruct.quantize \
--checkpoint nvidia/Llama-3.1-Nemotron-Nano-8B-v1 \
--context-length 512 \
--calibration-sequence-length 128 \
--num-samples 1 \
--output-dir nemotron_validation_ckpt_py310_aimet226
```
这仍会加载整个 8B 模型,可能需要 30-60 分钟。较小的参数值会缩小校准和计算图维度;它们并不会把模型变成小模型。
### 本次运行中非致命的警告
你可能会看到:
```text theme={null}
TracerWarning: Converting a tensor to a Python boolean...
```
```text theme={null}
The target quantizers could not be found. MatMul exception rule does not apply...
```
```text theme={null}
Token indices sequence length is longer than the specified maximum...
```
出现 WikiText 警告是因为数据集加载器在将拼接后的语料库切分为上下文窗口之前先进行分词。MatMul 消息表示某些单独的例外规则被跳过。这些警告在我成功的运行中同样出现过。
## 验证实际部署路径
不要只测试校准期间直接使用的计算图。要同时测试 128-token 提示处理器和序列长度为 1 的生成器:
```bash theme={null}
python -m qai_hub_models.models.llama_v3_1_8b_instruct.demo \
--checkpoint nemotron_validation_ckpt_py310_aimet226 \
--context-length 512 \
--sequence-length 128 \
--max-output-tokens 16 \
--seed 42 \
--prompt 'Explain gravity in one short English sentence.'
```
你应该看到类似这样的切换:
```text theme={null}
Switching from sequence_length=128 to sequence_length=1
```
切换之后,输出必须保持连贯。
### 为什么这个验证很重要
使用早先的 AIMET 2.33 / Python 3.12 软件栈时,量化打印出 `completed successfully`,且大的校准计算图能输出正确的第一个 token。然而 128-token 和 1-token 部署计算图却生成了不知所云的胡言乱语。解决办法不是增加校准样本,而是使用版本对齐的环境。
## 运行完整的 4K 上下文量化
```bash theme={null}
FULL_CKPT=nemotron_nano_w4a16_cl4096_py310_aimet226
rm -rf "$FULL_CKPT"
PYTORCH_CUDA_ALLOC_CONF=expandable_segments:True \
/usr/bin/time -v \
python -m qai_hub_models.models.llama_v3_1_8b_instruct.quantize \
--checkpoint nvidia/Llama-3.1-Nemotron-Nano-8B-v1 \
--context-length 4096 \
--calibration-sequence-length 2048 \
--num-samples 20 \
--output-dir "$FULL_CKPT" \
2>&1 | tee quantize_cl4096_aimet226.log
```
经过验证的结果:
```text theme={null}
Quantization completed successfully.
Elapsed time: 44:58.61
Maximum resident set size: 182062912 KiB
Exit status: 0
```
输出目录包含:
```text theme={null}
model.encodings
model.data
model_seqlen2048_cl4096.onnx
model_seqlen128_cl4096.onnx
model_seqlen1_cl4096.onnx
config.json
tokenizer.json
tokenizer_config.json
args.json
```
共享的 `model.data` 文件约为 32.1 GB。
## 在云端编译之前验证完整检查点
```bash theme={null}
CKPT=nemotron_nano_w4a16_cl4096_py310_aimet226
python -m qai_hub_models.models.llama_v3_1_8b_instruct.demo \
--checkpoint "$CKPT" \
--context-length 4096 \
--sequence-length 128 \
--max-output-tokens 32 \
--seed 42 \
--prompt 'Explain gravity in one short English sentence.'
```
经过验证的输出开头为:
```text theme={null}
Gravity is the force that causes things to attractively accelerate towards...
```
措辞并不完美,但输出是连贯的。这足以证明两个部署形状的计算图都能在本地正常工作。
***
# 在 Qualcomm AI Hub 中为 QCS9075 编译
## 配置 Qualcomm AI Hub Workbench
从你将用于查看任务的同一个 [Qualcomm 账户](https://workbench.aihub.qualcomm.com/account/)获取 API token:
```text theme={null}
NVIDIA BF16 Hugging Face checkpoint ->
Qualcomm Llama 3.1 8B PyTorch wrapper ->
Fixed-shape ONNX graphs ->
AIMET-ONNX W4A16 calibration ->
model.encodings + model.data + ONNX graphs ->
Qualcomm AI Hub Workbench
- split into five model parts
- compile prompt processor (sequence length 128)
- compile token generator (sequence length 1)
- link shared-weight binaries for QCS9075 ->
Five-bin Genie bundle ->
QAIRT 2.45 + Genie + QnnHtp ->
Hexagon v73 on the physical IQ-9075 EVK
```
### 技术概念
**W4A16** 表示大多数权重用 4 位整数表示,而激活值保持 16 位。Qualcomm 还在需要的地方将特定张量(包括语言模型头和 KV 缓存接口)保持在更高精度。
**ONNX** 是 Open Neural Network Exchange 的缩写,是一种可移植的模型格式,用于以独立于训练框架的方式表示机器学习模型。在 PyTorch、TensorFlow 或其他框架中训练的模型可以导出为 ONNX,然后由不同的推理引擎和硬件工具链进行优化、量化、编译或运行。在实践中,ONNX 充当交换层:它以标准化方式描述模型计算图、算子、张量形状、权重和元数据,使部署工具可以使用模型,而无需直接依赖原始训练框架。
**AIMET** 是 AI Model Efficiency Toolkit 的缩写,是 Qualcomm 的开源工具包,用于在部署前压缩和优化神经网络。它通常用于量化、校准和精度恢复,帮助将大型浮点模型转换为 INT8 或 W4A16 等更低精度的格式,同时尽可能保持模型质量。在 Qualcomm 部署流水线中,AIMET 通常位于模型导出(如 ONNX)和硬件编译之间,生成量化编码和校准产物,供下游 Qualcomm 工具编译,以便在目标加速器上高效推理。
**QuantSim** 是 AIMET 的量化模拟计算图。它在 ONNX 中插入量化/反量化操作,使校准能够估计缩放系数,并让主机在编译前近似模拟设备上的数值行为。
**提示处理器(prompt processor)与 token 生成器(token generator):** 提示处理器分块消费输入,在本次部署中每次调用处理 128 个 token。token 生成器在第一个输出 token 之后每次消费一个 token。两个计算图都必须正常工作;仅验证校准形状的计算图是不够的。
**KV 缓存**存储先前 token 的注意力键和值。它避免为每个生成的 token 重新计算整个提示,但其维度取决于上下文长度,因此被编译进部署计算图。
**HTP/cDSP:** Qualcomm 的 Hexagon Tensor Processor 通过计算 DSP 和 FastRPC 传输访问。应用程序使用主机侧 QNN 库、DSP 侧 skel 库、内核 FastRPC 设备和用户态守护进程。任何一层出现故障,都可能表现为一个笼统的设备创建错误。
**BFCL**
***
## 本次成功运行使用的硬件和软件
### 主机工作站
| 组件 | 经过验证的配置 |
| ---------- | ------------------------------------- |
| 主机操作系统 | Windows 主机 + WSL2 Linux |
| GPU | NVIDIA GeForce RTX 5090,计算能力 `sm_120` |
| 系统内存 | 192 GB |
| Python 环境 | Conda,Python 3.10.20 |
| 仓库位置 | WSL 原生 Linux 文件系统,而非 `/mnt/c` |
| 完整量化峰值 RSS | 174 GiB |
| 完整量化耗时 | 45 分钟 |
| 开发期间磁盘用量 | 项目目录下超过 128 GB,外加共享缓存 |
### 目标设备
| 组件 | 配置 |
| --------- | ---------------------------------------------- |
| 开发板 | Qualcomm Dragonwing IQ-9075 EVK |
| 芯片组 | QCS9075 |
| 内存 | 36 GB LPDDR5 |
| 操作系统 | EVK 上的 Ubuntu |
| 加速器 | Hexagon v73 HTP/NPU |
| QAIRT 运行时 | `2.45.0.260326`,与编译构建 `2.45.0.260326154327` 匹配 |
| 运行时可执行文件 | `genie-t2t-run` |
### 为什么这台主机的配置异常庞大
最终的 W4A16 检查点本身只是故事的一部分。在 QuantSim 创建、ONNX 导出、校准和检查点序列化期间,主机会临时持有大型计算图结构和外部张量数据。成功的 4K 上下文运行的常驻内存达到约 174 GiB。较小的工作站也许可以完成缩小规模的冒烟测试,但在完整的 `4096 / 2048 / 20` 运行中仍会失败。由于 RTX 5090(sm\_120)的兼容性问题出现了一些弯路;本教程会解决这些问题,因为这张显卡是唯一现实可得、且能胜任此任务的"发烧级"选择。
对于内存较小的主机,请使用裸机 Linux 服务器或至少 192-256 GB 系统内存的云端 A100/H100 级别机器。编译好的部署包随后可以复制回 EVK。
***
# 准备 WSL2 和存储
## 在 Linux 文件系统中工作
将项目存放在 WSL 文件系统下:
```bash theme={null}
mkdir -p ~/repos-native/qai-nemotron
cd ~/repos-native/qai-nemotron
```
Windows Subsystem for Linux(WSL2):避免在 `/mnt/c` 下进行大型 ONNX 和检查点操作。跨文件系统 I/O 更慢,而此工作流会执行数百 GB 的读写。
## 让 WSL 能看到足够的内存
最初几次失败的运行被 Linux 杀掉了,尽管 Windows 主机有 191 GB 内存。WSL2 自身有一个更低的内存上限。
如果尚不存在,请在 Windows 侧创建此文件:
```text theme={null}
C:\Users\\.wslconfig
```
超大内存工作站的示例:
```ini theme={null}
[wsl2]
memory=176GB
swap=96GB
```
然后在 PowerShell 或命令提示符中运行:
```powershell theme={null}
wsl --shutdown
```
重新打开 WSL 后,验证 Linux 能看到多少内存:
```bash theme={null}
free -h
swapon --show
grep -E 'MemTotal|SwapTotal' /proc/meminfo
```
**注意事项:** 具体数值必须为 Windows 留出足够内存。本教程中的完整运行使用了约 173.6 GiB RSS。如果你的主机无法提供这么多内存,请将量化移到服务器上进行,例如 [Lambda Cloud](https://lambda.ai/)。
## 规划磁盘用量
开始之前:
```bash theme={null}
df -h ~
```
实际建议至少留出 200 GB 可用空间。多个失败或验证用的检查点,每个都可能包含一个 30+ GB 的 `model.data` 文件、多个 ONNX 计算图、编码文件、临时归档、Hugging Face 权重、CUDA 软件包以及 pip/Conda 缓存。
***
# 创建版本对齐的主机环境
环境是本教程中最重要的可复现性细节。
我最初使用 AIMET-ONNX 2.33 和 ONNX Runtime GPU 1.22 的 Python 3.12 环境完成了量化,但部署形状的计算图输出了多语言乱码 token(™)。直接用于校准的计算图能产生正确的 token,而单独导出的 128-token 和 1-token 计算图却是错的。量化成功的提示信息并不保证检查点有效。
可用的环境尽可能与 Qualcomm 的 Llama 3.1 配方对齐,同时为 RTX 5090 保留了较新的 PyTorch 构建。
## 创建 Python 3.10 Conda 环境
```bash theme={null}
conda create -n qai-qcom310 python=3.10 pip -y
conda activate qai-qcom310
unset PYTHONPATH
export PYTHONNOUSERSITE=1
python -m pip install --upgrade pip setuptools wheel
```
验证:
```bash theme={null}
which python
python -V
```
预期结果:
```text theme={null}
/home//miniconda3/envs/qai-qcom310/bin/python
Python 3.10.x
```
## 安装兼容 Blackwell 的 PyTorch
Qualcomm 针对该模型的软件包最初固定为 PyTorch 2.4.1/CUDA 12.1。该构建能识别 RTX 5090,但缺少 `sm_120` 内核。PyTorch 警告 GPU 不兼容。
改为安装 CUDA 12.8 的 wheel:
```bash theme={null}
python -m pip install \
torch==2.7.1 \
torchvision==0.22.1 \
--index-url https://download.pytorch.org/whl/cu128
```
测试真正的 CUDA 内核,而不仅仅是设备枚举:
```bash theme={null}
python - <<'PY'
import torch
print('torch:', torch.__version__)
print('CUDA runtime:', torch.version.cuda)
print('CUDA available:', torch.cuda.is_available())
print('GPU:', torch.cuda.get_device_name(0))
print('capability:', torch.cuda.get_device_capability(0))
x = torch.randn((1024, 1024), device='cuda')
y = x @ x
torch.cuda.synchronize()
print('CUDA matmul passed:', float(y[0, 0]))
PY
```
## 安装 QAI Hub Models(不带 Llama extra)
不要在此环境中直接安装 Llama extra,因为它可能会将 PyTorch 降级到不兼容的版本。
```bash theme={null}
cat > /tmp/qai-qcom310-constraints.txt <<'EOF'
numpy==1.26.4
torch==2.7.1
torchvision==0.22.1
transformers==4.45.0
onnx==1.18.0
onnxsim==0.5.0
EOF
python -m pip install \
-c /tmp/qai-qcom310-constraints.txt \
numpy==1.26.4 \
qai-hub-models==0.56.0
python -m pip install \
-c /tmp/qai-qcom310-constraints.txt \
transformers==4.45.0 \
sentencepiece==0.2.1 \
psutil==6.1.1 \
onnx==1.18.0 \
onnxsim==0.5.0
```
## 安装 Qualcomm 的 AIMET-ONNX 2.26 wheel
```bash theme={null}
python -m pip install \
'https://github.com/quic/aimet/releases/download/2.26.0/aimet_onnx-2.26.0+cu121-cp310-cp310-manylinux_2_34_x86_64.whl'
```
该 wheel 专为 CPython 3.10 构建,这就是此环境不能使用 Python 3.12 的原因。
## 最后安装 ONNX Runtime GPU
```bash theme={null}
python -m pip uninstall -y onnxruntime onnxruntime-gpu
python -m pip install --no-deps onnxruntime-gpu==1.23.2
```
**注意事项:** `qai-hub-models` 的元数据可能会抱怨缺少普通的 `onnxruntime`。不要为了满足元数据而同时安装 CPU 和 GPU 发行版。两者都提供同一个 `onnxruntime` Python 模块,后安装的那个会悄悄替换另一个。
## 修复 AIMET 的 `libpython3.10.so.1.0` 查找问题
第一次 AIMET 2.26 运行失败并报错:
```text theme={null}
RuntimeError: Unable to run function PtrToInt64
libpython3.10.so.1.0: cannot open shared object file
```
该库存在于 Conda 环境中,但原生加载器不会搜索那个目录。
```bash theme={null}
export LD_LIBRARY_PATH="$CONDA_PREFIX/lib${LD_LIBRARY_PATH:+:$LD_LIBRARY_PATH}"
```
为此环境永久生效:
```bash theme={null}
mkdir -p "$CONDA_PREFIX/etc/conda/activate.d"
cat > "$CONDA_PREFIX/etc/conda/activate.d/qai-libpython.sh" <<'EOF'
export LD_LIBRARY_PATH="$CONDA_PREFIX/lib${LD_LIBRARY_PATH:+:$LD_LIBRARY_PATH}"
EOF
```
测试:
```bash theme={null}
python - <<'PY'
import ctypes
lib = ctypes.CDLL('libpython3.10.so.1.0', mode=ctypes.RTLD_GLOBAL)
print('Loaded:', lib._name)
PY
```
## 验证确切的环境
```bash theme={null}
python - <<'PY'
import sys
from importlib.metadata import PackageNotFoundError, version
import torch
import onnxruntime as ort
import aimet_onnx
packages = [
'qai-hub-models', 'aimet-onnx', 'onnx',
'onnxruntime-gpu', 'transformers', 'torch',
'torchvision', 'numpy'
]
print('Python:', sys.version)
for package in packages:
try:
print(f'{package:22} {version(package)}')
except PackageNotFoundError:
print(f'{package:22} not installed')
print('GPU:', torch.cuda.get_device_name(0))
print('Capability:', torch.cuda.get_device_capability(0))
print('ORT providers:', ort.get_available_providers())
print('AIMET:', aimet_onnx.__file__)
PY
```
经过验证的核心版本为:
```text theme={null}
Python 3.10.20
qai-hub-models 0.56.0
aimet-onnx 2.26.0+cu121
onnx 1.18.0
onnxruntime-gpu 1.23.2
transformers 4.45.0
torch 2.7.1+cu128
torchvision 0.22.1+cu128
```
保存环境,以备后续需要恢复:
```bash theme={null}
python -m pip freeze > qai-qcom310-successful-freeze.txt
```
***
# 在花一小时处理模型之前先验证 AIMET
## 运行一个微型 QuantSim 测试
导入成功还不够。要实际调用 AIMET 的原生 `libpymo` 路径并创建一个 QuantSim 会话:
```bash theme={null}
python - <<'PY'
import gc
import numpy as np
from onnx import TensorProto, helper, numpy_helper
from aimet_onnx.quantsim import QuantizationSimModel
input_info = helper.make_tensor_value_info('input', TensorProto.FLOAT, [1, 4])
output_info = helper.make_tensor_value_info('output', TensorProto.FLOAT, [1, 4])
weight = numpy_helper.from_array(np.eye(4, dtype=np.float32), name='weight')
node = helper.make_node('MatMul', ['input', 'weight'], ['output'])
graph = helper.make_graph([node], 'aimet_test', [input_info], [output_info], [weight])
model = helper.make_model(graph, opset_imports=[helper.make_opsetid('', 13)])
model.ir_version = 9
sim = QuantizationSimModel(
model=model,
providers=['CUDAExecutionProvider', 'CPUExecutionProvider'],
)
print('QuantSim providers:', sim.session.get_providers())
print('AIMET libpymo test passed')
del sim
gc.collect()
PY
```
预期结果:
```text theme={null}
QuantSim providers: ['CUDAExecutionProvider', 'CPUExecutionProvider']
AIMET libpymo test passed
```
如果测试本身通过且返回退出码为零,进程退出后仅与清理相关的 `__del__` 警告可以忽略。
***
# 量化 Nemotron
## 如有需要,先进行 Hugging Face 认证
接受相关模型许可证并登录:
```bash theme={null}
python -m pip install 'huggingface_hub[cli]'
hf auth login
```
## 先运行一次小规模验证量化
```bash theme={null}
cd ~/repos-native/qai-nemotron
conda activate qai-qcom310
export LD_LIBRARY_PATH="$CONDA_PREFIX/lib${LD_LIBRARY_PATH:+:$LD_LIBRARY_PATH}"
rm -rf nemotron_validation_ckpt_py310_aimet226
PYTORCH_CUDA_ALLOC_CONF=expandable_segments:True \
python -m qai_hub_models.models.llama_v3_1_8b_instruct.quantize \
--checkpoint nvidia/Llama-3.1-Nemotron-Nano-8B-v1 \
--context-length 512 \
--calibration-sequence-length 128 \
--num-samples 1 \
--output-dir nemotron_validation_ckpt_py310_aimet226
```
这仍会加载整个 8B 模型,可能需要 30-60 分钟。较小的参数值会缩小校准和计算图维度;它们并不会把模型变成小模型。
### 本次运行中非致命的警告
你可能会看到:
```text theme={null}
TracerWarning: Converting a tensor to a Python boolean...
```
```text theme={null}
The target quantizers could not be found. MatMul exception rule does not apply...
```
```text theme={null}
Token indices sequence length is longer than the specified maximum...
```
出现 WikiText 警告是因为数据集加载器在将拼接后的语料库切分为上下文窗口之前先进行分词。MatMul 消息表示某些单独的例外规则被跳过。这些警告在我成功的运行中同样出现过。
## 验证实际部署路径
不要只测试校准期间直接使用的计算图。要同时测试 128-token 提示处理器和序列长度为 1 的生成器:
```bash theme={null}
python -m qai_hub_models.models.llama_v3_1_8b_instruct.demo \
--checkpoint nemotron_validation_ckpt_py310_aimet226 \
--context-length 512 \
--sequence-length 128 \
--max-output-tokens 16 \
--seed 42 \
--prompt 'Explain gravity in one short English sentence.'
```
你应该看到类似这样的切换:
```text theme={null}
Switching from sequence_length=128 to sequence_length=1
```
切换之后,输出必须保持连贯。
### 为什么这个验证很重要
使用早先的 AIMET 2.33 / Python 3.12 软件栈时,量化打印出 `completed successfully`,且大的校准计算图能输出正确的第一个 token。然而 128-token 和 1-token 部署计算图却生成了不知所云的胡言乱语。解决办法不是增加校准样本,而是使用版本对齐的环境。
## 运行完整的 4K 上下文量化
```bash theme={null}
FULL_CKPT=nemotron_nano_w4a16_cl4096_py310_aimet226
rm -rf "$FULL_CKPT"
PYTORCH_CUDA_ALLOC_CONF=expandable_segments:True \
/usr/bin/time -v \
python -m qai_hub_models.models.llama_v3_1_8b_instruct.quantize \
--checkpoint nvidia/Llama-3.1-Nemotron-Nano-8B-v1 \
--context-length 4096 \
--calibration-sequence-length 2048 \
--num-samples 20 \
--output-dir "$FULL_CKPT" \
2>&1 | tee quantize_cl4096_aimet226.log
```
经过验证的结果:
```text theme={null}
Quantization completed successfully.
Elapsed time: 44:58.61
Maximum resident set size: 182062912 KiB
Exit status: 0
```
输出目录包含:
```text theme={null}
model.encodings
model.data
model_seqlen2048_cl4096.onnx
model_seqlen128_cl4096.onnx
model_seqlen1_cl4096.onnx
config.json
tokenizer.json
tokenizer_config.json
args.json
```
共享的 `model.data` 文件约为 32.1 GB。
## 在云端编译之前验证完整检查点
```bash theme={null}
CKPT=nemotron_nano_w4a16_cl4096_py310_aimet226
python -m qai_hub_models.models.llama_v3_1_8b_instruct.demo \
--checkpoint "$CKPT" \
--context-length 4096 \
--sequence-length 128 \
--max-output-tokens 32 \
--seed 42 \
--prompt 'Explain gravity in one short English sentence.'
```
经过验证的输出开头为:
```text theme={null}
Gravity is the force that causes things to attractively accelerate towards...
```
措辞并不完美,但输出是连贯的。这足以证明两个部署形状的计算图都能在本地正常工作。
***
# 在 Qualcomm AI Hub 中为 QCS9075 编译
## 配置 Qualcomm AI Hub Workbench
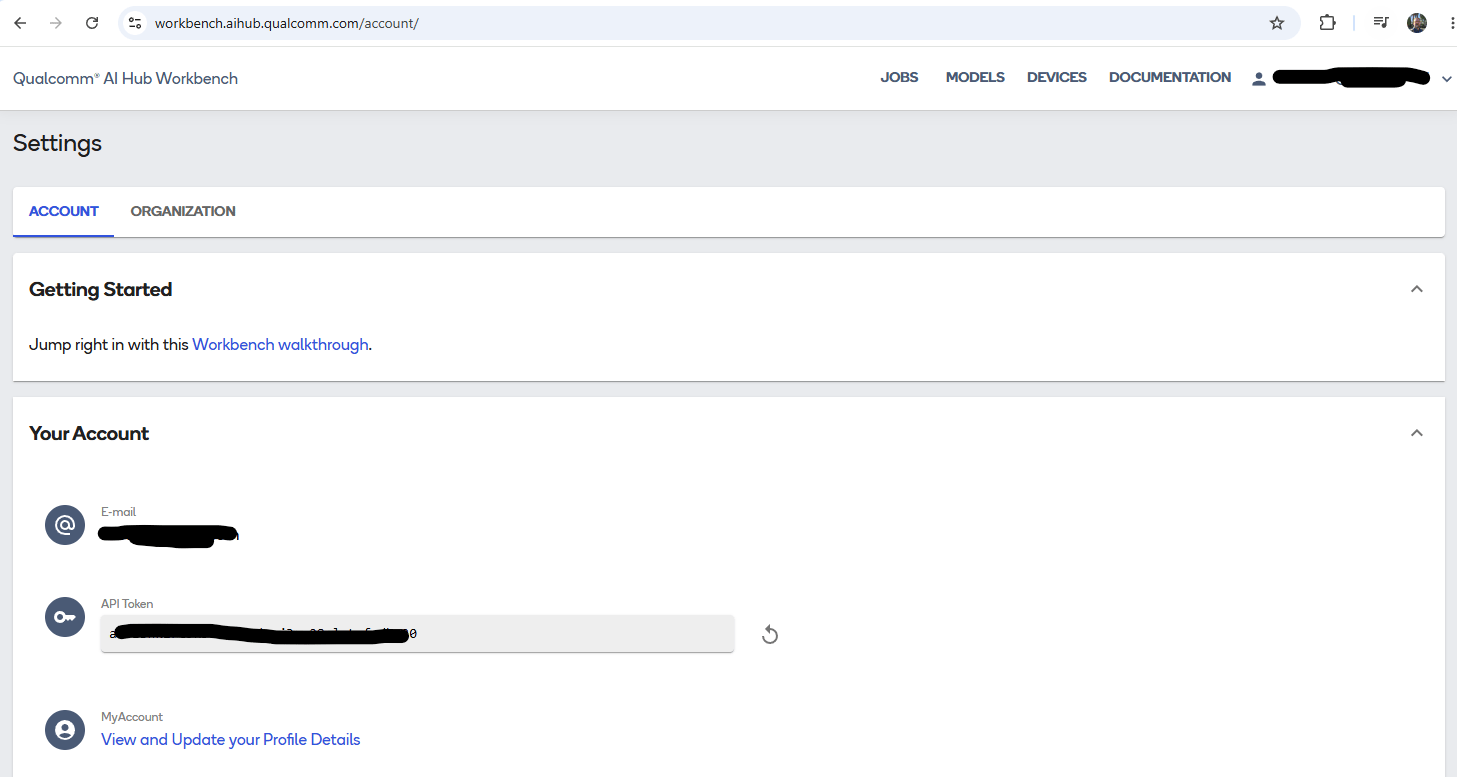
从你将用于查看任务的同一个 [Qualcomm 账户](https://workbench.aihub.qualcomm.com/account/)获取 API token:
 ```bash theme={null}
qai-hub configure --api_token YOUR_API_TOKEN
```
## 为 Dragonwing IQ-9075 EVK 导出
```bash theme={null}
CKPT=nemotron_nano_w4a16_cl4096_py310_aimet226
OUT=nemotron_iq9075_genie
rm -rf "$OUT"
python -m qai_hub_models.models.llama_v3_1_8b_instruct.export \
--checkpoint "$CKPT" \
--device 'Dragonwing IQ-9075 EVK' \
--context-length 4096 \
--sequence-length 128,1 \
--model-cache-mode disable \
--skip-profiling \
--skip-inferencing \
--output-dir "$OUT"
```
### 这条命令实际做什么
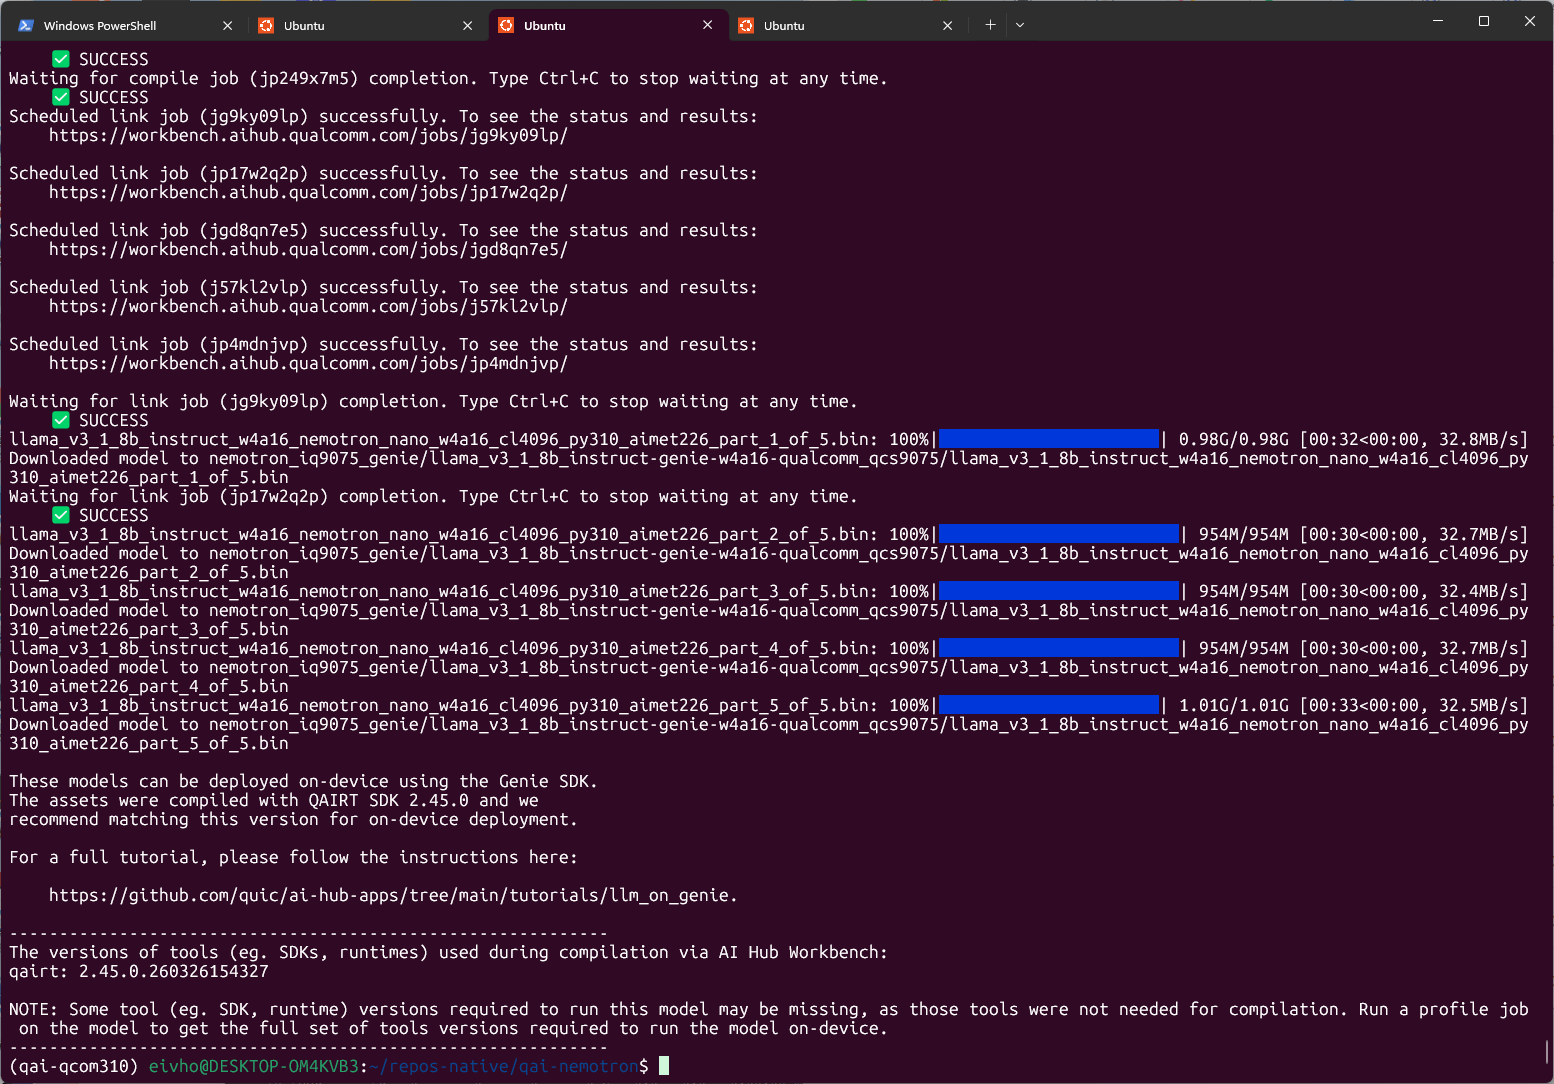
它**不会**将模型上传到你的物理 EVK。它将 AIMET/ONNX 产物上传到 Qualcomm AI Hub Workbench,为 QCS9075 目标编译,将它们链接为运行时二进制文件,并将 Genie 部署包下载回主机。
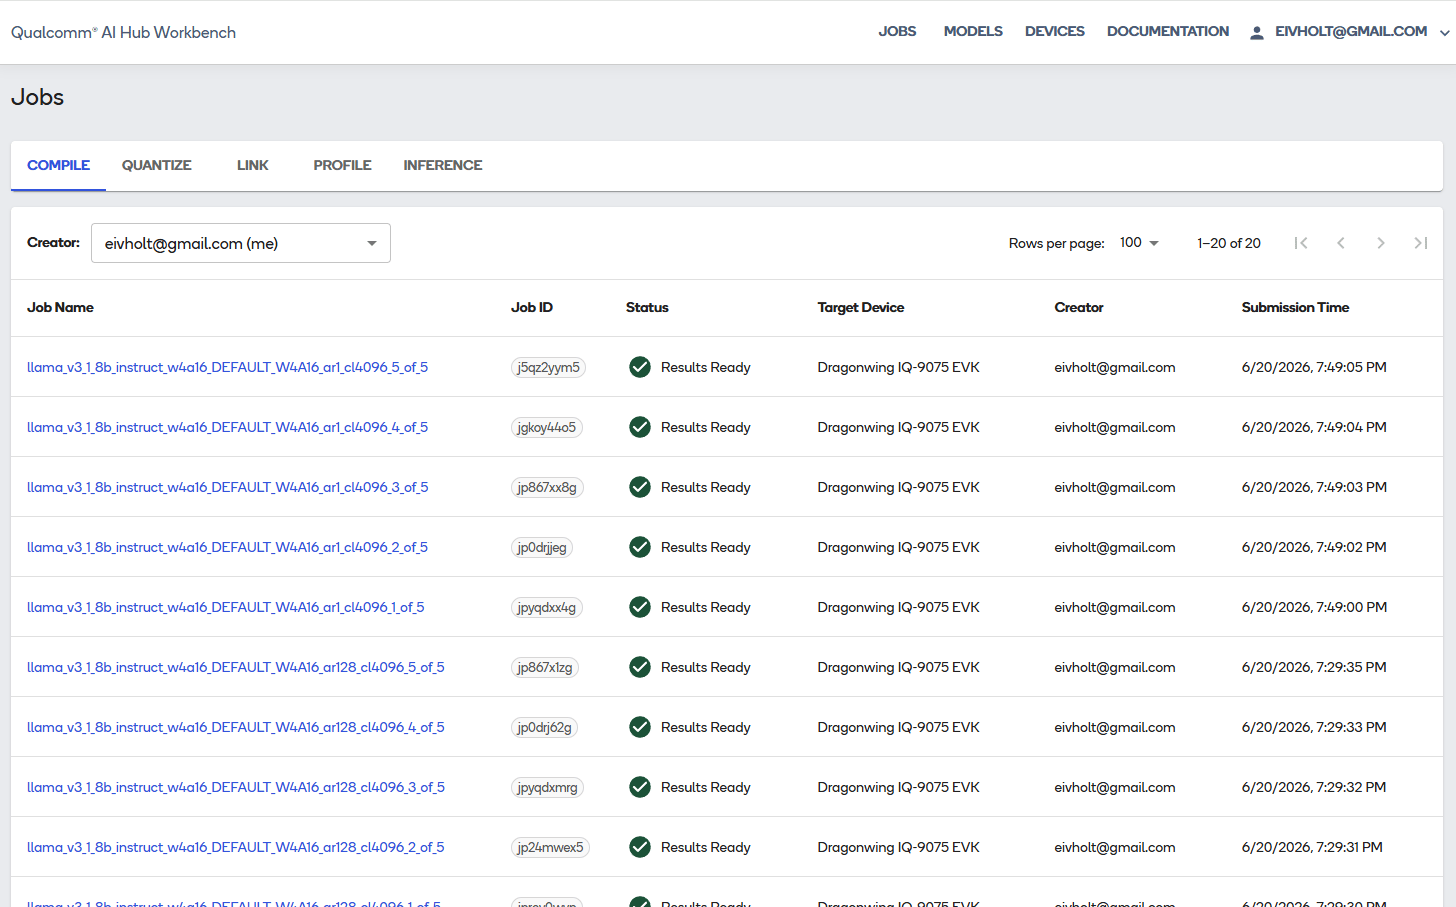
由于模型被拆分为五个部分且需要两种序列长度,Workbench 会创建:
* 五个 128-token 提示处理器的编译任务;
* 五个 1-token 生成器的编译任务;
* 五个链接任务,用于组合对应部分并共享权重。
这可能需要一段时间,但客户端和 Web 应用中都会报告进度。
```bash theme={null}
qai-hub configure --api_token YOUR_API_TOKEN
```
## 为 Dragonwing IQ-9075 EVK 导出
```bash theme={null}
CKPT=nemotron_nano_w4a16_cl4096_py310_aimet226
OUT=nemotron_iq9075_genie
rm -rf "$OUT"
python -m qai_hub_models.models.llama_v3_1_8b_instruct.export \
--checkpoint "$CKPT" \
--device 'Dragonwing IQ-9075 EVK' \
--context-length 4096 \
--sequence-length 128,1 \
--model-cache-mode disable \
--skip-profiling \
--skip-inferencing \
--output-dir "$OUT"
```
### 这条命令实际做什么
它**不会**将模型上传到你的物理 EVK。它将 AIMET/ONNX 产物上传到 Qualcomm AI Hub Workbench,为 QCS9075 目标编译,将它们链接为运行时二进制文件,并将 Genie 部署包下载回主机。
由于模型被拆分为五个部分且需要两种序列长度,Workbench 会创建:
* 五个 128-token 提示处理器的编译任务;
* 五个 1-token 生成器的编译任务;
* 五个链接任务,用于组合对应部分并共享权重。
这可能需要一段时间,但客户端和 Web 应用中都会报告进度。
 ### 隐私与许可说明
此步骤会将模型衍生产物发送到 Qualcomm 的云服务。在使用专有或受限的检查点之前,请审查 NVIDIA、Meta、Qualcomm 以及组织内部的政策。
## 检查下载的部署包
经过验证的部署包写入到:
```text theme={null}
nemotron_iq9075_genie/
llama_v3_1_8b_instruct-genie-w4a16-qualcomm_qcs9075/
```
它包含五个二进制文件,总计约 5 GB:
```text theme={null}
...part_1_of_5.bin
...part_2_of_5.bin
...part_3_of_5.bin
...part_4_of_5.bin
...part_5_of_5.bin
genie_config.json
htp_backend_ext_config.json
tokenizer.json
tool-versions.yaml
```
文件名中保留了 `llama_v3_1_8b_instruct`,因为这是用于构建计算图的 Qualcomm 实现。文件名中嵌入的检查点名称以及部署包中的权重都属于 Nemotron 检查点。
检查所需的运行时:
```bash theme={null}
cat "$OUT"/*/tool-versions.yaml
```
经过验证的输出:
```text theme={null}
qairt: 2.45.0.260326154327
```
***
# 将部署包复制到 EVK
## 传输完整目录
从主机执行:
```bash theme={null}
BUNDLE="$OUT/llama_v3_1_8b_instruct-genie-w4a16-qualcomm_qcs9075"
rsync -avh --progress \
"$BUNDLE/" \
ubuntu@EVK_IP:~/nemotron_genie/
```
不要只复制 `.bin` 文件。Genie 还需要分词器和 JSON 配置文件。
***
# 在 EVK 上安装 QAIRT
推理时 EVK 上不需要 Python 环境。Genie 是原生的 QAIRT 可执行文件。
## 安装 QAIRT 2.45
在 EVK 上运行:
```bash theme={null}
sudo apt-get update
sudo apt-get install -y curl ca-certificates unzip rsync
QAIRT_VER='2.45.0.260326'
QAIRT_ZIP="/tmp/v${QAIRT_VER}.zip"
QAIRT_URL="https://softwarecenter.qualcomm.com/api/download/software/sdks/Qualcomm_AI_Runtime_Community/All/${QAIRT_VER}/v${QAIRT_VER}.zip"
curl -fL --retry 3 "$QAIRT_URL" -o "$QAIRT_ZIP"
TMP_UNZIP="$(mktemp -d)"
unzip -q "$QAIRT_ZIP" -d "$TMP_UNZIP"
sudo mkdir -p "/opt/qairt/${QAIRT_VER}"
if [ -d "$TMP_UNZIP/qairt/${QAIRT_VER}" ]; then
sudo rsync -a "$TMP_UNZIP/qairt/${QAIRT_VER}/" "/opt/qairt/${QAIRT_VER}/"
else
sudo rsync -a "$TMP_UNZIP/" "/opt/qairt/${QAIRT_VER}/"
fi
sudo ln -sfn "/opt/qairt/${QAIRT_VER}" /opt/qairt/current
sudo chmod -R a+rX "/opt/qairt/${QAIRT_VER}"
rm -rf "$TMP_UNZIP" "$QAIRT_ZIP"
```
如果 Software Center 需要认证,请在主机上下载 ZIP 文件并复制到 EVK 的 `/tmp` 目录。
## 创建干净的 QAIRT 环境脚本
IQ-9075 是搭载 Hexagon v73 的 QCS9075。
```bash theme={null}
cat > "$HOME/qairt-env.sh" <<'EOF'
#!/usr/bin/env bash
export QAIRT_HOME='/opt/qairt/current'
export QAIRT_SDK_ROOT="$QAIRT_HOME"
export QNN_SDK_ROOT="$QAIRT_HOME"
export QAIRT_TARGET='aarch64-oe-linux-gcc11.2'
export PRODUCT_SOC='9075'
export DSP_ARCH='73'
# Use one QAIRT/QNN installation only.
export PATH="$QAIRT_HOME/bin/$QAIRT_TARGET:/usr/local/sbin:/usr/local/bin:/usr/sbin:/usr/bin:/sbin:/bin"
export LD_LIBRARY_PATH="$QAIRT_HOME/lib/$QAIRT_TARGET:/usr/lib/aarch64-linux-gnu:/lib/aarch64-linux-gnu"
export ADSP_LIBRARY_PATH="$QAIRT_HOME/lib/hexagon-v73/unsigned"
EOF
chmod +x "$HOME/qairt-env.sh"
source "$HOME/qairt-env.sh"
hash -r
```
验证:
```bash theme={null}
printf 'QAIRT_HOME=%s\n' "$QAIRT_HOME"
printf 'LD_LIBRARY_PATH=%s\n' "$LD_LIBRARY_PATH"
printf 'ADSP_LIBRARY_PATH=%s\n' "$ADSP_LIBRARY_PATH"
type -a genie-t2t-run
readlink -f "$(command -v genie-t2t-run)"
```
***
# 安装 FastRPC 并启用 DSP
## 理解错误 14001
我第一次运行 Genie 失败并报错:
```text theme={null}
Failed to create device: 14001
Device Creation failure
```
模型二进制文件并没有出错。QNN 无法创建 HTP 设备,因为 EVK 缺少用户态 FastRPC 库、FastRPC 守护进程未配置,且 `/dev/fastrpc-cdsp` 仅 root 可访问。我很快在 Qualcomm 仓库中发现了这个已被报告的问题。
FastRPC 是 ARM CPU 进程与计算 DSP 之间的传输层。主机应用加载 QNN stub 库;FastRPC 与加载匹配 skel 库的 DSP 进程通信。
## 安装 Qualcomm FastRPC 软件包
```bash theme={null}
sudo apt-get update
sudo apt-get install -y software-properties-common acl
if ! grep -Rqs 'ubuntu-qcom-iot/qcom-ppa' \
/etc/apt/sources.list /etc/apt/sources.list.d 2>/dev/null; then
sudo add-apt-repository -y ppa:ubuntu-qcom-iot/qcom-ppa
fi
sudo apt-get update
sudo apt-get install -y \
qcom-fastrpc1 \
qcom-fastrpc-dev \
qcom-libdmabufheap-dev
sudo ldconfig
```
除非你有意要替换 QAIRT 的 QNN 库,否则不要从 PPA 安装第二套 QNN 运行时。将 `/usr/lib` 的 QNN 库与 `/opt/qairt` 的 DSP 库混用可能导致 stub/skel 版本错误。
## 将用户添加到 FastRPC 组
```bash theme={null}
sudo systemd-sysusers
getent group fastrpc || sudo groupadd --system fastrpc
sudo usermod -aG fastrpc ubuntu
sudo reboot
```
重新连接后:
```bash theme={null}
source "$HOME/qairt-env.sh"
id
ls -l /dev/fastrpc-cdsp
ldconfig -p | grep libcdsprpc
systemctl --no-pager --full status cdsprpcd
```
经过验证的状态为:
```text theme={null}
ubuntu is a member of fastrpc
/dev/fastrpc-cdsp is group-accessible
libcdsprpc.so resolves from /lib/aarch64-linux-gnu
cdsprpcd is active
```
## 独立验证 Hexagon 后端
```bash theme={null}
qnn-platform-validator --backend dsp --coreVersion
qnn-platform-validator --backend dsp --testBackend
```
预期摘要:
```text theme={null}
Backend Hardware : Supported
Backend Libraries : Found
Core Version : Hexagon Architecture V73
Unit Test : Passed
```
当摘要显示成功时,`Error in saving the results` 消息可以忽略。
***
# 在 EVK 上运行 Nemotron
## 创建格式正确的提示
使用带有真实换行符的提示文件。Nemotron 的推理模式通过系统提示控制。
```bash theme={null}
cd ~/nemotron_genie
cat > prompt.txt <<'EOF'
<|begin_of_text|><|start_header_id|>system<|end_header_id|>
detailed thinking off<|eot_id|><|start_header_id|>user<|end_header_id|>
Explain gravity in one short English sentence.<|eot_id|><|start_header_id|>assistant<|end_header_id|>
EOF
```
若要进行开启推理的实验,请将系统内容替换为:
```text theme={null}
detailed thinking on
```
## 运行 Genie 并保存性能分析
```bash theme={null}
source "$HOME/qairt-env.sh"
cd ~/nemotron_genie
set -o pipefail
genie-t2t-run \
-c genie_config.json \
--prompt_file prompt.txt \
--profile profile.txt \
2>&1 | tee genie-run.log
echo "exit code: ${PIPESTATUS[0]}"
```
经过验证的输出:
```text theme={null}
Using libGenie.so version 1.17.0
[INFO] "Using create From Binary"
[INFO] "Allocated total size = 306545152 across 10 buffers"
[BEGIN]: Gravity is the force that pulls objects toward each other...
[END]
exit code: 0
```
`rpcmem_android.c` 的 dummy-call 消息仅供参考;运行时正在使用平台的 FastRPC 实现。
## 解读性能分析
成功的运行报告了:
| 指标 | 结果 |
| ----------- | --------------: |
| 模型/对话初始化 | 4.06 s |
| 提示 token 数 | 29 |
| 提示处理速率 | 158.05 tokens/s |
| 首个 token 时间 | 183.5 ms |
| 生成的 token 数 | 31 |
| token 生成速率 | 10.03 tokens/s |
| token 生成时间 | 3.09 s |
初始化成本在常驻服务中通常只需支付一次。10.03 tokens/s 的解码速率与 Qualcomm 公布的 Llama 3.1 8B W4A16 在 IQ-9075 上的结果几乎相同,这有力地证明了自定义 Nemotron 检查点使用了预期的 HTP 路径,而不是悄悄回退到 CPU。
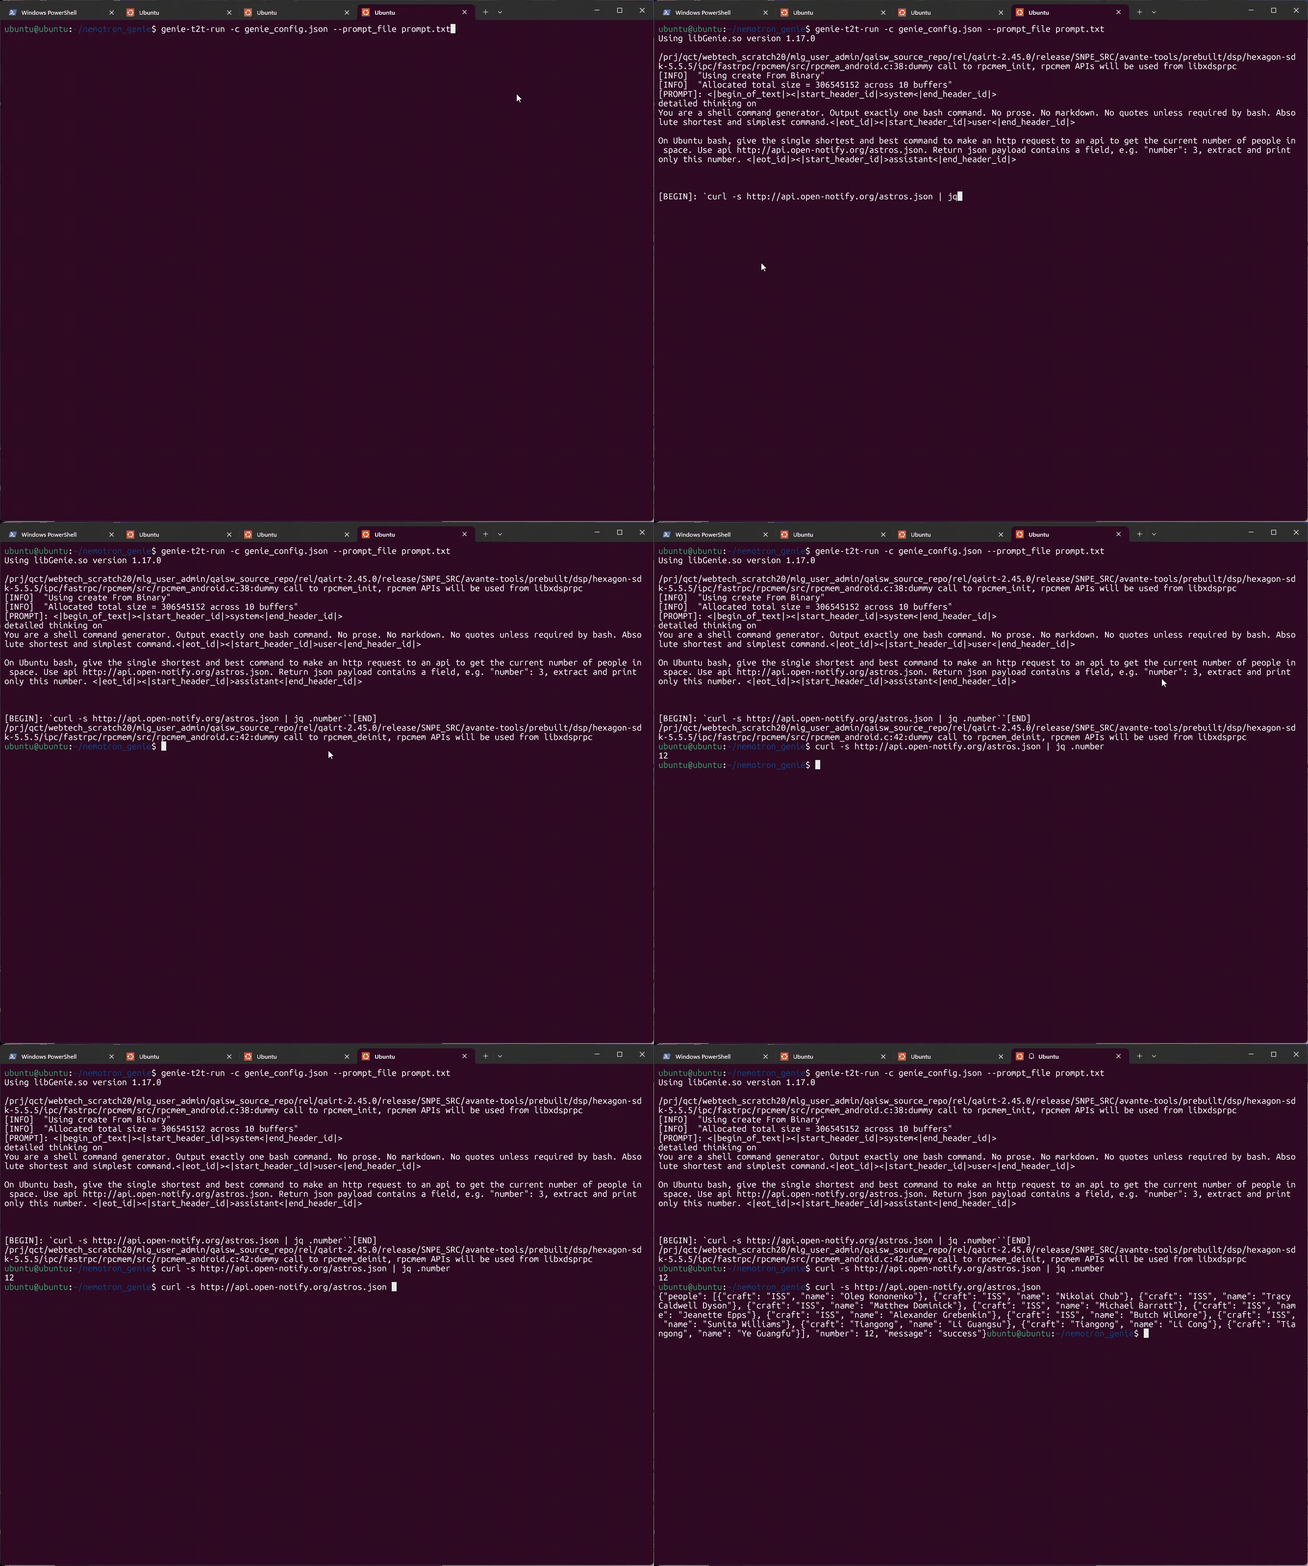
下面的简短演示在 EVK 上运行,展示了 Nemotron Nano 生成 curl 命令并提取 JSON 负载属性:
##
### 隐私与许可说明
此步骤会将模型衍生产物发送到 Qualcomm 的云服务。在使用专有或受限的检查点之前,请审查 NVIDIA、Meta、Qualcomm 以及组织内部的政策。
## 检查下载的部署包
经过验证的部署包写入到:
```text theme={null}
nemotron_iq9075_genie/
llama_v3_1_8b_instruct-genie-w4a16-qualcomm_qcs9075/
```
它包含五个二进制文件,总计约 5 GB:
```text theme={null}
...part_1_of_5.bin
...part_2_of_5.bin
...part_3_of_5.bin
...part_4_of_5.bin
...part_5_of_5.bin
genie_config.json
htp_backend_ext_config.json
tokenizer.json
tool-versions.yaml
```
文件名中保留了 `llama_v3_1_8b_instruct`,因为这是用于构建计算图的 Qualcomm 实现。文件名中嵌入的检查点名称以及部署包中的权重都属于 Nemotron 检查点。
检查所需的运行时:
```bash theme={null}
cat "$OUT"/*/tool-versions.yaml
```
经过验证的输出:
```text theme={null}
qairt: 2.45.0.260326154327
```
***
# 将部署包复制到 EVK
## 传输完整目录
从主机执行:
```bash theme={null}
BUNDLE="$OUT/llama_v3_1_8b_instruct-genie-w4a16-qualcomm_qcs9075"
rsync -avh --progress \
"$BUNDLE/" \
ubuntu@EVK_IP:~/nemotron_genie/
```
不要只复制 `.bin` 文件。Genie 还需要分词器和 JSON 配置文件。
***
# 在 EVK 上安装 QAIRT
推理时 EVK 上不需要 Python 环境。Genie 是原生的 QAIRT 可执行文件。
## 安装 QAIRT 2.45
在 EVK 上运行:
```bash theme={null}
sudo apt-get update
sudo apt-get install -y curl ca-certificates unzip rsync
QAIRT_VER='2.45.0.260326'
QAIRT_ZIP="/tmp/v${QAIRT_VER}.zip"
QAIRT_URL="https://softwarecenter.qualcomm.com/api/download/software/sdks/Qualcomm_AI_Runtime_Community/All/${QAIRT_VER}/v${QAIRT_VER}.zip"
curl -fL --retry 3 "$QAIRT_URL" -o "$QAIRT_ZIP"
TMP_UNZIP="$(mktemp -d)"
unzip -q "$QAIRT_ZIP" -d "$TMP_UNZIP"
sudo mkdir -p "/opt/qairt/${QAIRT_VER}"
if [ -d "$TMP_UNZIP/qairt/${QAIRT_VER}" ]; then
sudo rsync -a "$TMP_UNZIP/qairt/${QAIRT_VER}/" "/opt/qairt/${QAIRT_VER}/"
else
sudo rsync -a "$TMP_UNZIP/" "/opt/qairt/${QAIRT_VER}/"
fi
sudo ln -sfn "/opt/qairt/${QAIRT_VER}" /opt/qairt/current
sudo chmod -R a+rX "/opt/qairt/${QAIRT_VER}"
rm -rf "$TMP_UNZIP" "$QAIRT_ZIP"
```
如果 Software Center 需要认证,请在主机上下载 ZIP 文件并复制到 EVK 的 `/tmp` 目录。
## 创建干净的 QAIRT 环境脚本
IQ-9075 是搭载 Hexagon v73 的 QCS9075。
```bash theme={null}
cat > "$HOME/qairt-env.sh" <<'EOF'
#!/usr/bin/env bash
export QAIRT_HOME='/opt/qairt/current'
export QAIRT_SDK_ROOT="$QAIRT_HOME"
export QNN_SDK_ROOT="$QAIRT_HOME"
export QAIRT_TARGET='aarch64-oe-linux-gcc11.2'
export PRODUCT_SOC='9075'
export DSP_ARCH='73'
# Use one QAIRT/QNN installation only.
export PATH="$QAIRT_HOME/bin/$QAIRT_TARGET:/usr/local/sbin:/usr/local/bin:/usr/sbin:/usr/bin:/sbin:/bin"
export LD_LIBRARY_PATH="$QAIRT_HOME/lib/$QAIRT_TARGET:/usr/lib/aarch64-linux-gnu:/lib/aarch64-linux-gnu"
export ADSP_LIBRARY_PATH="$QAIRT_HOME/lib/hexagon-v73/unsigned"
EOF
chmod +x "$HOME/qairt-env.sh"
source "$HOME/qairt-env.sh"
hash -r
```
验证:
```bash theme={null}
printf 'QAIRT_HOME=%s\n' "$QAIRT_HOME"
printf 'LD_LIBRARY_PATH=%s\n' "$LD_LIBRARY_PATH"
printf 'ADSP_LIBRARY_PATH=%s\n' "$ADSP_LIBRARY_PATH"
type -a genie-t2t-run
readlink -f "$(command -v genie-t2t-run)"
```
***
# 安装 FastRPC 并启用 DSP
## 理解错误 14001
我第一次运行 Genie 失败并报错:
```text theme={null}
Failed to create device: 14001
Device Creation failure
```
模型二进制文件并没有出错。QNN 无法创建 HTP 设备,因为 EVK 缺少用户态 FastRPC 库、FastRPC 守护进程未配置,且 `/dev/fastrpc-cdsp` 仅 root 可访问。我很快在 Qualcomm 仓库中发现了这个已被报告的问题。
FastRPC 是 ARM CPU 进程与计算 DSP 之间的传输层。主机应用加载 QNN stub 库;FastRPC 与加载匹配 skel 库的 DSP 进程通信。
## 安装 Qualcomm FastRPC 软件包
```bash theme={null}
sudo apt-get update
sudo apt-get install -y software-properties-common acl
if ! grep -Rqs 'ubuntu-qcom-iot/qcom-ppa' \
/etc/apt/sources.list /etc/apt/sources.list.d 2>/dev/null; then
sudo add-apt-repository -y ppa:ubuntu-qcom-iot/qcom-ppa
fi
sudo apt-get update
sudo apt-get install -y \
qcom-fastrpc1 \
qcom-fastrpc-dev \
qcom-libdmabufheap-dev
sudo ldconfig
```
除非你有意要替换 QAIRT 的 QNN 库,否则不要从 PPA 安装第二套 QNN 运行时。将 `/usr/lib` 的 QNN 库与 `/opt/qairt` 的 DSP 库混用可能导致 stub/skel 版本错误。
## 将用户添加到 FastRPC 组
```bash theme={null}
sudo systemd-sysusers
getent group fastrpc || sudo groupadd --system fastrpc
sudo usermod -aG fastrpc ubuntu
sudo reboot
```
重新连接后:
```bash theme={null}
source "$HOME/qairt-env.sh"
id
ls -l /dev/fastrpc-cdsp
ldconfig -p | grep libcdsprpc
systemctl --no-pager --full status cdsprpcd
```
经过验证的状态为:
```text theme={null}
ubuntu is a member of fastrpc
/dev/fastrpc-cdsp is group-accessible
libcdsprpc.so resolves from /lib/aarch64-linux-gnu
cdsprpcd is active
```
## 独立验证 Hexagon 后端
```bash theme={null}
qnn-platform-validator --backend dsp --coreVersion
qnn-platform-validator --backend dsp --testBackend
```
预期摘要:
```text theme={null}
Backend Hardware : Supported
Backend Libraries : Found
Core Version : Hexagon Architecture V73
Unit Test : Passed
```
当摘要显示成功时,`Error in saving the results` 消息可以忽略。
***
# 在 EVK 上运行 Nemotron
## 创建格式正确的提示
使用带有真实换行符的提示文件。Nemotron 的推理模式通过系统提示控制。
```bash theme={null}
cd ~/nemotron_genie
cat > prompt.txt <<'EOF'
<|begin_of_text|><|start_header_id|>system<|end_header_id|>
detailed thinking off<|eot_id|><|start_header_id|>user<|end_header_id|>
Explain gravity in one short English sentence.<|eot_id|><|start_header_id|>assistant<|end_header_id|>
EOF
```
若要进行开启推理的实验,请将系统内容替换为:
```text theme={null}
detailed thinking on
```
## 运行 Genie 并保存性能分析
```bash theme={null}
source "$HOME/qairt-env.sh"
cd ~/nemotron_genie
set -o pipefail
genie-t2t-run \
-c genie_config.json \
--prompt_file prompt.txt \
--profile profile.txt \
2>&1 | tee genie-run.log
echo "exit code: ${PIPESTATUS[0]}"
```
经过验证的输出:
```text theme={null}
Using libGenie.so version 1.17.0
[INFO] "Using create From Binary"
[INFO] "Allocated total size = 306545152 across 10 buffers"
[BEGIN]: Gravity is the force that pulls objects toward each other...
[END]
exit code: 0
```
`rpcmem_android.c` 的 dummy-call 消息仅供参考;运行时正在使用平台的 FastRPC 实现。
## 解读性能分析
成功的运行报告了:
| 指标 | 结果 |
| ----------- | --------------: |
| 模型/对话初始化 | 4.06 s |
| 提示 token 数 | 29 |
| 提示处理速率 | 158.05 tokens/s |
| 首个 token 时间 | 183.5 ms |
| 生成的 token 数 | 31 |
| token 生成速率 | 10.03 tokens/s |
| token 生成时间 | 3.09 s |
初始化成本在常驻服务中通常只需支付一次。10.03 tokens/s 的解码速率与 Qualcomm 公布的 Llama 3.1 8B W4A16 在 IQ-9075 上的结果几乎相同,这有力地证明了自定义 Nemotron 检查点使用了预期的 HTP 路径,而不是悄悄回退到 CPU。
下面的简短演示在 EVK 上运行,展示了 Nemotron Nano 生成 curl 命令并提取 JSON 负载属性:
##  # 此次部署证明了什么
## 已证明
* NVIDIA 针对 Nemotron 的 Llama 3.1 8B 权重可以使用 AIMET W4A16 量化。
* Qualcomm AI Hub 可以为 QCS9075 编译该自定义检查点。
* 生成的提示处理器和 token 生成器可以通过 Genie/QnnHtp 在 Hexagon v73 上执行。
* EVK 以约 10 tokens/s 的速度产生连贯输出。
* 相对于 Qualcomm 原版 Llama 3.1 8B 路径,自定义检查点没有带来明显的吞吐量损失。
# 智能体边缘 AI
在后续教程中,我将介绍如何把这类模型用作设备端智能体 AI 的 LLM。
# 此次部署证明了什么
## 已证明
* NVIDIA 针对 Nemotron 的 Llama 3.1 8B 权重可以使用 AIMET W4A16 量化。
* Qualcomm AI Hub 可以为 QCS9075 编译该自定义检查点。
* 生成的提示处理器和 token 生成器可以通过 Genie/QnnHtp 在 Hexagon v73 上执行。
* EVK 以约 10 tokens/s 的速度产生连贯输出。
* 相对于 Qualcomm 原版 Llama 3.1 8B 路径,自定义检查点没有带来明显的吞吐量损失。
# 智能体边缘 AI
在后续教程中,我将介绍如何把这类模型用作设备端智能体 AI 的 LLM。