> ## Documentation Index
> Fetch the complete documentation index at: https://dragonwingdocs.qualcomm.com/llms.txt
> Use this file to discover all available pages before exploring further.

# 第 2 部分:使用 Edge Impulse 进行球拍检测

> 一个下午,从数据集到 IQ-8275 EVK 上的实时 NPU 推理。无需 QAIRT 工具链,无需交叉编译,无需 C++ 守护进程。

<div style={{ marginBottom: "2rem" }}>
  <div
    style={{
fontSize: "0.72rem",
fontWeight: 700,
color: "#31017D",
letterSpacing: "1.5px",
textTransform: "uppercase",
marginBottom: "0.5rem"
}}
  >
    Qualcomm Linux · Edge Impulse · Computer Vision
  </div>

  <p style={{ fontSize: "0.95rem", color: "#555", lineHeight: 1.7, margin: "0 0 0.75rem" }}>
    在 Edge Impulse 平台上训练球拍检测器,将其部署到 IQ-8275 EVK,无需编写一行训练代码即可获得 2 毫秒的 NPU 推理。
  </p>

  <div style={{ fontSize: "0.85rem", color: "#888", display: "flex", gap: "0.5rem", flexWrap: "wrap", alignItems: "center" }}>
    <a href="https://www.linkedin.com/in/raulrosettomunoz/" target="_blank" rel="noopener noreferrer" style={{ color: "#888", textDecoration: "none" }}>Raul Muñoz</a>
    <span>·</span>
    <span>Aug 5, 2026</span>
    <span>·</span>
    <a href="/zh/tutorials/paddle-npu-story" style={{ color: "#31017D", fontWeight: 600, textDecoration: "none" }}>← 完整故事</a>
  </div>
</div>

<hr style={{ border: "none", borderTop: "1px solid #eee", margin: "0 0 2rem" }} />

这是从"我有图片"到"它在 NPU 上运行"的最快路径。无需 QAIRT SDK(软件开发工具包),无需交叉编译工具链,无需 C++ 守护进程。预计用时不到两小时,其中大部分时间是在 Edge Impulse 的服务器上进行训练。

**最终您将获得:** 一个运行在 IQ-8275 EVK 上的原生 aarch64 二进制文件,在 HTP(Hexagon Tensor Processor)NPU 上以**每次推理 2 毫秒**的速度检测乒乓球拍。

本教程假定您有一块刚刷好 Qualcomm Linux 的 IQ-8275 EVK。如果您尚未设置开发板,请先按照 [IQ-8275 EVK 设备设置指南](/zh/Linux/devices/iq8275-evk/device-overview)操作。

***

## 您需要的东西

|                 |                                                                                           |
| --------------- | ----------------------------------------------------------------------------------------- |
| Edge Impulse 账户 | 免费开发者套餐,访问 [studio.edgeimpulse.com](https://studio.edgeimpulse.com)                       |
| 开发板             | IQ-8275 EVK,刚刷好 Qualcomm Linux — 参见[设备设置指南](/zh/Linux/devices/iq8275-evk/device-overview) |
| 一台相机            | 手机、网络摄像头或任何可以拍照的设备                                                                        |
| 开发板上的 Node.js   | 用于 `edge-impulse-linux-runner` — 使用 `apt install nodejs npm` 安装                           |
| `scp`           | 用于将二进制文件复制到开发板                                                                            |

***

## 步骤 1:创建项目

登录 [Edge Impulse Studio](https://studio.edgeimpulse.com),点击 **Create new project**,为其命名(例如 `pingpong-paddle`)。其他所有内容保持默认。项目类型将在添加学习块时确定。

***

## 步骤 2:构建数据集

这是最重要的一步。模型的好坏取决于它学习的照片。

进入左侧菜单的 **Data acquisition**。使用 **Upload data** 或 Edge Impulse 移动应用直接从手机收集图像。目标是两个类别下**至少 150–200 张图像**:

**带球拍的照片(`paddles` 标签):**

* 不同距离:特写、一臂之遥、桌子对面
* 不同光照:明亮房间、昏暗房间、窗户光、灯光
* 不同背景:桌面、地板、墙壁、户外
* 不同角度:正面、倾斜、部分遮挡
* 有手持和无手持

**背景照片(无需标签):**

* 相同环境但没有球拍 — 约占总图像的 20–30%
* 这些照片教会模型"这里什么都没有"是什么样子,这对检测器来说是工作的一半

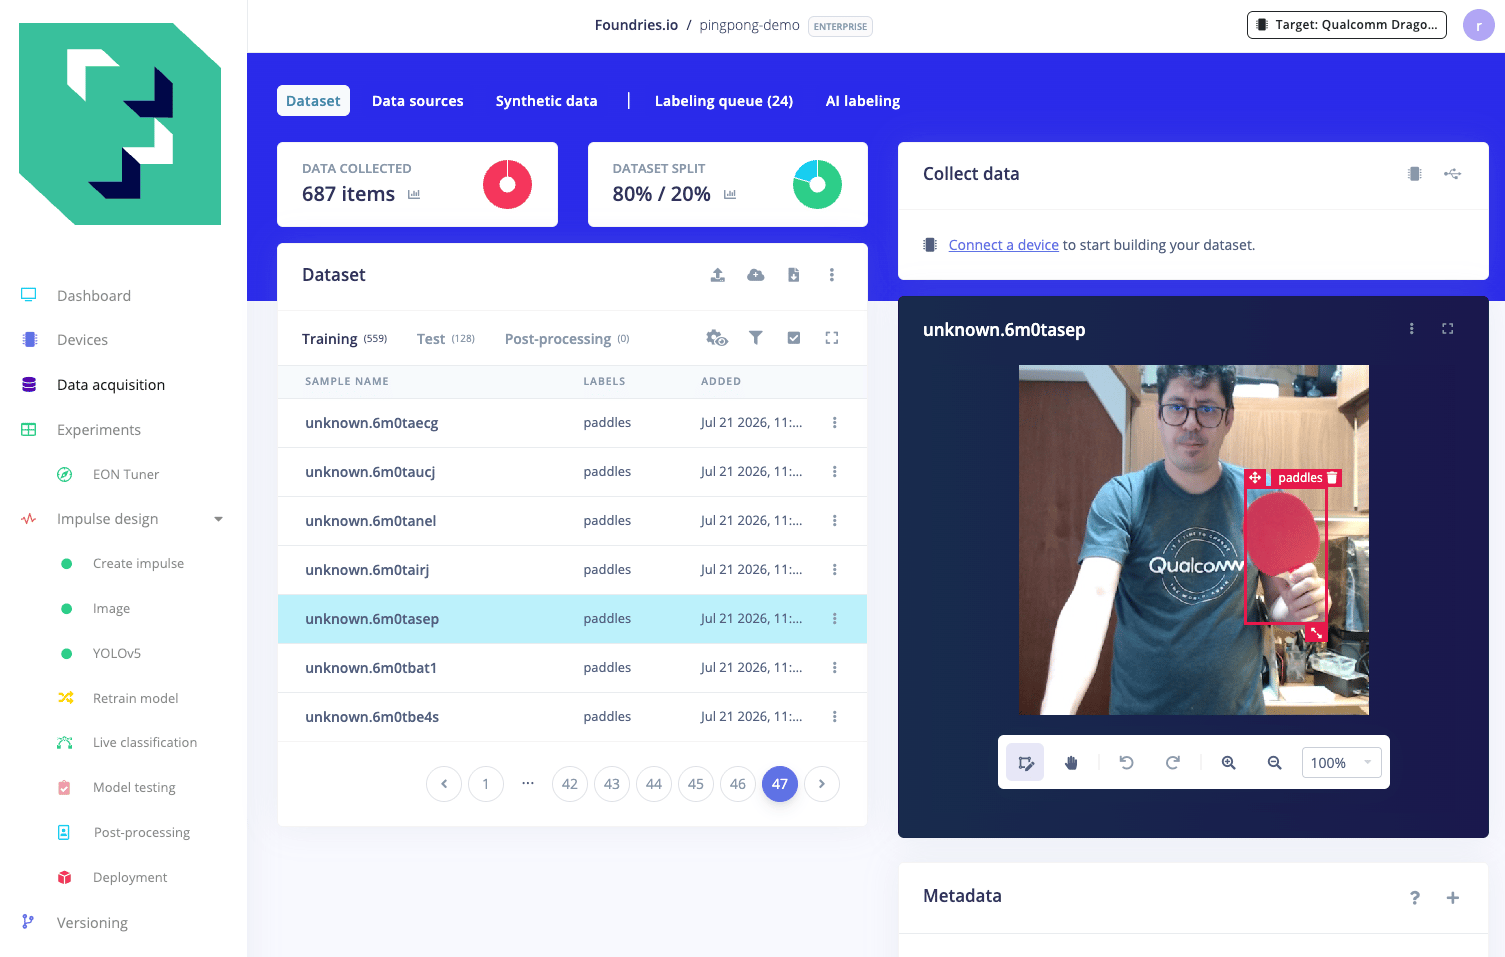
对于每张球拍照片,在 **Labeling queue** 标签页中围绕球拍绘制边界框。保持标签名称一致:所有边界框都使用 `paddles`。

<img src="https://mintcdn.com/qualcomm-prod/ZRoYdq-twSwPVBFY/tutorials/img/paddle-npu/ei_dataset.png?fit=max&auto=format&n=ZRoYdq-twSwPVBFY&q=85&s=fbc8cd7f94552b33dc22c66c241e6559" alt="Edge Impulse 数据采集:带边界框的已标注图像" width="1505" height="957" data-path="tutorials/img/paddle-npu/ei_dataset.png" />

<Note>
  **多样性胜过数量。** 覆盖多种场景的 200 张图像,比在同一房间同一位置拍摄的 500 张照片泛化能力好得多。如果模型之后在特定场景(昏暗光线、特写、不寻常角度)上失败,请添加更多该场景的照片。
</Note>

***

## 步骤 3:构建 impulse

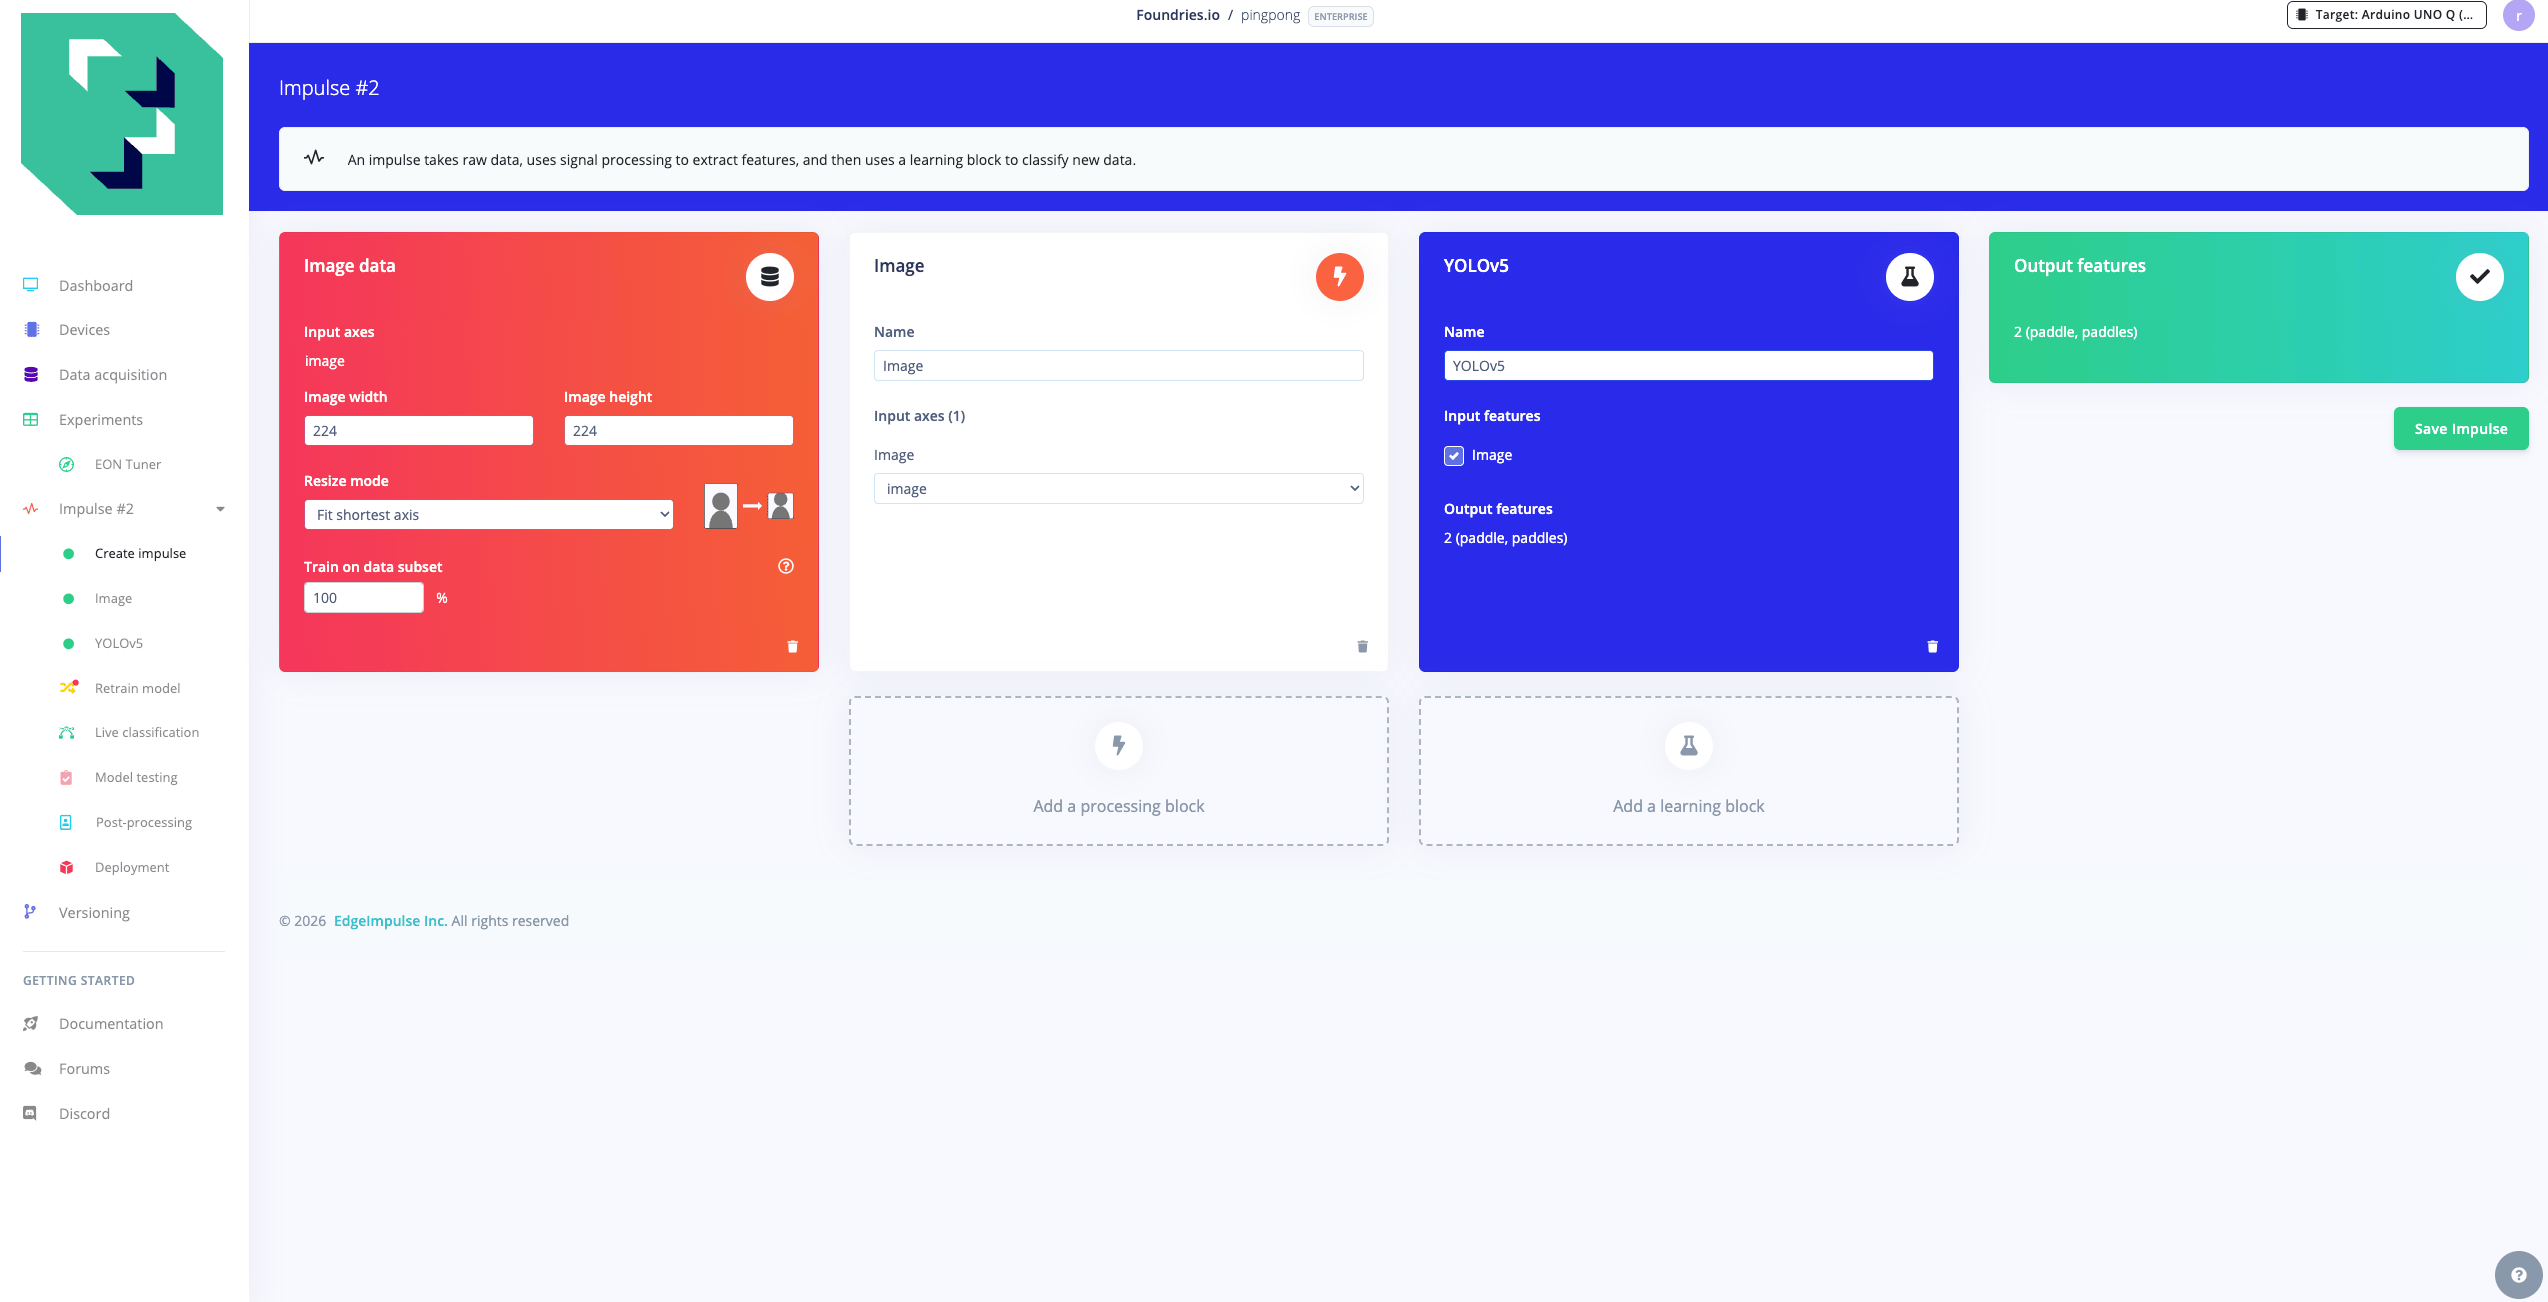
1. 左侧菜单:**Impulse design** → **Create impulse**。
2. 输入块:**Image**,320 × 320,Resize mode: Squash。
3. 处理块:**Image**(Color depth: RGB)。
4. 学习块:**Object Detection → YOLOv5**(Foundries.io)。
5. 点击 **Save impulse**。

<img src="https://mintcdn.com/qualcomm-prod/ZRoYdq-twSwPVBFY/tutorials/img/paddle-npu/ei_impulse_design.png?fit=max&auto=format&n=ZRoYdq-twSwPVBFY&q=85&s=832e2dfba459e69fd8fe9abaa3f5976d" alt="Impulse 设计:320×320 Image 输入 + YOLOv5 学习块" width="2548" height="1302" data-path="tutorials/img/paddle-npu/ei_impulse_design.png" />

<Note>
  **YOLOv5 可用性。** YOLOv5 不再是 Edge Impulse Studio 的内置块(2025 年 2 月移除)。要将其添加到您的项目中,请从 [edgeimpulse/ml-block-yolov5](https://github.com/edgeimpulse/ml-block-yolov5) 作为自定义块推送:

  ```bash theme={null}
  git clone https://github.com/edgeimpulse/ml-block-yolov5
  cd ml-block-yolov5
  edge-impulse-blocks init   # links to your project
  edge-impulse-blocks push
  ```

  推送后,刷新 Studio,YOLOv5 会出现在 **Add learning block** 下。另外,**YOLO-Pro**(内置块,标记为 *Developer Preview*)也可以正常工作并产生等效的结果。
</Note>

***

## 步骤 4:生成特征

左侧菜单:**Image** → **Generate features** → 点击 **Generate features**。

等待约 1–2 分钟。确认摘要显示您的训练条目和 **1 class (paddles)**。

***

## 步骤 5:训练

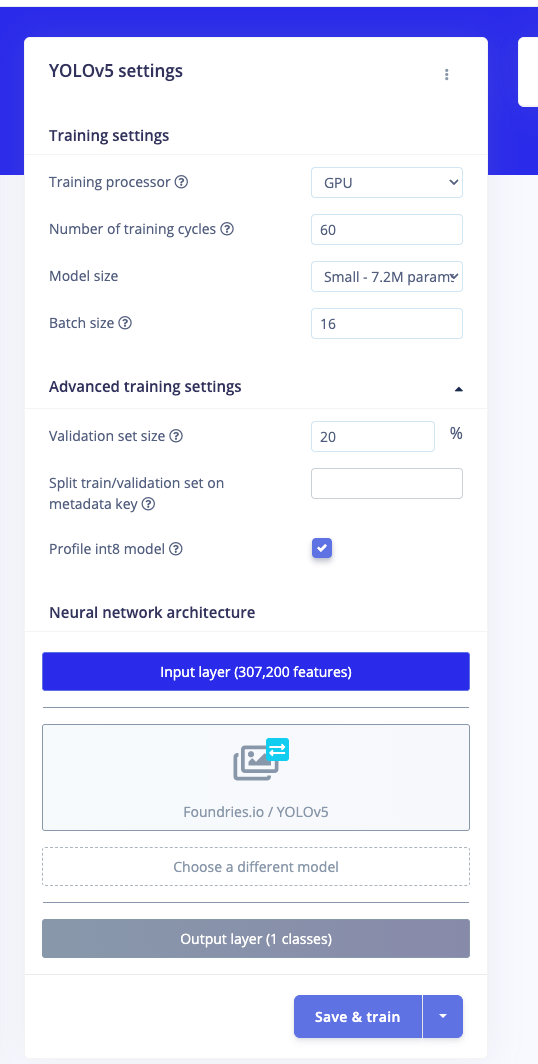
左侧菜单:**YOLOv5**,然后配置:

| 设置                  | 值                   |
| ------------------- | ------------------- |
| Training processor  | GPU                 |
| Model size          | Small (7.2M params) |
| Training cycles     | 60                  |
| Pretrained weights  | True                |
| Validation set size | 20%                 |
| Profile int8 model  | **enabled**         |

点击 **Save & train**。训练在 Edge Impulse 的 GPU 工作节点上运行,大约 10 到 15 分钟。

<img src="https://mintcdn.com/qualcomm-prod/ZRoYdq-twSwPVBFY/tutorials/img/paddle-npu/ei_yolov5_settings.png?fit=max&auto=format&n=ZRoYdq-twSwPVBFY&q=85&s=663dcf1d03d03c9da749ac93b0f52d07" alt="YOLOv5 设置:GPU、Small、60 个周期、启用 Profile int8 model" width="538" height="1064" data-path="tutorials/img/paddle-npu/ei_yolov5_settings.png" />

预期结果:

| 指标            | 值      | 含义                                         |
| ------------- | ------ | ------------------------------------------ |
| mAP\@0.5      | \~0.98 | IoU 0.5 下的平均精度均值,表示模型查找球拍的准确性和完整性。1.0 为完美。 |
| mAP\@0.5:0.95 | \~0.46 | 同一指标在更严格的框重叠阈值下的平均值(COCO 标准)。              |
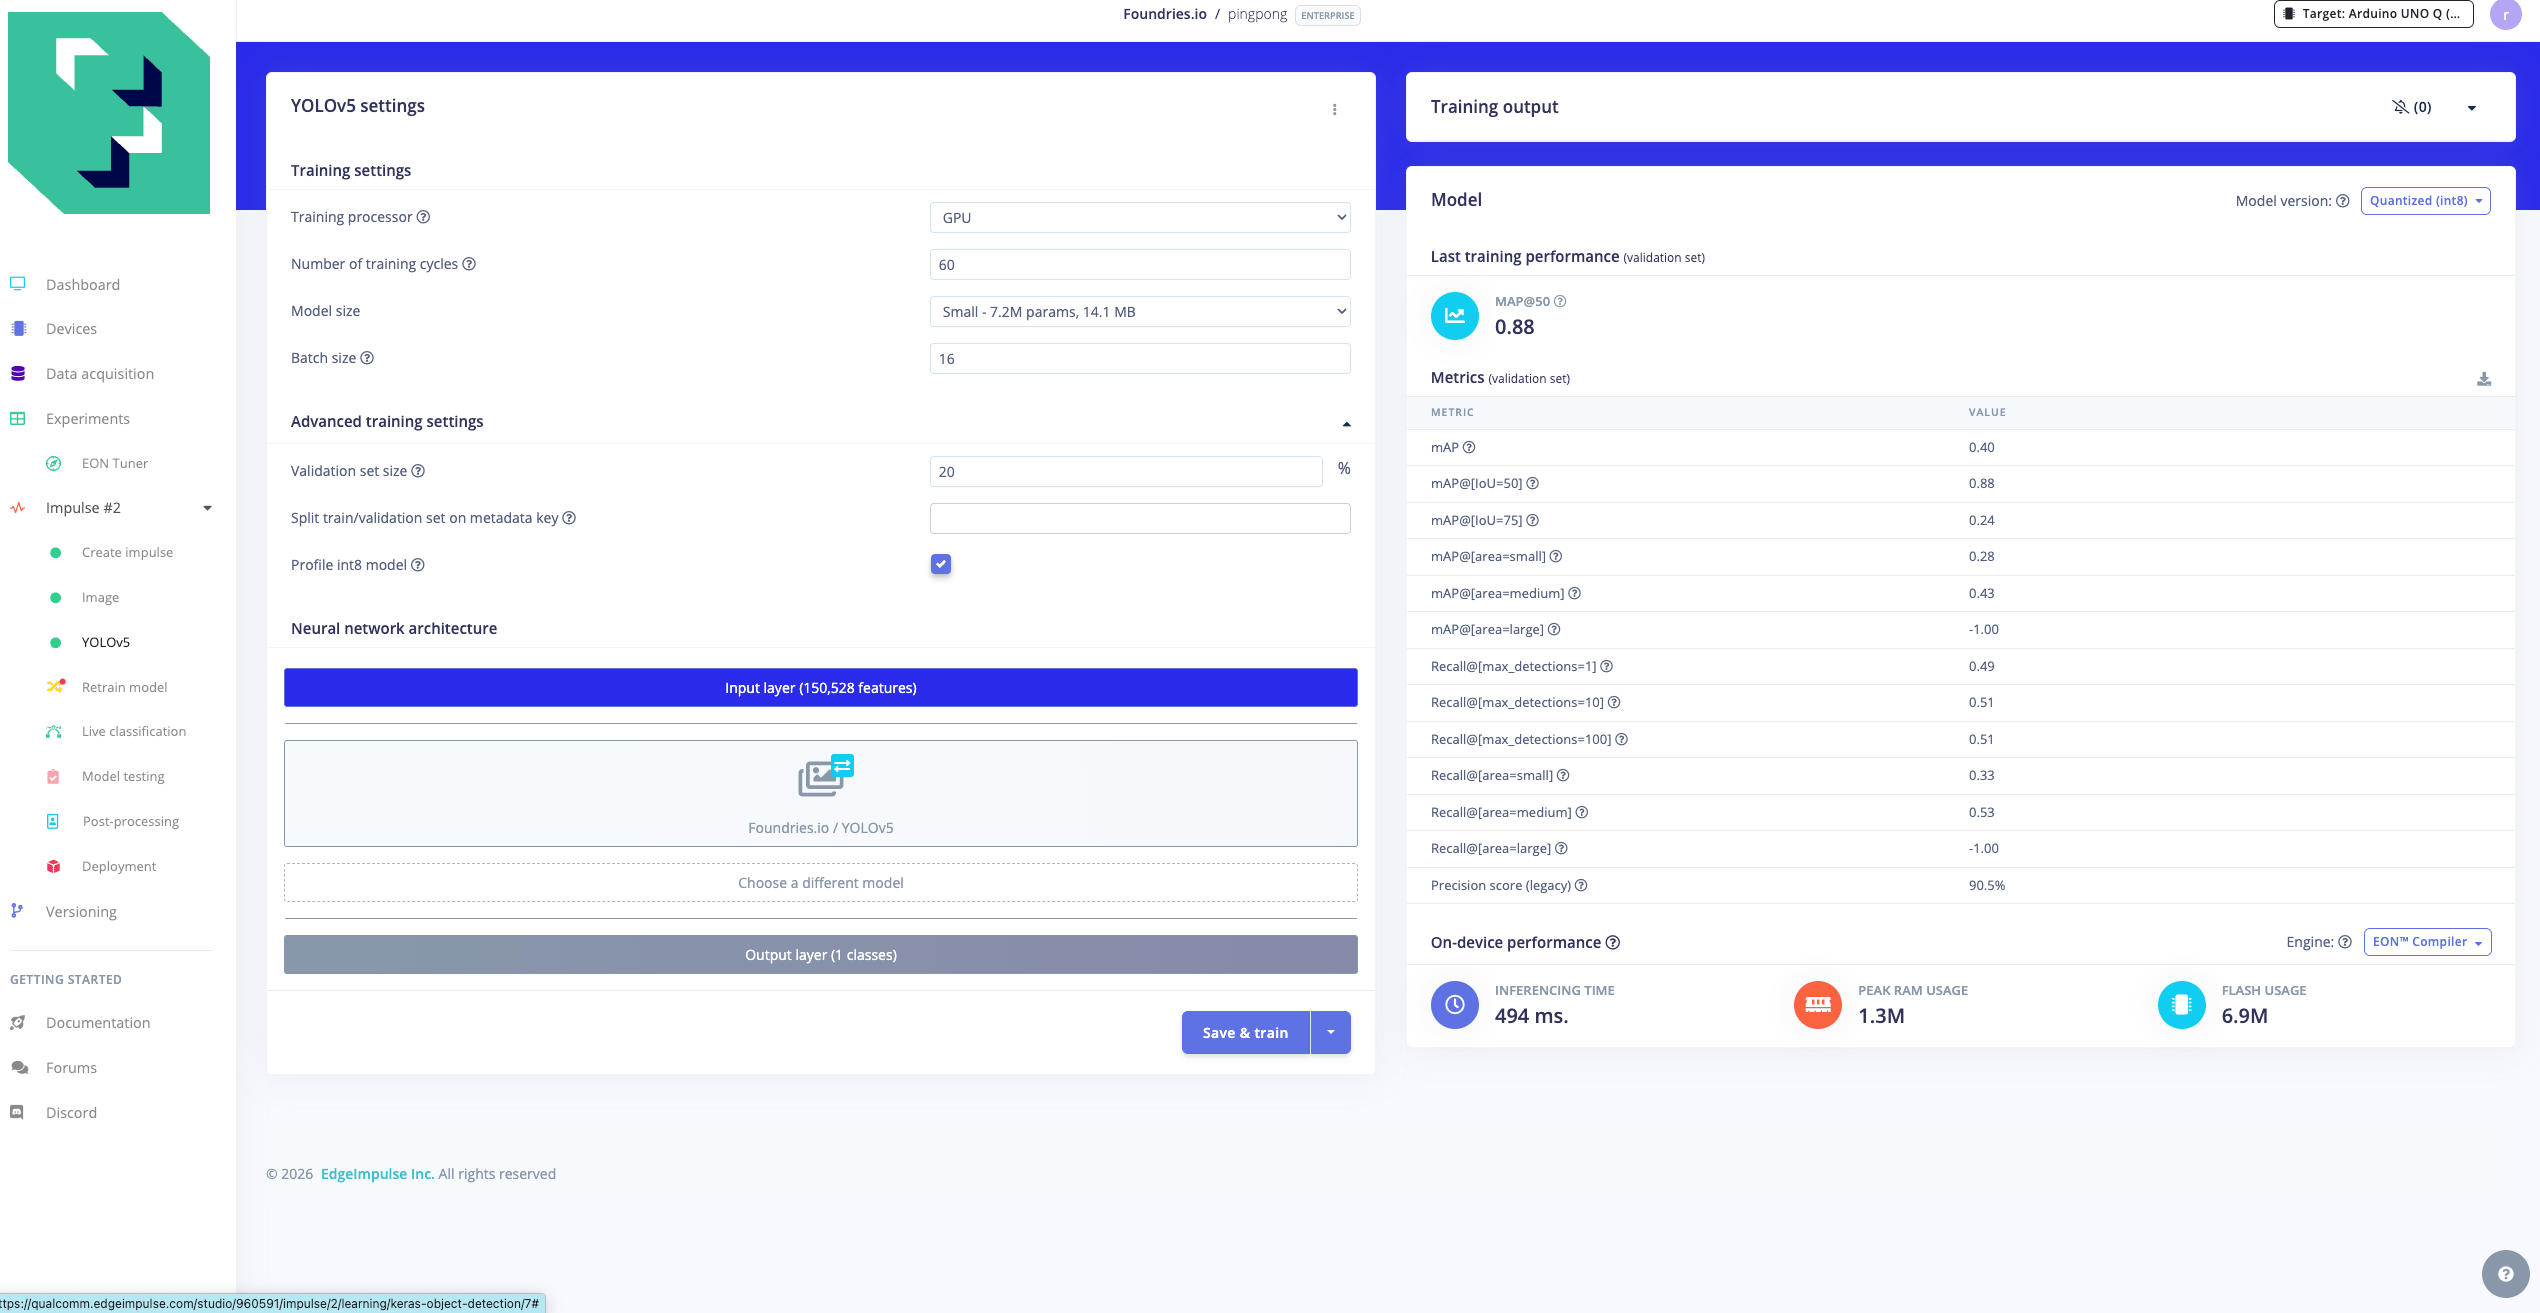
<img src="https://mintcdn.com/qualcomm-prod/ZRoYdq-twSwPVBFY/tutorials/img/paddle-npu/ei_training_result.png?fit=max&auto=format&n=ZRoYdq-twSwPVBFY&q=85&s=f823d63b87ba4f9ca3d5559eccb61b6f" alt="训练结果:F1 0.88,mAP 0.980" width="2540" height="1313" data-path="tutorials/img/paddle-npu/ei_training_result.png" />

这些数字来自为本项目构建的约 670 张图像的数据集,采集自多种距离、光照条件和背景。150 张图像的数据集可能得分较低;而变化丰富的 200 张图像集可以接近这个水平。

***

## 步骤 6:下载部署二进制文件

1. 左侧菜单:**Deployment**。
2. 搜索 **"Qualcomm Dragonwing IQ 8275 EVK (AARCH64 with Qualcomm QNN)"**。
3. 点击 **Build**。
4. 下载 `.eim` 文件(约 20 MB)。

`.eim` 是一个自包含的原生 aarch64 可执行文件,内嵌了模型、Edge Impulse Linux 运行时和 Qualcomm QNN(Qualcomm Neural Network)TFLite 委托。开发板上无需单独安装运行时。

***

## 步骤 7:复制到开发板并运行

```bash theme={null}
# Copy the binary
scp your-file.eim root@<board-ip>:/home/weston/pingpong-demo.eim

# Make executable and run
ssh root@<board-ip> "chmod +x /home/weston/pingpong-demo.eim && /home/weston/pingpong-demo.eim"
```

开发板默认凭据:`root` / `oelinux123`。`/home/weston` 是 `weston` 用户的主目录 — 该用户是每个原厂 Qualcomm Linux 镜像上预先创建的 Wayland 合成器用户。这并非本教程特有;如果您的镜像使用不同的用户,请将全文中的 `weston` 替换为您的用户名。

启动时,该二进制文件会打印一个 JSON 握手信息,确认它运行在 NPU 上:

```json theme={null}
{
  "inferencing_engine": {"engine_type": 4, "properties": ["qnn_delegates"]},
  "model_parameters": {
    "image_input_height": 320, "image_input_width": 320,
    "labels": ["paddles"], "model_type": "object_detection"
  }
}
```

`engine_type: 4` 加上 `qnn_delegates` 表示图正通过 QNN TFLite 委托运行在 HTP NPU 上。

确认握手后,在进入步骤 8 之前用 **Ctrl-C** 停止 `.eim` 进程 — 下面的 runner 将启动模型文件进行实时检测。

***

## 步骤 8:运行实时检测

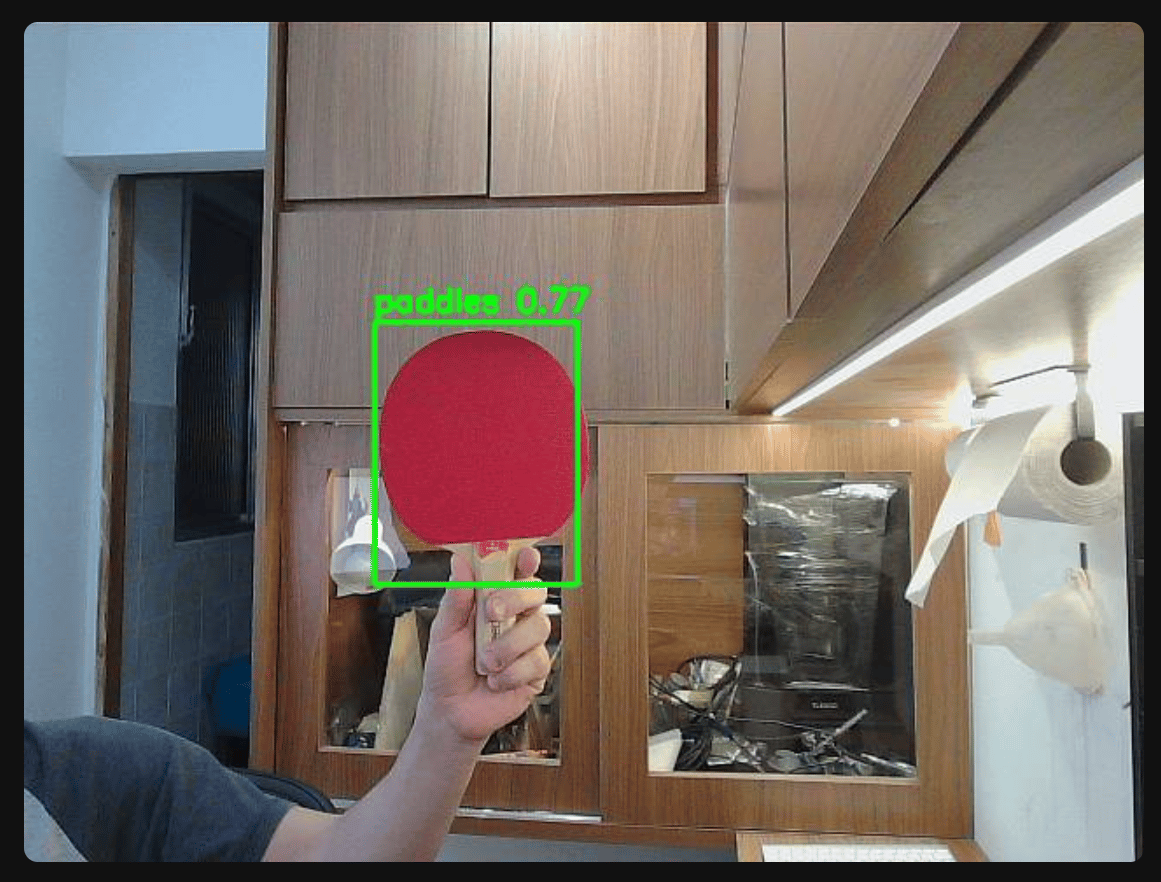
`.eim` 是一个套接字服务:启动后,它等待帧输入并返回检测结果。要真正向它发送图像并查看结果,请使用 `edge-impulse-linux-runner` CLI,它会打开开发板的摄像头,将帧流式传输到 `.eim`,并实时打印检测结果。

```bash theme={null}
# On the board
npm install -g edge-impulse-linux
edge-impulse-linux-runner --model-file /home/weston/pingpong-demo.eim
```

runner 会打开摄像头,将每一帧发送到 `.eim`,并打印每帧的检测结果和延迟。在 IQ-8275 EVK 上运行 10 次的结果:

| 指标              | 值          |
| --------------- | ---------- |
| 预热(JIT 编译,首次推理) | \~3 ms     |
| 稳态推理            | **\~2 ms** |
| 仅推理的 FPS(理论值)   | \~500 fps  |

3 毫秒的预热是首次调用时的一次性开销,此时 QNN 委托为 HTP 编译图。此后的每次调用都是 2 毫秒,常驻在 NPU 内存中。

<img src="https://mintcdn.com/qualcomm-prod/ZRoYdq-twSwPVBFY/tutorials/img/paddle-npu/ei_live_detection.png?fit=max&auto=format&n=ZRoYdq-twSwPVBFY&q=85&s=166885cdf9d8a7014c8e7372c4722adf" alt="通过 Edge Impulse .eim 在 IQ-8275 EVK 上进行实时球拍检测 — &#x22;paddles 0.97&#x22; 边界框" width="1161" height="882" data-path="tutorials/img/paddle-npu/ei_live_detection.png" />

<Note>
  **协议细节。** `.eim` 通过 UNIX 套接字使用 JSON 协议。推理的正确消息键是 `classify_shm`,特征通过 POSIX 共享内存传递,而更直观的 `classify` 键会返回错误。`edge-impulse-linux-runner` 会正确处理这一点;如果您构建自定义客户端,请使用 `classify_shm`。
</Note>

***

## 底层发生了什么

`.eim` 是 JIT 部署路径:模型以 INT8 TFLite 图的形式存储,并在首次推理调用时为 HTP 编译。它用较小的首次调用开销(3 毫秒)换取可移植性。同一个二进制文件无需重新编译即可在任何支持 QNN 的开发板上运行。

另一种选择是 AOT(Ahead-Of-Time,提前编译):使用 QAIRT 工具链离线编译模型,并交付一个芯片专用的上下文二进制文件(`.bin`),它零预热,但只能在构建时针对的确切 HTP 硬件版本上运行。两条路径都能达到 2 毫秒的稳态。完整的 QAIRT 流水线记录在[使用 Qualcomm 工具逐步实现球拍检测](/zh/tutorials/paddle-npu-reproduce)中。

***

## 后续步骤

* **完整故事:** 每一个设计决策、失败和基准测试:
  [教 Qualcomm 芯片识别乒乓球拍](/zh/tutorials/paddle-npu-story)

* **每条命令、每个脚本,端到端:**
  [使用 Qualcomm 工具逐步实现球拍检测](/zh/tutorials/paddle-npu-reproduce)

* **所有内联源文件(env.sh、转换脚本、requirements):**
  [配套文件](/zh/tutorials/paddle-npu-story-files)