

Prerequisites
- IQ-9075 EVK hardware
- Ethernet cable (RJ45)
- Host PC on the same network as the IQ-9075 EVK
- SSH client software
- Basic Linux command-line knowledge
Architecture
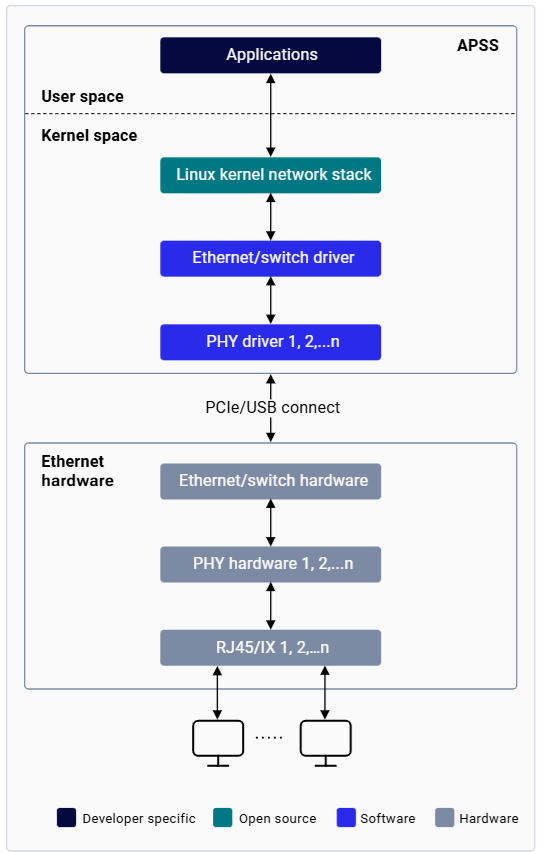
| Component | Description |
|---|---|
| Application Processor Subsystem (APSS) | Runs on a Linux-based operating system |
| Ethernet driver | Linux kernel driver providing data connectivity over a wired Ethernet interface |
| PHY driver | Low-level driver managing the Ethernet physical layer; implements a state machine for PHY lifecycle from initialization to link establishment; interacts with MDIO to access PHY registers |
| Ethernet hardware | 1× QEP8081 PHY for 10/100/1000/2500 Mbps, enabled by RJ45 connector |
Getting Started

Bring Up Ethernet

Establish access to the device via SSH over Wi-Fi or the serial prompt before proceeding. See the Set up the device section for instructions.
Flash the corresponding CDT on the device to ensure the correct configuration is used for Ethernet bring-up.
Configure MAC Address (optional)
The IQ-9075 EVK ships with a factory MAC address. Skip this step to use it as-is.To change the MAC address:
Assign an IP Address
On a public network, the DHCP server assigns an IP address automatically. To assign a static IP address manually:
Ethernet Operations
Check Connectivity
Useping to verify connectivity between the device and a remote host. The client IP address must be in the same subnet as the device.
Configure NIC Settings
Useethtool to view and configure NIC parameters such as speed, duplex, and auto-negotiation:
Configure Network Interface
Useip addr add to assign a static IP address when DHCP based automatic IP assignamnet is unavailable:
Capture Network Traffic
Usetcpdump to intercept and analyze packets:
View Routing Table
Configure Link Speed
Set link speed from the supported modes shown inethtool output:
Troubleshooting
Collect Diagnostic Logs
Collect dmesg logs
Common Issues
No Link Detected
No Link Detected
Symptoms: Solutions: Replace faulty cable, ensure both ends are securely connected, verify link partner is powered on, check for PHY driver errors in
ethtool end0 shows “Link detected: no”; interface shows as DOWN.Steps:dmesg.Cannot Ping Remote Host
Cannot Ping Remote Host
Symptoms: Link detected but ping fails; “Destination Host Unreachable” or “Network is unreachable”.Steps:Solutions: Configure correct IP address and subnet mask; add default gateway if needed (
route add default gw <gateway_ip>); verify firewall rules are not blocking ICMP.Slow Network Performance
Slow Network Performance
Symptoms: High latency, slow file transfers, packet loss.Steps:Solutions: Force 1000 Mbps full-duplex if auto-negotiation fails; replace cable if errors are detected; adjust MTU for specific network requirements.
Interface Not Detected
Interface Not Detected
Symptoms: Solutions: Ensure correct CDT is flashed; verify Ethernet driver is compiled in kernel; check for hardware initialization errors in
eth0 does not appear in ip a show output.Steps:dmesg; reboot and check again.Advanced Diagnostics
Filter Ethernet-related dmesg messages:.pcap file in Wireshark on your host PC.
Monitor real-time hardware statistics:
Command Reference
| Command | Purpose | Example |
|---|---|---|
dmesg | View kernel messages | dmesg | grep eth |
ethtool <if> | Check link status | ethtool end0 |
ethtool -S <if> | View NIC statistics | ethtool -S end0 |
ip addr show | Show IP addresses | ip addr show end0 |
ip route show | Show routing table | ip route show |
ping <host> | Test connectivity | ping 192.168.1.10 |
tcpdump -i <if> | Capture packets | tcpdump -i end0 |
netstat -r | Show routes | netstat -r |
netstat -i | Show interface stats | netstat -i |