gbm_create_device(187): Info: backend name is: msm_drmSetting pipeline to PAUSED ...Pipeline is live and does not need PREROLL ...Setting pipeline to PLAYING ...New clock: GstSystemClock
##################################### MENU #####################################============================== Pipeline Controls==============================(0) NULL: Set the pipeline into NULL state(1) READY: Set the pipeline into READY state(2) PAUSED: Set the pipeline into PAUSED state(3) PLAYING: Set the pipeline into PLAYING state==================================== Other====================================(p) Plugin Mode: Choose a plugin which to control(q) Quit : Exit the applicationChoose an option:
3
拍摄快照
使用以下菜单步骤在录制视频的同时拍摄快照。
Menu Steps
(1) ready -> (3) Playing -> (p)Plugin Mode : Select (8)camerasrc -> (37) capture-image -> (1): still - Snapshot ->(1) Snapshot count ( 'guint' value for arg1)
4
停止并获取文件
要停止摄像头,请按 Enter,再按 b(返回),然后按 q(退出)。录制的视频文件和快照图像保存在 /opt/ 中。可通过在主机 PC 上运行以下 scp 命令从设备拉取录制的内容:
SCP (SSH)
$ scp -r root@[ip-addr]:/opt/<file name> .
MIPI 多摄像头流传输
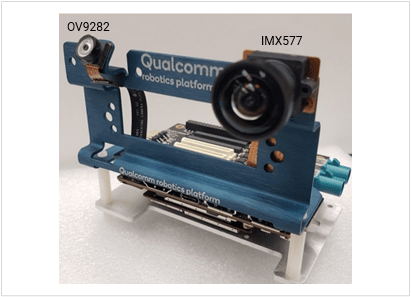
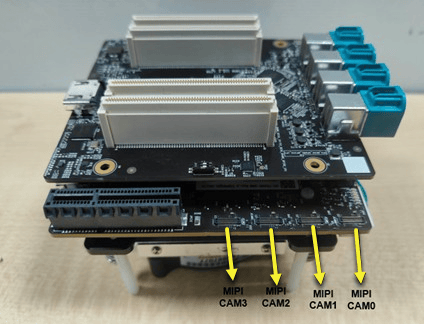
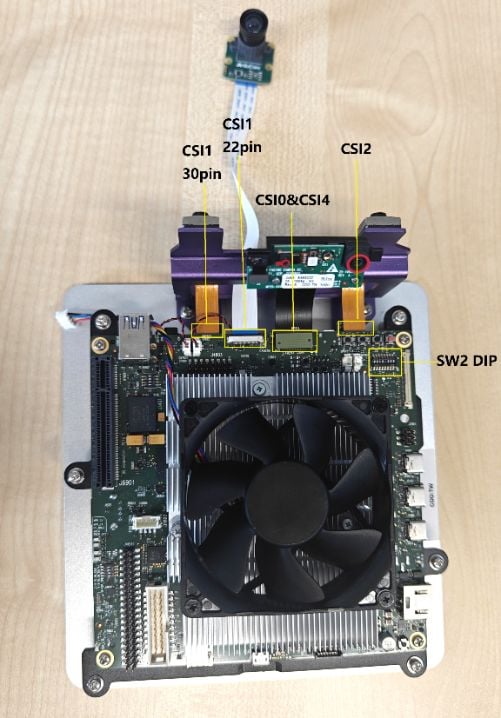
QCS6490 有五个 CSI PHY,可连接五个 MIPI 摄像头。QCS6490 有三个 IFE 和两个 IFE Lite。这意味着您可以使用 IFE 运行三个摄像头,使用 IFE Lite 运行两个摄像头。IFE Lite 仅支持从传感器进行原始(raw)转储。您可以将单色(mono)摄像头连接到 IFE Lite,转储原始帧,然后使用 CHI 节点将输出转换为 YUV 帧。要在 RB3 平台上验证五摄像头并发:
1
连接 MIPI 摄像头
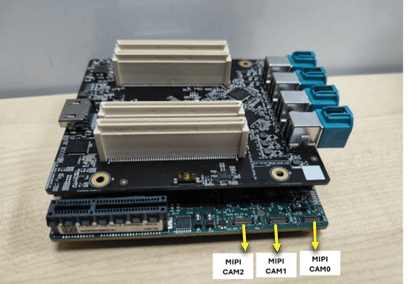
按照下表连接 MIPI 摄像头。
插槽
摄像头传感器
CAM 0A
OV9282 单色摄像头
CAM 0B
OV9282 单色摄像头
CAM1
IMX577 bayer 摄像头
CAM2
IMX577 bayer 摄像头
CAM3
IMX577 bayer 摄像头
2
并发运行所有五个摄像头的 GST 命令
对于 OV9282 单色摄像头,使用单独的摄像头管线(RealTimeMonoToYUV)。该管线使用 IFE Lite 转储原始帧,然后使用 CHI 节点将其转换为 YUV 帧。使用 GST 参数 ife-direct-stream=1 来使用此摄像头管线。由于它使用 IFE Lite 运行,因此这些摄像头上不会应用 2A。
gbm_create_device(187): Info: backend name is: msm_drmSetting pipeline to PAUSED ...Pipeline is live and does not need PREROLL ...Setting pipeline to PLAYING ...New clock: GstSystemClock
##################################### MENU #####################################============================== Pipeline Controls==============================(0) NULL: Set the pipeline into NULL state(1) READY: Set the pipeline into READY state(2) PAUSED: Set the pipeline into PAUSED state(3) PLAYING: Set the pipeline into PLAYING state==================================== Other====================================(p) Plugin Mode: Choose a plugin which to control(q) Quit : Exit the applicationChoose an option:
3
拍摄快照
使用以下菜单步骤在录制视频的同时拍摄快照。
Menu Steps
(1) ready -> (3) Playing -> (p)Plugin Mode : Select (11)camerasrc ->(38) capture-image -> (1): still - Snapshot ->(1) Snapshot count ( 'guint' value for arg1)
4
停止并获取文件
要停止摄像头,请按 Enter,再按 b(返回),然后按 q(退出)。录制的视频文件和快照图像保存在 /opt/ 中。可通过在主机 PC 上运行以下 scp 命令从设备拉取录制的内容:
gbm_create_device(187): Info: backend name is: msm_drmSetting pipeline to PAUSED ...Pipeline is live and does not need PREROLL ...Setting pipeline to PLAYING ...New clock: GstSystemClock
##################################### MENU #####################################============================== Pipeline Controls==============================(0) NULL: Set the pipeline into NULL state(1) READY: Set the pipeline into READY state(2) PAUSED: Set the pipeline into PAUSED state(3) PLAYING: Set the pipeline into PLAYING state==================================== Other====================================(p) Plugin Mode: Choose a plugin which to control(q) Quit : Exit the applicationChoose an option:
3
拍摄快照
使用以下菜单步骤在录制视频的同时拍摄快照。
Menu Steps
(1) ready -> (3) Playing -> (p)Plugin Mode : Select (11)camerasrc ->(38) capture-image -> (1): still - Snapshot ->(1) Snapshot count ( 'guint' value for arg1)
4
停止并获取文件
要停止摄像头,请按 Enter,再按 b(返回),然后按 q(退出)。录制的视频文件和快照图像保存在 /opt/ 中。可通过在主机 PC 上运行以下 scp 命令从设备拉取录制的内容:
gbm_create_device(187): Info: backend name is: msm_drmSetting pipeline to PAUSED ...Pipeline is live and does not need PREROLL ...Setting pipeline to PLAYING ...New clock: GstSystemClock
##################################### MENU #####################################============================== Pipeline Controls==============================(0) NULL: Set the pipeline into NULL state(1) READY: Set the pipeline into READY state(2) PAUSED: Set the pipeline into PAUSED state(3) PLAYING: Set the pipeline into PLAYING state==================================== Other====================================(p) Plugin Mode: Choose a plugin which to control(q) Quit : Exit the applicationChoose an option:
3
拍摄快照
使用以下菜单步骤在录制视频的同时拍摄快照。
Menu Steps
(1) ready -> (3) Playing -> (p)Plugin Mode : Select (11)camerasrc ->(38) capture-image -> (1): still - Snapshot ->(1) Snapshot count ( 'guint' value for arg1)
4
停止并获取文件
要停止摄像头,请按 Enter,再按 b(返回),然后按 q(退出)。录制的视频文件和快照图像保存在 /opt/ 中。可通过在主机 PC 上运行以下 scp 命令从设备拉取录制的内容:
Using camera /base/soc@0/cci@ac4b000/i2c-bus@1/camera@1a as cam0 [0:15:01.067615799] [2155] INFO Camera camera.cpp:945 configuring streams:(0) 4056x3040-SRGGB10_CSI2Pcam0: Capture 10 frames
Using camera /base/soc@0/cci@ac4b000/i2c-bus@1/camera@1a as cam0 [0:15:01.067615799] [2155] INFO Camera camera.cpp:945 configuring streams:(0) 4056x3040-SRGGB10_CSI2Pcam0: Capture 10 frames
Using camera /base/soc@0/cci@ac4b000/i2c-bus@1/camera@1a as cam0 [0:15:01.067615799] [2155] INFO Camera camera.cpp:945 configuring streams:(0) 4056x3040-SRGGB10_CSI2Pcam0: Capture 10 frames
Using camera /base/soc@0/cci@ac4b000/i2c-bus@1/camera@1a as cam0 [0:15:01.067615799] [2155] INFO Camera camera.cpp:945 configuring streams:(0) 4056x3040-SRGGB10_CSI2Pcam0: Capture 10 frames
Using camera /base/soc@0/cci@ac4b000/i2c-bus@1/camera@1a as cam0 [0:15:01.067615799] [2155] INFO Camera camera.cpp:945 configuring streams:(0) 4056x3040-SRGGB10_CSI2Pcam0: Capture 10 frames
USB 摄像头
Qualcomm Linux 设备为符合 USB 视频类(UVC)标准的 USB 网络摄像头提供驱动支持。UVC 视频驱动将这些摄像头暴露为 V4L2 视频设备,可通过 /dev/videoX 等字符设备节点进行访问。有关 USB 摄像头的使用,请参阅 USB camera configuration。示例应用 gst-usb-single-camera-app 可用于 USB 摄像头验证。