

Prerequisites
Host requirements
- Install OpenSSL 0.9.80 June 2010 (or later version) on the Linux host computer.
- Install the following efitools:
- cert-to-efi-sig-list: converts OpenSSL certificates to EFI signature lists
- sign-efi-sig-list: signs the EFI signature list
- hash-efi-sig-list: creates a hash signature list entry from a binary
Provision replay protected memory block on device
Replay protected memory block (RPMB) provisioning is mandatory for UEFI secure boot enablement. For more information, see RPMB.Configure an UEFI secure boot to generate keys and certificates
You can setup an initial UEFI secure boot configuration and convert the keys and certificates into a format that UEFI can understand. See the workflow to understand the off-target preparation and the on-device execution. Figure : UEFI secure boot workflow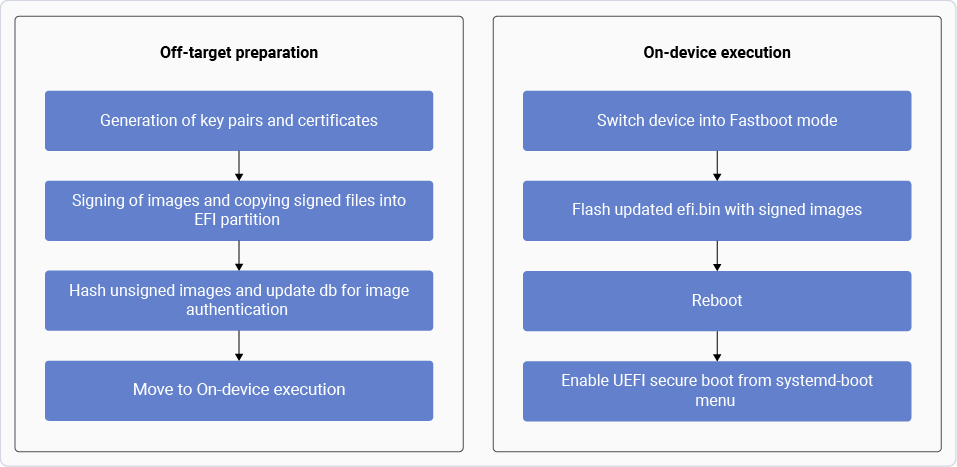
Generate key and certificate
To enable UEFI secure boot, generate a pair of keys and certificates for signing and authentication. The key generation supports the following algorithms:- RSA 2048/4096 with SHA-256/SHA384 hash algorithm
- ECDSA secp256r1/secp384r1
- Create a directory and run the commands in the same location to perform these steps on a Linux machine.
- For ECC, replace
rsa:2048withec:secp384r1orec:secp256r1. For SHA384, replace-sha256with-sha384in the following commands.
Generate UID
You can generate a GUID and create three new keys with self-signed certificates in CRT/PEM format and keys in.key format:
GUID uses uuidgen to generate the signature owner GUID:
Create PK key
- Create a PK key pair (RSA-2048) and certificate:
- Convert the
.crtfile into the.cerfile: - Convert the
.crtfile into the.eslfile: - Sign and generate the
.authfile with the.crt,.esl, and.keyfiles:
Create KEK key
- Create a KEK key pair (RSA-2048) and certificate:
- Convert the
.crtfile into the.cerfile: - Convert the
.crtfile into the.eslfile: - Sign and generate the
.authfile with the.crt,.esl, and.keyfiles:
Create dB key
- Create a dB key pair (RSA-2048) and certificate:
- Convert the
.crtfile into the.cerfile: - Convert the
.crtfile into the.eslfile: - Sign and generate the
.authfile with the.crt,.esl, and.keyfiles:
Sign images and copy (.auth) key/signed files to EFI partition
The EFI system partition consists of EFI, loader, and ostree with information relevant to EFI when using systemd-boot. The DTB partition consists of dtb directories. The EFI system partition holds essential files for booting the system and managing updates, while the DTB partition contains hardware configuration information. This section provides instructions to:The systemd-boot validates the signed images and is also used to enroll the following:
- Sign various images.
- Copy
(.auth)key and signed files to EFI partition and DTB partition directories.- Signed and executable images such as the
bootaa64.efifile (systemd-boot) are placed in theefimountedbin/EFI/BOOT/directory and thelinux-<target-name>.efifile (Linux) image is placed in theefimountedbin/EFI/Linuxdirectory.
- UEFI secure boot keys are placed in a specific directory in
/keysfor key enrollment. The systemd-boot uses these keys and stores them in the RPMB during UEFI boot time services.- You can configure the wait time (in seconds) in the systemd-boot loader configuration. Kernel loading is delayed during the wait time, allowing you to review and select available options in the systemd-boot menu.
- Device tree files are stored in the
dtbmountedbin/dtbdirectory. These files are used by UEFI during runtime, and the device tree files are initialized. While signing,.sigfiles are created and placed in the same directory as these files are non-PE images.
Table : EFI system partition (efi.bin) /EFI/Loader/Boot/bootaa64.efiloader.conf/Linux/linux-<target-name>.efi/keys/authkeys/db.auth/keys/authkeys/KEK.auth/keys/authkeys/PK.authTable : DTB partition (dtb.bin) --- --- qclinux_fit.img (or combined-dtb.dtb)qclinux_fit.sig (or combined-dtb.sig)
Place signed images and keys in EFI partition
Follow these steps to place the signed images and keys in an EFI partition on a Linux host machine.- Locate the
efi.binanddtb.binfile paths in thecontents.xml, file to obtain theefi.binand dtb.bin` files from the meta. - Mount the
efi.binfile into the<workspace>directory and create anefimountedbindirectory within the<workspace>directory. - Mount the
dtb.binfile into the <workspace> directory and create adtbmountedbindirectory within the <workspace> directory. - Mount the
efi.binfile: - Mount the
dtb.binfile: - Create the
loader/keys/authkeysdirectory chain in<workspace>/efimountedbin/to enroll keys. - Select and copy the
.auth files(PK.auth, KEK.auth, and db.auth) to the authkeys directory inefimountedbin. - Sign the
bootaa64.efi,linux-<target-name>.efi, andqclinux_fit.img(orcombined-dtb.dtb) binary files with the keys and copy to the respective directories in theefimountedbinanddtbmountedbindirectories.- Sign
efiimages:The sbsign tool is designed for signing EFI boot images, such as
bootaa64.efithat follow EFI specifications. This tool, which is used for UEFI secure boot signing is available for download and use on Linux systems. It’s important to note that sbsign can only sign PE images with a.efiextension.-
Copy the
bootaa64.efifile from the/efimountedbin/EFI/BOOTdirectory and thelinux-<target-name>.efifile from theefimountedbin/Linux/directory to the<workspace>/imagesdirectory on your Linux machine. - Sign the images:
-
Copy the
- Sign the dtb image:
All images authenticated by UEFI secure boot are regular APIs and typically in the PE format. The signature header and size are appended to the existing PE header, and the signature is appended at the end of the signed file.
However, when images in non-PE formats require UEFI secure boot authentication, the absence of the PE header and its magic number to recognize the image format fail. As a result, it’s not possible to use standard tools and paths for image verification.
Currently, among the list of images that UEFI secure boot verifies, only the dtb files are in non-PE format images. As an alternative to the sbsign tool, you can use the
OpenSSL cmscommand to generate signature files for signing images in non-PE format. Follow these steps for signing non-EFI images:- To sign the dtb file and signature file, run the following command:
- To sign the image, run the following command:
- Sign
- Copy the signed
qclinux_fit.img,linux-<target-name>.efi, andbootaa64.efiimages back to their respective directories(dtbmountedbin/, efimountedbin/Linux/, and efimountedbin/EFI/BOOT/). - Configure the timeout duration of systemd-boot manager to display menu:
- Open and edit the
loader.conffile at/loader/loader.confwith sudo access:
- Add the line
timeout 10to set the boot menu timeout and save the file.
- Open and edit the
- To unmount the EFI binary to retrieve the latest
efi.binfile, run the command:
- To unmount the DTB binary to retrieve the latest
dtb.binfile, run the command:
- To flash signed images and keys on the target, bring the device into the Fastboot mode and using following commands flash updated
efi.binanddtb.binimages:
Enable UEFI secure boot from systemd-boot menu
Ensure that the EFI signed images and the secure boot keys are first generated and then flashed on the target, along with the systemd-boot manager timeout configuration. For more details, see Sign images and copy (.auth) key/signed files to EFI partition. Note The key enrollment using systemd-boot manager to store keys into RPMB is a one-time operation. After successful key enrollment, the reprovisioning and updating of UEFI secure boot keys isn’t possible. Following steps enables the UEFI secure boot on the device.- After the UEFI is loaded and run during the next bootup, the systemd-boot manager displays the following interactive menu on the serial log.
- Use vol- key to stop the timeout, which displays Enroll Secure Boot keys: authkeys.
- Use power key to start enrollment. This is followed by a timeout with option to abort this enrollment operation, in this timeout duration don’t use any key. After this timeout is completed, the key enrollment operation is executed. A successful key enrollment is shown in the following log.
- After the key is successfully enrolled, UEFI automatically switches from SetupMode to UserMode. Then systemd-boot triggers a device reboot.
- On next device bootup, UEFI starts in UserMode and the UEFI secure boot is enabled. A successful enablement of UEFI secure boot is shown in the following serial log.
- Once the UEFI secure boot is successfully enabled, revert the systemd-boot manager timeout configuration.
Hash unsigned images and update DB for image authentication
UEFI secure boot allows image authentication. This authentication is achieved through the hash of images stored in the signature database (dB), even if the images aren’t signed or the certificates in the images aren’t present in the dB. This process is reserved for content that can’t be signed or altered from its vendor-provided state. If the image hash is available in the database deny (dBX) list, the trust of signed binaries can be removed without having to revoke the corresponding certificates or keys. This is useful, for example, when dealing with an earlier signed boot loader that’s vulnerable to recent exploits. It’s redundant to apply a signature and create a dB hash for the same binary. Follow these steps if the image composition doesn’t require any changes, meaning no new keys and certificates are being added or modified in the image, and no UEFI secure boot authentication is needed for the existing images. You can calculate the hash of images and generate an allowed signature dB file.Generate db.auth file for unsigned images
- Generate a hash of all images to be verified and convert the hash into an
.eslfile: - Sign the
.eslhash file with the dB key: - Copy the generated
db.authfile into the EFI binary and provision the keys into the device.
- Mount the
efi.binfile to the<workspace>directory and create anefimountedbinfolder in the<workspace>directory. - Create a
testkeysfolder in the<workspace>directory on the Linux machine and copy the pre-existing keys to it. - Sign the images:
- Copy the
db.authfile to theqckeysfolder at<workspace>/efimountedbin/loader/keys/qckeys. - Follow the dtb signing steps and sign the dtb images to generate a new
efi.binfile. For more information, see Sign images and copy (.auth) key/signed files to EFI partition. - For a Linux host machine on the target:
- Erase any existing UEFI secure boot keys and flash the EFI binary with fastboot.
- Provision keys with systemd-boot. For more information, see Enable UEFI secure boot from systemd-boot menu. Note All unsigned files are signed with other keys and authenticated with UEFI using this method.
Next steps
- For chipset feature management and to upgrade the chipset feature packs, see Install or upgrade SoftSKU feature packs.
- To customize memory and SEPolicy, see Customize security services.
- For common logging and debugging techniques, see Debug Qualcomm TEE and secure devices.