The IQ9-EVK supports camera sensor connectivity through four MIPI CSI interfaces, supporting both C-PHY and D-PHY modes.
Hardware Architecture CSI Interface Mapping CSI Interface Analog Switch Camera Connector B2B Connector CSI0 U45 (TMUX646ZECR) JCAM0 JEXP4, Pins 111–120 CSI1 U42 (TMUX646ZECR) JCAM1 JEXP4, Pins 51–60 CSI2 U44 (TMUX646ZECR) JCAM2 JEXP4, Pins 40–49 CSI3 U43 (TMUX646ZECR) JCAM3 JEXP4, Pins 29–38
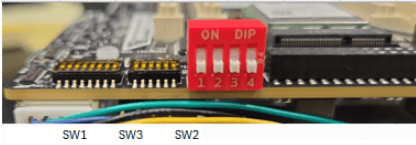
DIP Switch Configuration The four CSI PHYs can be routed to either MIPI camera ports or GMSL camera ports (via mezzanine board) using DIP switches.
SW1 is the left series of switches in the image above.
Switch ON OFF (default) SW1-5 CSI0 → GMSL mezzanine CSI0 → mainboard SW1-6 CSI1 → GMSL mezzanine CSI1 → mainboard SW1-7 CSI2 → GMSL mezzanine CSI2 → mainboard SW1-8 CSI3 → GMSL mezzanine CSI3 → mainboard
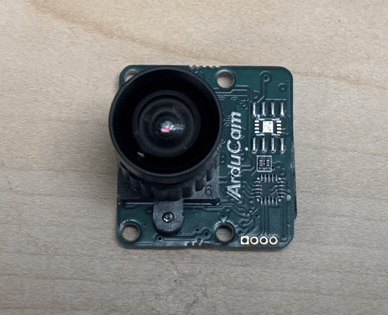
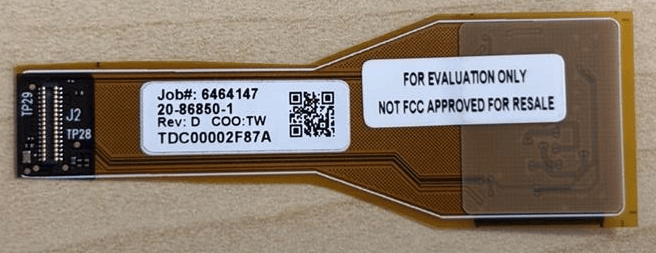
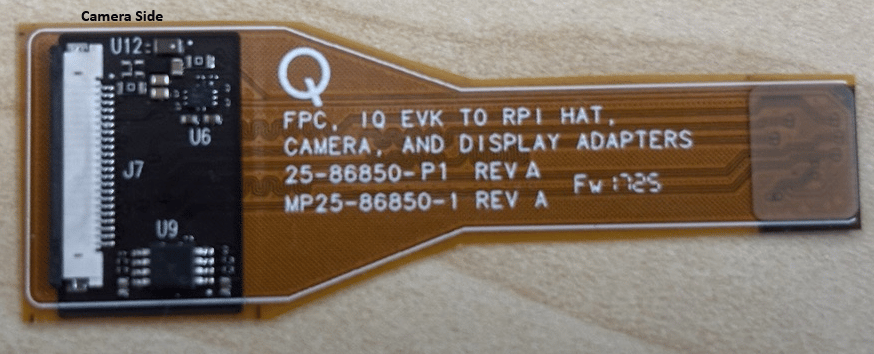
Supported Camera Sensors Raspberry Pi Camera Sensors Flex cable (Arducam 22-pin Raspberry Pi to Qualcomm 30-pin CSI adapter): MIPI CSI Camera Sensors Supported Resolutions Resolution Aspect Ratio IMX577 OV9282 4000 × 3000 4:3 Yes No 3840 × 2160 16:9 Yes No 1920 × 1080 16:9 Yes No 1280 × 720 16:9 Yes Yes 1024 × 768 4:3 Yes Yes 800 × 600 4:3 Yes Yes 640 × 480 4:3 Yes Yes 320 × 240 4:3 Yes Yes
Advanced features such as SHDR, LDC, and EIS are not supported on IQ-9075. There is no hardware JPEG encoder — snapshots use a software encoder running on the CPU.
Camera Streaming Single Camera Stream gst-launch-1.0 -e qtiqmmfsrc name=camsrc camera= 0 ! \ 'video/x-raw,format=NV12,width=1280,height=720,framerate=30/1' ! fakesink
If the pipeline status changes to PLAYING, the camera is running. Press Ctrl+C to stop.
Video Encoding gst-launch-1.0 -e qtiqmmfsrc name=camsrc camera= 0 ! \ video/x-raw,format=NV12,width=1280,height=720,framerate=30/1, \ interlace-mode=progressive,colorimetry=bt601 ! \ v4l2h264enc capture-io-mode= 4 output-io-mode= 5 \ extra-controls="controls,video_bitrate=6000000,video_bitrate_mode=0;" ! \ h264parse ! mp4mux ! filesink location=/home/ubuntu/mux_avc.mp4
Retrieve the file:
scp -r ubuntu@ < ip-add r > :/home/ubuntu/mux_avc.mp4 .
Object Detection Pipeline Download required models and assets first:
cd /home/ubuntu
curl -L -O https://raw.githubusercontent.com/quic/sample-apps-for-qualcomm-linux/refs/heads/main/qualcomm-linux/scripts/download_artifacts.sh
sudo chmod +x download_artifacts.sh && sudo ./download_artifacts.sh
Then run the object detection pipeline:
gst-launch-1.0 -e qtivcomposer name=mixer \ sink_0::position="<0, 0>" sink_0::dimensions="<640, 360>" \ sink_1::position="<640, 0>" sink_1::dimensions="<640, 360>" \ mixer. ! queue ! waylandsink enable-last-sample= false fullscreen= true \ qtiqmmfsrc name=camsrc_0 camera= 0 multicamera-hint= true ! \ video/x-raw,format=NV12,width=1280,height=720,framerate=30/1 ! queue ! \ tee name=split_0 split_0. ! queue ! qtimetamux name=mux_0 ! queue ! \ qtivoverlay ! queue ! mixer. split_0. ! queue ! qtimlvconverter ! queue ! \ qtimltflite delegate=external external-delegate-path=libQnnTFLiteDelegate.so \ external-delegate-options="QNNExternalDelegate,backend_type=htp;" \ model=/etc/models/yolox_quantized.tflite ! queue ! \ qtimlpostprocess settings="{ \" confidence \" : 75.0}" results= 10 module=yolov8 \ labels=/etc/labels/yolox.json ! text/x-raw ! queue ! mux_0.
Video Encoding + Snapshot
Start the pipeline
gst-pipeline-app -e qtiqmmfsrc name=camsrc camera= 0 ! \ video/x-raw,format=NV12,width=1280,height=720,framerate=30/1, \ interlace-mode=progressive,colorimetry=bt601 ! queue ! \ v4l2h264enc capture-io-mode= 4 output-io-mode= 5 \ extra-controls="controls,video_bitrate_mode=0,video_bitrate=6000000;" ! \ queue ! h264parse ! mp4mux ! queue ! \ filesink location="/home/ubuntu/mux_720_avc.mp4" \ camsrc.image_1 ! "image/jpeg,width=1280,height=720,framerate=30/1" ! \ multifilesink location=/home/ubuntu/frame%d.jpg async= false sync= true \ enable-last-sample= false
Take a snapshot
From the interactive menu: (1) Ready → (3) Playing → (p) Plugin Mode → (11) camerasrc → (37) capture-image → (1) Snapshot → enter count
Stop and retrieve files
Press Enter → b (Back) → q (Quit). scp -r ubuntu@ < ip-add r > :/home/ubuntu/ < filenam e > .
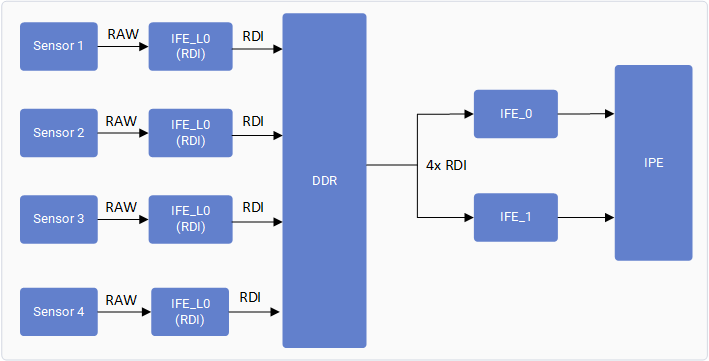
Multi-Camera with Offline IFE The IQ-9075 has two IFEs for real-time bayer-to-YUV processing. The Offline IFE feature allows a single IFE to process two cameras in offline mode, enabling concurrent streaming from all four cameras.
A maximum of two cameras can operate concurrently with real-time IFE. All four cameras can operate concurrently using the Offline IFE feature.
Run the 4-camera AI inference pipeline with multicamera-hint=true on each qtiqmmfsrc source. See the single-camera object detection pipeline above for the pattern — replicate for camera=1, camera=2, and camera=3.
Verify Multi-Camera Operation User log — look for: RealTimeFeatureZSLPreviewRawOfflineIFE_0_cam_0 status is now PipelineStatus::STREAM_ON
Kernel log — look for: Acquired Single IFE[0] SFE[0] OFFLINE: Y with [9 pix] [0 pd] [0 rdi] ports for ctx:1
Troubleshooting
Check camera module connection and DIP switch settings
Restart cam-server
systemctl restart cam-server
# or
pkill cam-server
Run a single-stream test
gst-launch-1.0 -e qtiqmmfsrc name=camsrc camera= 0 ! \ video/x-raw,format=NV12,width=1280,height=720,framerate=30/1 ! fakesink
Camera Sensor Not Probing
Collect logs and search for probe success: journalctl -f > /home/ubuntu/log.txt
Expected probe success log: CAM_INFO: CAM-SENSOR: Probe success, slot:0, slave_addr: 0x34, sensor_id:0x577
If no probe success appears, check the flex cable connection or camera module.
Enable CSI debug logs and collect dmesg: sudo su echo 3 > /sys/kernel/debug/camera/ife/ife_csid_debug dmesg -w > /home/ubuntu/dmesg.txt
Start the camera and check for SOF/EOF IRQ messages in the log. Collect Debug Logs journalctl -f > /home/ubuntu/user_log.txt # User space logs dmesg -w > /home/ubuntu/kernel_log.txt # Kernel logs
Resources Topic Link Camera Architecture Camera Architecture Camera Sensor Driver Development Camera Sensor Driver Development Customize Camera Use Case and Pipeline Customize Camera Use Case and Pipeline Customize Advanced Camera Features Customize Advanced Camera Features