Figure: PCIe device connection link
The path between the devices is called a Link. It is made up of one or more transmit and receive pairs. One pair of the Link is called a Lane. The PCIe device connection in Qualcomm Linux devices supports 16 lanes. The number of lanes or the Link width is x16. The following table lists the types of PCIe connections for devices.Table : PCIe connections
| PCIe type | Description |
|---|---|
| Root complex (RC) | Connects the CPU to the PCIe topology |
| Switch | Connects more than 2 ports and acts as a packet router |
| Bridge | Connects different buses: for example, PCIe to PCIe, or PCIe to peripheral component interconnect (PCI) |
| Endpoint (EP) | Resides at the bottom of the PCIe topology tree structure and has only an upstream port |
| Legacy endpoint | Uses older PCI bus operations to support backward compatibility |
PCIe host mode enumeration feature
When a system first powers up, the configuration software running on the system host processor is aware of the existence of only Bus 0 (if PCIe is supported). The software is not aware of the bus topology or any device connected to the bus. The enumeration process discovers the various buses, devices, and functions present in the system. When enumeration is complete, each bus in the system is numbered as follows:- The primary bus number indicates the bus that directly connects to the primary interface of the bridge (towards the root complex).
- The secondary bus number indicates the bus that directly connects to the secondary interface of the bridge (away from the root complex).
- The subordinate bus number indicates the highest numbered bus that exists on the downstream side of the bridge.
- Link training
- Scanning for devices on the bus
- Registration
PCIe layered architecture
The following figure shows the PCIe software architecture.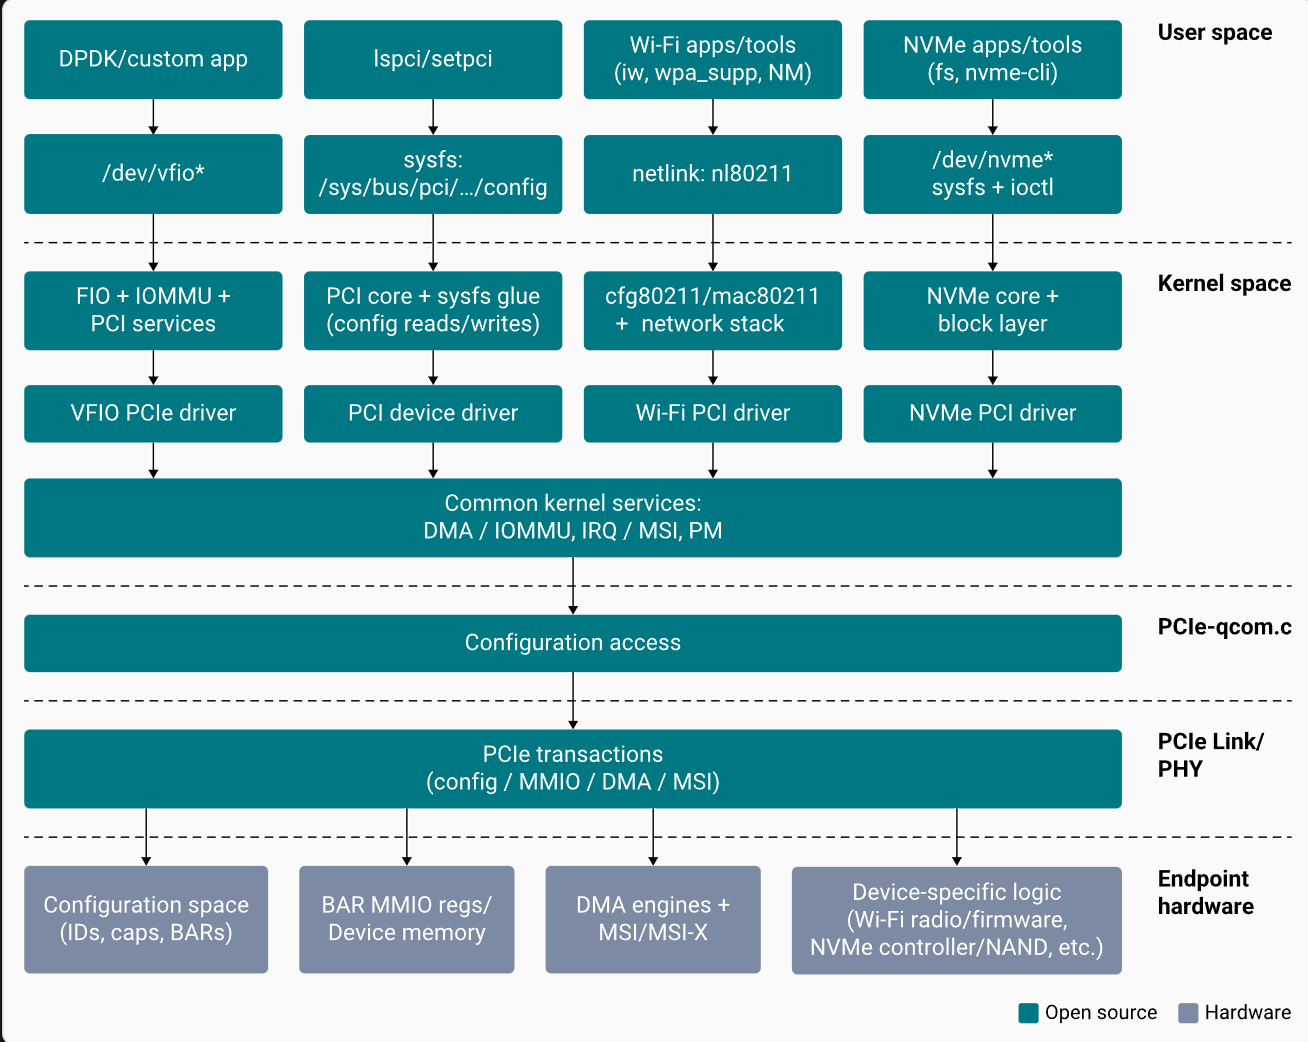
Figure : PCIe software architecture
The following figure shows the layered architecture model of PCIe.
Figure : PCIe layered architecture
The transmission units exchanged are as follows.- Ordered set between the physical layer entities.
- Data link layer packet (DLLP) between data link layer entities.
- Transaction layer packet (TLP) between transaction layer entities.
Table : Layers in PCIe architecture
| Layer | Features |
|---|---|
| Physical layer | Logical sub-block: Link training, initialization, and maintenance. |
| Physical sub-block: 8b/10b encoding and decoding, and parallel-to-serial and serial-to-parallel conversion. | |
| Data link layer | Assembly and disassembly of the DLLP packet. |
| Generation and validation of the link layer CRC (LCRC). | |
| Acknowledgment and no acknowledgment protocol (replay of TLPs in error). | |
| Transaction layer | Assembly and disassembly of the TLP packet. |
| Generation and validation of end-to-end CRC (ECRC). | |
| Flow control receives entity advertises for the available receive buffer size information using DLLPs. | |
| Quality of service (QoS): traffic class (TC) to virtual channel (VC) mapping. | |
| Transaction ordering: implements the transaction ordering rule within a VC. |

Figure : PCIe configuration address space
PCIe software driver configuration
The PCIe controller driver initializes the PCIe resources and performs link training. After successful training, the controller driver calls the PCIe framework for link enumeration, such as endpoint discovery, identifying the client driver, and probing those drivers. For more information about the PCIe framework and client driver PCIe registrations, see https://www.kernel.org/doc/html/latest/PCI/index.html.Link training
Link training comprises the following operations:- The PCIe driver
pcie-qcom.cfile at https://github.com/torvalds/linux/blob/master/drivers/pci/controller/dwc/pcie-qcom.c obtains the required resources such as regulators, clocks, from the device tree. - The PCIe driver calls Synopsys DesignWare® Core host driver pcie-designware-host.c file at https://github.com/torvalds/linux/blob/master/drivers/pci/controller/dwc/pcie-designware-host.c to initialize the root complex.
- The Synopsys DesignWare Core driver performs all necessary initializations.
- The Synopsys DesignWare Core driver calls a function pointer to perform host initialization.
- The Qualcomm PCIe driver performs PHY power-on, enables all regulators, clocks.
- The Synopsys DesignWare Core driver starts the link training by calling the function pointer to start the link.
Hardware initialization
The driver initializes and configures the PCIe hardware block and performs link training. The initialization occurs after theplatform _probe() driver function is called.
Note: The PCIE_0 root complex instance is enabled by default for the WLAN EP connection.
Enable PCIe endpoint (EP) mode for Dragonwing IQ-9075 (Lemans)
Each PCIe controller instance on Dragonwing IQ-9075 (Lemans) can operate in either root complex (RC) or endpoint (EP) mode, but not both at the same time. The device tree defines a separate node for each mode at the same base address, and only one of the two may be enabled per PCIe instance.Note: Monaco also supports PCIe EP mode, but that support isn’t in this kernel tree yet and is planned for a future release.
Table : Lemans PCIe EP nodes
| EP node | RC node (mutually exclusive) | Compatible | num-lanes | linux,pci-domain |
|---|---|---|---|---|
| pcie0_ep | pcie0 | qcom,sa8775p-pcie-ep | 2 | 0 |
| pcie1_ep | pcie1 | qcom,sa8775p-pcie-ep | 4 | 1 |
pcie0_ep and pcie1_ep are defined in arch/arm64/boot/dts/qcom/lemans.dtsi with status = "disabled" by default, since the corresponding RC nodes (pcie0, pcie1) are enabled instead. The Qualcomm PCIe EP controller driver that binds to these nodes is drivers/pci/controller/dwc/pcie-qcom-ep.c (driver name qcom-pcie-ep).
PCIe EP mode kernel configuration
CONFIG_PCI_ENDPOINT and CONFIG_PCI_ENDPOINT_CONFIGFS are already enabled in the Lemans defconfig. CONFIG_PCIE_QCOM_EP, which builds the Qualcomm EP controller driver, is not enabled by default and must be turned on to bring up EP mode. CONFIG_PCI_EPF_MHI and its dependency CONFIG_MHI_BUS_EP also aren’t enabled by default and must be turned on to use the MHI endpoint function.
To enable these configs, apply the following patch to the arch/arm64/configs/defconfig file.
Note:
CONFIG_PCIE_QCOM_EP depends on CONFIG_PCI_ENDPOINT and selects CONFIG_PCIE_DW_EP and CONFIG_PCIE_QCOM_COMMON, defined in drivers/pci/controller/dwc/Kconfig. CONFIG_PCI_EPF_MHI, defined in drivers/pci/endpoint/functions/Kconfig, depends on CONFIG_MHI_BUS_EP, the MHI endpoint bus implementation in drivers/bus/mhi/ep/Kconfig.Enable the EP node in the device tree
Bothpcie1 (RC) and pcie1_ep (EP) are defined with labels in lemans.dtsi, and pcie1 defaults to status = "disabled" there. However, lemans-evk.dts re-enables pcie1 in RC mode for the onboard M.2 E-key connector (&pcie1 { ... status = "okay"; };). Since a PCIe instance can only be RC or EP at a given time, switching PCIE_1 to EP mode on the Lemans EVK means disabling that RC override and enabling pcie1_ep instead. Apply the following changes to arch/arm64/boot/dts/qcom/lemans-evk.dts:
pcie1_default_state (defined in the &tlmm node further down in lemans-evk.dts) sets the pin function, drive strength, and bias for GPIO 4 (PERST#) and GPIO 5 (WAKE#), but doesn’t fix their direction, so the EP node can reuse the same pinctrl group and physical GPIOs as RC mode. However, the signal direction on each GPIO reverses between modes:
- In RC mode,
pcie-qcom.crequests the PERST# GPIO asGPIOD_OUT_HIGH— the root complex drives PERST# to reset the downstream device. RC mode doesn’t drive a WAKE# GPIO. - In EP mode,
pcie-qcom-ep.crequestsreset-gpiosasGPIOD_IN— the endpoint reads PERST# as an input driven by the connected root complex — and requestswake-gpiosasGPIOD_OUT_LOW— the endpoint drives WAKE# as an output to the host.
Note: The upstream
qcom,pcie-ep.yaml binding requires reset-gpios, the GPIO wired to the PERST# input driven by the connected root complex. The pcie1_ep node in lemans.dtsi doesn’t define this property, since it’s board-specific.PCIE_0: disable the pcie0 RC override and enable pcie0_ep instead, reusing the pcie0_default_state pinctrl group and its PERST#/WAKE# GPIOs.
Note: Disabling
pcie0 also disables the M.2 E-key connector’s PCIe link (pcieport0), since that connector is wired to PCIE_0 in RC mode. Only switch PCIE_0 to EP mode if you don’t need the M.2 connector for a PCIe card.phys, iommus, interconnects, power-domains, clocks, and resets are already populated for both EP nodes and don’t need to be modified for a standard bring-up.
PCIe EP driver initialization
qcom_pcie_ep_probe() in pcie-qcom-ep.c acquires the parf, dbi, mmio, and dma register regions, all five instance clocks, the core reset, the reset (PERST#) and optional wake (WAKE#) GPIOs, and the optional pciephy PHY, then calls the common DesignWare dw_pcie_ep_init() to initialize the endpoint core. Lemans matches the qcom,sa8775p-pcie-ep compatible string, which selects the cfg_1_34_0 configuration (HDMA support enabled, NO_SNOOP override, and the MHI RAM parity check disabled).
A global IRQ thread (qcom_pcie_ep_global_irq_thread()) handles link-up and link-down events, bus master enable (BME), and PM turn-off/D-state notifications raised by the connected root complex.
Bind the MHI endpoint function using configfs
Thepci-epf-mhi.c driver registers one device ID per SoC in pci_epf_mhi_ids[], each with its own header (vendor/device ID) and MHI channel configuration. Lemans matches the pci_epf_mhi_sa8775p entry, which sets device ID 0x0116, uses BAR_0, 32 MSI vectors, an MRU of 0x8000, and enables DMA-assisted transfers (MHI_EPF_USE_DMA). This entry also selects the standard mhi_v1_channels table (LOOPBACK, SAHARA, DIAG, SSR, QDSS, EFS, MBIM, QMI, IP-CTRL-1, IPCR, DUN, IP_SW0). The header and channel configuration are fixed by this entry, so no vendorid/deviceid configfs writes are needed.
After the kernel boots with pcie1_ep enabled, use the PCI endpoint configfs interface to bind the MHI endpoint function to the qcom-pcie-ep controller. The function directory name must match the pci_epf_mhi_sa8775p entry so the correct device ID and channel table are probed.
1 to start asserts the endpoint’s readiness and lets the link train with the connected root complex. pci_epf_mhi_bind() looks up the mmio register region and doorbell interrupt from the parent qcom-pcie-ep platform device, and pci_epf_mhi_link_up() registers the MHI endpoint controller once the link comes up.
Note: Load
mhi_bus_ep before pci_epf_mhi if they’re built as separate modules, since CONFIG_PCI_EPF_MHI depends on CONFIG_MHI_BUS_EP.Verify MHI EP mode enumeration
On the host connected to the Lemans EP port, confirm the device enumerates as a PCI endpoint with the MHI device ID.Enable QPS615 PCIe switch
This section describes how to enable a QPS615 PCIe switch in the Qualcomm Linux hardware SoCs. The QPS615 switch endpoint is supported on thePCIe1 instance. The following figure shows the QPS615 endpoint and connections.

Figure : QPS615 PCIe switch connection diagram
The Qualcomm PCIe driver documentation can be accessed at the following locations:- https://github.com/torvalds/linux/blob/master/Documentation/devicetree/bindings/pci/qcom%2Cpcie-sc8280xp.yaml
- https://elixir.bootlin.com/linux/v6.6.48/source/Documentation/devicetree/bindings/pci/qcom,pcie.yaml
- https://github.com/torvalds/linux/blob/master/Documentation/devicetree/bindings/phy/qcom%2Csc8280xp-qmp-pcie-phy.yaml
PCIe-related configurations
The following configurations are enabled by default to support the QPS615 switch. Disable the QPS615 switch default support, by reverting the code changes, to use it for a different PCIe endpoint. To enable PCIe-relatedconfigs, apply the following patch to the /arch/arm64/configs/qcom_addons.config file.
Message signaled interrupt (MSI)
The current MSI mapping doesn’t have all the vectors. The Qualcomm Linux hardware SoCs support eight vectors. Each vector in turn supports 32 MSIs. Therefore, the total MSIs supported are 256. For information about adding all the MSI groups supported for this PCIe instance, see https://lore.kernel.org/linux-arm-msm/f1168212-bc6e-4570-869c-2870d6f248ad@linaro.org/T/.Sample PCIe kernel driver log
The following is a sample PCIe kernel driver log from the QPS615 device enumeration.Ethernet interfaces supported through QPS615 PCIe switch
The QPS615 PCIe switch enables Ethernet connectivity for the device. When the device loads the QPS615 driver and establishes the PCIe link, it automatically activates the supported Ethernet interfaces, by default, during device startup. To customize the default configuration or enable extra MAC/PHY components beyond Qualcomm’s hardware setup, see the Bring up Ethernet section in the Qualcomm Linux Ethernet guide.Table : Supported Ethernet interfaces
| Interface type | Speed | Connector type | Description |
|---|---|---|---|
| QEP PHY (SGMII) | 2.5 GbE | IX/RJ45 connector (QEP8121) |
|
| AQR PHY (USXGMII) | 10 GbE | IX/RJ45 connector (AQR113C) |
|
Bring up alternate hardware components
You can attach MAC/PHY components other than the hardware configuration provided by Qualcomm and bring them up. To replace QPS615 with other PCIe based MAC/PHY, see Enable QPS615 PCIe switch.Note: You must obtain the MAC/PHY driver and firmware from the respective vendor. Qualcomm isn’t responsible for these configuration changes.
Enable USB interface through PCIe switch
This section provides instructions on how to activate a USB interface through a PCIe switch in the Qualcomm Linux hardware SoCs. The PCIE1 instance is connected to the endpoint of the QPS615 switch, and the downstream port of the QPS615 is connected to the PCIe to USB endpoint. For the PCIe to USB endpoint connections using the QPS615, see the mainboard and interposer block diagram at https://docs.qualcomm.com/bundle/publicresource/topics/80-80021-251/rb3_hardware_overview.html.Note: Dragonwing IQ-9075 PCIe software doesn’t support USB.
Download PCIe to USB controller firmware
To download the firmware from https://www.renesas.com/us/en/products/interface/usb-switches-hubs/upd720201-usb-30-host-controller#design_development, register and log in to https://www.renesas.com/. Rename the downloaded firmware file to renesas_usb_fw.mem.Note: To prevent command failures, update the software as described in the Set up the device section before updating the Renesas firmware.
- Connect device to Host PC via USB cable for adb.
- Push firmware to device.
- To activate the firmware do either of the following options.
- Option A: Reboot target for USB type A ports.
- Option B: Manually bind the Renesas xHCI driver.
- Verify firmware enumeration.
PCIe kernel driver logs for PCIe to USB device enumeration reference
You can run the following commands to view the device information:- To display device information in USB, run the following command.
The following message is displayed.
- To display device information in PCIe, run the following command.
The following message is displayed.
Connect QPS615 switches in cascade
Connect the QPS615 switches in cascade to enable additional Ethernet, PCIe, and USB ports.Note: This feature is supported only in QCS6490.

Figure : QPS615 switches in cascade connection
- To reset the QPS615 switch, toggle the RESX GPIOs for both QPS615 #1 and QPS615 #2.
- To control the endpoint reset, trigger PERST. Both the switches share the PERST.
- Switch-attached devices:
- The QPS615 PCIe tree node hierarchy is statically fixed.
- All nodes for switching USP and DSP ports are created during PCIe initialization.
- One of the switch DSP ports represents WLAN.
- If you disable the WLAN node, it disables the WLAN device, but the PCIe downstream port remains enabled and returns a default maximum link width.
- Directly-attached WLAN devices:
- Disables only a single node.
- Returns the Invalid argument, when WLAN is disabled.
Enable NVMe through PCIe interface
This section describes how to enable NVMe using PCIe for storage expansion. To verify if NVMe is connected over a PCIe interface, do the following:- To display PCIe device information, run the following command.
Output:
- Locate the PCIe logs.
Output:
- To locate the NVMe directories, run the following command.
Output:
Update the iommu-map property for SMMUv2 targets
Targets that use an SMMUv2 IOMMU for PCIe (for example, Dragonwing IQ-9075 (Lemans), Monaco, and Kodiak) translate each PCIe Requester ID (RID) to a Stream ID (SID) through theiommu-map property in the PCIe host bridge node. Getting this property wrong is a common source of no iommu-map translation for id failures when adding devices, switches, or endpoints downstream of a PCIe root complex.
How iommu-map works
Eachiommu-map entry has the form:
drivers/of/base.c: of_map_id()) applies the following rule.
count = 1, the mapping simplifies to RID == rid_base -> SID = sid_base. Using count = 1 per entry (sparse point mapping) pins exactly one RID to exactly one SID, regardless of how large the RID value is, and avoids exhausting the SMMU’s implemented SID range.
Note: A naive single-range entry, such as
iommu-map = <0x0 &pcie_smmu 0x0000 0x500>;, maps count consecutive RIDs to count consecutive SIDs, so the SID offset grows proportionally with the RID value. This fails once RIDs from a downstream switch or additional endpoint exceed the SMMU’s available SID range.PCIe RID and SID basics
A PCIe RID is a 16-bit value that encodes the bus, device, and function.Table : Common RID values
| Bus | Dev | Fn | RID (hex) | Description |
|---|---|---|---|---|
| 0 | 0 | 0 | 0x0000 | Root complex, always present |
| 1 | 0 | 0 | 0x0100 | First device downstream of the RC (endpoint or switch upstream) |
| 2 | 1 | 0 | 0x0208 | Switch downstream port, device 1 |
| 2 | 16 | 1 | 0x0281 | lspci address 02:10.1 |
lemans.dtsi reference example
Lemans defines two PCIe controllers, each mapped to its own SID subrange within the sharedpcie_smmu (qcom,sa8775p-smmu-500, an SMMUv2-family IOMMU). pcie0 uses SID base 0x0000 and pcie1 uses SID base 0x0080, so their SID spaces don’t overlap.
0x0000 (bus 0, dev 0, fn 0) maps to SID 0x0000 on pcie0 and SID 0x0080 on pcie1. RID 0x0100 (bus 1, dev 0, fn 0) maps to SID 0x0001 on pcie0 and SID 0x0081 on pcie1. Monaco follows the same pattern with its own pcie_smmu instance, and Kodiak follows the same pattern using apps_smmu (qcom,sc7280-smmu-500) instead of a dedicated pcie_smmu.
Note:
lemans-ride-common.dtsi places a WiFi chip on pcieport0 (bus 1, dev 0, fn 0 — RID 0x0100) and inherits the iommu-map from lemans.dtsi without an override, since the base file already covers that RID.Extending iommu-map for a switch topology
If a PCIe switch is fitted downstream of a controller (for example, adding an NVMe SSD on bus 4 through two switch ports), extend the entry list with one line per RID, keepingcount = 1 for each:
0x0000 through 0x0004), all within pcie0’s subrange, instead of a single range entry that would need count = 0x500 and could exceed the SMMU’s implemented SID range.
Note: SID values assigned to each RID don’t need to be sequential or in RID order. They only need to be unique within the controller’s
iommu-map and within the SMMU’s implemented SID range.Diagnose a missing iommu-map entry
When a device’s RID has no matchingiommu-map entry, the kernel logs an error similar to the following.
- Read the RID from the log. In this example, the RID is
0x0281. - Decode the RID into bus, device, and function.
Cross-check against the
lspciaddress in the same log line (0001:02:10.1→ bus 2, device 0x10, function 1). The fields match, confirming the RID decodes correctly. - Choose a free SID for this device. Look at the existing
iommu-mapentries and pick a SID that isn’t already used by another entry in this controller’s map and is within the SMMU’s implemented SID range. - Add the entry with
count = 1.If fn0 and fn1 are consecutive and neither has a SID yet, a singlecount = 2entry can cover both instead:<0x0280 &apps_smmu 0x1403 0x2>maps RID0x0280to SID0x1403and RID0x0281to SID0x1404. - Rebuild the DTB, flash, and reboot, then confirm the fix.
The error line must no longer appear.
Note:
lspci shows a device regardless of whether an iommu-map entry exists, since lspci reads PCI configuration space directly and isn’t affected by IOMMU mapping. Use dmesg, not lspci, to confirm a missing entry is fixed.drivers/of/base.c: of_map_id().
PCIe client driver sample
The client driver defines thedevice-id table and pci_driver structures, and registers with the PCIe framework. The following are a few PCIe client driver samples for reference.
- Sample data structure to hold client-specific private data.
- Sample driver: You can provide data according to your driver-specific data structure.
- Sample device ID table with the driver-specific data. The client driver registers with the
0x306device ID.
Note:
MODULE_DEVICE_TABLE(pci, sample_pci_id_table); is mandatory.- Sample
pci_driverdata structure with client driver name,pci-idtable, and callbacks. The pointer to this structure is passed while registering with the PCI frame work. - To register with PCI firmware, call
pci_register_driver(&sample_pci_driver)frommodule_init().
PCIe bringup
For information about PCIe bringup, see PCIe-related configurations and QPS615 switch support.PCIe power optimization
PCIe defines two types of power management methods.- Power management software that determines the power management capability of each device and manages each device individually
- System that doesn’t require software intervention such as active state power management (ASPM)
PCIe L0 link states
PCIe power management defines the following L0 link states:- L0: active state where all PCIe transactions and other operations are enabled
- L0s: ASPM state with low-resume latency (energy saving standby state)
PCIe device states
PCIe power management defines the following device states:- D0 (mandatory): The device is in full ON state, where there are two substates
- D0uninitialized: The function is present in the D0uninitialized state after the device comes out of reset, waiting to be enumerated and configured.
- D0active
- The function is present in the D0active state following the completion of the enumeration and configuration process.
- The function enters the D0active state when the system software enables one or more (in any combination) function parameters, such as memory space enable, I/O space enable, or BME bits.
- D1 (optional): light-sleep state
- The function can’t initiate a TLP except for the PME message
- The function can’t act as the target of transactions other than for configuration transactions.
- The function issues a software command to enter the D1 state by programming the PM control and status register.
- D2 (optional): deep-sleep state
- The function can’t initiate a TLP except for the PME message
- The function can’t act as the target of transactions other than configuration transactions.
- The function issues a software command to enter the D2 state by programming the PM control and status register.
- D3 (mandatory): device is the lowest power state, where the function must support both the D3 states
- D3hot
- The function can’t initiate a TLP except for the PME message.
- The function can’t act as the target of transactions other than configuration transactions.
- The function issues a software command to enter the D3hot state by programming the power state field.
- D3cold: device enters the D3cold state and power is removed; when power is restored, the device enters the D0uninitialized state.
PCIe verification
For information about PCIe verification, see PCIe-related configurations and QPS615 switch support.Debug PCIe issues
Thelspci and setpci commands are native to Linux distributions. These commands have various levels of output. These commands also provide a useful point-in-time look at the capabilities and status of the different components trained on the PCI bus. Most of these capabilities are reflections of the configuration space registers required by the PCIe base specification. For more details, see https://pcisig.com/specifications. To view the usage instructions, run the following command.
- Display device information
The following message is displayed.
- Display PCIe device and vendor IDs in the device control register.
The following message is displayed.
PCIe examples
For information about the upstream device tree reference, see the following files.- QCS6490 and QCS5430: https://elixir.bootlin.com/linux/v7.0-rc7/source/arch/arm64/boot/dts/qcom/kodiak.dtsi
- Dragonwing IQ-9075: https://elixir.bootlin.com/linux/v7.0-rc7/source/arch/arm64/boot/dts/qcom/lemans.dtsi
- Dragonwing IQ-8275: https://elixir.bootlin.com/linux/v7.0-rc7/source/arch/arm64/boot/dts/qcom/monaco.dtsi
- Dragonwing IQ-615: https://git.kernel.org/pub/scm/linux/kernel/git/qcom/linux.git/tree/arch/arm64/boot/dts/qcom/qcs615.dtsi?h=arm64-for-6.16
- https://git.kernel.org/pub/scm/linux/kernel/git/torvalds/linux.git/tree/drivers/pci/controller/dwc/pcie-qcom.c?h=v6.8-rc6#n1634
- QCS6490 and QCS5430: https://elixir.bootlin.com/linux/v7.0-rc7/source/arch/arm64/boot/dts/qcom/kodiak.dtsi
- Dragonwing IQ-9075: https://elixir.bootlin.com/linux/v7.0-rc7/source/arch/arm64/boot/dts/qcom/lemans.dtsi
- Dragonwing IQ-615: https://git.kernel.org/pub/scm/linux/kernel/git/qcom/linux.git/tree/arch/arm64/boot/dts/qcom/qcs615.dtsi?h=arm64-for-6.16
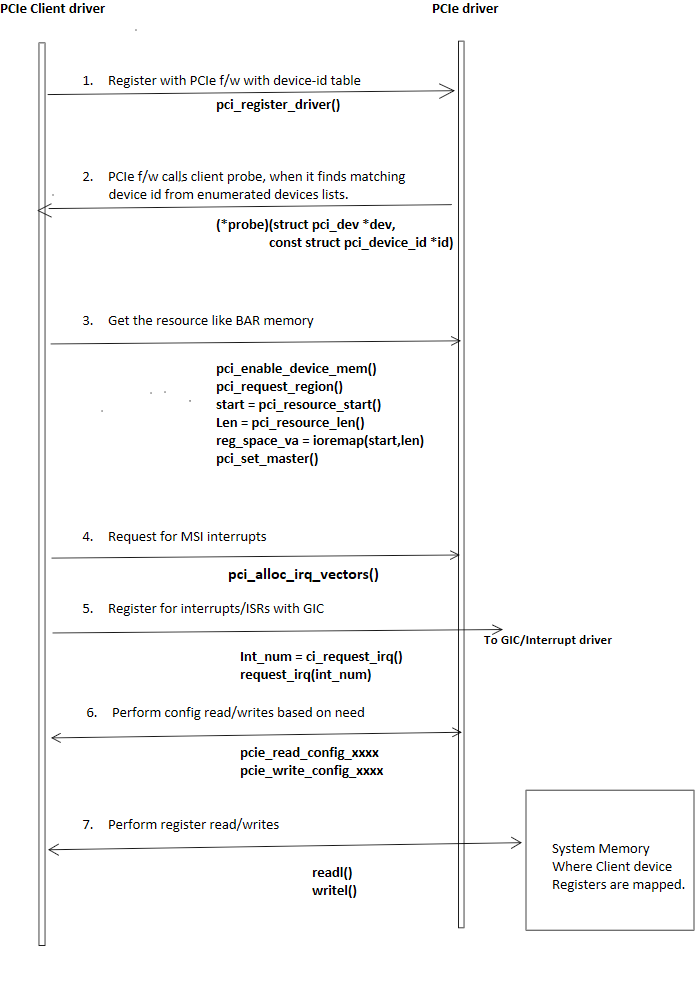
Client and PCI driver operation flow example
The following figure shows the sequence that the PCIe client driver follows to configure the PCIe driver for a client.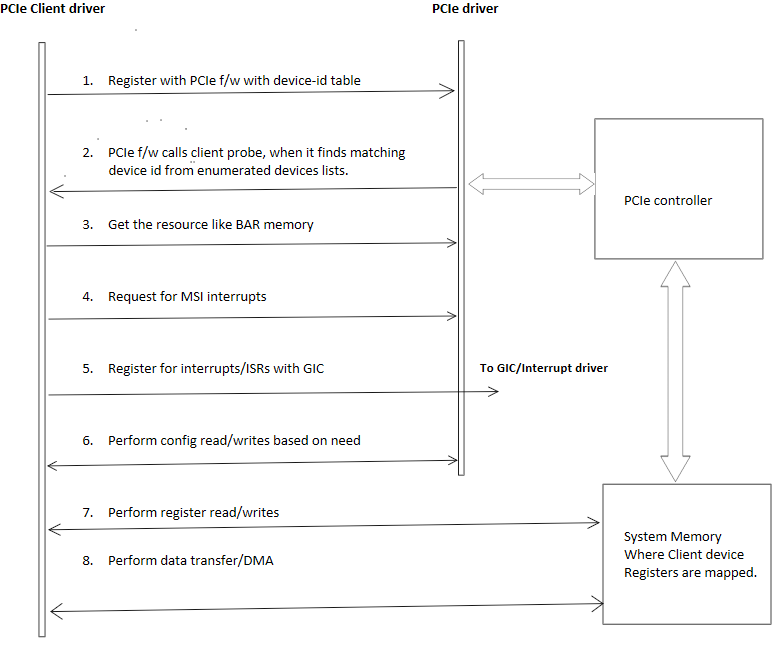
Client and PCI driver high-level call flow example
The following figure shows the high-level call flow and call details between the PCIe client driver and PCIe driver.